First Layer Rippling: What to try next?
-
Building my first full custom machine. I'm struggling to get a first layer without rippling or some waves of separation off the plate. I'm not sure what's causing it as I've tried all the calibrations I'm familiar with. Main ones:
- E-Step Calibration which was performed successfully
- Autobed leveling: BL touch and adjustable 4 point manually adjustable corners. Managed max deviation < 0.1mm and mean error of <0.01mm
- Z offset Calibration: which I did by printing a 0.2mm sheet with a 0.2mm first layer and then checking with my calipers the thickness to success
- I tried baby-stepping things up 0.05mm+/- using the DWC job status tool and that yielded negligible results.

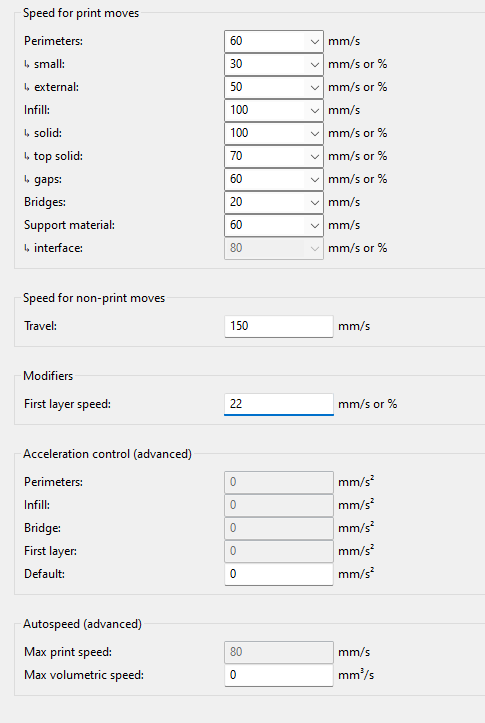
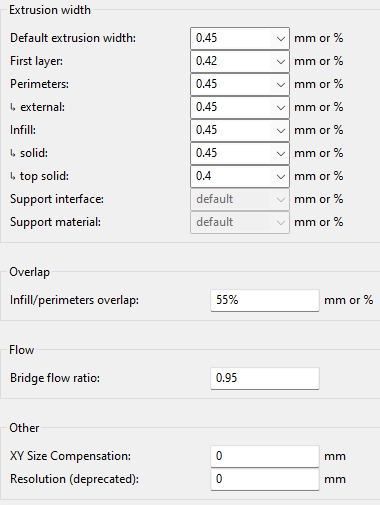
Much of the architecture and parts come from a Prusa Mini so I used a lot of the slic3r PE settings for the mini in my slic3r custom profile. However, maybe the issue lies here? Maybe it's because it isn't heated? I'm trying to avoid that at all costs for the time being. Here are a few clips of my slic3r settings. I'm not sure what else to play around with next:
-
 undefined JRCL marked this topic as a question
-
It looks like excessive extrusion. At least if I saw that on my printers that is what it would be.
As a test can try adjusting the Extrusion Factors slider during printing to see if you can obtain improvement.
Or it could be that you are not using Mesh Bed Compensation so the nozzle gets too close to the bed which can look much the same.
Frederick
Printers: a small Utilmaker style, a small CoreXY and a E3D MS/TC setup. Various hotends. Using Duet 3 hardware running 3.4.6
-
@jrcl what filament did you used? and hows your exrrusion modifier? does it stick to the bed? if yes, it can be too high EM
-
@fcwilt I will certainly be checking that tool out next! As far turning on MBC, I have it configured in my config.g, its also setup in bed.g, then I call G32 in the print file, is there anything else I need to do?
-
@barracuda72 PLA. Haven’t played around with extrusion modifier yet but am going to next pet @fcwilt. It doesn’t seem to have any other adhesion issues on the skirt or other layers so I don’t think that’s the problem.
-
@jrcl said in First Layer Rippling: What to try next?:
@fcwilt I will certainly be checking that tool out next! As far turning on MBC, I have it configured in my config.g, its also setup in bed.g, then I call G32 in the print file, is there anything else I need to do?
G32 and bed.g are related to Manual Bed Leveling or Auto Bed Leveling.
I was talking about Mesh Bed Compensation which is related to G29 and mesh.g.
If you happen to be using G29 in your bed.g file you are not really doing it that way it is intended to be done.
Frederick
Printers: a small Utilmaker style, a small CoreXY and a E3D MS/TC setup. Various hotends. Using Duet 3 hardware running 3.4.6
-
There are two things that will cause this
- Nozzle too close to the build plate... Print first layer and measure layer to make sure that the layer is actually the right thickness...if first lay is to be .3mm then the first layer print should also be 3mm.
This may also be a bed level problem - Over extrusion... this can happen if you have if you have adjusted first layer extrusion width to be more than 100%
- Nozzle too close to the build plate... Print first layer and measure layer to make sure that the layer is actually the right thickness...if first lay is to be .3mm then the first layer print should also be 3mm.
-
I have found that the Calibration tools in SuperSlicer are really helpful and can get you to a point where you only then need to tweak from there on.
RailCore II - Duet Mini + 1LC, Voron V0.1 - Duet Mini
Voron 2.4 disassembled..... Waiting for the RailCore Mini.... -
@jrcl said in First Layer Rippling: What to try next?:
I'm struggling to get a first layer without rippling or some waves of separation off the plate
Looks familiar to me: the filament sometimes likes to stick with the nozzle instead of the print bed. Or it cools down too fast. A bed heater can help, for PETG, it is a must.
In a first step, I would lower the speed of the first layer drastically, so you can observe what happens in detail.
Second, try to improve the bed adhesion. Depending on what kind of surface you use, there are different recipes to apply. Hm, what’ yours: PEI, glass, masking tape … ?
Third, I think there is some sign of under-extrusion on top of the left side of your triangle: doesn’t matter now, but that’s a case for tuning the PA settings.
-
@fcwilt oooo I'm not sure I set that up correctly then, I'm not familiar with mesh.g. I was using G29 in my bed.g file previously. What's the intended way it should be done?
-
@paulhew I've never heard of SuperSlicer, I'll make sure to check it out! Thanks for the rec!
-
It doesn't look like overextrusion or nozzle too close to the bed to me. It looks more like there's something on the bed that's keeping the plastic from sticking. I'd thoroughly clean the bed before printing.
Are you heating the bed? Are you running the print cooling fan during the first layer? - don't do that.
I don't know what your bed surface is, but I use PEI for everything. I clean the bed frequently- maybe every third print of the same material, and every time I change print materials, by using a melamine sponge (sold as Magic Eraser in the US) first, then a wipe down with 90% IPA on a clean lint-free cloth. I never touch the bed surface with my hands. Everything I print - ABS, PETG, TPU, and very rarely PLA - sticks fine.
-
@mrehorstdmd Bed has been cleaned with 99% IPA after every use. PEI top sheet on top of glass plate and part cooling fan is not running during first layer. Hoping my new filament that comes in today is a little better than the generic sample PLA I'm using right now as I wait for the order
-
@jrcl
I'd agree with Percar;It looks to me as if it may be overextruding for the nozzle height, so forcing each adjacent strip sideways and breaking it free from the bed.
Try using babystepping and increasing the nozzle height as soon as the print starts, to see if it smooths out?
I went through this with my converted TronXY when initially getting that going, similar effects due to Z too low on the first layer.
-
undefined JRCL has marked this topic as solved
-
Over Extrusion ended up being the problem on this one. After dropping the DWC EM control down to 75% yielded proper layer width, height, and adhesion. A few questions on what to do with this information.
Does anything from the DWC extrusion factor control actually stick or is just for watching live and then going into my configuration file and adjusting?
Is there a flow test or calibration I could run to double-check/calibrate this properly? I thought my E-step calibration would mostly account for this error but that doesn't seem to be true.
-
@jrcl said in First Layer Rippling: What to try next?:
Does anything from the DWC extrusion factor control actually stick or is just for watching live and then going into my configuration file and adjusting?
If your E-step calibration is right, your first layer height is „wrong“, I.e. it doesn’t match the slicer’s expectations. In other words, the nozzle height is too low for the amount of filament the slicer wants to extrude. Instead of changing the extrusion rate for the first layer, I would augment the nozzle’s distance to the bed (or try a thinner first layer). Else, you run into trouble with other (first) layer heights.
-
@jrcl said in First Layer Rippling: What to try next?:
@fcwilt oooo I'm not sure I set that up correctly then, I'm not familiar with mesh.g. I was using G29 in my bed.g file previously. What's the intended way it should be done?
Manual Bed Leveling (MBL) or Auto Bed Leveling (ABL) is something that is typically done to get the printer ready for printing.
Mesh Bed Compensation (MBC) is used during printing to improve adhesion of the first few layers.
So the current firmware has G32 which executes the file bed.g where you put the commands needed to do MBL or ABL.
And the firmware has G29 which will execute the file mesh.g (if it exists) and that file is where you put the commands to create the height map needed for MBC.
Of course to actually use MBC you also need to have the commands to load the height map in your print start code.
Some folks create the height map as part of the print start code. I don't do that as I use a 400 point height map and creating it takes time and increases wear on the printer. I have found that I can create the height map once and just load it to print.
The DWC has a drop down menu with selections related to MBL/ABL and MBC
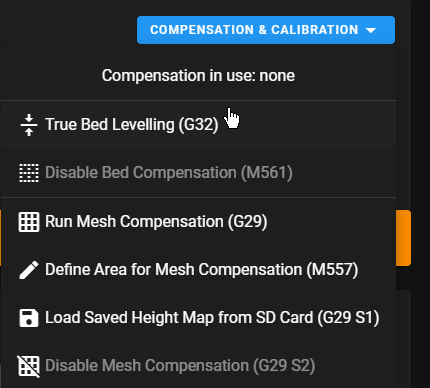
It is not required to follow the above convention but there is no real reason not to, and it keeps your code in sync with the drop down menu.
Hope that helps.
Frederick
Printers: a small Utilmaker style, a small CoreXY and a E3D MS/TC setup. Various hotends. Using Duet 3 hardware running 3.4.6
-
This post is deleted! -
Just incase you have not found SuperSlicer, it can be downloaded from here.
https://github.com/supermerill/SuperSlicer/releasesPresuming you run windows...
https://github.com/supermerill/SuperSlicer/releases/download/2.4.58.2/SuperSlicer_2.4.58.2_win64_220401.zipP.
-
@fcwilt For what its worth, the default files created by RepRapFormware Configuration Tool do not configure it that way. They have M561, G29 in bed.g, and do not have a mesh.g.
Where did you see that its should be the other way? Given the RRF Configuration Tool is the "official" way to set up the configuration, what you're saying seems to not be in alignment with the recommendations.