Duet3D Logo Duet3D
    • Tags
    • Documentation
    • Order
    • Register
    • Login

    How do I enable the hot end heater

    Scheduled Pinned Locked Moved
    General Discussion
    2
    30
    944
    Loading More Posts
    • Oldest to Newest
    • Newest to Oldest
    • Most Votes
    Reply
    • Reply as topic
    Log in to reply
    This topic has been deleted. Only users with topic management privileges can see it.
    • kb58undefined
      kb58
      last edited by kb58

      The basic print function on my homebuilt printer works pretty well now. Eventually, the routines will be split up into more logical routines or macros, along with constant and continued tuning. Before doing that though, there's working through the long list of nagging little details.

      Right now, if I forget to manual enable the hotend heater via the DWC, the printer goes on its way, not realizing that it's disabled, so it tries to prime the extruder, which predictable fails. I searched through the Gcode Dictionary but could not find how to enable the hotend heater via either G or M code. I assume I'm missing it, or is there a very good reason why it is meant to be manually enabled. Thanks

      Scratch-built 350mmx350mm coreXY, linear rails, ballscrews, 3 Z axis, Duet3 6HC, v3.3, Tool Board v1.1, BondTech LGX + Mosquito hot end

      fcwiltundefined 1 Reply Last reply Reply Quote 0
      • fcwiltundefined
        fcwilt @kb58
        last edited by

        @kb58

        Here are links to docs for commands related to your question:

        G10

        M140

        M568


        And also related to your question you may recall may approach of using the filament specific config.g file to deal with temps (and other things)?

        Here is one of those files:

        M221 S100 D0                         ; set extrusion multiplier
        G10 S190 R0                          ; set extruder temps
        M140 S60 R0                          ; set bed temps
        
        set global.g_print_beg_prime   =  10 ;
        set global.g_print_beg_retract = 0.5 ;
        set global.g_print_end_retract = 0.5 ;
        

        And here are the parts of my print_begin.g file which invokes the filament config.g file and later waits for the temps to be reached:

        ; select tool and configure based on filament selected
        
        T0							; select tool 0 so extruder commands below will work
        M703							; configure selected filament (sets bed/extruder temps, extrusion multiplier)
        
        M291 R"Heating Extruder & Bed" P"Please wait..." T0
        
        M116							; wait for temps to reach set points
        
        M291 R"Priming Extruder" P"Please wait..." T0


        Printers: a small Utilmaker style, a small CoreXY and a E3D MS/TC setup. Various hotends. Using Duet 3 hardware running 3.4.6

        kb58undefined 1 Reply Last reply Reply Quote 0
        • kb58undefined
          kb58 @fcwilt
          last edited by kb58

          @fcwilt said in How do I enable the hot end heater:

          T0 ; select tool 0 so extruder commands below will work M703 ; configure selected filament (sets bed/extruder temps, extrusion multiplier)

          Thanks. So doing it this way places all the filament information in the printer. Do these settings overrule the same settings from the slicer, or do those have to be set to zero? If they're set to zero, though, I'm not sure that means that the slicer doesn't set the parameters, or does set them to zero, so it's back to: where is the printer getting its filament settings from?

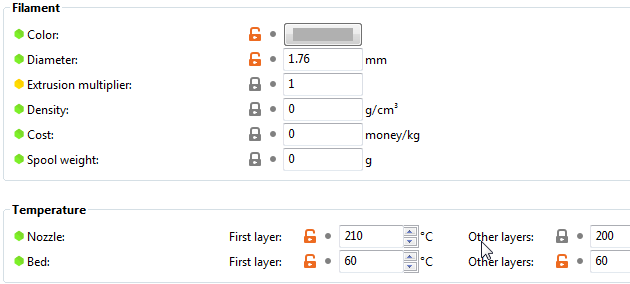
          For example, here's what PrusaSlicer is setting for filament parameters:
          89d86ef6-e0b4-4252-aa49-765d6e1a728c-image.png

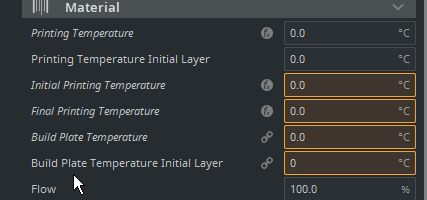
          Over here in the Duet-resident filament config file is:
          df76623b-b7bc-4179-8883-dd951f2f2410-image.png

          So, "who wins out?"

          Guess I'll find out by trying it.

          Scratch-built 350mmx350mm coreXY, linear rails, ballscrews, 3 Z axis, Duet3 6HC, v3.3, Tool Board v1.1, BondTech LGX + Mosquito hot end

          fcwiltundefined 1 Reply Last reply Reply Quote 0
          • fcwiltundefined
            fcwilt @kb58
            last edited by

            @kb58

            This is what Cura does for the settings:

            Cura Printer Settings.png

            Cura Temp Settings.png

            ; Cura (Repeteir flavor - no temps) inserts the following around the call to this file
            
            ;M109 S0                        ; set extruder temp and wait (no wait with S0)
            ;M82                            ; absolute E moves
            ;M98 P"print_begin.g"           ; invokes this file
            ;G92 E0                         ; set E position
            ;G92 E0                         ; set E position again (have no idea why)
            ;G1 F1800 E-1                   ; do initial retract
            

            The M109 is setting the extruder temp to 0 which is of no consequence so when you get to the T0/M703 commands in the print_begin.g file the temp settings commands in the filament specific config.g file (G10, M140, M558) are executed and determine the temps.

            Printers: a small Utilmaker style, a small CoreXY and a E3D MS/TC setup. Various hotends. Using Duet 3 hardware running 3.4.6

            kb58undefined 1 Reply Last reply Reply Quote 0
            • kb58undefined
              kb58 @fcwilt
              last edited by kb58

              @fcwilt Okay, thanks, so the printer "wins" as far as which parameters are being used.

              Okay, I'm trying to get the call to filament config settings to work, yet it's as if the printer isn't seeing them at all.

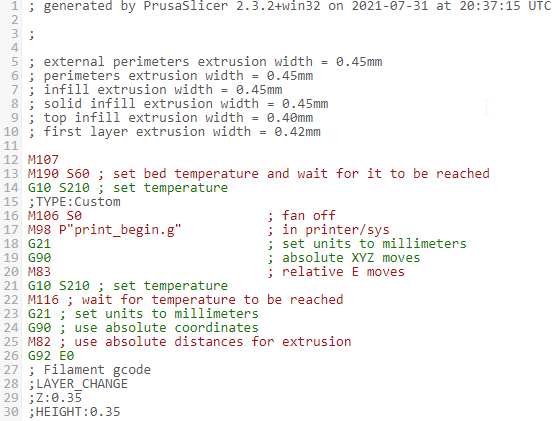
              Here's my print_begin file:

              ; PrusaSlicer (RepRapflavor) inserts the following around the call to this file
              ;M106 S0                        ; fan off
              ;M98 P"print_begin.g"           ; invokes this file
              ;G21                            ; set units to millimeters
              ;G90                            ; absolute XYZ moves
              ;M83                            ; relative E moves
              
              G32				; home and level bed, then move to bed center and set Z datum
              
              ; select tool and configure based on filament selected
              T0                              ; select tool 0 so extruder commands below will work
              M703                            ; loads selected filament configuration (bed/extruder temps, extrusion
              				; multiplier, etc). See config.g in filament folder.
              
              ; setup to print
              G90                             ; absolute moves
              G1 Z20 F2000              	; position for cleaning - set as desired
              G1 X0 Y-170 F10000              ; position for cleaning - set as desired
              
              M291 R"Heating Extruder & Bed" P"Please wait..." T0
              M116                            ; wait for temps to reach set points
              M291 R"Priming Extruder" P"Please wait..." T0
              
              M83                             ; insure extruder relative mode
              G92 E0                          ; reset the extruder logical position
              G1 E10 F60                      ; prime the extruder
              M400                            ; wait to complete
              G92 E0                          ; reset the extruder logical position
              
              M291 R"Clean Nozzle and Bed" P"Click OK to begin printing" S3 T0
              
              G1 E-1.2 F60                    ; retract to control oozing
              M400                            ; wait to complete
              G92 E0                          ; reset the extruder logical position
              
              G1 X0 Y0 F10000			; move probe to center of bed
              G30                             ; probe once to set Z=0 datum, necessary for loading height map
              
              G29 S1                          ; load existing height map, "heightmap.csv" (created via G29 S0)
              

              And here is my filament config.g:

              M291 R"PLA+" P"Configuring..." T0
              M221 S100 D0			; set extrusion multiplier
              G10 S190 R190			; set extruder temps
              M140 S60 R60			; set bed temp
              M291 R"PLA+" P"Configuring - Done" T1


              What happens is:

              1. Start print
              2. Bed heater starts warming up immediately
              3. Bed temp reaches 60C (hot end remains at zero C commanded and off the entire time).
              4. Bed is leveled and Z datum set
              5. Nozzle moves to front of bed and immediately, "Clean Nozzle and Bed" is displayed. At the same time, the extruder starts running, but of course with the hot end never having been enabled and the temperature remaining at zero, it just clunks away on cold filament.

              So it seems to be flying right past setting extruder temperature or waiting for it to achieve the target. It is not displaying the "configuring" messages in filament config.g file, nor is it displaying "Heating bed and extruder".

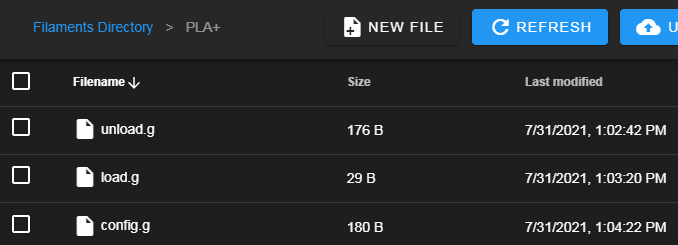
              Do the SD /sys/filament/PLA+ files belong somewhere else? Here is where the filament files are:
              31508052-8cad-4531-8698-3a056e9c2adf-image.png

              Scratch-built 350mmx350mm coreXY, linear rails, ballscrews, 3 Z axis, Duet3 6HC, v3.3, Tool Board v1.1, BondTech LGX + Mosquito hot end

              fcwiltundefined 1 Reply Last reply Reply Quote 0
              • fcwiltundefined
                fcwilt @kb58
                last edited by

                @kb58

                Well the filament folder appears to be correct as you are seeing the filament specific files but the filament folder is not contained in the system folder but rather at the same level.

                This is what an FTP connection to my printer displays:

                SD Folders.png

                Please post the first 10-20 lines of the file you are trying to print.

                Thanks.

                Frederick

                Printers: a small Utilmaker style, a small CoreXY and a E3D MS/TC setup. Various hotends. Using Duet 3 hardware running 3.4.6

                kb58undefined 2 Replies Last reply Reply Quote 0
                • kb58undefined
                  kb58 @fcwilt
                  last edited by

                  @fcwilt 11a0679c-383f-437b-8562-4ef7bc87ff0e-image.png

                  Scratch-built 350mmx350mm coreXY, linear rails, ballscrews, 3 Z axis, Duet3 6HC, v3.3, Tool Board v1.1, BondTech LGX + Mosquito hot end

                  1 Reply Last reply Reply Quote 0
                  • kb58undefined
                    kb58 @fcwilt
                    last edited by kb58

                    @fcwilt How does someone without an FTP connection create a Filament folder at the same level as SYS? I did the automated code load/upgrade, and my file structure has remained the same since. I don't see how, via the DWC, to "back out a level" in order to create a new folder. I realize I can force it to happen by removing the SD card from the printer and making it happen within my laptop, but... really?

                    Scratch-built 350mmx350mm coreXY, linear rails, ballscrews, 3 Z axis, Duet3 6HC, v3.3, Tool Board v1.1, BondTech LGX + Mosquito hot end

                    fcwiltundefined 1 Reply Last reply Reply Quote 0
                    • fcwiltundefined
                      fcwilt @kb58
                      last edited by

                      @kb58 said in How do I enable the hot end heater:

                      @fcwilt How does someone without an FTP connection create a Filament folder at the same level as SYS? I did the automated code load/upgrade, and my file structure has remained the same since. I don't see how, via the DWC, to "back out a level" in order to create a new folder. I realize I can force it to happen by removing the SD card from the printer and making it happen within my laptop, but... really?

                      The DWC does it for you.

                      See the following:

                      DWC Filaments Left.png

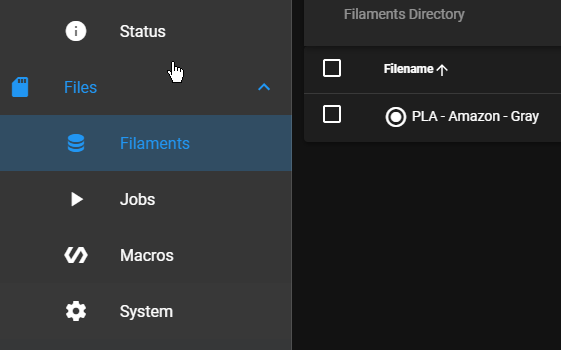
                      You select the Filaments item on the left (see above)

                      DWC Filaments Right.png

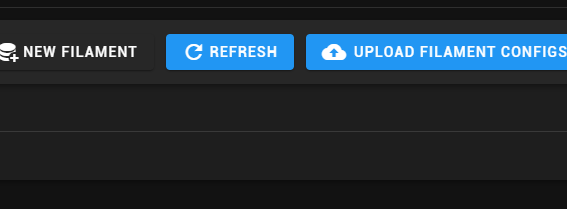
                      Then you select New Filament on the right upper corner (see above)

                      It will ask for a name and then create the required folder and files (they are empty) in the correct location.

                      Then you should see the new filament name on the left in the list of filaments.

                      Selecting the filament should take you to the empty files ready for editing.

                      Frederick

                      Printers: a small Utilmaker style, a small CoreXY and a E3D MS/TC setup. Various hotends. Using Duet 3 hardware running 3.4.6

                      kb58undefined 1 Reply Last reply Reply Quote 0
                      • kb58undefined
                        kb58 @fcwilt
                        last edited by kb58

                        @fcwilt Yes that is how it's set up now (had to cut and paste the code in from the laptop, rather than pointing the DWC to where to get it from).

                        Anyway, there's something else going on. I double checked that the filament files are where they should be, but when the print is started, it's as if it's not executing the filament config.g file. No messages and it's not setting extruder temperature. Not sure where the bed temp command of 60C is coming from but suspect that's from the slicer.

                        Scratch-built 350mmx350mm coreXY, linear rails, ballscrews, 3 Z axis, Duet3 6HC, v3.3, Tool Board v1.1, BondTech LGX + Mosquito hot end

                        fcwiltundefined 1 Reply Last reply Reply Quote 0
                        • fcwiltundefined
                          fcwilt @kb58
                          last edited by fcwilt

                          @kb58

                          I don't know why I thought you were using Cura - Prusa is a bit different.

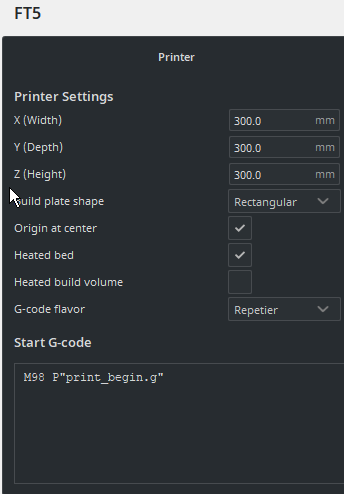
                          This is what I found Prusa generates and the conditions I used in configuring Prusa:

                          ; PrusaSlicer (RepRapflavor - no temps) inserts the following around the call to this file
                          ;M107                           ; fan off (should be M106 S0)
                          ;M98 P"print_begin.g"           ; invokes this file
                          ;G21                            ; set units to millimeters
                          ;G90                            ; absolute XYZ moves
                          ;M83                            ; relative E moves
                          

                          Check your settings in Prusa and see if the generated code matches the above.

                          Frederick

                          Printers: a small Utilmaker style, a small CoreXY and a E3D MS/TC setup. Various hotends. Using Duet 3 hardware running 3.4.6

                          kb58undefined 1 Reply Last reply Reply Quote 0
                          • kb58undefined
                            kb58 @fcwilt
                            last edited by kb58

                            @fcwilt I did at 14:58

                            Scratch-built 350mmx350mm coreXY, linear rails, ballscrews, 3 Z axis, Duet3 6HC, v3.3, Tool Board v1.1, BondTech LGX + Mosquito hot end

                            fcwiltundefined 1 Reply Last reply Reply Quote 0
                            • fcwiltundefined
                              fcwilt @kb58
                              last edited by

                              @kb58 said in How do I enable the hot end heater:

                              @fcwilt I did at 14:58

                              I know - I was working too fast and trying to juggle too many things at once - see my post before this one regards Prusa settings.

                              Frederick

                              Printers: a small Utilmaker style, a small CoreXY and a E3D MS/TC setup. Various hotends. Using Duet 3 hardware running 3.4.6

                              kb58undefined 1 Reply Last reply Reply Quote 0
                              • kb58undefined
                                kb58 @fcwilt
                                last edited by

                                @fcwilt 8f97add0-6f43-4acf-9936-32bed6eff19a-image.png

                                Scratch-built 350mmx350mm coreXY, linear rails, ballscrews, 3 Z axis, Duet3 6HC, v3.3, Tool Board v1.1, BondTech LGX + Mosquito hot end

                                1 Reply Last reply Reply Quote 0
                                • kb58undefined
                                  kb58
                                  last edited by kb58

                                  A portion of "print_begin"
                                  ddfa6c28-0a66-437c-b68c-0be105aaab2a-image.png

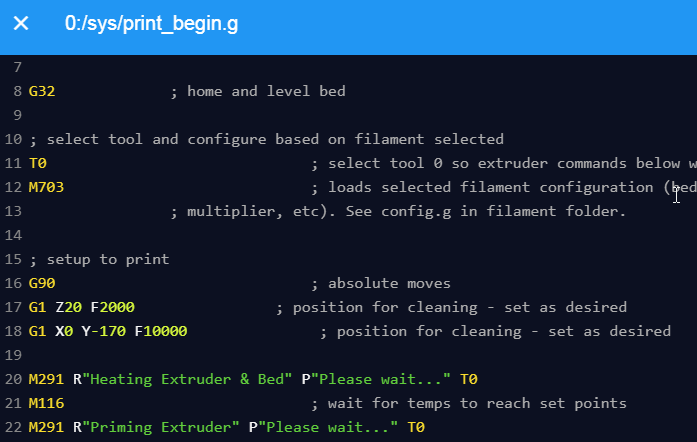
                                  I think the clue is in this area. Even if the M703 on Line 12 isn't doing anything, I can't figure out why the messages on Line 20 and 22 aren't appearing.

                                  What's strange is that this all used to work fine before adding content to the filament files... Maybe I need to back up and delete it.

                                  Scratch-built 350mmx350mm coreXY, linear rails, ballscrews, 3 Z axis, Duet3 6HC, v3.3, Tool Board v1.1, BondTech LGX + Mosquito hot end

                                  fcwiltundefined 1 Reply Last reply Reply Quote 0
                                  • fcwiltundefined
                                    fcwilt @kb58
                                    last edited by

                                    @kb58

                                    The G32 invokes bed.g

                                    Perhaps something is happening in bed.g that is causing the problem.

                                    Post bed.g, please.

                                    Frederick

                                    Printers: a small Utilmaker style, a small CoreXY and a E3D MS/TC setup. Various hotends. Using Duet 3 hardware running 3.4.6

                                    kb58undefined 1 Reply Last reply Reply Quote 0
                                    • kb58undefined
                                      kb58 @fcwilt
                                      last edited by kb58

                                      @fcwilt

                                      ; bed.g
                                      ; called to perform automatic bed compensation via G32
                                      ;
                                      M561				; clear any bed transform
                                      G28 				; home all
                                      G30 P0 X-139 Y-119 Z-99999 	; probe near left front leadscrew
                                      G30 P1 X0 Y150 Z-99999 		; probe near rear center leadscrew
                                      G30 P2 X145 Y-119 Z-99999 S3	; probe near right front leadscrew, then perform 3-pt calibration
                                      
                                      G1 X0 Y0
                                      G30
                                      G30 s-1
                                      
                                      ;M291 P"Leveling finished" R"Probing..." S1 T2
                                      
                                      M291 P"Leveling finished" S1 T2
                                      

                                      Scratch-built 350mmx350mm coreXY, linear rails, ballscrews, 3 Z axis, Duet3 6HC, v3.3, Tool Board v1.1, BondTech LGX + Mosquito hot end

                                      fcwiltundefined 1 Reply Last reply Reply Quote 0
                                      • fcwiltundefined
                                        fcwilt @kb58
                                        last edited by

                                        @kb58 said in How do I enable the hot end heater:

                                        @fcwilt

                                        ; bed.g
                                        ; called to perform automatic bed compensation via G32
                                        ;
                                        M561				; clear any bed transform
                                        G28 				; home all
                                        G30 P0 X-139 Y-119 Z-99999 	; probe near left front leadscrew
                                        G30 P1 X0 Y150 Z-99999 		; probe near rear center leadscrew
                                        G30 P2 X145 Y-119 Z-99999 S3	; probe near right front leadscrew, then perform 3-pt calibration
                                        
                                        G1 X0 Y0
                                        G30
                                        G30 s-1
                                        
                                        ;M291 P"Leveling finished" R"Probing..." S1 T2
                                        
                                        M291 P"Leveling finished" S1 T2
                                        

                                        That last M291 doesn't have the R parameter - perhaps that is the problem.

                                        Also why are you doing the G30 S-1? It doesn't hurt but I'm just curious.

                                        Frederick

                                        Printers: a small Utilmaker style, a small CoreXY and a E3D MS/TC setup. Various hotends. Using Duet 3 hardware running 3.4.6

                                        1 Reply Last reply Reply Quote 0
                                        • kb58undefined
                                          kb58
                                          last edited by kb58

                                          Don't see how, given that:
                                          ed7461d6-8f84-4229-97d5-4738c7b1d45a-image.png

                                          So R is just an option title.

                                          About the G30 s-1, it's just for checking on what the printer thinks the probe to bed offset is. Want to make sure it's not drifting.

                                          Scratch-built 350mmx350mm coreXY, linear rails, ballscrews, 3 Z axis, Duet3 6HC, v3.3, Tool Board v1.1, BondTech LGX + Mosquito hot end

                                          kb58undefined fcwiltundefined 2 Replies Last reply Reply Quote 0
                                          • kb58undefined
                                            kb58 @kb58
                                            last edited by kb58

                                            @kb58 Hah, I'm back at the same point when this thread was started. I can make everything work if I manually enable the hot end heater via the DWC. I had expected the filament code to enable the hot end heater and it simply doesn't. I'll have to review that code, or insert some new code to make it happen.

                                            Scratch-built 350mmx350mm coreXY, linear rails, ballscrews, 3 Z axis, Duet3 6HC, v3.3, Tool Board v1.1, BondTech LGX + Mosquito hot end

                                            1 Reply Last reply Reply Quote 0
                                            • First post
                                              Last post
                                            Unless otherwise noted, all forum content is licensed under CC-BY-SA