Probe Drift: dc42 IR & Inductive, heat & no heat.
-
Edit: I have changed this thread to a question as I have uncovered some strange behaviour. I can see a significant drift in the results of probing when the heat bed is off on both a dc42 IR probe and an inductive probe.
I had my probe speed at 120 for no real reason. Just was. Currently running a thorough test probing the bed in the centre and the four corners of a 150mm square centred at (0,0). Each test point is probed 30 times.
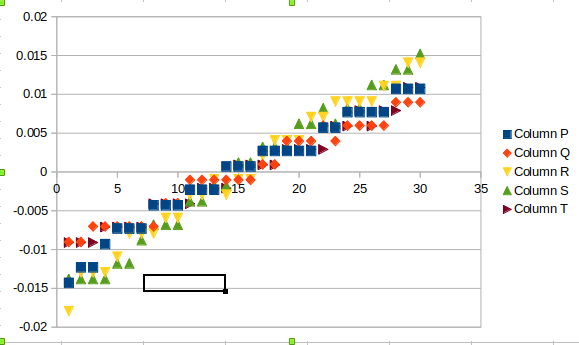
Long story short the inductive probe appears to have a 6 sigma deviation of about 0.02mm. That's fine for me. One thing of serious note though is it appears this level of accuracy is beginning to show the result of no thermal control presenting itself in a general trend on the probe test.
Here is 5 test sets plotted in the order that they were taken, and the result being the deviation from the sets mean value. Test ran at 60mm/min probe speed:

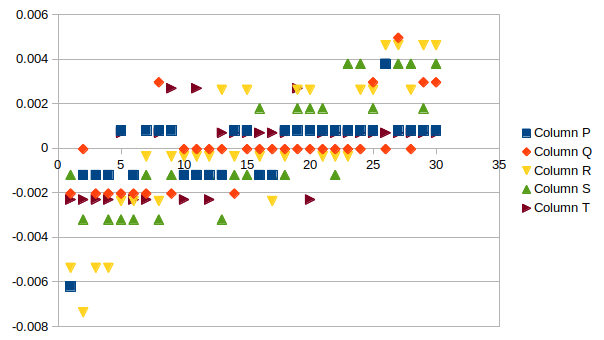
Here is the same presentation for a test ran with a probe speed of 240mm/min:

This system is a cantilever Ormerod 2 with metal arms and bed support. I'm running a Mk3 alloy bed sandwiched between MDF and 3mm float glass. The z axis is 8mm lead screw driven directly by a 1.8 degree stepper running at 16 microstepping on a Duet v0.6 board. One microstep is about 0.0025mm and one major step about 0.04mm.
Finally The inductive probe is looking very promising. Even at 8mm detection distance it is struggling on proximity to the glass. At a guess I've got about 1mm clearance. Just heating up my bed to see if the probe tests are more consistent at an elevated and controlled bed temperature. After that I will try swapping my black paper (there because of former dc42 probe) with a sheet of tinfoil to see if that helps detection at all.
-
have you seen toms video? https://www.youtube.com/watch?v=il9bNWn66BY
-
I had seen that test an age ago. The rig is setup purposly to test the sensors directly, and I was more interested to see the trends in the graphs that I saw that I think is something warming up. Just not sure if it is the sensor, the machine, or both!
Now running 240mm/min tests at 20 minute intervals with the bed set to 85C.
If my machine is moving around by 0.02mm in the time it takes me to probe these points then it has a significant influence in the accuracy of bed levelling etc.
-
Arse. Did three tests didn't realise reloading standard config shut off heaters! Will do again another time.
I'm seeing about a 30 micron drift in readings from the start of a test to the end. I was hoping to see that level out after an hour, but that will have to wait until later.
-
Whats your refrence? (micro)Step count? Test dial indicator?
-
Fair point not told you much about the test.
It's running repeat G30 probes, recording the value to P numbers then printing the lost out after doing all 30. I copy the numbers from the DWC console into a speadsheet.
I'm not looking at actual deviation, more how much the duet thinks things have changed between repeat probes based on the information from the sensor/probe. Hence why the resolution of measurements appears to ne in one microstep steps.
-
Repeating some of the work this morning while the little one doses.
I've fixed the probe speed this time and am looking at the change in z position (as reported by the G30 probe) of the bed. I've set the bed at 85C as I do for PETG. I took my first data set as soon as the bed hit 85C and have been collecting data sets each 20 minutes (apart from first which was 30 minutes) from them. Time between the first and last data set is 1hr30 at the moment.
In this period of time the z axis has risen 0.513mm!

I'm hoping to see a plateau soon as I can hear the tiny man grumbling...
Edit: I think I'll write this up properly and report back with a link. It's a fair chunk of work (each data set is 150 probes!) just to throw in a post.
-
@dc42 I'm now upto 1.11mm raise in bed level with not much sign of this slowing. How can I be sure this isn't a software bug and is indeed thermal issues?
I will try again at shorter time intervals to see if the change is definitely time related rather than number of probes.
I've attached my test sequence below. Set bed temp. Wait for temp. Home. Then run the below at 20 minute intervals.
-
All other things aside this may have shown why I can't run one build after another without re-checking nozzle height.
My suspicion is this is highlighting the thermal instability of my machine rather than a bug, but thought I'd raise the question.
-
@doctrucker, is the trigger height stable if you do repeated probing without heating the bed?
Inductive probes are known to be temperature sensitive.
-
To make any sense of the data you really should distinguish between the difference in trigger height and the thermal expansion?
If you have a solid base to use as a refrence, most midrange chinesium dial test indicators are surprisingly accurate. I have some "saitek" branded 0.001mm stuff in the $20-30 range and they do their job according to the fancy Mitutoyo stuff we had at my old job. But at that scale you really need think through the whole test setup.
-
@dc42 I think there certainly is some oddness with the sensor. The earlier linked Tom's review (will listen again very carefully!) seemed to indicate an increase in standard deviation with heat. I'm not seeing that but I am seeing a drift.
First tests this morning (85C) were ran over 3hr48 and showed a total movement in the average of the bed probes bed of 1.26mm.
Just re-ran back to back tests with no heat and in 1hr02 I saw a total drift of 0.442mm. The drift in the first test at 1hr09 was 0.399. This shows the readings have drifted more after a large number of probes in short succession than after a longer period of time at 85C with less probes.
Very peculiar! I would like to run the no heat tests at similar intervals as the heated test but I would also like sleep tonight so will leave that for another night!

-
@bearer I am certainly thinking though the setup in a little more detail. This wasn't intended as a detailed study initially but has become so after observation of weird results.
I'll look at doing a dragging paper test to confirm whether this is a change in trigger height. Having said that given the thermal expansion of aluminium is sitting somewhere around 24 microns per metre for every degree kelvin increase I think it is becoming more likely that this is a drift in trigger height.
Edit: One of the next tests will tie the shell of the sensor to ground. Just tried some spare sensors and there is no continuity between the metal shell and ground.
-
@dc42 I've repeated the tests today with no heat and I can still see a drift (not vague) in the average of each of the individual points. The average drift with the tests ran back to back is 0.45mm. When the timings of the tests are similar to before the drift was in the order of 0.25mm.
If this was a software bug I would have expected the time between the tests to have made little difference. The output on DWC is at times clipped with everything after deviation missing.
I'm now trying to reassemble the test rig as carefully as possible (as not to disturb the axis) and re-run the tests on the IR probe later today or tomorrow.
I will still write this up properly.
-
I'm getting the same behaviour with dc42's IR probe.
Is this something to do with recording 30 points with G30 on a v0.6 board?
In DWC console I get some messages like:
G32 bed probe heights: 0.155 0.160 0.163 0.160 0.163 0.163 0.163 0.163 0.163 0.163 0.165 0.163 0.165 0.165 0.167 0.165 0.167 0.167 0.167 0.165 0.167 0.167 0.170 0.173 0.173 0.170 0.170 0.170 0.173 0.175, mean 0.166, deviation from mean 0.004
(-75,-75)But on other tests they look like:
G32 bed probe heights: -0.278 -0.275 -0.270 -0.275 -0.275 -0.273 -0.273 -0.273 -0.273 -0.270 -0.268 -0.270 -0.270 -0.268 -0.265 -0.268 -0.268 -0.268 -0.265 -0.265 -0.265 -0.265 -0.265 -0.263 -0.260 -0.260 -0.260 -0.260 -0.258 -0.258, mean -0.267, deviation(-75,75)
The co-ordinate in brackets comes because I have the following code:
...clip...
G30 P29 X0 Y0 Z-99999 S-1
; Test (-1, -1)
M118 S"(-75,-75)"
...clip... -
Here's two big bits of data:


You can see a massive drift in the average of the five probed points. You can see this drift occurring within one data set.
Looking at these graphs at each time (x-axis) there are six data points. One is an average of the other five. The other five display the average of 30 probes at the centre of the bed and a the four corners of a square centred at (0,0) with a 150mm side.
I would of say the +1mm drift seen in the dc42 IR test is too much to be thermal expansion (but I may be wrong!
 ) when the only heat into the system is the steppers, and they aren't warm to the touch. The bed temperture only fluctuated by about 0.1C during these tests.
I have got a printed z-axis coupler which I will swap out with another machine. I would be surprised if this is the cause as it is small and 1mm is a massive proportion of it's own length.
I've yet to do the paper drag tests as I wanted to keep the tests as similar as possible to this point. I think it is fair to say the drift is unlikely to be purely down to either the inductive or IR sensor.
-
Coupler was slipping!

Much more like it. 6 sigma tolerance now in the region of 10microns.
Edit: ...and yes I have now levelled my bed!
