7-inch DWC and PanelDue anomalies
-
I have the following configuration
Duet Web Control Version 2.0.4
FIRMWARE_NAME: RepRapFirmware for Duet 2 WiFi/Ethernet FIRMWARE_VERSION: 2.05RC1 ELECTRONICS: Duet WiFi 1.02 or later FIRMWARE_DATE: 2019-11-29b1; Configuration file for Duet WiFi (firmware version 1.21) ; executed by the firmware on start-up ; ; generated by RepRapFirmware Configuration Tool v2 on Fri Mar 15 2019 23:53:22 GMT-0500 (hora estándar de Colombia) ; General preferences G90 ; Send absolute coordinates... M83 ; ...but relative extruder moves G21 ; G21 establece las unidades en mm / G20 establece las unidades en pulgadas ; kinematics type M669 K1 ; Select CoreXY mode ; Network M552 S1 ; Enable network M586 P0 S1 ; Enable HTTP M586 P1 S0 ; Disable FTP M586 P2 S0 ; Disable Telnet ; Drives M569 P5 S1 ; Drive 5 goes forwards axis X M569 P6 S0 ; Drive 6 goes forwards axis Y M569 P7 S1 ; Drive 7 goes forwards Extrusor M569 P8 S1 ; Drive 8 goes forwards Axis z M569 P9 S1 ; Drive 9 goes forwards Axis Z M569 P10 S1 ; Drive 10 goes forwards axis z M569 P11 S1 ; Drive 11 goes forwards axis z M584 X5 Y7 Z8:9:10:11 U9 V10 W11 E6 ; Apply custom drive mapping and four Z motors connected to driver outputs 8, 9, 10 and 11 Z M350 X16 Y16 Z16:16:16:16 I1 ; Configure microstepping with interpolation M350 E2 M350 U16 V16 W16 I1 M92 X80 Y80 Z400:400:400:400 E311;E2487 E155 E311 ; Set steps per mm M92 U400 V400 W400 M566 X900 Y900 Z30:30:30:30 E20 ; Set maximum instantaneous speed changes (mm/min) M566 U30 V30 W30 M203 X18000 Y18000 Z200:200:200:200 E600 ;E1500 ; Set maximum speeds (mm/min) M203 U200 V200 W200 M201 X4000 Y4000 Z100:100:100:100 E100 ;E1000 ; Set accelerations (mm/s^2) M201 U100 V100 W100 M84 S30 ; Set idle timeout ; define posiciones de los tornillos M671 X-321:-321:317:317 Y-144:184:184:-144 S4 ;agregar parametro F2 ; Axis Limits M208 X-267 Y-245 Z0 S1 ; Set axis minima M208 U0 V0 W0 S1 M208 X267 Y230 Z406 S0 ; Set axis maxima M208 U406 V406 W406 S0 ; Endstops Makerbot Mechanical Endstop v1.2 M574 X1 Y1 S0 ; S_ endstop-type: 0 = active low, 1 = active high, 2 = slice-direction-probe, 3 = motor load detection ; MicroSiwch ;M574 Z1 U1 V1 W1 S1 M574 Z1 U1 V1 W1 S1 ; Z-Probe ;M574 Z1 S2 ; Set endstops controlled by probe ;M307 H3 A-1 C-1 D-1 ; Disable heater on PWM channel for BLTouch ;M558 P9 H5 F120 T18000 A5 R0.2 B1 ;S0.03 R0.75 Set Z probe type to bltouch and the dive height + speeds ;G31 P25 X0 Y33 Z1.13 ; Set Z probe trigger value, offset and trigger height ;M557 X-265:265 Y-207:245 S53:113 ;Define mesh grid ; Heaters M305 P0 T100000 B4138 R4700 ; Set thermistor + ADC parameters for heater 0 M143 H0 S120 ; Set temperature limit for heater 0 to 120C M305 P1 T100000 B4725 C7.060000e-8 R4700 ; Set thermistor + ADC parameters for heater 1 M143 H1 S250 ; Set temperature limit for heater 1 to 250C M912 P0 S-6.5 ; ajuste el calentador 1 ajuste electronico del monitor de temperatura en grados centigrados ;m571 consultar ;Extrusora de tornillo M305 P2 T100000 B4100 R4700 ; Set thermistor + ADC parameters for heater 1 M143 H2 S250 ; Set temperature limit for heater 1 to 250C M305 P3 T100000 B4100 R4700 ; Set thermistor + ADC parameters for heater 1 M143 H3 S250 ; Set temperature limit for heater 1 to 250C M305 P4 T100000 B4100 R4700 ; Set thermistor + ADC parameters for heater 1 M143 H4 S250 ; Set temperature limit for heater 1 to 250C M305 P5 T100000 B4100 R4700 ; Set thermistor + ADC parameters for heater 1 M143 H5 S250 ; Set temperature limit for heater 1 to 250C M305 P6 T100000 B4100 R4700 ; Set thermistor + ADC parameters for heater 1 M143 H6 S250 ; Set temperature limit for heater 1 to 250C ; Fans ;M106 P0 I0; invertir PWM del ventilador 1 M106 P0 S0 F500 H-1 ; Set fan 0 value, PWM signal inversion and frequency. Thermostatic control is turned off M106 P1 S0 I0 F500 H-1 ; Set fan 1 value, PWM signal inversion and frequency. Thermostatic control is turned on M106 P2 S127 I1 F500 H-1 ; Set fan 2 value, PWM signal inversion and frequency. Thermostatic control is turned off ; Tools M563 P0 D0 H1 S"Extrusora volcano" ; Define tool 0 G10 P0 X0 Y0 Z0 ; Set tool 0 axis offsets G10 P0 R0 S0 M563 P1 D0 H2:3:4:5 S"Extrusora de Tornillo" G10 P1 X0 Y0 Z0 ; Set tool 0 axis offsets G10 P1 R0:0:0:0 S0:0:0:0 ; Set initial tool 0 active and standby temperatures to 0C M563 P2 H6 S"Temperatura Tolva" G10 P2 X0 Y0 Z0 ; Set tool 0 axis offsets G10 P2 R0 S0 ; Avance de presión unidad extrusora ;M572 D0 S0.06 ; Automatic saving after power loss is not enabled M911 S21 R23 P"M913 X0 Y0 G91 M83 G1 Z3 E-5 F1000" ; Set voltage thresholds and actions to run on power loss ; Custom settings are not configured ; activar bltouch ;M280 P3 S160 I1 ; Alarm Release and Push-Pin UP ;M280 P3 S140 I1; modo 5v logic zmin M929 P"eventlog.txt" S1; iniciar el registro en el archivo eventlog.txt ;LEDs ;M307 H4 A-1 C-1 D-1 ;M307 H5 A-1 C-1 D-1 ;M307 H6 A-1 C-1 D-1 ;M307 H7 A-1 C-1 D-1 ; GUI config ;M404 N1.75 ; display for users nominal-filament-diameter/width of setup, in this case 1.75mm ; seleccionar herramienta T0 ; Load any saved values from last use, that were saved with M500 command M501 ; Ensure that M501 is at the end of config.g in order for the values in config-override.g to be loaded at startup ; config done ;M291 P"Config done" S2 T3 ; send message ;M300 S300 P1000 ; beep ;M292 ; Hide the message M80The PanelDue the heaters overlap with the macros, it would be better to leave the macros by default only available in the macro button.

the DWC sometimes the temperatures are not plotted and when I activate the tool T1 in dark mode it turns white, and the heater is repeated.
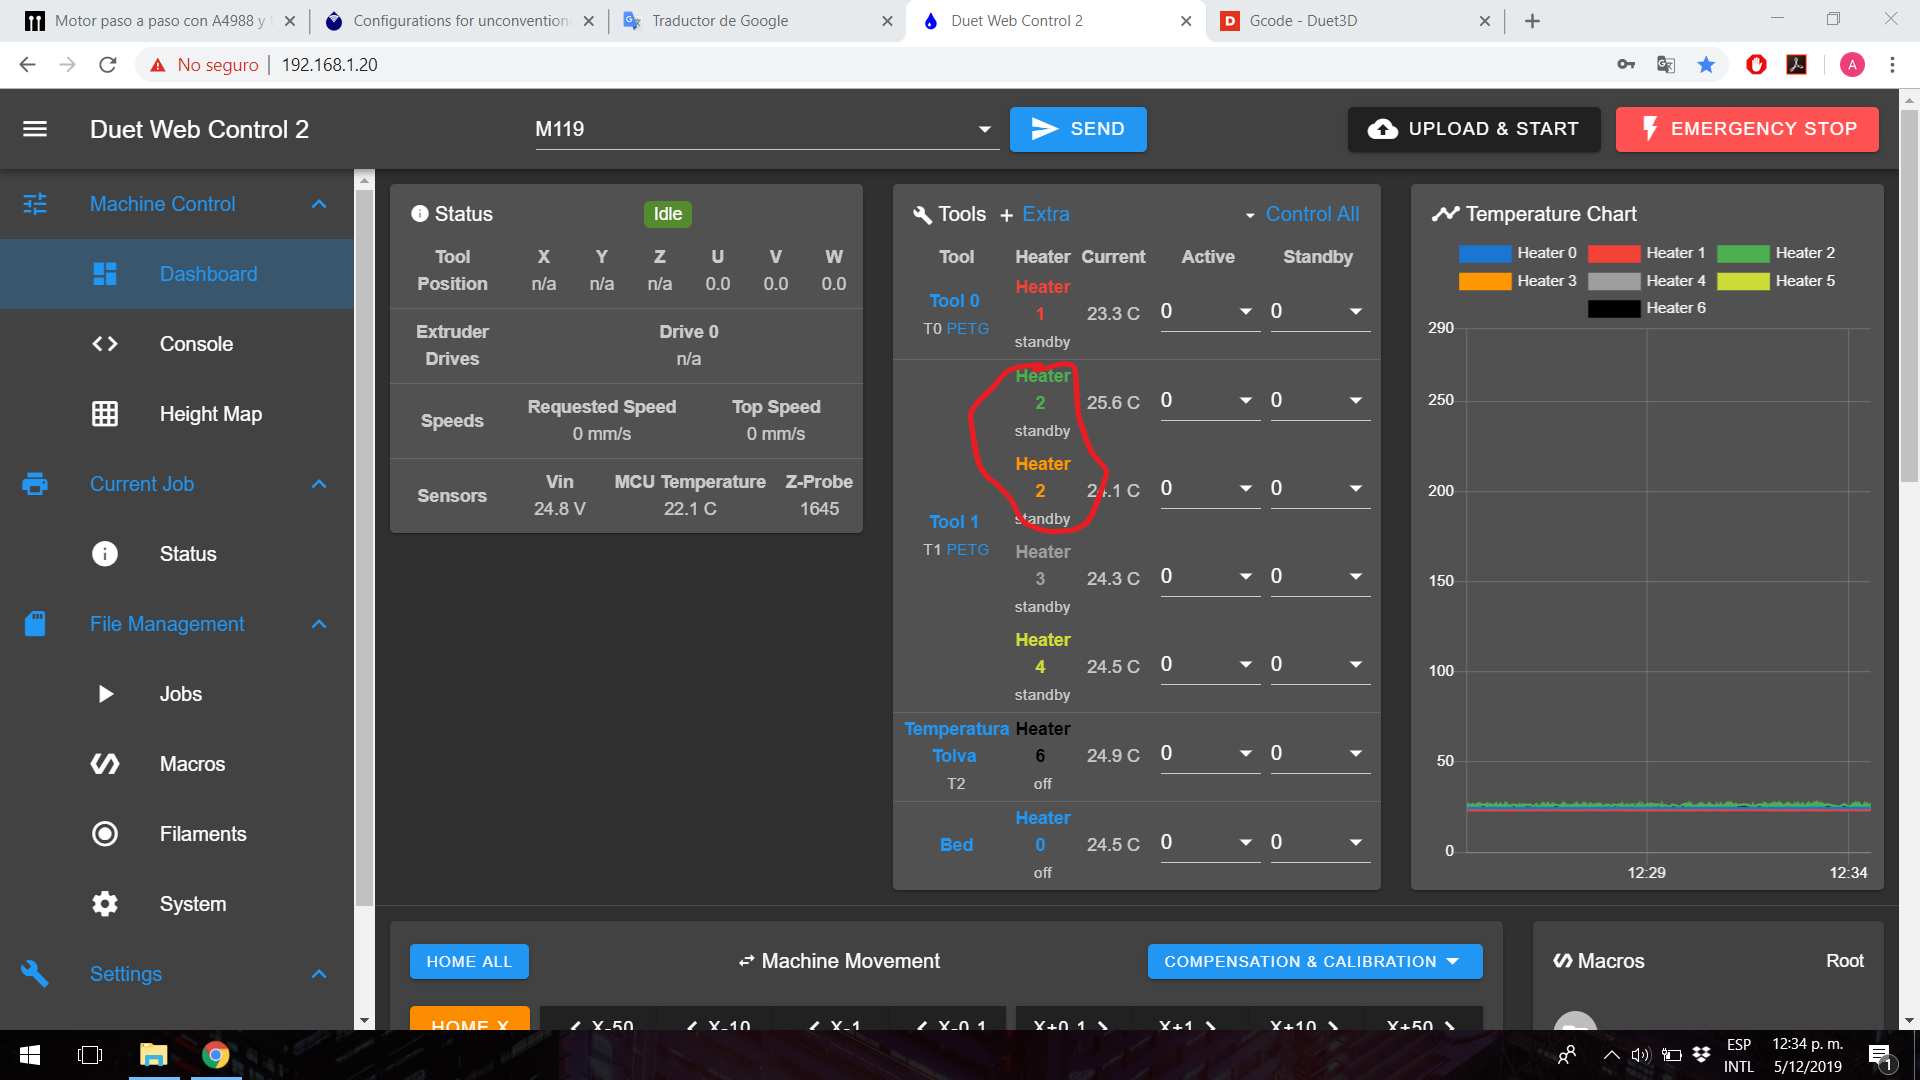
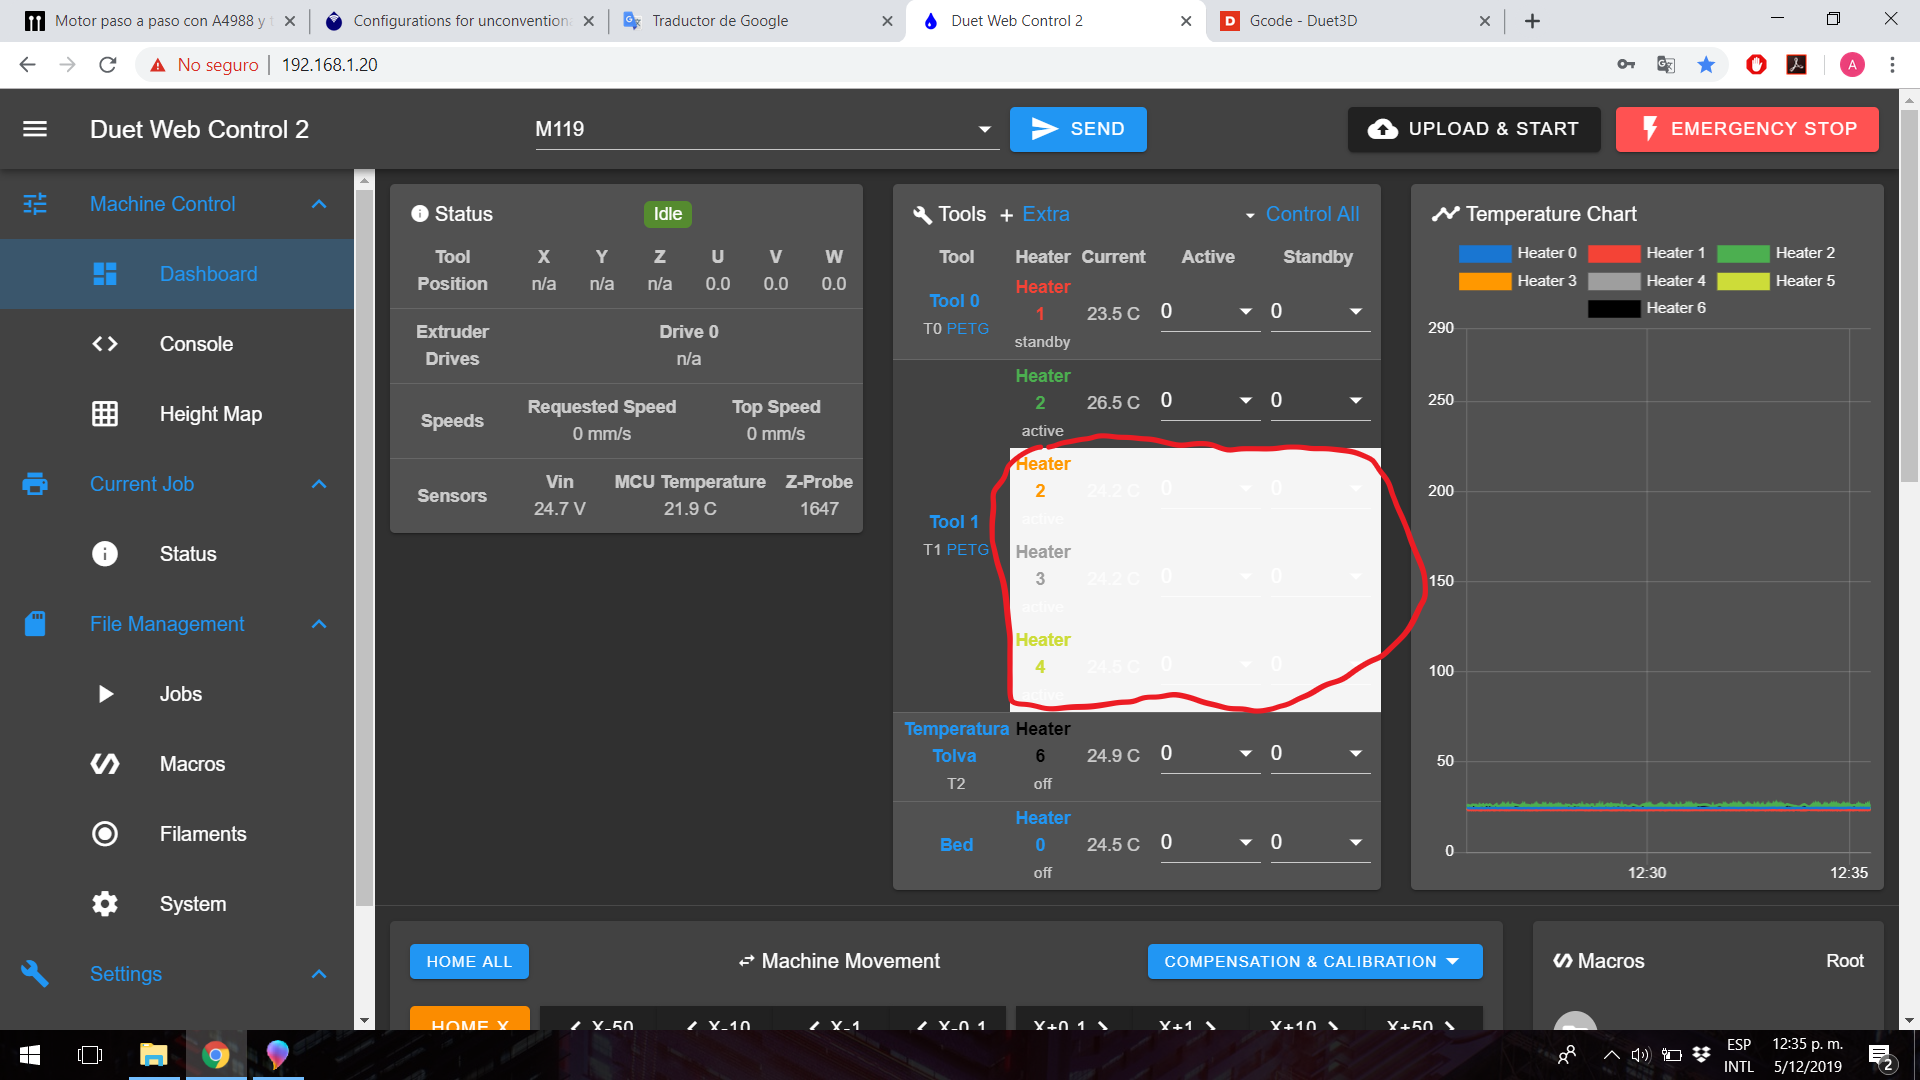
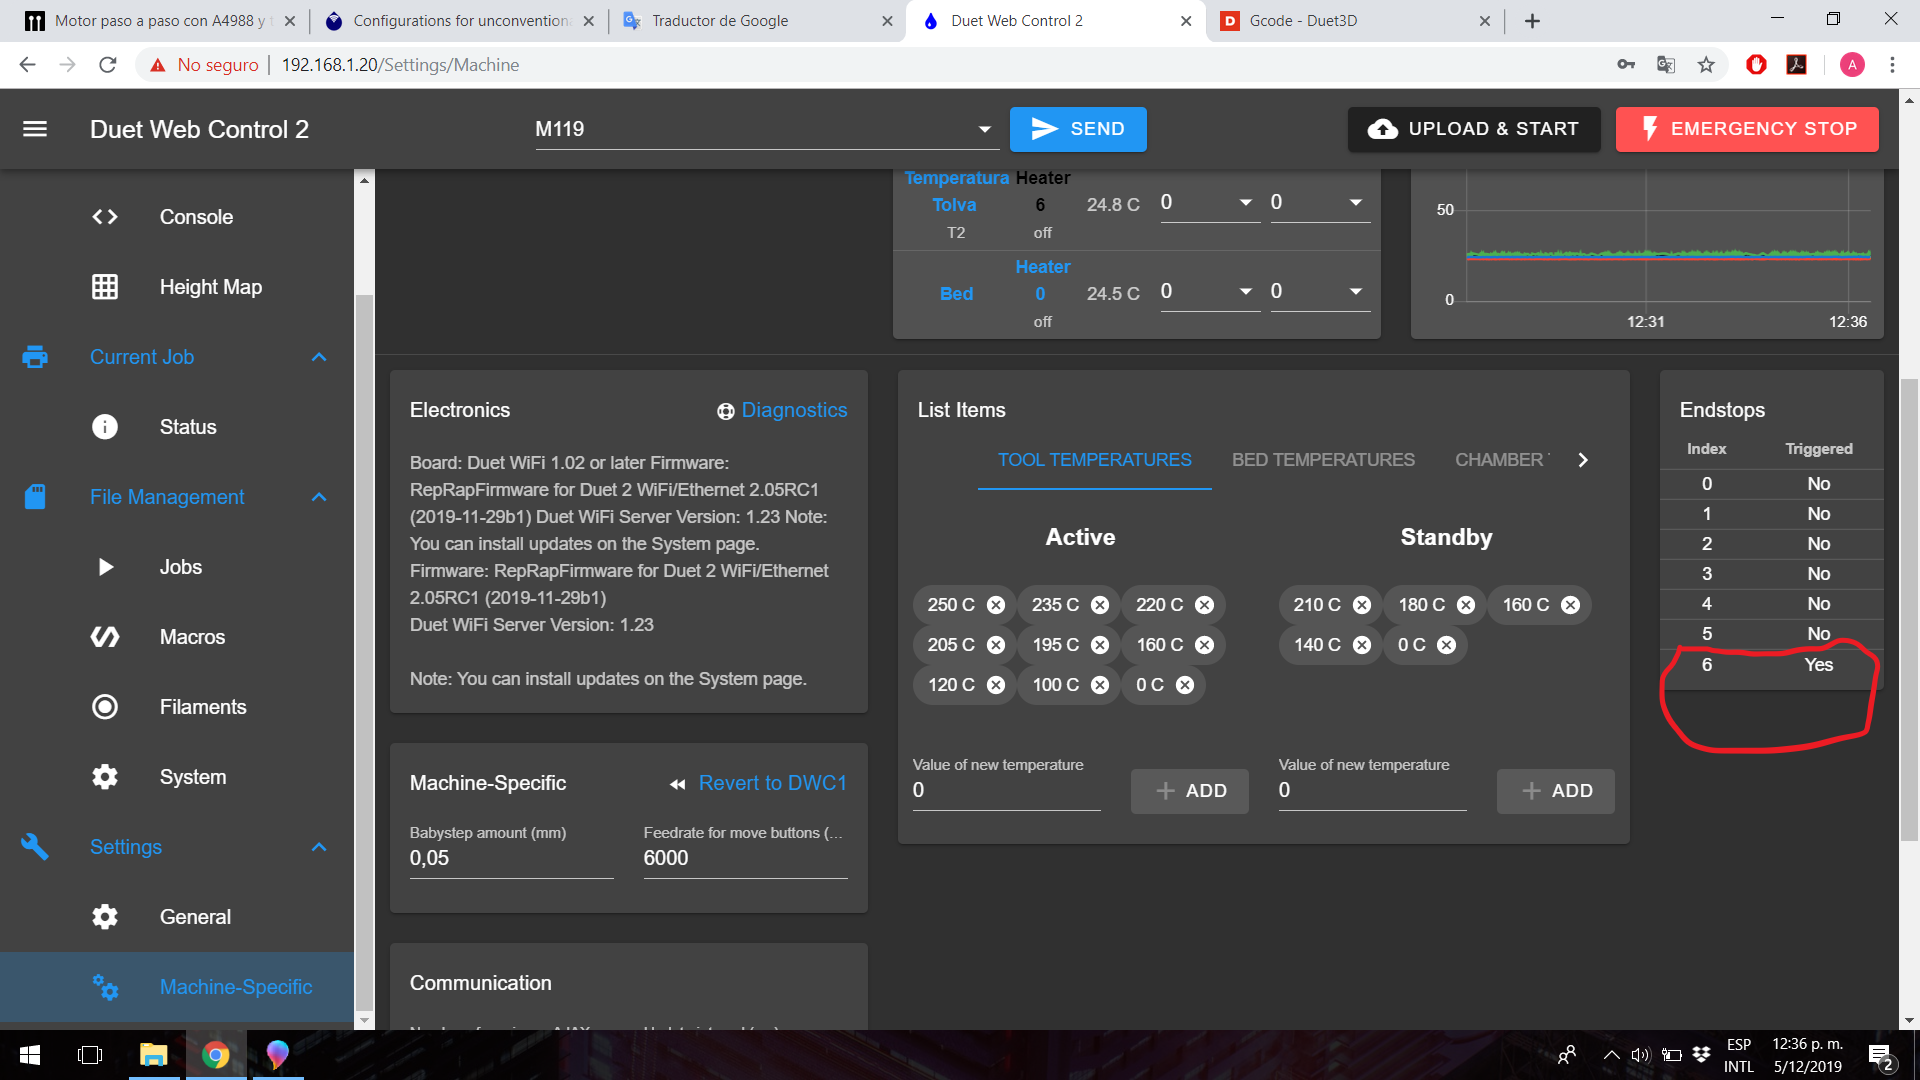
according to me I don't have a probe, but an activated one appears in the interface
It seems that the M80 command is generating a problem, after turning it off and on (M80) it stays in a state where it cannot be used, the same happens if it is sent from the console, it stays charging and does not receive any other command .
-
There is a known incompatibility between RRF 2.05RC1 and DWC2. Either revert to DWC 1.22.6, or revert to RRF 2.03, until RRF 2.05RC2 us released (hopefully tomorrow).