Confirmation of setup please!
-
Hey all,
I've done my best with configuring my machine, but I'm just not able to get things to stick. I'm unsure if everything is configured correctly, I've poured over the docs and articles, but there seems to be a number of ways to approach just about everything, so it makes for a hodgepodge of code.
I'm hoping someone can go over my configuration and see if I missed a beat somewhere. Here are my current stats as I think you'd need to know
Type of build : BLV Mod from scratch
Controller : Duet Wifi
Stepper Motors : Nema 17 Stepper Motor X 5
( https://www.amazon.com/gp/product/B06XSYP24P/ref=ppx_yo_dt_b_search_asin_title?ie=UTF8&psc=1)
Power Supply : eTopxizu 12v 30a Dc Universal Regulated Switching Power
https://www.amazon.com/gp/product/B00D7CWSCG/ref=ppx_yo_dt_b_search_asin_title?ie=UTF8&psc=1
Build Plate : 220 x 220 heated with mirror for surface, only alcohol based cleaner used.
Hot End : E3D V6 (original)
BL Touch (Original)
Bowden ConfigurationDual Z configuration for Z steppers
Physical dimensions available upon request.
Here's the code as it currently stands;
; bed.g
; Called using G32
; Called to perform True Autolevel using 3-point probe
;
M561 ; clear any bed transform
G29 S2; Clear bed height map
; Probe 3-point
M401 ; Deploy probe - deployprobe.g
G30 P0 X210 Y0 Z-9999 ; Front Right
G30 P1 X0 Y0 Z-9999 ; Front Left
G30 P2 X105 Y210 Z-9999 S2 ; Center Rear
M402 ; Retract Probe - retractprobe.g; Configuration file for Duet WiFi (firmware version 1.21)
; executed by the firmware on start-up
;
; generated by RepRapFirmware Configuration Tool v2 on Fri May 24 2019 20:44:40 GMT-0500 (Central Daylight Time); General preferences
G90 ; Send absolute coordinates...
M83 ; ...but relative extruder moves; Network
M550 P"3DPrinter" ; Set machine name
M552 S1 ; Enable network
M586 P0 S1 ; Enable HTTP
M586 P1 S0 ; Disable FTP
M586 P2 S0 ; Disable Telnet; Drives
M569 P0 S0 ; Physical drive 0 goes Backwards
M569 P1 S0 ; Physical drive 1 goes Backwards
M569 P2 S1 ; Physical drive 2 goes forwards
M569 P3 S0 ; Physical drive 3 goes forwardsM584 X0 Y1 Z2:4 E3; two Z motors connected to driver outputs Z and E1
M671 X-81.5:291.5 Y110:110 S2; leadscrews at left (connected to Z) and right (connected to E1) of X X Value = Leadscrew left distance to nozzle and then right distance to nozzle and leadscrewM350 X16 Y16 Z16 E16 I1 ; Configure microstepping with interpolation
M92 X99.9 Y100.1 Z399.6183 E120 ; Set steps per mm
M566 X900.00 Y900.00 Z12.00 E110.00 ; Set maximum instantaneous speed changes (mm/min)
M203 X6000.00 Y6000.00 Z4000.00 E1200.00 ; Set maximum speeds (mm/min)
M201 X500.00 Y500.00 Z20.00 E250.00 ; Set accelerations (mm/s^2)
M906 X1100.00 Y1100.00 Z1100.00 E1100.00 I30 ; Set motor currents (mA) and motor idle factor in per cent
M84 S30 ; Set idle timeout; Axis Limits
M208 X0 Y0 Z0 S1 ; Set axis minima
M208 X210 Y210 Z200 S0 ; Set axis maxima;New Settings
M208 X0:210 Y0:210 ; X carriage moves from 0 to 210, Y bed goes from 0 to 210; Endstops
M574 X1 Y1 S1 ; Set active high endstops; Z-Probe
M574 Z1 S2 ; Set endstops controlled by probe
M307 H3 A-1 C-1 D-1 ; Disable heater on PWM channel for BLTouch
M558 P9 H5 F500 T4000 X0 Y0 Z1 ; Set Z probe type to bltouch and the dive height + speeds (F100 T2000 original settings)
G31 P25 X34.82 Y-8 Z0.175 ; Set Z probe trigger value, offset and trigger height
M557 X0:210 Y15:210 S52.5 ; Define mesh grid; Heaters
M305 P0 T100000 B4138 R4700 ; Set thermistor + ADC parameters for heater 0
M143 H0 S120 ; Set temperature limit for heater 0 to 120C
M305 P1 T100000 B4725 C7.060000e-8 R4700 ; Set thermistor + ADC parameters for heater 1
M143 H1 S280 ; Set temperature limit for heater 1 to 280C; Fans
M106 P0 S0 I0 F500 H T45 ; Set fan 0 value, PWM signal inversion and frequency. Thermostatic control is turned on
M106 P1 S1 I0 F500 H1 T45 ; Set fan 1 value, PWM signal inversion and frequency. Thermostatic control is turned on; Tools
M563 P0 D0 H1 ; Define tool 0
G10 P0 X0 Y0 Z0 ; Set tool 0 axis offsets
G10 P0 R0 S0 ; Set initial tool 0 active and standby temperatures to 0C; Automatic saving after power loss is not enabled
; Custom settings are not configured
; Miscellaneous
M501 ; Load saved parameters from non-volatile memory; deployprobe.g
; called to deploy a physical Z probe
;
; generated by RepRapFirmware Configuration Tool v2 on Fri May 24 2019 20:44:40 GMT-0500 (Central Daylight Time)
M280 P3 S10 I1; retractprobe.g
; called to retract a physical Z probe
;
; generated by RepRapFirmware Configuration Tool v2 on Fri May 24 2019 20:44:40 GMT-0500 (Central Daylight Time)
M280 P3 S90 I1 -
@hbrownell Please send M115 to the Duet, and post the response. This will show the firmware version you are on, and we'll be able to tailor any specific information to that. It looks like you're on RepRapFirmware 2, so if you aren't already, update to RRF 2.05 and the latest DWC:
https://github.com/dc42/RepRapFirmware/releases/tag/2.05
https://github.com/chrishamm/DuetWebControl/releases/tag/2.0.7I thought the BLV was a CoreXY? You don't have any command in your config.g to make it so! See https://duet3d.dozuki.com/Wiki/Gcode?revisionid=HEAD#Section_M669_Set_kinematics_type_and_kinematics_parameters
In your 'Drives' section, you're missing a M569 command, as you're using driver 4 (E1) for Z. Add
M569 P4 S1 ; Physical drive 4 goes forwardsand test it turns the right way.I'd tend to use the calculated values for M92, ie
M92 X100 Y100 Z400 E120and use M579 scaling https://duet3d.dozuki.com/Wiki/Gcode?revisionid=HEAD#Section_M579_Scale_Cartesian_axesFor prints to stick, you need two things; the right temperature, and the hot end the correct distance from the bed. To accurately set the temperature, you need to have the thermistors set correctly. It looks like you've set the hot end thermistor with
M305 P1 T100000 B4725 C7.060000e-8 R4700, but the bed thermistor is using the RRF config tool default:M305 P0 T100000 B4138 R4700. Ideally, you need to find the specification of your bed thermistor to set this correctly, so you can get accurate temperatures.To get the nozzle the right height for the first layer, you need the probe set up correctly, and either have confidence that your bed is parallel to the plane the nozzle moves in, or use some kind of bed compensation. This is reliant on the probe. In your config,g:
M574 Z1 S2 ; Set endstops controlled by probeChange this toM574 Z0 ; Set endstops controlled by probe
M558 P9 H5 F500 T4000 X0 Y0 Z1Remove X, Y and Z parameters (deprecated)
As you have BLTouch, if you're having problems, see the following: https://duet3d.dozuki.com/Wiki/BLTouch_Troubleshooting
If you're using RRF 2.05, you shouldn't need M401 and M402 commands in homing and bed macros, as the firmware knows it's a BLTouch withM558 P9.
Set Z height in G31 by following https://duet3d.dozuki.com/Wiki/Test_and_calibrate_the_Z_probe
Once you have confidence your probe is working correctly, run a bed mesh with G29 https://duet3d.dozuki.com/Wiki/Gcode?revisionid=HEAD#Section_G29_Mesh_bed_probe
As you have independent Z leadscrews, you can level the bed, at least in one direction; see: https://duet3d.dozuki.com/Wiki/Bed_levelling_using_multiple_independent_Z_motorsI'm sure I've missed some stuff, but hope that helps!
Ian
-
I did't get a notice that you responded so sorry for my delayed response. Here is my current rig
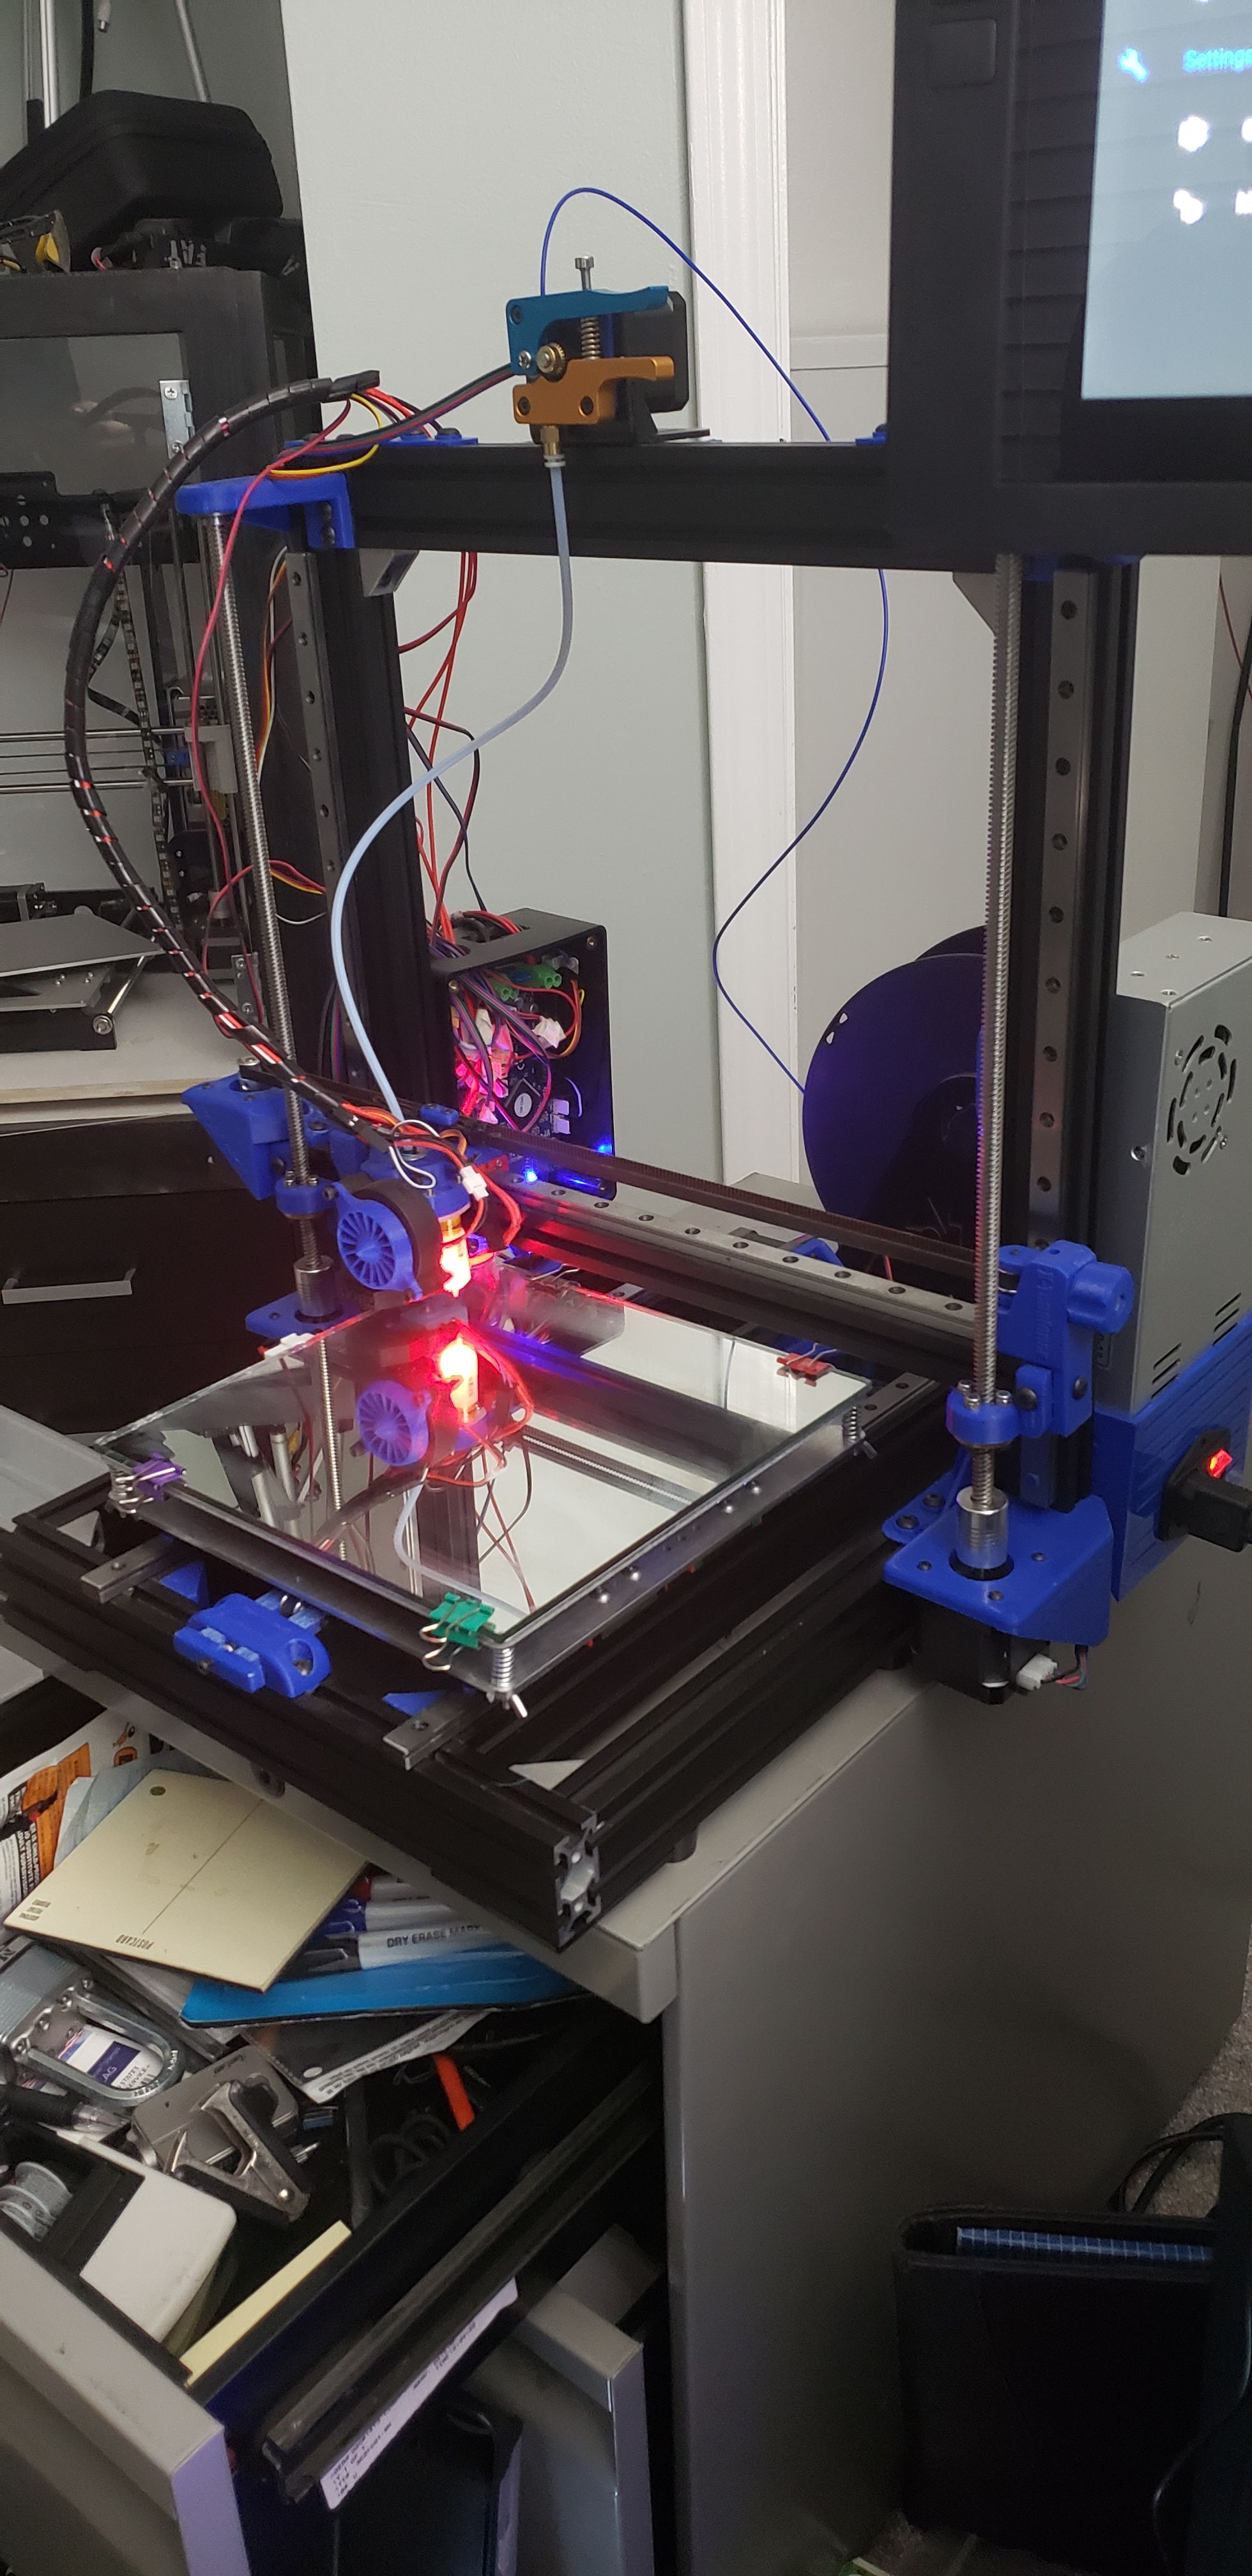
It's in a state of dissaray until I get the issues sorted then I'll clean it all up.M115
FIRMWARE_NAME: RepRapFirmware for Duet 2 WiFi/Ethernet FIRMWARE_VERSION: 2.05 ELECTRONICS: Duet WiFi 1.02 or later FIRMWARE_DATE: 2019-12-13b1So, even though I am getting 100mm movement currently on my axis, you're saying I should switch to the M579 and scale it there? Just curious, why would you want to do it that way? (I'm not against it, just don't understand the difference)
This is the bed I have on there;
https://www.amazon.com/gp/product/B07B21CBYL/ref=ppx_yo_dt_b_search_asin_title?ie=UTF8&psc=1My original goal was to take my A8 and replace the frame, but then wound up being an entirely new build.
After making some changes, I notice that my graph doesn't seem to work anymore. My numbers show in the tool and hot bed area, but the graph is stagnant.for the BL Touch, If I'm having problems, I don't know it lol. I'm just throwing numbers at it that people tell me and hoping something starts to work. The machine itself seems to do what I ask it to, sans actually printing. I'll make your suggested changes this weekend if I hear back from you regarding my questions and any additional notes you may have.
I set up my Dual Z using that article and this one as well,
https://betrue3d.dk/bltouch-on-duet-wifi-configuratio-and-usage/?fbclid=IwAR0zviIZtiONLHmPA3edkyk6x4cVK8oN21BnGs7I2pCvMi8D2E7TpzfTZ04#multizmotorI'm still not understanding where the dual Z gets taken into account and how to properly utilize it (like, what is the code that initializes it from the STL?)
Ian, I appreciate the input, thank you so much!
Henri
Thank you!!
-
@hbrownell said in Confirmation of setup please!:
I'm still not understanding where the dual Z gets taken into account and how to properly utilize it (like, what is the code that initializes it
Typically you'd have bed.g configured to do the probing and leveling and then that would get called in your start gcode with G32 (G32 calls bed.g) or you could have it as part of the homez.g or homeall.g macro so that it gets run with G28.
-
I have my bed.g file listed above in the code, does that look right?
So, when I start my rig, I should run G32 then add G28 with the stl file?
-
@hbrownell said in Confirmation of setup please!:
have my bed.g file listed above in the code, does that look right?
Well no, that looks like you're doing a 3 point plane form of bed correction.
See the example here that shows two points close to the lead screws being sampled to adjust for the tilt: https://duet3d.dozuki.com/Wiki/Bed_levelling_using_multiple_independent_Z_motors
Each motor must be controlled by its own driver. The positions of the lead screw need to be noted in config.g, and your X gantry must have enough play in it to allow for some independent adjustment.
@hbrownell said in Confirmation of setup please!:
So, when I start my rig, I should run G32 then add G28 with the stl file?
the sequence would be something like G28, G32, G28 again. The first one homes all your axis so you can move them safely. The G32 would correct for any tilt of the X gantry, and then home the axis again because the geometry has potentially changed from the tilt correction. At this point you could run a G29 to map the surface of the bed. Or if you already have a map saved, load it with G29 S1 and start your print.