Print quality issue
-
@OBELIKS I can't get that link to work. Private group or broken link?
-
@OBELIKS thanks for the input.
As DocTrucker, the link seems broken for me aswell.
Although i just set up a Cura profile, my initial results are not something spectacular but i guess i have to further tune the profile. I will update on this one again as soon as i have a more complete profile.
-
Ah yes, private group for Prusa printers.
Some of the prints that are there:
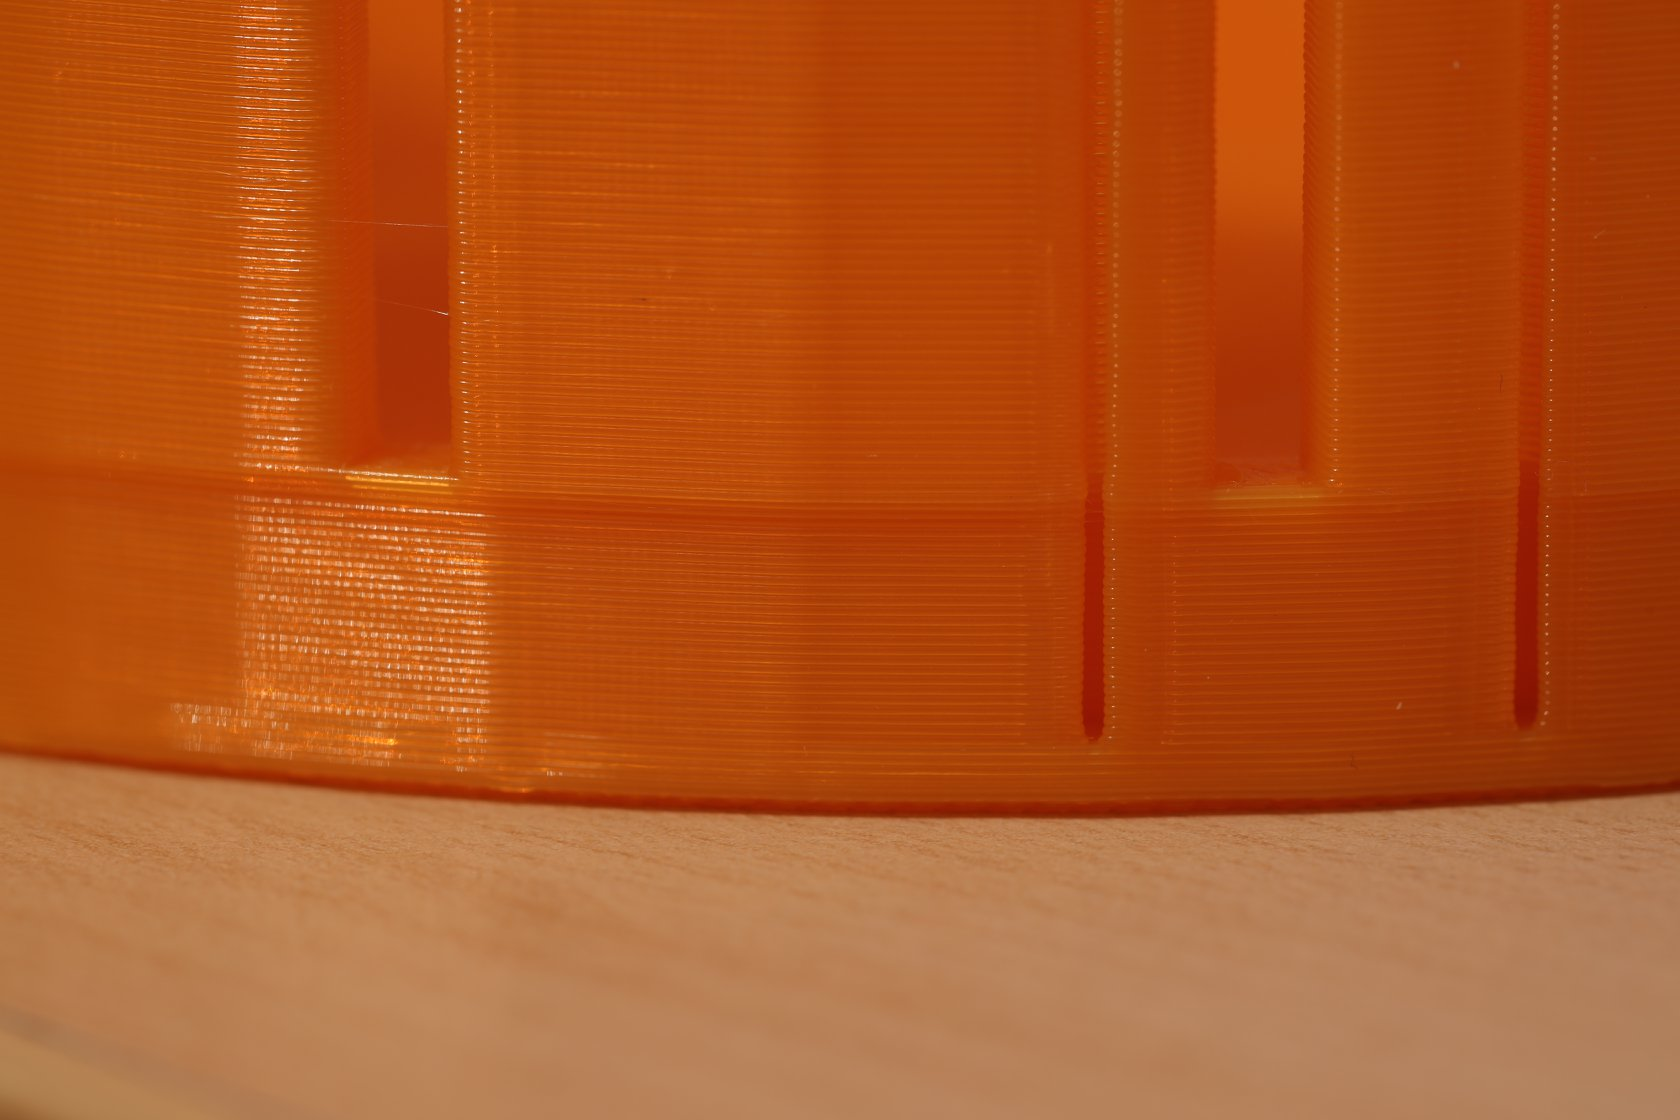
While it could be unrelated, it's a good idea to first check a different slicer. -
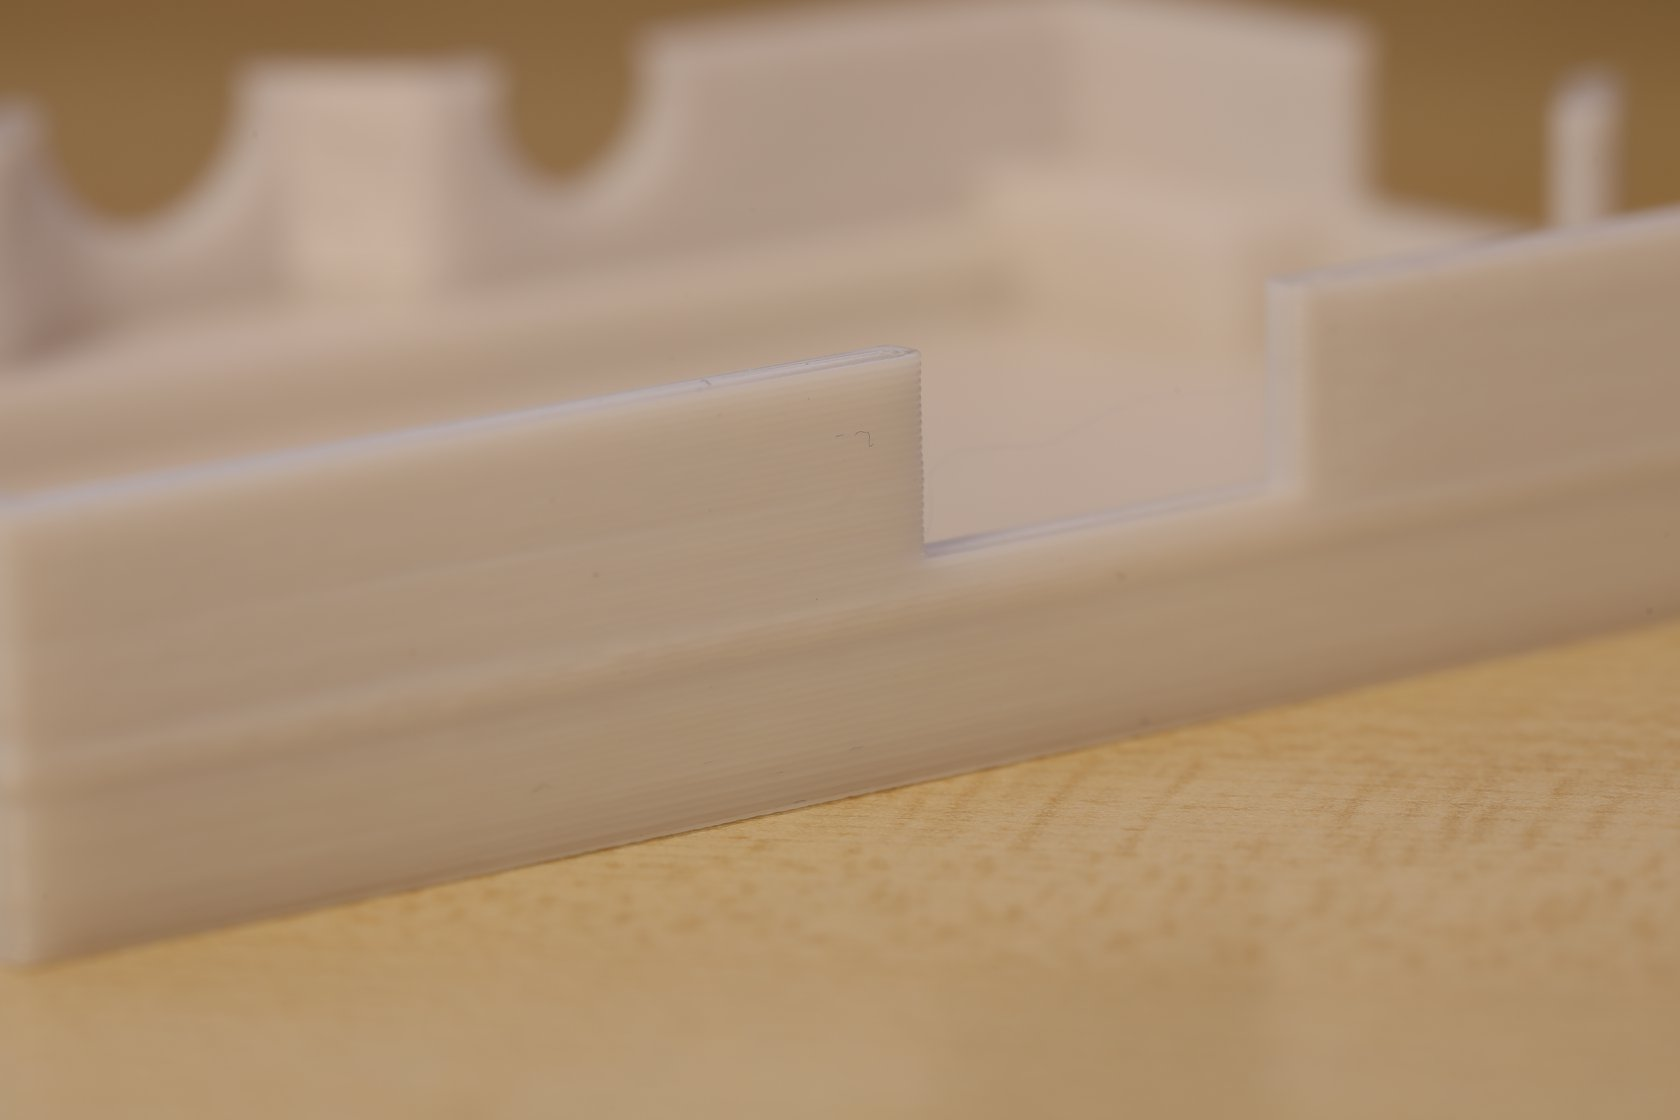
Especially if the issue is present when you transition from a solid infill/top layer to empty space as it is seen on last picture.
-
@OBELIKS thanks for the pictures! Yes this seems to be for sure part of the reason of my quality problems. I will be a bit more persistent with my Cura profile to see if the cura engine avoids this issue.
I upgrade this weekend my Z in dual leadscrew and that left no more time to experiment further. In my case i believe it is a combination of my belts being not perpendicular in the Y axis, the slicer issue that you mention and (maybe) 1 suspicious pulley. I will update with results on this thread as soon as i have redesigned the belt clamps and i have a complete cura profile.
-
@OBELIKS said in Print quality issue:
First try a different slicer. It could be this https://m.facebook.com/groups/675831176090951?view=permalink&id=1183905701950160
Since we can't see the link what is the cause of the bulges?
-
I don't know if the real problem was already discovered and fixed, but here is the "official" reply from one of the developers (Vojtech Bubnik):
There are multiple effects in play, therefore some of your prints may show a different effect than the prints from the others. Ideally we would compare apples to apples, we would work with Slic3r's 3MF files that contain all the modifiers and parameters, so we can keep track of most of the variables in play.
First, the Slic3r's logic to extend the solid infill is there to anchor the solid top infill into the sparse infill. The logic is sound, but it has its drawbacks as you guys found out, it consumes material , it adds to the print time, and currently it is not configurable in Slic3r. Cura and S3D just do not extend the infill, thus you may see gaps at the bottom of your boxes as you already have found out as well. In the future versions of Slic3r, we may make the extension into the solid infill configurable.
In addition, Slic3r applies perimeter-infill overlap to close some of the gaps between the solid infill and inner perimeters, which it may have a negative effect on the accuracy of the outer wall. You may try to decrease the overlap number with the risk of getting some gaps in solid infill, the config parameter is available to you.
Then there is sometimes an effect of thin walls being extruded with just perimeters with no infill, and it may happen, that the wall thickness is not an integer multiple of the extrusion width (this is again a bit complicated by the fact, that Slic3r calculates the wall width as the tangent width giving the "corrugated iron sheet" surface of printed vertical walls, you will find a "recommended object thin wall thickness" hint at the Print Settings -> Layers and perimeters page for a given integer number of perimeters), so Slic3r will produce some overlap of the inner most perimeters to fill in the space completely, if the "Detect thin walls" feature is disabled. If you enable the "Detect thin walls", then Slic3r will fill in the remainder inside the inner most perimeter with a single line. Unfortunately the "Detect thin walls" feature currently may produce some unwanted single line extrusions at sharp protrusions of a model, therefore we have it disabled by default in our profiles. In the future, we will split the "Detect thin walls" to "Thin walls inside / Thin walls inside and outside" the way it has been done recently in S3D. By the way, S3D's recent implementation most likely copied from the initial gap fill algorithm implemented some 3 years ago in the original Slic3r, as it manifests the same behavior including the negative artifacts (read bugs).
Lastly, it is the physics as others noted. Plastics, if extruded first from pellets into a filament, and then from filament into a very thin rectangular extrusion, will behave neither as a liquid, nor as a solid. The stretching of the plastic will align the long molecular chains of the polymer, introducing internal stresses to the extrusion. This internal stress will pull the extrusion together if not cooled quickly enough. Indeed, as many of you found out, in a cool basement the effects are more pronounced, also on my MK2 the 3D Benchy has the line more pronounced at the side away from the cooling fan.
So, it is "just" physics, and it will be very difficult to compensate for the internal stresses and cooling effects of the filament IMHO, one of the reasons being the viscoelastic behavior of the molten plastics, and the dependence of the plastic behavior on its composition, temperature, hydrolisis of the polymer molecular chains if the filament is not 100% dry (polyesters - PLA & PET are sensitive to hydrolisis, hydrolised filament contains shorter polymer chains, thus being less viscous), effectivity of the cooling, reflections of the cooling air from the already printed objects etc.
-
@Dkos it's a longshot. Can you try to slice again as you did and then export to .obj and open that in Blender. It will probably not show anything out of order, but still worth a shot.
-
@OBELIKS Sorry for the delayed answer, i needed to find some free time to work on the printer.
Thanks for the blender idea, i did it and the layers seemed perfectly aligned in blender.
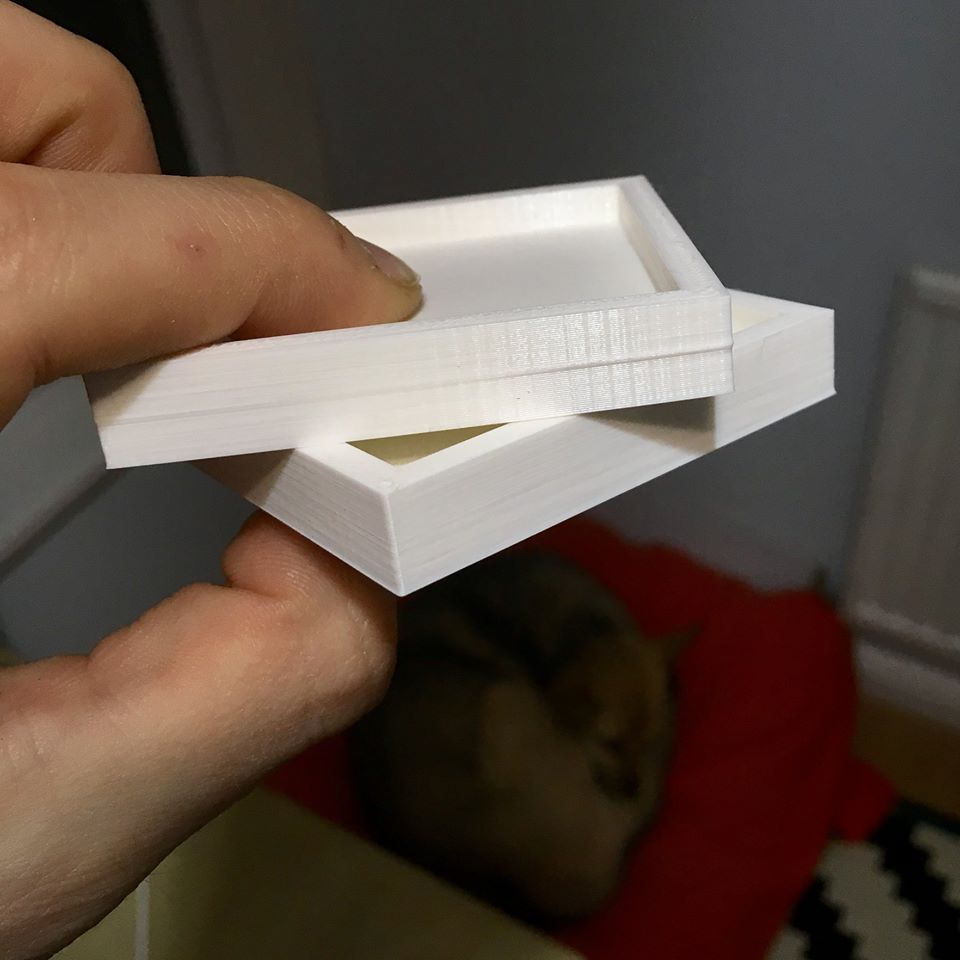
So I moved on, and created a Cura profile, which is kind of tuned at the moment. The issue is not completely eliminated using Cura engine, but playing with the settings a bit did decrease it.
Edit: language corrections..
-
So.. in order to fight the issues one by one. I did a kind of "dirty" redesign of the belt clamps in order to make the belts parallel, which did improve the situation:

I did the Z upgrade. Initially i went with 1 motor with a closed loop belt and pulleys/idlers but after a lot of tweaking to trying to make a faint Z wobble disappear, i failed and converted to 2 motors on Z with independent drivers.

Now, either i came upon a new issue, or one that was underlying here the whole time.
My X axis walls, especially the right one is messed up. Y axis is perfect (on which the fan is also blowing directly upon). Printing the cube at 45 deg angle to isolate motor movements seems to produce much better results.
Normal orientation:
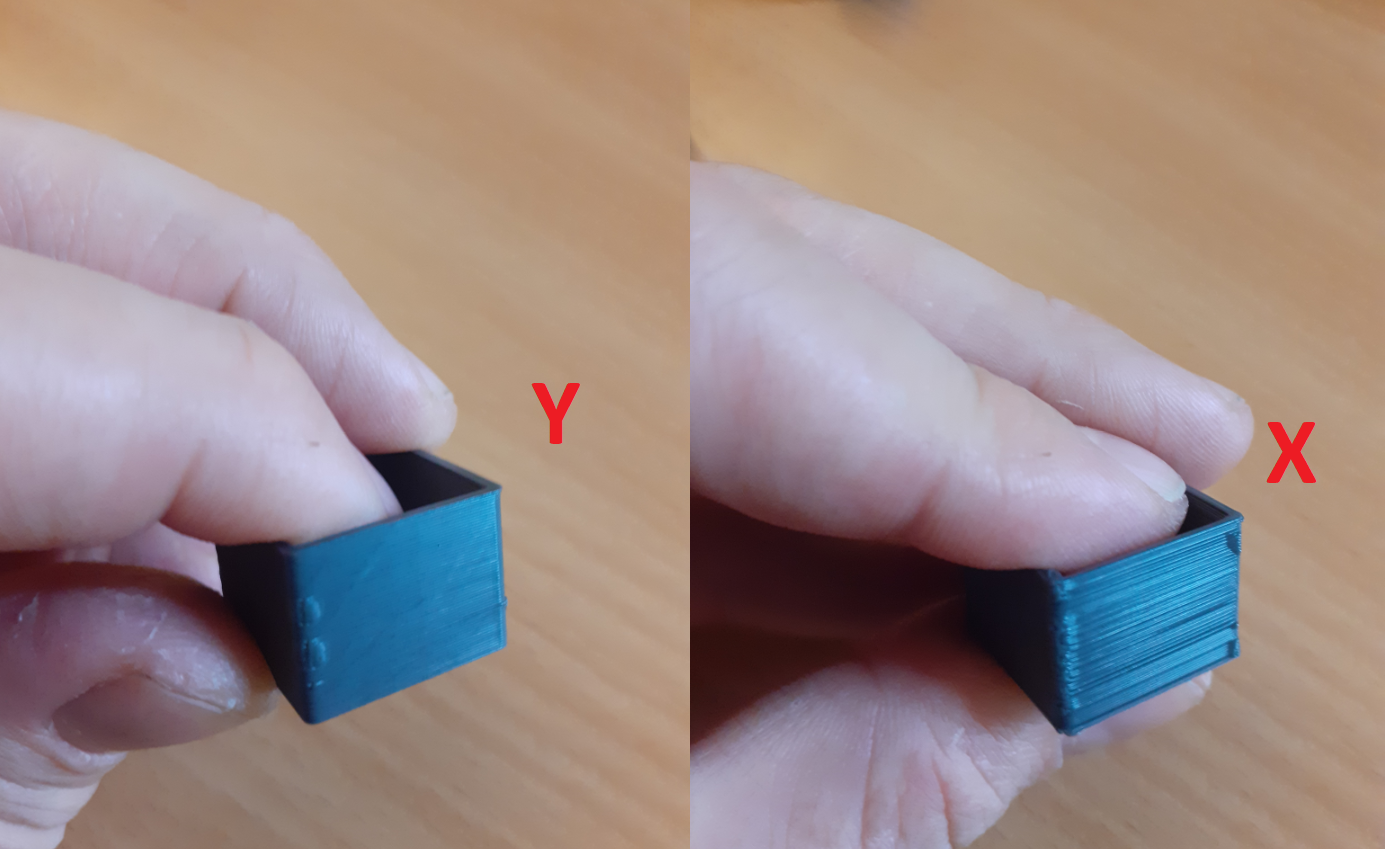
At 45 deg:
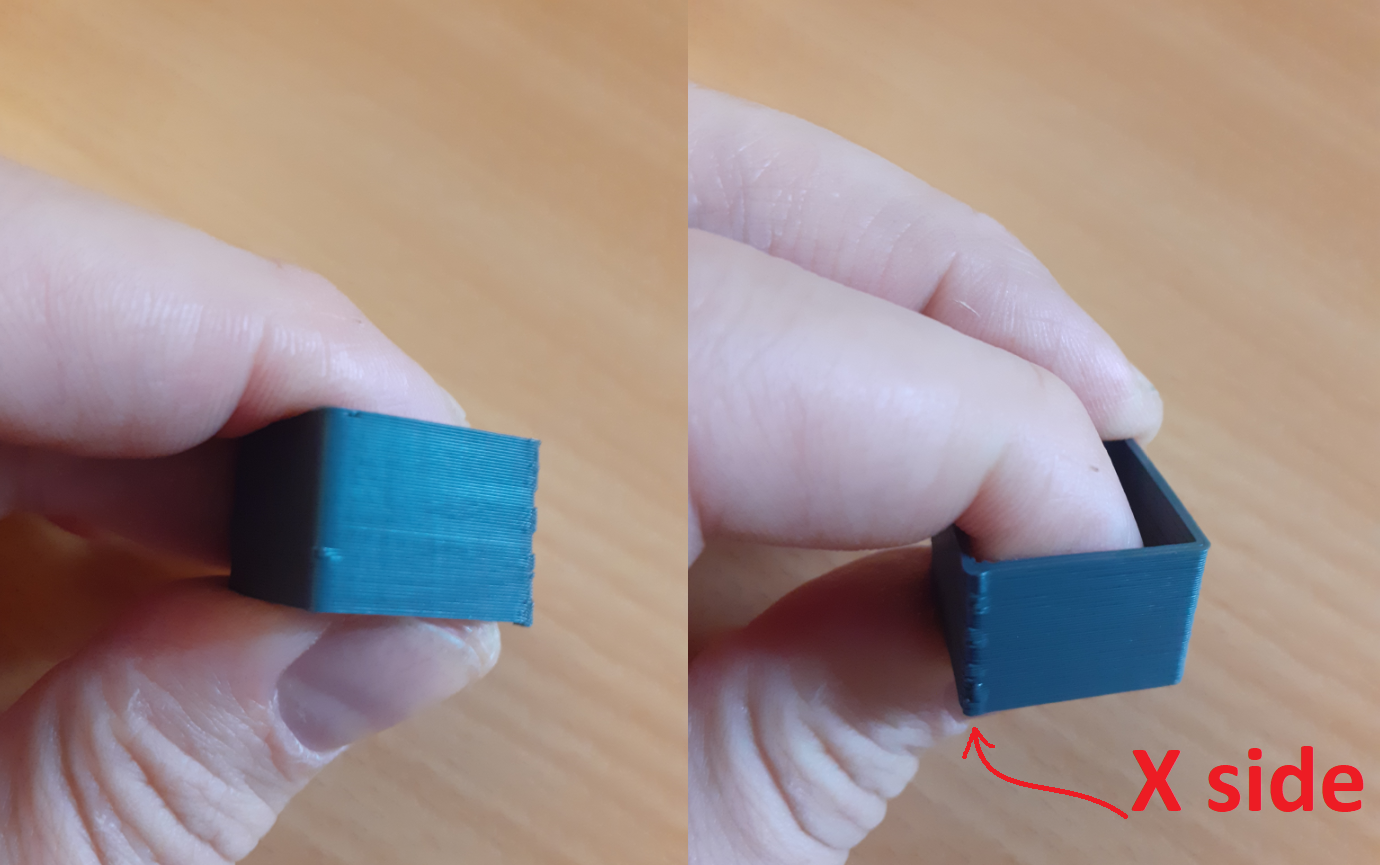
Extruder one-sided cooling:

Does it look like it is related to cooling? Or some kind of backlash when both motors are working towards a move along the X axis?
P.S Ignore the messy wiring, it is temporary. I will fix everything in a nice manner as soon as i move all the electronics at the bottom department
") .
. -
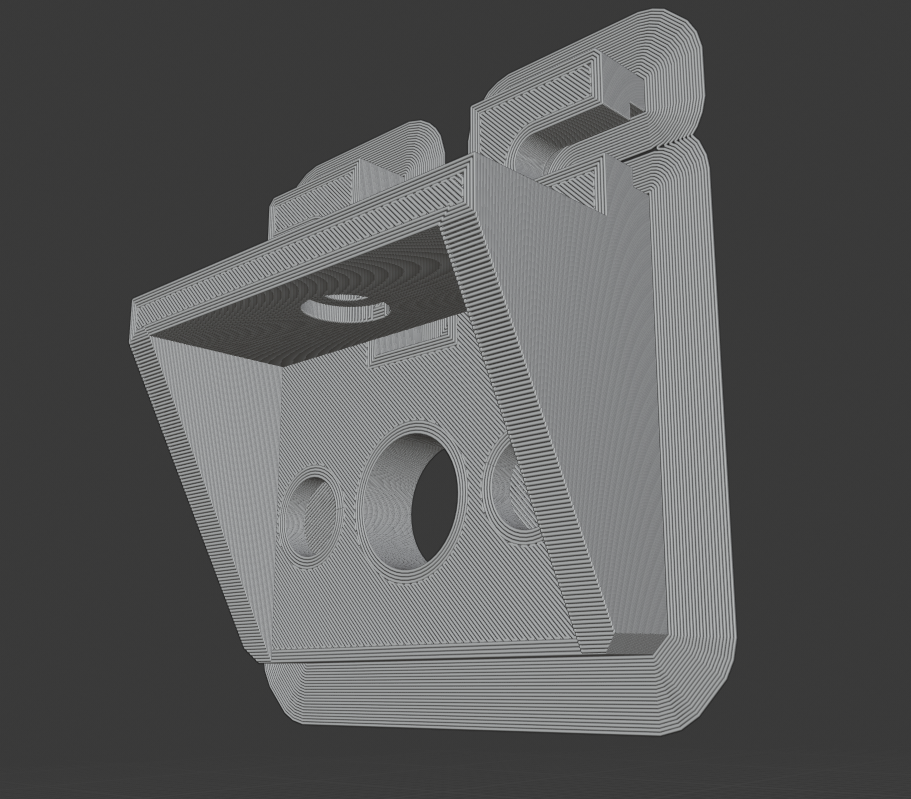
So, I finally solved my issue. The culprits where all these idlers:

These are the typical cheap ones, that had a fair amount of play between the inner 3mm bore and the m3 bolt which is of course less a bit less that 3mm. I did a quick test by replacing them with pairs of F623ZZ (which i was able to tighten all the way without blocking their rotation...) and had a huge quality improvement, so i went ahead and redesigned all the idlers to use F625ZZ to go from 3mm to 5mm shaft, and placed an order for shoulder bolts. That should be considerably stiffer.
That of course as far as the mechanical part is concerned. The slicer related issues might be compensated a fair amount by tweaking the settings, but not entirely disappear.
Thanks for all the ideas!
Edit: forgot to add some samples, not anything complicated but that only prints i have at the moment


-
Cheers for the feedback on the solution. One more item to double check on the machines!
-
WOW
Can you make a picture with M3 bolt in the cheap idler? Is the gap visible? -
Thanks!
@DocTrucker More and more things to keep track of! It may be a good idea to make a maintenance list with all the hardware to be checked in some "fixed" intervals..Now whether that will actually happen in the end or not is another matter

@OBELIKS I will try to see if I can capture it with my phone camera and I ll post back as soon as I get back in the evening!
-
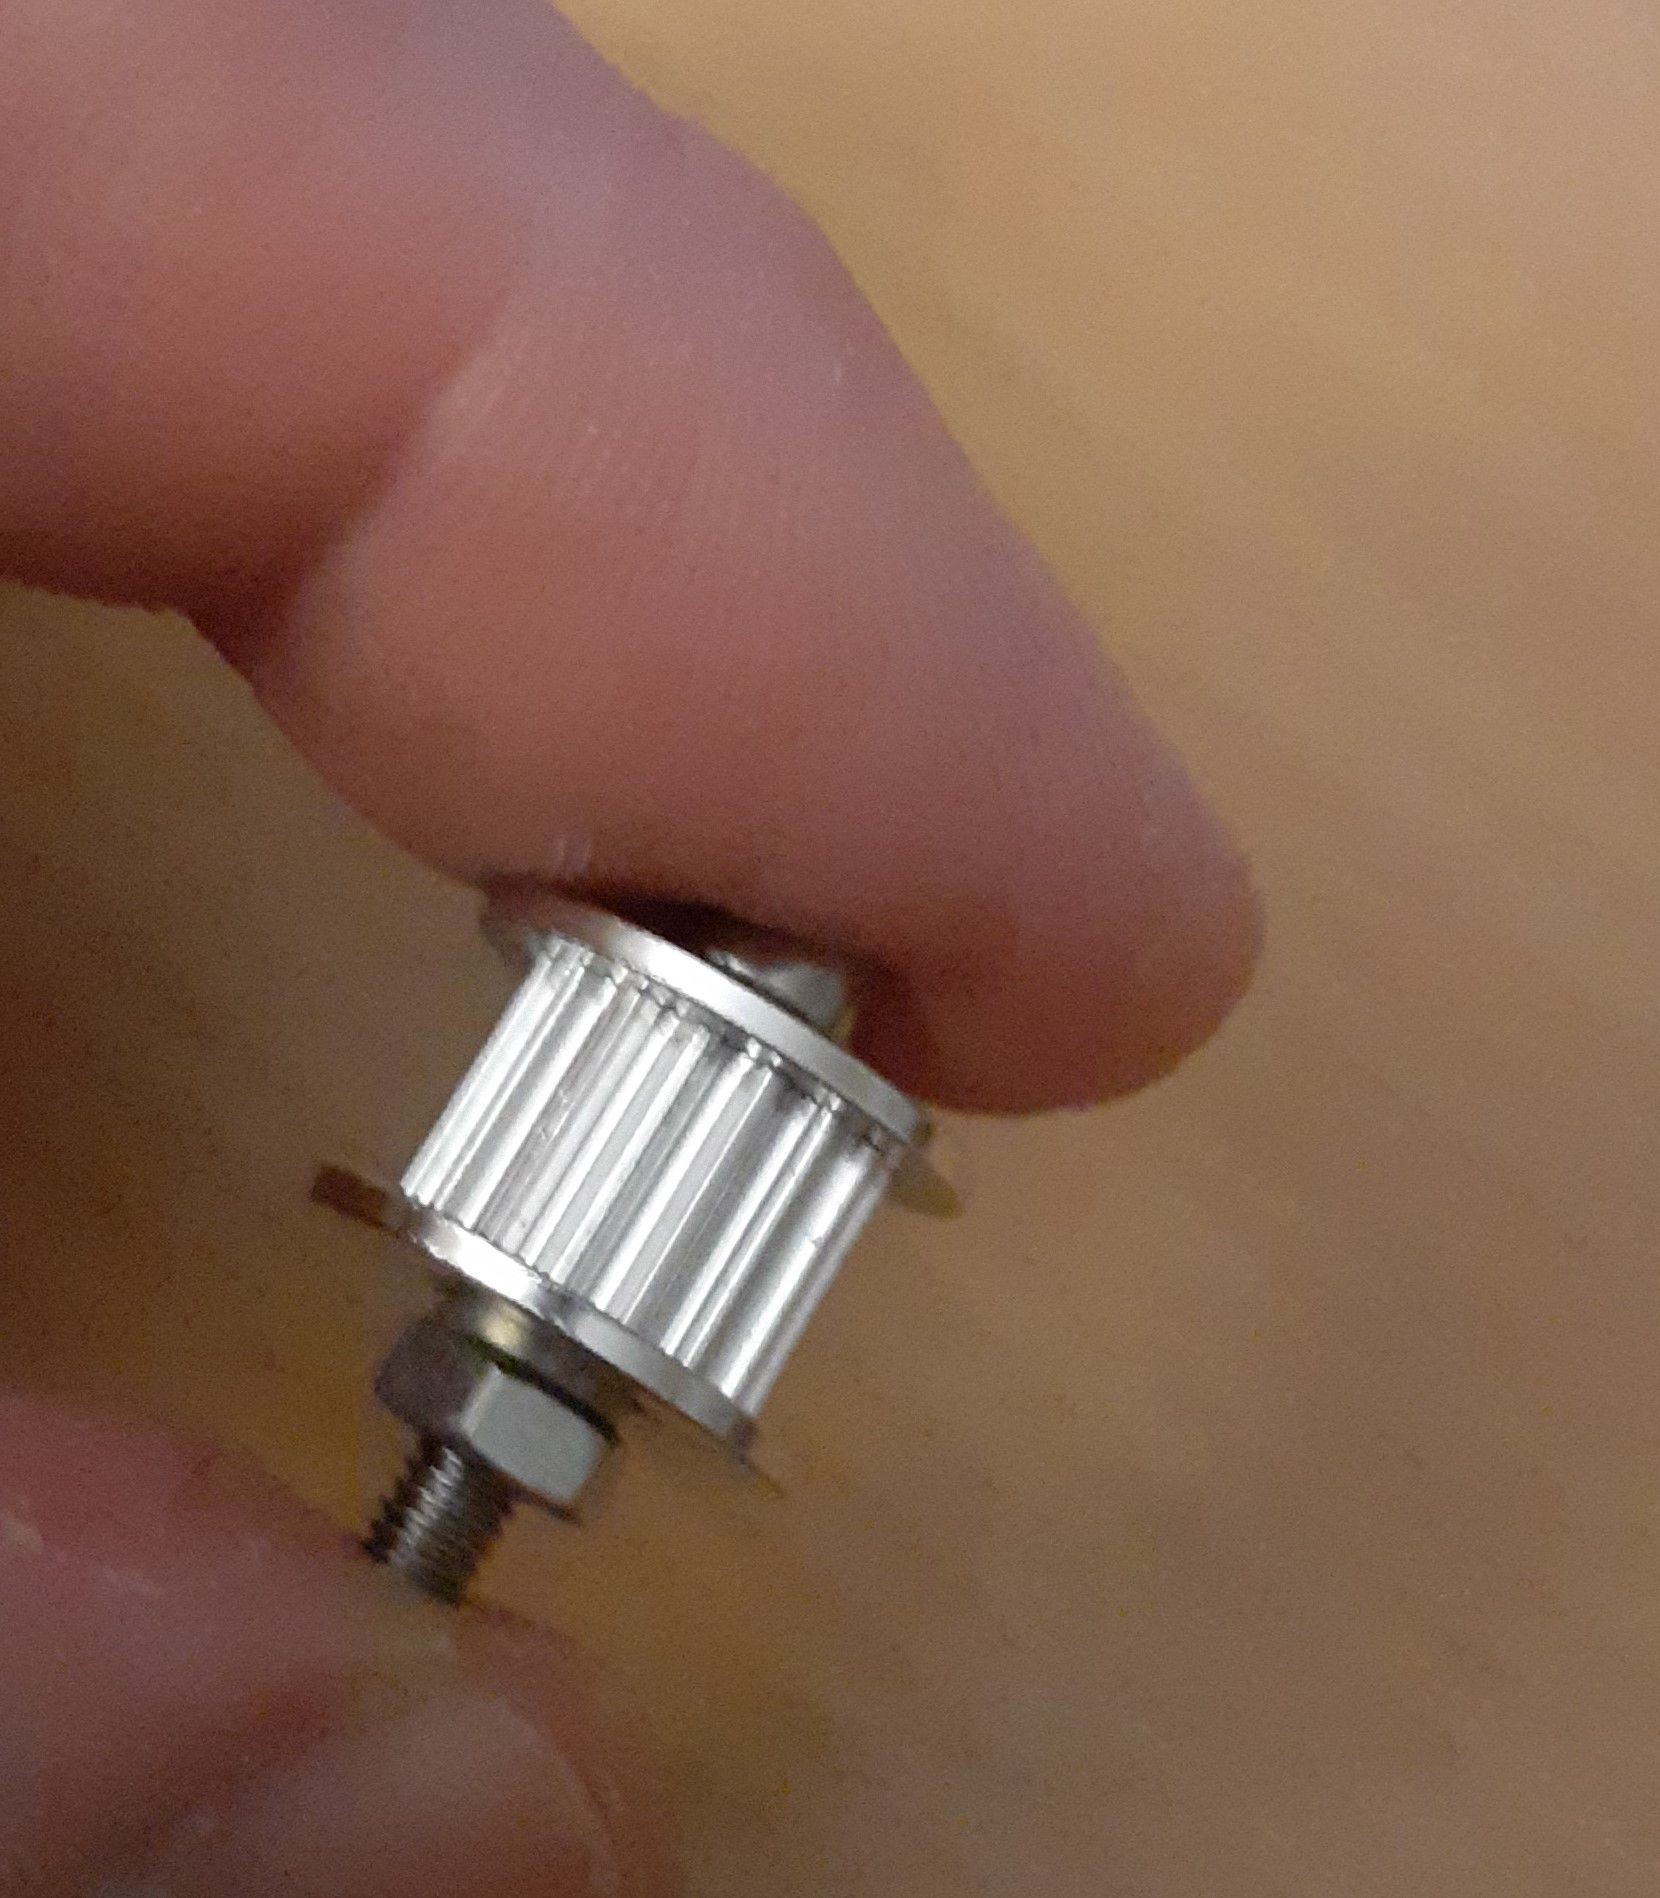
i recently upgrade my idler bolts to these
https://www.filastruder.com/collections/railcore/products/shoulder-screws-bolts?variant=17989603917895
with gates idler -
@Veti These are exactly the type i ordered as well, i am confident that the idlers will be much more robust.
-
@OBELIKS This is as good of an image as i can get using my phone:
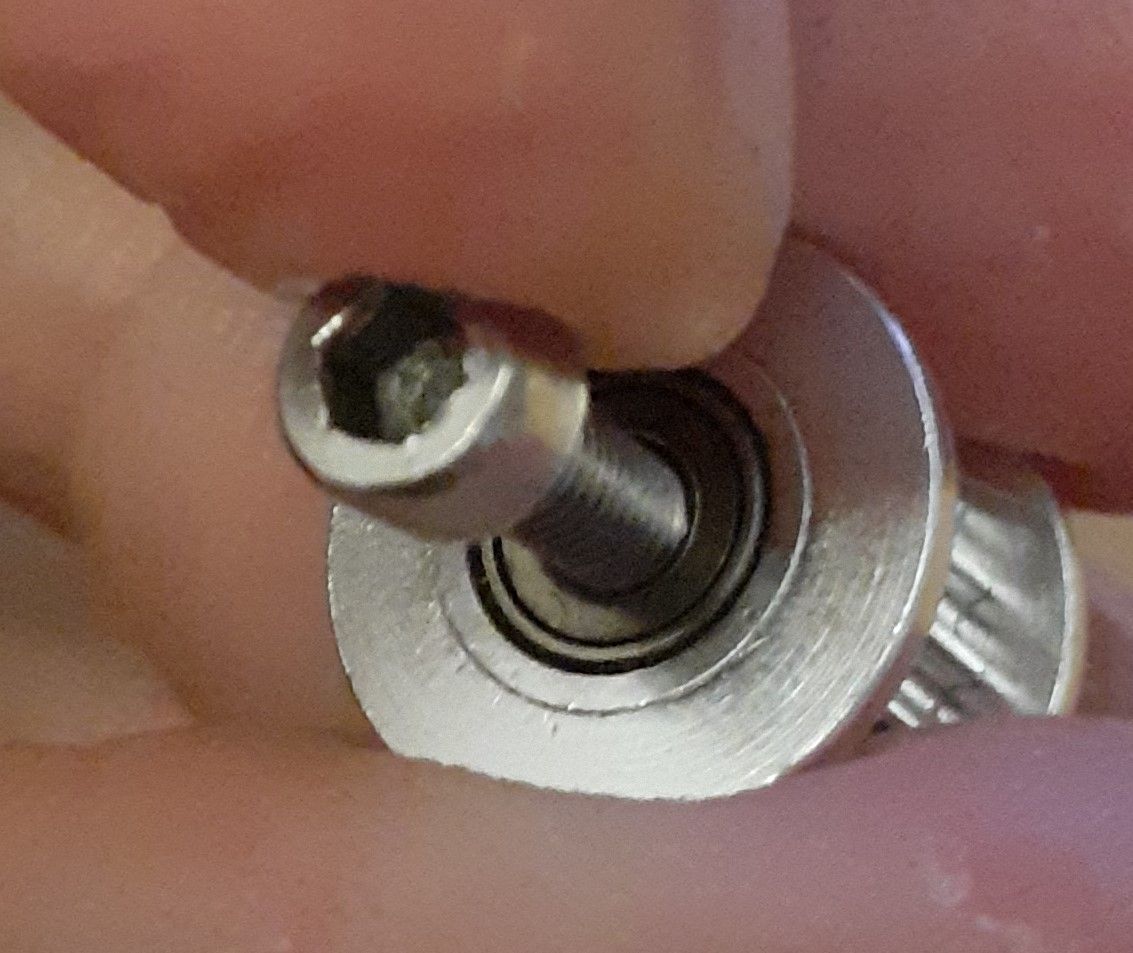
The small gap between the inner bore and the screw was enough to produce a fair amount of play (it is even visible that the screw is not completely perpendicular to the idler the way i am holding it).
The main problem is that I could not tighten up the screw as much as I should because the idler would not be turning anymore. This is no longer an issue using the flanged bearings. Moreover, even if I could screw it all the way, still I would never be sure that it will be totally concentric.
-
@Dkos said in Print quality issue:
The main problem is that I could not tighten up the screw as much as I should because the idler would not be turning anymore.
A washer or short spacer between the bearing and the frame would probably have cured that.
-
@dc42 The way it was setup it had a bit more than a 1mm clearing between the part face and the bearing, something like this:
I tried a washer on the top as well, but it was always blocking at the end.The way i got a bit around that it was to use locknuts and fine tuning until i get the minimum play i could get while still allowing rotation. But i could not remove all the play no matter how much time i spend "fine-tuning" it..
Maybe it was just the batch of my idlers that were bad i dont know..
Edit: "badge" -> "batch"
-
@Dkos You ought to use shoulder bolts. What you are using is what I would call a set screw - one that is fully threaded. A true bolt or shoulder bolt has an unthreaded section which is much better bearing surface than a threaded section. A threaded bolt will always be undersize which is one reason why you have that gap.