How does thermostatic control work?
-
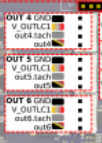
Hello, I have a Duet 6HC with a 12VDC fan. I'm looking to control the fan via PWM to control the nozzle temperature. I know the wiring works because I connect the fan's negative terminal to OUT4 GND and positive terminal to OUT4 V_OUTLC1. The fan spins fine. If I change the pinout to negative terminal to OUT4 GND and positive terminal to out4 and it doesn't spin. I've also tried the same on OUT5 and OUT6. I've also tried changing the PWM Q500 to Q400, Q300, etc... I can't get the thing to spin on OUT4 , OUT5, or OUT6. Can someone please explain to me how the PWM fan control is supposed to work? How does thermostatic control work? What are the pros and cons to thermostatic control?
Here is the fan: https://www.digikey.com/en/products/detail/ys-tech-usa/EYW06015012LL-12/12318104
.

; Fans
M950 F0 C"out4" Q500 ; create fan 0 on pin out4 and set its frequency
M106 P0 S0 H-1 ; set fan 0 value. Thermostatic control is turned off
M950 F1 C"out5" Q500 ; create fan 1 on pin out5 and set its frequency
M106 P1 S1 H1 T45 ; set fan 1 value. Thermostatic control is turned onALL CONFIG FILE
; Configuration file for Duet 3 (firmware version 3.3)
; executed by the firmware on start-up
;
; generated by RepRapFirmware Configuration Tool v3.3.5 on Mon Nov 01 2021 10:47:25 GMT-0400 (Eastern Daylight Time); General preferences
G90 ; send absolute coordinates...
M83 ; ...but relative extruder moves
M550 P"MAMMOTH_NOV_1_2021" ; set printer name;Enable PanelDue Touchscreen
M575 P1 S1 B57600; Network
M552 P0.0.0.0 S1 ; enable network and acquire dynamic address via DHCP
M586 P0 S1 ; enable HTTP
M586 P1 S0 ; disable FTP
M586 P2 S0 ; disable Telnet; Drives
M569 P0.0 S0 ; physical drive 0.0 goes backwards
M569 P0.1 S0 ; physical drive 0.1 goes forwards
M569 P0.2 S1 ; physical drive 0.2 goes forwards
M569 P0.3 S0 ; physical drive 0.3 goes forwards
M584 X0.0 Y0.1 Z0.2 E0.3 ; set drive mapping
M350 X16 Y16 Z16 E16 I1 ; configure microstepping with interpolation
M92 X80.00 Y80.00 Z320.00 E300.00 ; set steps per mm
M566 X900.00 Y900.00 Z160.00 E120.00 ; set maximum instantaneous speed changes (mm/min)
M203 X12000.00 Y12000.00 Z1000.00 E3000.00 ; set maximum speeds (mm/min)
M201 X50.00 Y50.00 Z50.00 E150.00 ; set accelerations (mm/s^2)
M906 X2000 Y2000 Z2000 E2800 I30 ; set motor currents (mA) and motor idle factor in per cent
M84 S30 ; Set idle timeout; Axis Limits
M208 X0 Y0 Z0 S1 ; set axis minima
M208 X1060 Y560 Z400 S0 ; set axis maxima; Endstops
M574 X1 S1 P"io1.in" ; configure switch-type (e.g. microswitch) endstop for low end on X via pin io1.in
M574 Y1 S1 P"io2.in" ; configure switch-type (e.g. microswitch) endstop for low end on Y via pin io2.in
M574 Z1 S1 P"io3.in" ; configure switch-type (e.g. microswitch) endstop for low end on Z via pin io3.in; Z-Probe
M558 P0 H1 F120 T6000 ; disable Z probe but set dive height, probe speed and travel speed
M557 X15:215 Y15:195 S20 ; define mesh grid; Heaters
M308 S0 P"temp0" Y"thermistor" T100000 B4138 ; configure sensor 0 as thermistor on pin temp0
M950 H0 C"out0" T0 ; create bed heater output on out0 and map it to sensor 0
M307 H0 B0 S1.00 ; disable bang-bang mode for the bed heater and set PWM limit
M140 H0 ; map heated bed to heater 0
M143 H0 S280 ; set temperature limit for heater 0 to 120C
M308 S1 P"temp1" Y"thermistor" T100000 B4138 ; configure sensor 1 as thermistor on pin temp1
M950 H1 C"out1" T1 ; create nozzle heater output on out1 and map it to sensor 1
;M307 H1 B0 S1.00 ; disable bang-bang mode for heater and set PWM limit
;M307 H1 A350 C139 D5.5 B0 ;
;M307 H1 B0 R0.570 C1789.2 D21.80 S1.00;
M307 H1 B0 R0.565 C959.9 D28.26 S1.00;
M143 H1 S280 ; set temperature limit for heater 1 to 280C; Fans
M950 F0 C"out4" Q500 ; create fan 0 on pin out4 and set its frequency
M106 P0 S0 H-1 ; set fan 0 value. Thermostatic control is turned off
M950 F1 C"out5" Q500 ; create fan 1 on pin out5 and set its frequency
M106 P1 S1 H1 T45 ; set fan 1 value. Thermostatic control is turned on; Tools
M563 P0 D0 H1 F0 ; define tool 0
G10 P0 X0 Y0 Z0 ; set tool 0 axis offsets
G10 P0 R0 S0 ; set initial tool 0 active and standby temperatures to 0C; Custom settings are not defined
Regards,
Sam -
The out# terminals switch to ground.
So connect the positive wire of the fan to the fixed positive output voltage and the negative wire of the fan to out# terminal.
Frederick
-
@fcwilt Thank you. I will try this. Very interesting. Never heard of anyone pulsing the connection to ground before, but that makes sense.
-
@fcwilt Thank you. Your wiring worked. The + fan wire went to V_OUTLC1 and the - fan wire went to OUT4. I was able to adjust the fan speed using the slider in the Duet Web Control. This was for the one with thermostatic control off. I also tried OUT5, which had thermostatic control on (while the machine was heated up), and I wasn't able to adjust the fan speed, but not a big deal. I'm very happy that you were able to help with OUT4

I also think I fried my 12VDC fan before my original post, putting the jumper on 24VDC, which didn't help my cause.
Overall, this is great progress though, and to be able to regulate the new fan with PWM is awesome

-
You cannot control, via the slider, the speed of a thermostatically controlled fan, if that is what you were trying to do.
Glad to hear you are making progress.
Frederick