Z probe already triggered at start of probing move
-
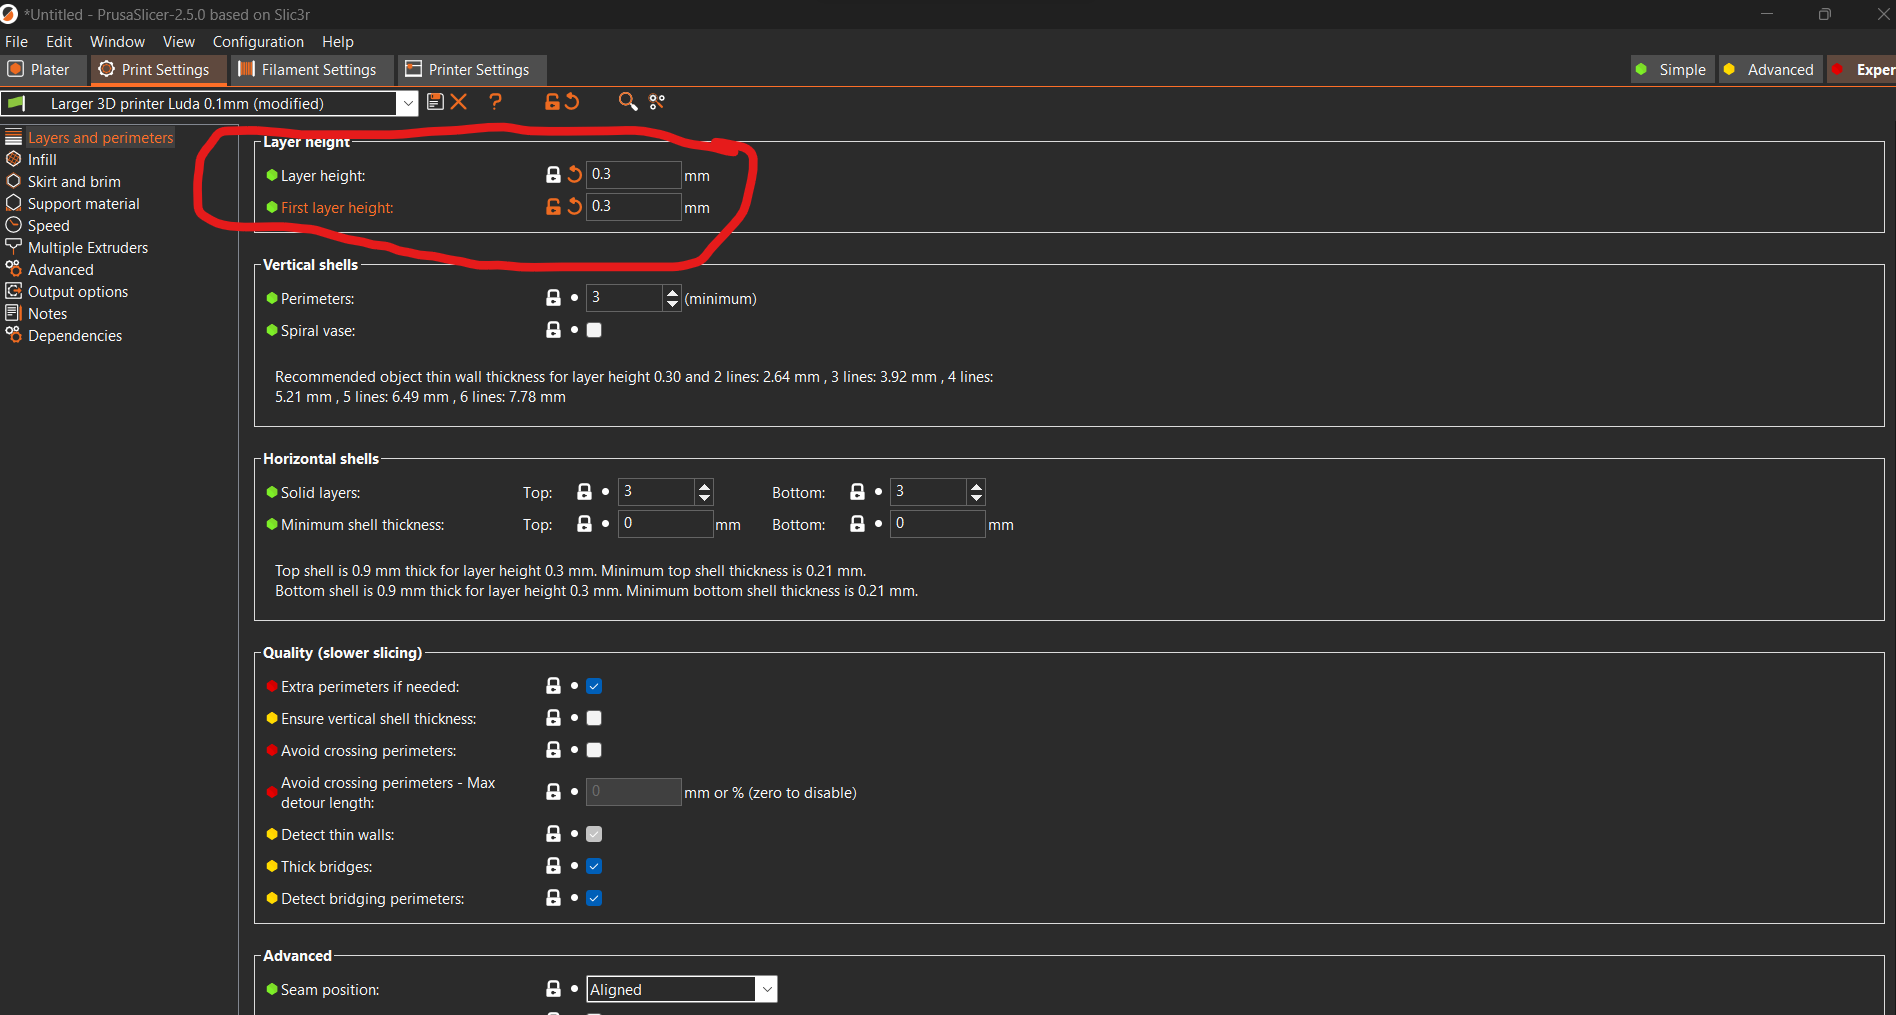
@Phaedrux Bro. I am facing now another issue. When I am printing and I put the layer height to 0.3mm. it does not goes to 0.3mm it stays at 2.5mm which is the offset that i have pre-set for the printer when I do Home.all
Any input on this one?
I have attached my settings

-
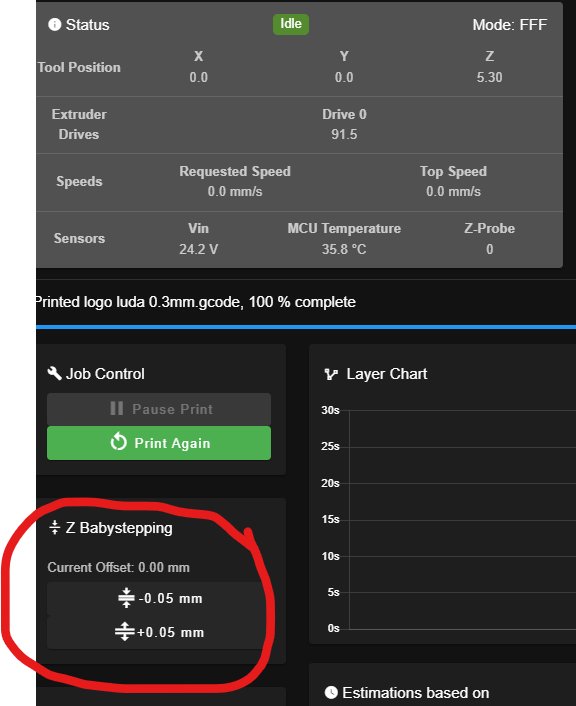
Additionally, how can I make babystepping work? I've noticed that when I click on it while printing, it doesn't move down to match the layer height required for correct printing.
Does this behave like Prusa Printer that has the live Z adjustment?
-
@JlunaMX Here my config.g in case you needed:
; Configuration file for Duet WiFi (firmware version 3.3)
; executed by the firmware on start-up
;
; generated by RepRapFirmware Configuration Tool v3.3.15 on Sun Feb 19 2023 20:39:14 GMT-0500 (Eastern Standard Time); General preferences
G90 ; send absolute coordinates...
M83 ; ...but relative extruder moves
M550 P"O&MAKERSLAB" ; set printer name; Network
M552 S1 ; enable network
M586 P0 S1 ; enable HTTP
M586 P1 S0 ; disable FTP
M586 P2 S0 ; disable Telnet; Drives
M569 P5 R1 T2.5:2.5:5:5 S1 ; physical drive 5 goes forwards (X)
M569 P6 R1 T2.5:2.5:5:5 S1 ; physical drive 6 goes forwards (Y1)
M569 P7 R1 T2.5:2.5:5:5 S1 ; physical drive 7 goes forwards (Y2)
M569 P8 R1 T2.5:2.5:5:5 S1 ; physical drive 8 goes forwards (Z)M584 X6 Y7 Z5 E8 ; set drive mapping
M350 X16 Y16 Z16 E16 I1 ; configure microstepping with interpolation
M92 X45 Y45 Z400.00 E374.00 ; set steps per mm
M566 X900.00 Y900.00 Z60.00 E400.00 ; set maximum instantaneous speed changes (mm/min)
M203 X6000.00 Y6000.00 Z180.00 E3000.00 ; set maximum speeds (mm/min)
M201 X500.00 Y500.00 Z20.00 E500.00 ; set motor currents (mA) and motor idle factor in per cent
M84 S30 ; Set idle timeout; Axis Limits
M208 X0 Y0 Z0 S1 ; set axis minima
M208 X708 Y694 Z700 S0 ; set axis maxima; Endstops
M574 X1 S1 P"xstop" ; configure switch-type (e.g. microswitch) endstop for low end on X via pin xstop
M574 Y1 S1 P"ystop" ; configure switch-type (e.g. microswitch) endstop for low end on Y via pin ystop
M574 Z2 S1 P"zstop" ; configure switch-type (e.g. microswitch) endstop for high end on Z via pin zstop; Z-Probe
M558 P1 C"!zprobe.in" H5 F120 T6000 ; set Z probe type to unmodulated and the dive height + speeds
G31 P1.5 X0 Y0 Z0.1 ; set Z probe trigger value, offset and trigger height
M557 X15:621 Y15:621 S101 ; define mesh grid; Heaters
M308 S0 P"bedtemp" Y"thermistor" T100000 B4138 ; configure sensor 0 as thermistor on pin bedtemp
M950 H0 C"bedheat" T0 ; create bed heater output on bedheat and map it to sensor 0
M307 H0 B1 S1.00 ; enable bang-bang mode for the bed heater and set PWM limit
M140 H0 ; map heated bed to heater 0
M143 H0 S300 ; set temperature limit for heater 0 to 300C
M308 S1 P"spi.cs1" Y"rtd-max31865" ; configure sensor 1 as PT1000 on pin e0temp
M950 H1 C"e0heat" T1 ; create nozzle heater output on e0heat and map it to sensor 1
M307 H1 B0 S0.50 ; disable bang-bang mode for heater and set PWM limit
M143 H1 S300 ; set temperature limit for heater 1 to 280C
M308 S2 P"spi.cs2" Y"rtd-max31865" ; configure sensor 2 as PT1000 on pin e1temp
M950 H2 C"e1heat" T2 ; create nozzle heater output on e1heat and map it to sensor 2
M307 H2 B0 S0.50 ; disable bang-bang mode for heater and set PWM limit
M143 H2 S315 ; set temperature limit for heater 2 to 315C; Fans
M950 F0 C"fan0" Q500 ; create fan 0 on pin fan0 and set its frequency
M106 P0 S0 H-1 ; set fan 0 value. Thermostatic control is turned off
M950 F1 C"fan1" Q500 ; create fan 1 on pin fan1 and set its frequency
M106 P1 S1 H1:2 T45 ; set fan 1 value. Thermostatic control is turned on; Tools
M563 P0 D0 H1:2 S"Typhoon" ; define tool 0
G10 P0 X0 Y0 Z0 ; set tool 0 axis offsets
G10 P0 R0 S0 ; set initial tool 0 active and standby temperatures to 0C; Custom settings are not defined
M575 P1 B57600 S1
T0 -
@JlunaMX said in Z probe already triggered at start of probing move:
Here is what it gave me per your request. my motor didn't even move haha, did a really weird sound and I stopped everything due to that sound.
I am not sure if I have to play with it a little but more until they move. I am going to put the microstep on 400 which is the lowest instead of 1600.
I think you made a mistake with the belt pitch. It's in mm. 0.2 is supposed to be 2 since that's a common belt pitch.
And driver microstep is 16, not 1600.
Are you sure the pulley tooth count is 30?
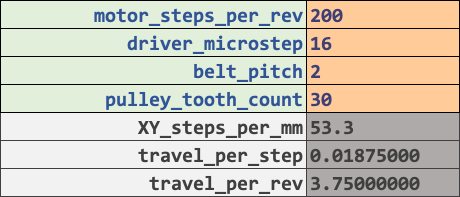 motor_steps_per_rev 200
driver_microstep 16
belt_pitch 2
pulley_tooth_count 30
XY_steps_per_mm 53.3
travel_per_step 0.01875000
travel_per_rev 3.75000000 -
@JlunaMX said in Z probe already triggered at start of probing move:
@Phaedrux Bro. I am facing now another issue. When I am printing and I put the layer height to 0.3mm. it does not goes to 0.3mm it stays at 2.5mm which is the offset that i have pre-set for the printer when I do Home.all
Any input on this one?
I have attached my settings
How did you get G31 Z2.5? This should be the height of the nozzle above the bed when the probe triggers. You must measure it, along with the XY offset of the probe from the nozzle.
https://docs.duet3d.com/en/User_manual/Connecting_hardware/Z_probe_testing
@JlunaMX said in Z probe already triggered at start of probing move:
Additionally, how can I make babystepping work? I've noticed that when I click on it while printing, it doesn't move down to match the layer height required for correct printing.
Baby stepping won't let you go below the M208 Z minima value you've set. If you require a lot of baby stepping to get the first layer right, you've got other issues you need to solve first, likely measuring the probe offset. If Z0 is set correctly, you shouldn't need baby stepping at all.
Did you update your homing files with my suggestions?
-
@Phaedrux Yes I did Update the homing files and updating that my homing is correct, now everytime I press the homing button it goes where it should be.
Now going back to the step per mm. I did what you told me and this is what I got:

Does it makes sense for you? because my machine when I put the 41.995 it does more steps per mm that it should do. And yes my pulley its 30 tooth.
Besides that with my setting being like this:
with calculation:

without calculation (experimenting) in this case the x & y run 50mm when pressed to do so, meanwhile utilizing the numbers from the calculation it goes beyond 50mm:

Right now I am not sure what to do.. If changing the pulley of the motor and belt for a better combination or leave it like that. But here is the thing if I leave it as is the prints comes out weird.
For example yesterday I was printing this:
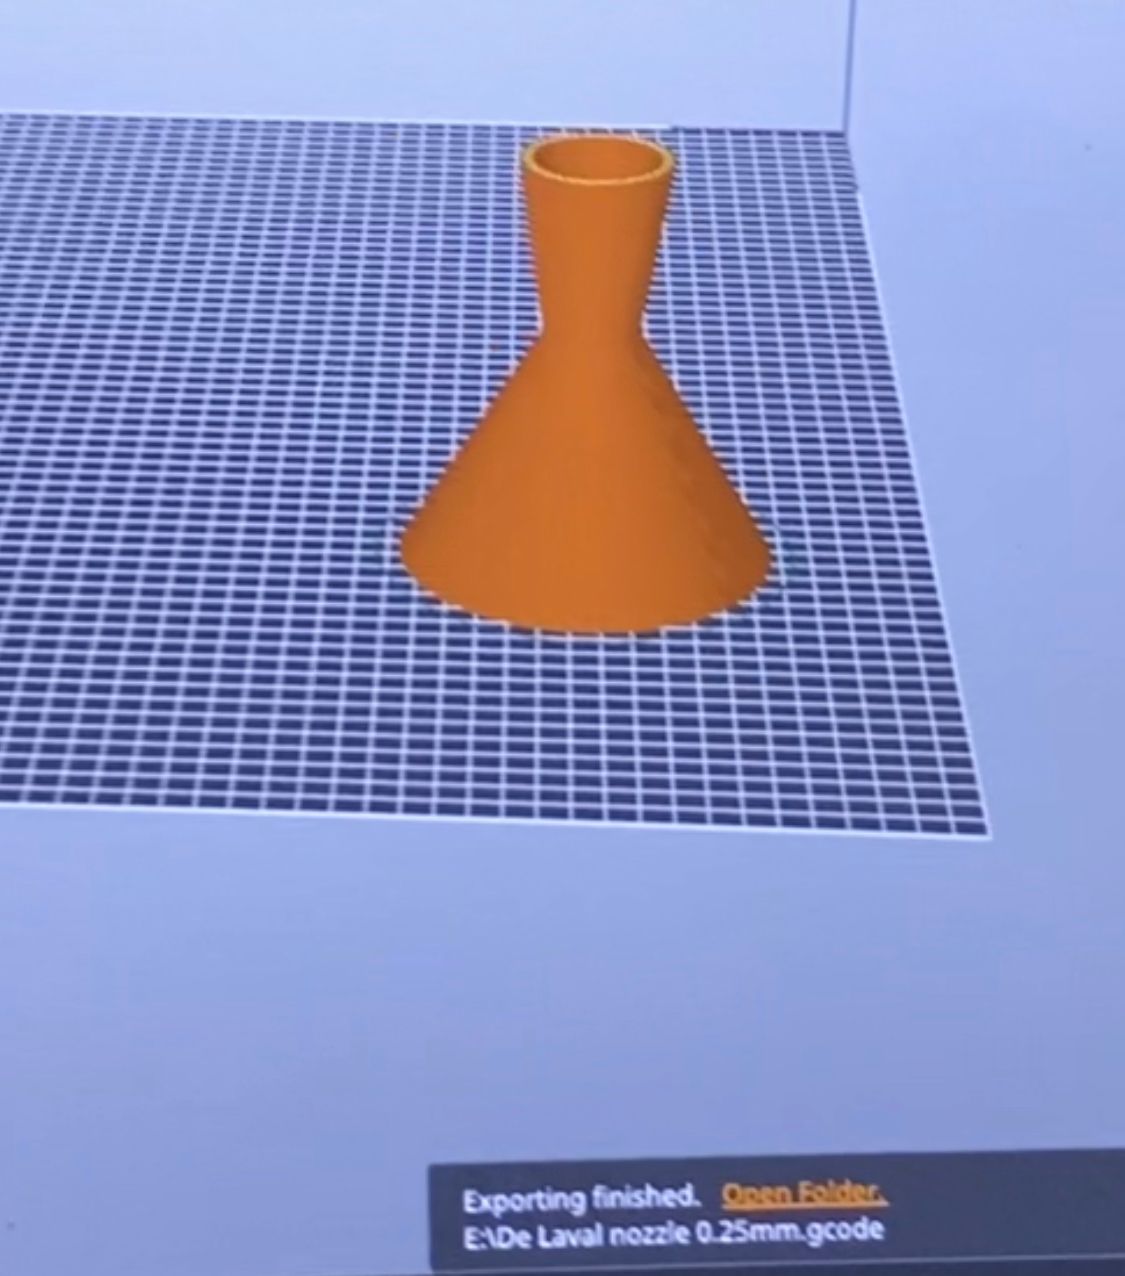
and ended up looking like this

At this point I'm not sure what the issue could be. It could either be a mistake in the steps per mm, or there might be a problem with the configuration files.
-
Belt pitch 5.08mm? What kind of belt do you have? If you hold a ruler with mm markings up to the tooth side, how far apart are the teeth?
-
-
It's strange that the steps per mm that create accurate movement is exactly half of the calculated value. This makes me think we're missing something. If the drive pulley tooth count were actually 60 teeth that would give 21 steps per mm.
Would you be able to post some photos of the machine so I can get a better idea of what you've got?
If 21 produces the correct amount of movement, that's great though.
Is the Z axis moving correctly?
-
@Phaedrux Yeah I know its very strange. Yeap the z axis is moving ok so far. If anything I will keep you updated.
I will post some pic soon of the machine
-
@Phaedrux I've fixed the steps per mm issue. Switching to an encoder driver and applying the equation resolved the problem for the X and Y axes, now set to 42 steps/mm.
However, there's an issue with the Z-axis. The offset from the G-code isn't functioning correctly, despite being shown on the Duet interface. I suspect it's due to the Z-axis calibration, especially since I'm using a leadscrew. How can I calculate the steps/mm for the Z-axis with a leadscrew?
-
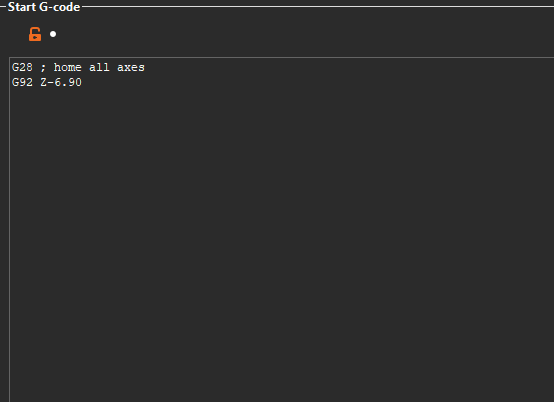
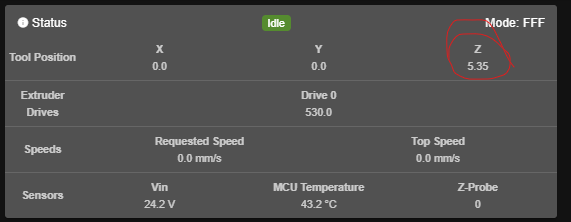
I tried the setup. When I start the 3D print, instead of the Z-axis going down to -6.90, it goes up to 0.35. I don't know why it's doing this. I know it might seems a little exaggerated but I am just applying around and the printer does not go down.
Is the anything that I should add at the star of my G-code?
my set up
; Configuration file for Duet WiFi (firmware version 3.3)
; executed by the firmware on start-up
;
; generated by RepRapFirmware Configuration Tool v3.3.15 on Sun Feb 19 2023 20:39:14 GMT-0500 (Eastern Standard Time); General preferences
G90 ; send absolute coordinates...
M83 ; ...but relative extruder moves
M550 P"O&MAKERSLAB" ; set printer name; Network
M552 S1 ; enable network
M586 P0 S1 ; enable HTTP
M586 P1 S0 ; disable FTP
M586 P2 S0 ; disable Telnet; Drives
M569 P5 R1 T2.5:2.5:5:5 S1 ; physical drive 5 goes forwards (X)
M569 P6 R1 T2.5:2.6:5:5 S0; physical drive 6 goes forwards (Y1)
M569 P7 R1 T2.5:2.6:5:5 S0 ; physical drive 7 goes forwards (Y2)
M569 P8 R1 T2.6:2.6:2.6:2.6 S1 ; physical drive 8 goes forwards (Z)M584 X6 Y7 Z5 E8 ; set drive mapping
M350 X32 Y32 Z16 E32 I1 ; configure microstepping with interpolation
M92 X42 Y42 Z250 E374.00 ; set steps per mm
M566 X900.00 Y900.00 Z60.00 E400.00 ; set maximum instantaneous speed changes (mm/min)
M203 X6000.00 Y6000.00 Z180.00 E3000.00 ; set maximum speeds (mm/min)
M201 X500.00 Y500.00 Z20.00 E500.00 ; set motor currents (mA) and motor idle factor in per cent
M84 S30 ; Set idle timeout; Axis Limits
M208 X0 Y0 Z-8.30 S1 ; set axis minima
M208 X1005 Y970 Z700 S0 ; set axis maxima; Endstops
M574 X1 S1 P"xstop" ; configure switch-type (e.g. microswitch) endstop for low end on X via pin xstop
M574 Y1 S1 P"ystop" ; configure switch-type (e.g. microswitch) endstop for low end on Y via pin ystop
M574 Z1 S1 P"zstop" ; configure switch-type (e.g. microswitch) endstop for high end on Z via pin zstop; Z-Probe
M558 P1 C"!zprobe.in" H5 F120 T6000 ; set Z probe type to unmodulated and the dive height + speeds
G31 P1.0 X0 Y0 Z-5.50 ; set Z probe trigger value, offset and trigger height
M557 X15:1005 Y15:970 S110 ; define mesh grid; Heaters
M308 S0 P"bedtemp" Y"thermistor" T100000 B4138 ; configure sensor 0 as thermistor on pin bedtemp
M950 H0 C"bedheat" T0 ; create bed heater output on bedheat and map it to sensor 0
M307 H0 B1 S1.00 ; enable bang-bang mode for the bed heater and set PWM limit
M140 H0 ; map heated bed to heater 0
M143 H0 S300 ; set temperature limit for heater 0 to 300C
M308 S1 P"spi.cs1" Y"rtd-max31865" ; configure sensor 1 as PT1000 on pin e0temp
M950 H1 C"e0heat" T1 ; create nozzle heater output on e0heat and map it to sensor 1
M307 H1 B0 S0.50 ; disable bang-bang mode for heater and set PWM limit
M143 H1 S300 ; set temperature limit for heater 1 to 280C
M308 S2 P"spi.cs2" Y"rtd-max31865" ; configure sensor 2 as PT1000 on pin e1temp
M950 H2 C"e1heat" T2 ; create nozzle heater output on e1heat and map it to sensor 2
M307 H2 B0 S0.50 ; disable bang-bang mode for heater and set PWM limit
M143 H2 S315 ; set temperature limit for heater 2 to 315C; Fans
M950 F0 C"fan0" Q500 ; create fan 0 on pin fan0 and set its frequency
M106 P0 S0 H-1 ; set fan 0 value. Thermostatic control is turned off
M950 F1 C"fan1" Q500 ; create fan 1 on pin fan1 and set its frequency
M106 P1 S1 H1:2 T45 ; set fan 1 value. Thermostatic control is turned on; Tools
M563 P0 D0 H1:2 S"Typhoon" ; define tool 0
G10 P0 X0 Y0 Z0 ; set tool 0 axis offsets
G10 P0 R0 S0 ; set initial tool 0 active and standby temperatures to 0C; Custom settings are not defined
M575 P1 B57600 S1
T0; Z - config.g for Closed Loop motor
-
@JlunaMX said in Z probe already triggered at start of probing move:
How can I calculate the steps/mm for the Z-axis with a leadscrew?
Z_steps_per_mm = (motor_steps_per_rev * driver_microstep) / screw_lead -
@Phaedrux it worked. Now how do I save the babystepping for when i am going to print the tip stay fixed at a proper distance. Because it not working from Custome G-code - PrusaSlicer
Any input on this? How should I approach this?
-
@JlunaMX said in Z probe already triggered at start of probing move:
how do I save the babystepping
Take the amount of baby stepping you are using and adjust the probe trigger height in config.g in the G31 Z value.
If you're not using a probe, you would need to adjust your Z homing macro to alter the homed position with a G92 Z
Does that make sense? Share your homing files if not.
-
Not clear for me. Here is the Homez
HomeZ
G90 ; absolute positioning
G1 X150 Y150 F6000
G30I am using a Probe
Above, I have posted my Config.g if you need to look at it.
-
@JlunaMX said in Z probe already triggered at start of probing move:
31 P1.0 X0 Y0 Z-5.50
It's the Z value you need to adjust.
Making it large in the positive direction will result in the nozzle being closer to the bed. Making it larger in the negative direction will make the nozzle farther from the bed.
What type of probe do you have? -5.5 would mean the tip of the nozzle is 5.5mm below the surface of the bed when the probe triggers.
-
@Phaedrux I have an Inductive Probe. Will try to adjust this on the printer and give you feedback.
-
You should measure your trigger height using this guide if you haven't already. This may remove the need to adjust with baby stepping in the first place.
https://docs.duet3d.com/en/User_manual/Connecting_hardware/Z_probe_testing
-
@Phaedrux thank you will try that!