Duet3D Logo Duet3D
    • Tags
    • Documentation
    • Order
    • Register
    • Login
    1. Home
    2. Phaedrux
    • Profile
    • Following 3
    • Followers 61
    • Topics 45
    • Posts 27,118
    • Best 2,612
    • Controversial 8
    • Groups 2

    Phaedrux

    @Phaedrux

    Moderator

    Always trying to pull off the best looking print possible.

    3.1k
    Reputation
    2.2k
    Profile views
    27.1k
    Posts
    61
    Followers
    3
    Following
    Joined Last Online
    Website forum.duet3d.com/topic/5282/my-custom-d-bot Location Saskatchewan, Canada Age 42

    Phaedrux Unfollow Follow
    Moderator administrators

    Best posts made by Phaedrux

    • Tuning Macros Menus (Accel, Jerk, Retraction, Pressure Advance)

      0_1532570209712_Screenshot 2018-07-25 19.26.32.png

      A couple weeks ago I posted a firmware retraction tuning macro set. And now I've taken it to the logical conclusion and included macros for live tuning many more variables. This makes finding the sweet spot for print speeds quick and easy. Simply print your favourite tuning STL and start making adjustments to see the effects in real time.

      • Acceleration for X, Y, Z, E, axis plus Print and Travel moves
      • Jerk for X, Y, Z, E
      • Pressure Advance with values for Bowden and Direct drive
      • Firmware retraction variables

      You can download the macros from github here in a zip file.

      The easiest way to install them is to put the SD card into your computer and extract the zip file into the /macros folder.

      The menus work best with a PanelDue, but work with the DWC macros menu as well.

      Values have been stepped in increments of 60mm/min (1mm/s) for most things. But steps of 1000 are also available. Z axis adjustments are more sensitive at 10mm/min increments. I've tried to go to ranges high enough that should be good for most users.

      For acceleration and jerk tuning to work, make sure you've disabled any accel or jerk control inserted by the slicer.

      For retraction tuning you must be using firmware retraction. See the other firmware retraction thread for more details.

      Each time a value is changed it is echoed to the console window so you can see what the last used value was so you can add it to the config.g to make it permanent. You may need to turn on command echo in the DWC settings for pop ups to show up. In the PanelDue they show up in the console window.

      I've done my best to make sure all the commands are accurate to what they say they are, but mistakes may have been made. I've done some testing, but I haven't tested every single one. Even if I have made no mistakes, you can still potentially damage something by choosing a value that is completely unreasonable for your setup. For example, choosing a very long retraction value for a direct drive extruder. I recommend you start with small values and work your way up.

      If you find any mistakes, please let me know and I'll update the download link.

      If you change things too much and want to go back, you can simply reboot the controller and the defaults from config.g will be loaded. Alternatively, you can edit the Return to Defaults macro to use your current values before you start to test, that way you can return to your old values with the touch of a button.

      Here's a few more pictures of what the menus look like in the DWC:

      0_1532572721686_Screenshot 2018-07-25 19.26.52.png

      0_1532572739163_Screenshot 2018-07-25 19.26.57.png

      0_1532572788665_Screenshot 2018-07-25 19.27.03.png

      0_1532572749747_Screenshot 2018-07-25 19.27.07.png

      0_1532572767965_Screenshot 2018-07-25 19.29.27.png

      0_1532572800675_Screenshot 2018-07-25 19.29.31.png

      More photos showing the menus on a PanelDue 7.

      IMG_8931.JPG
      IMG_0073 copy.jpeg IMG_0072 copy.jpeg IMG_0071 copy.jpeg IMG_0070 copy.jpeg

      posted in Tuning and tweaking acceleration jerk macros paneldue retraction tuning
      Phaedruxundefined
      Phaedrux
    • Community Projects Wiki

      I've started a wiki page to list all of the active community hardware and software projects. There are so many useful addons it would be nice to have a centralized place to gather them together.

      I've added a few to start with that I could remember off the top of my head, but I know there are a ton of others out there, so please post a link to any you'd like added.

      https://duet3d.dozuki.com/c/Community_Projects

      posted in General Discussion
      Phaedruxundefined
      Phaedrux
    • Danal's passing

      It's been brought to my attention that one of our most active and valued community members has passed away. If you've ever read one of Danal's helpful and informative posts you'll likely be as disheartened as I was to learn that he has passed.

      https://www.dignitymemorial.com/obituaries/frisco-tx/danal-estes-9198882

      posted in Off Topic
      Phaedruxundefined
      Phaedrux
    • RE: Where is Phaedrux?

      It's nice to know you're being missed. 😊

      Thanks for your concern. On September 17th my wife and I welcomed our second child. Though we weren't expecting her until mid December. It was very sudden and the complications made for a very stressful time. She's been in the NICU since and will likely be there for another month or two. Add COVID into all that and I had a knee surgery and it all left very little time for anything else. She's doing well though and things have stabilized enough that I'll be back around much more again.

      posted in Off Topic
      Phaedruxundefined
      Phaedrux
    • My custom D-Bot

      Over the past year I've been planning, building, and commissioning a custom D-Bot CoreXY I call the Z-Bot. I chose the D-Bot because it seemed fairly sturdy, was expandable to the size I wanted, and there seemed to be a decently sized community surrounding it. There's still a few things I'd like to do with it, but for the most part I consider it finished.

      ZBot

      Details:

      • 300mm^3 D-Bot hardware kit from AliExpress
      • 300x275x300 print volume
      • DuetWifi with 7" PanelDue
      • MeanWell SE-200-24V passively cooled PSU
      • 13"x13"x1/4" MIC-6 aluminum build plate bonded to 12"x12" PEI
      • 600w AC Silicone heater with Fotek SSR-40DA relay
      • 0.9 steppers for A and B motors from SteppersOnline
      • 1.8 stepper for the Z Axis
      • Three TR8*1mm lead screws connected with 1524mm GT2 continuous loop belt
      • Titan Aero extruder on custom carriage with BLTouch, belt tensioners and C shaped cooling shroud.
      • E3D pancake motor for extruder
      • Gates GT2 belts
      • Delrin V-Wheels
      • Aluminum spacers and precision shims.
      • Hardened steel 0.4 or 0.6 nozzle, 40w heater, PT100 sensor
      • Suited for high temp plastics
      • Sunon blower and Noctua fans for quiet printing
      • Z Max optical endstop for power failure recovery
      • PSU has integrated USB power ports and voltage display
      • Buck converter provides 12v for the fans
      • Raspberry Pi Zero W with camera module running MotionEye, powered by PSU USB ports.
      • Proper grounding throughout with a Ground Fault Circuit Interrupter plug
      • Aluminum plates and brackets in place of plastic where ever possible
      • Plastic parts printed in AMZ3D Red PLA and SpoolWorks Red PETG
      • Prints comfortably at 133mm/s with moderate acceleration and jerk settings.
      • Travel moved at 233mm/s 3000mm/min acceleration.

      Here's a list of the key mods I used on this printer:

      • 3rd Z-axis Belt Tensioner for DBot
      • Two-bearing Z mount for 3 lead screw for DBot
      • 2x1 plate with cutout
      • 3-wheeled Y guide
      • 3-wheeled Z guide
      • DuetWifi box for 2020
      • 7" PanelDue case for V Slot
      • MeanWell SE-200-24 PSU Case for VSlot
      • AC-Bot 2.0.2 Titan Aero X Carriage for DBot

      ZBot

      The Z axis took the most time to finalize. The DBot's biggest weakness in the stock build is the bed. The stock build is only for 300x200 and uses a cantilevered bed supported at the back on V wheels and requires you to find the center of gravity for the bed assembly to position the lead screws. On a 300x300 build the amount of droop and bounce is unworkable. Furthermore, the stock build uses 2 Z motors which are problematic to keep in sync.

      My solution was to add another beam and wheel assembly to the front so that it rides on all 4 corners. Then to balance the weight between 3 lead screws, one at the middle back, and two at the front left and right. This makes for a very solid bed that rides smoothly up and down the vslot.

      ZBot

      To keep the 3 screws in sync I used a single motor and a 1524mm continuous loop GT2 belt. Each screw is supported in it's own double bearing block. The motor mount also doubles as a slide tensioner for the belt. Both are existing mods from the community.

      ZBot

      In order to reduce the torque requirements for the single motor, and to prevent the likelihood of the heavy bed auto rotating downwards when power is removed, I chose 1mm lead screws and a 1.8 motor and a 2:1 gear ratio between motor and screws. (20T drive pulley, 40T screw pulley) It also allows for 0.0025 mm layer step intervals for high Z resolution.

      ZBot

      Originally I worried that the Z axis would be very slow in this arrangement, but it's actually turned out to be very stable, and quite fast. My only disappointment in the build is the aluminum plate has a slight bulge on one corner, likely from shipping damage. Mesh bed compensation to the rescue.

      Where possible I switched to 3 wheel carriage mods with tensioners to help make getting the wheels aligned and equally tensioned a lot easier.

      With the Titan Aero and a 40w heating cartridge I've managed PLA print speeds up to 200mm/s (0.4 width, 0.2 layers, 215c) on infill and perimeters with good quality. Overall I'm very pleased with the quality and speed of the printer, thanks in no small part to the Duet. The power and flexibility of RepRapFirmware cannot be understated. Being able to create and customize macros and live adjust values is a game changer. I can never go back to the way it once was.

      Here are some example prints.

      lawn darts
      lawn darts

      Lawn Darts printed at 0.3 layer height @ 100mm/s

      benchy

      boaty

      alt text

      For anyone building a DBot and wanting to see my configs, you can find the original config files here: DBot Config Files

      More modern example config file sets for RRF2 and RRF3 can be found here: https://github.com/Duet3D/RRF-machine-config-files/tree/master/DBotCoreXY

      More photos of the printer and example prints can be found here: Photo Album

      Thanks for taking a look.

      posted in My Duet controlled machine
      Phaedruxundefined
      Phaedrux
    • RE: Where is Phaedrux?

      87602f2a-9554-4e9a-816f-57880d97da49-IMG_4361.jpeg

      Just wanted to let all the well wishers know that my daughter came home right before Christmas and is doing quite well.

      posted in Off Topic
      Phaedruxundefined
      Phaedrux
    • Preview version of CNC optimized DWC.

      There is a preview of the CNC version of DWC at https://github.com/Duet3D/DWC-CNC/releases.

      You may also be interested in some plugins created by @Sindarius

      https://github.com/Sindarius/DWC_GamepadJogger_Plugin
      Adds the ability to use a gamepad to jog your spindle

      and

      https://github.com/Sindarius/DWC_GCodeViewer_Plugin
      Will let you get a visual of your gcode, I recommend sticking to wire mode for CNC gcode. Just recently finished adding G2&3 support.

      posted in CNC
      Phaedruxundefined
      Phaedrux
    • RE: Tuning Jerk/Accel/Speed settings

      Assuming you have basic calibration out of the way...

      The volumetric extrusion rate of your hotend will be the limiting factor. Once you know that you can find a print speed/layer height/extrusion width combo that maximizes the extrusion rate and produces a good surface finish.

      I think this is too often overlooked in 3D printing. When I see people say they are printing at 200mm/s I have to wonder what layer height and extrusion width are they using? What is their acceleration and jerk values? Is the surface quality any good? Is the part strong?

      Take this for example:
      ecf5100a-2603-4fe2-85af-ed0cf2e3707b-image.png

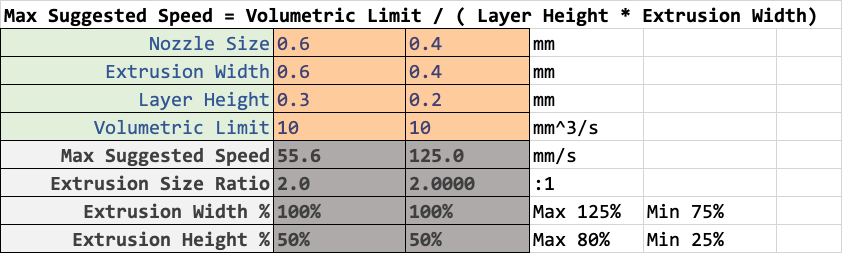
      One is printing at 55mm/s and the other at 125mm/s. But the volumetric rate is the same, and if you sliced the same model with those two different profiles for layer height and extrusion width, total print time will be roughly the same. (slightly less for the 0.3 layer profile due to less repetition of movement).

      Depending on what you're printing, one or the other may make more sense, but the point is that print speed is almost irrelevant as long as you are maximizing your volumetric rate, you will be completing the print in as little time as possible.

      In addition to the melt rate limit, you'll have to be able to cool the extruded plastic fast enough. So your cooling solution needs to be sufficient, and minimum layer time will be practical limit on speed at the other end.

      You can use some calculators to find the theoretical limits for top speed and acceleration, but by the sounds of it they are already well above practical values for qualities sake on your printer.

      Now you don't mention much about your printers mechanical setup, but your sig says Hephaestus, which would be quite rigid. But as a general rule I would suggest that you set your maximum X Y speed to be equal to your travel move speed. That way when you use the speed factor slider you won't be able to increase your travel speeds to dangerous levels.

      For travel acceleration, using the acceleration calculator to find the max for your motors/power supply without losing torque would be a start. In practice, you'd probably find the travel moves to be particularly violent, and this can have a negative impact on quality from ringing, and from the nozzle dragging filament at the end of an extrusion move causing stringing or blobs.

      To find this speed/accel combo for travel moves, I would do a dry run of a larger model to get a feel for what travel moves would actually look like. Adjust the speed factor and travel acceleration during the print. You'll be able to tell the difference between sluggish movement and rough jerky movement. (for my coreXY travel is 175mm/s and 2500 accel and 1500mm/min jerk. Anything more is too rough and may skip steps if it catches a curled edge.)

      Once you have travels set up, you can move onto print moves. For external perimeters, I use the max speed that maximizes my volumetric flow, and then limit that for quality using acceleration and jerk. First I tune for jerk by setting acceleration to the same as the travel acceleration and then adjusting jerk until it sounds smooth. I know that's subjective, but trust me, you can tell the difference between smooth motion, sluggish motion, and smooth but rapid motion. (For me that's 1200mm/min for external walls, and 1500mm/min for infill)

      Now that print speed and jerk is set. You can use a test cube for ringing testing to dial in wall acceleration. Just start low and increase it every few layers and repeat until you've got no ringing. Something like this scaled up to 100mm cubed works well. ringtest.stl

      You may also find dynamic acceleration adjustment useful.

      For internal features acceleration is less critical because ringing doesn't really matter, so I usually use a value in between the external wall and travel values.

      At that point I tune for retraction distance and speed using a simple retraction tower. Using firmware retraction allows you to change the values every few layers. Within about two cycles you can get it dialed in pretty well. For me, 1mm retraction and 60mm/s retract and 45mm/s unretract seems to work best (titan aero)

      With retraction done pressure advance is next. I use the simple cube/cylinder method described here: https://duet3d.dozuki.com/Wiki/Pressure_advance#Section_Methods_of_finding_the_right_amount_of_pressure_advance

      Make sure your extruder max speed/accel/jerk values are sufficiently high to allow pressure advance to work optimally.

      Once you find the right PA value, you may need to reduce retraction distance slightly and increase the skin/infill wall overlap.

      I should also mention that I usually use Cura because it allows for detailed control over speed/accel/jerk values per move type. This gives me a great deal of control, but it also means that those values are baked into the gcode and cannot be changed on the fly during a print. Disable those features during live tuning obviously.

      Prusa slicer allows control over speed and acceleration for some moves but not jerk.

      If you use a slicer that doesn't give you that level of control, you can at least use M204 to set separate acceleration values for print and travel moves.

      posted in Tuning and tweaking
      Phaedruxundefined
      Phaedrux
    • RE: Danal's passing

      Hard to believe it's been a year, both because it feels like it's been much longer than that and at the same like it was just the other day.

      posted in Off Topic
      Phaedruxundefined
      Phaedrux
    • Firmware Retraction Tuning with Macros

      You can find a more complete set of tuning macros here:

      https://forum.duet3d.com/topic/6181/tuning-macros-menus-accel-jerk-retraction-pressure-advance


      Retraction Tuning Macros

      I took some time today to whip up a set of macros that should make fine tuning your retraction settings much easier.

      They can be found here: DropBox Download for Retraction Tuning Zip file

      0_1531091983047_Screenshot 2018-07-08 17.18.04.png

      Here's how it works.

        1. First you must have firmware retraction enabled in your slicer.
          1a. In Slic3r PE, this can be found under Printer settings, General tab, Firmware retraction check box near the bottom of the right pane.
          1b. In Cura, you will need to use version 3.4+ and install the Printer Settings plugin from the tool box, and then unhide the firmware retraction setting for it to show up in the right menu bar. It'll show up under the Printer Settings menu at the bottom.
          1c. In Simplify3D you'll have to setup a post processing script to insert the G10/G11 retraction commands at the appropriate place https://thrinter.com/using-firmware-retraction-with-simplify3d/
        1. Download a retraction tuning model from Thingiverse.
          There are plenty of guides out there that give you an idea of what to start with.
        1. Slice the model with firmware retraction enabled and your usual print settings
        1. Use the macros provided to quickly step through the various parameters while the print is running and note how they affect stringing and layer seams.
          4b. There are a range of hopefully sensible values for both direct drive, and bowden tube setups.
          4c. Every time you choose a value the current settings are echoed back so you can find them in the console.
          4d. Warning Be careful with retraction distance. Using Bowden distances in a direct drive system will quickly pull your filament right out and possibly lead to a jam.
        1. Once you have things looking good, use the macro to report the current settings and enter it into your config.g to make them permanent.
        1. You can edit the "Return to defaults" macro with your usual retraction settings so you have something to quickly return to if you really mess it up.

      Let me know how it works out for you if you try it or if you find any errors. Speeds and distances are fairly granular but you might want to fine tune by hand further once you get into the ball park.

      In addition to retraction parameters there is also extruder acceleration, jerk and travel acceleration which you can tune. These can be particularly useful for eliminating blobbing and stringing.

      posted in Tuning and tweaking macros retraction
      Phaedruxundefined
      Phaedrux

    Latest posts made by Phaedrux

    • RE: Repurposing an Anycubic Kobra S1 for Visual Inspection

      3 or 4 points will give you a flat plane that crosses those points, but won't account for any variation in between those points. That may be enough for your needs.

      To hop over you could configure a high dive height in M558 on the probe so that after each probe it has to move up at least enough to be above your object.

      posted in General Discussion
      Phaedruxundefined
      Phaedrux
    • RE: "Connecting" between SBC and Duet

      @Timothee-Leblond said in "Connecting" between SBC and Duet:

      the raspberry cannot find the board anymore.

      What exactly do you mean by this? What are you seeing happen?

      @Timothee-Leblond said in "Connecting" between SBC and Duet:

      However I can still access to DWC through wifi.

      And what do you see in DWC? Are you able to send commands like M122?

      Have you checked the ribbon cable?

      Have you tested the Duet on it's own in standalone mode with an SD card in the Duet and ribbon cable disconnected?

      posted in General Discussion
      Phaedruxundefined
      Phaedrux
    • RE: Duet3 mini 5+ SD card reader fault?

      Please send an email to warranty@duet3d.com and CC your reseller. Include a link to this forum thread and the details of your original purchase. You'll receive a reply with a form to fill out.

      posted in Duet Hardware and wiring
      Phaedruxundefined
      Phaedrux
    • RE: Duet3 mini 5+ SD card reader fault?

      When and where did you purchase the Duet3 mini5+?

      posted in Duet Hardware and wiring
      Phaedruxundefined
      Phaedrux
    • RE: MB6HC and Toolboard issues

      Your firmware is quite old and no longer supported. I suggest you go through the process to update, and we can trouble shoot from there.

      https://github.com/Duet3D/RepRapFirmware/releases/tag/3.6.0

      Peruse the change log

      Download the zip file and upload it through DWC.

      https://github.com/Duet3D/RepRapFirmware/releases/download/3.6.0/Duet2and3Firmware-3.6.0.zip

      posted in General Discussion
      Phaedruxundefined
      Phaedrux
    • RE: Incompatible software versions error, but same firmware in use

      Can you share a diagram or photo of your wiring?

      How have you updated the firmware previously? I suggest you upload th complete zip file again and allow it to update everything again.

      https://github.com/Duet3D/RepRapFirmware/releases/download/3.5.1/Duet2and3Firmware-3.5.1.zip

      Also, 3.5.1 is quite old at this point. Once you have everything worked out I suggest you update to 3.6.

      It wouldn't hurt to share your config.g file as well.

      posted in General Discussion
      Phaedruxundefined
      Phaedrux
    • RE: [3.6.0] Command "M999 B-1" -> "CAN address out of range"

      @EagleB3 said in [3.6.0] Command "M999 B-1" -> "CAN address out of range":

      Maybe it's worth adding to the descriptions I quoted that the command requires a working plugin?

      @droftarts 😉

      posted in Duet Web Control
      Phaedruxundefined
      Phaedrux
    • RE: Phase A may be disconnected.

      Have you tried remapping the X axis to a different driver and testing to see if the problem remains?

      posted in Duet Hardware and wiring
      Phaedruxundefined
      Phaedrux
    • RE: Phase A may be disconnected.

      What do your crimps look like?

      Is this a new build or was this previously working?

      posted in Duet Hardware and wiring
      Phaedruxundefined
      Phaedrux
    • RE: Abnormal behaviour - stall homing on 3.6

      Please share your full config.g

      posted in Firmware installation
      Phaedruxundefined
      Phaedrux