Duet WIFI with Micron Cobra extruder temperature setting
-
Hi SaltyPetz,
-
HTH its abbreviation for "Hope This Helps"
")
-
In case the command I noted did not fixed your problem, Upload your config.g file, as T3P3Tony said. this would assist us to assist you.
-
In case you have Multimeter, check the resistance of the thermistor at room temp (also make note of the room temperture if you can). report here your findings.
-
-
I tried using a copy of the other person using a tevo black widow and it still doesn't work. Mine is the same setup except the extruders everything else is the same.
; Configuration file for Duet WiFi (firmware version 1.20 or newer)
; executed by the firmware on start-up
;
; generated by RepRapFirmware Configuration Tool on Sat Mar 03 2018 14:29:05 GMT-0500 (Eastern Standard Time); General preferences
G90 ; Send absolute coordinates...
M83 ; ...but relative extruder moves; Network
M550 P"Black Widow" ; Set machine name
M552 S1 ; Enable network
M587 S"NETWORKNAMEHERE" P"NETWORKPASSWORDHERE" ; Configure access point. You can delete this line once connected
M586 P0 S1 ; Enable HTTP
M586 P1 S0 ; Disable FTP
M586 P2 S0 ; Disable Telnet; Drives
M569 P0 S1 ; Drive 0 goes forwards X
M569 P1 S0 ; Drive 1 goes backwards Y
M569 P2 S0 ; Drive 2 goes backwards Z
M569 P3 S1 ; Drive 3 goes forwards EM350 X16 Y16 Z16 E16 I1 ; Configure microstepping with interpolation
M92 X80 Y80 Z1600 E427 ; Set steps per mm for 16x microstepping
M566 X900 Y900 Z12 E10 ; Set maximum instantaneous speed changes (mm/min)
M203 X6000 Y6000 Z500 E1200 ; Set maximum speeds (mm/min)
M201 X500 Y150 Z300 E200 ; Set accelerations (mm/s^2)
M906 X1050 Y1050 Z1300 E1050 I30 ; Set motor currents (mA) and motor idle factor in per cent
M84 S30 ; Set idle timeout; Axis Limits
M208 X0 Y0 Z0 S1 ; Set axis minima
M208 X335 Y260 Z250 S0 ; Set axis maxima; Endstops
M574 X1 Y1 S0 ; Set active low endstops
M574 Z1 S2 ; Set endstops controlled by probe
M557 X0:335 Y45:260 S20 ; Define mesh grid; Heaters
M301 H0 S1.00 P32.6 I1.360 D79.4 T0.4 W180 B30 ; Use PID on bed heater (may require further tuning)
M305 P0 T100000 B4138 C0 R4700 ; Set thermistor + ADC parameters for heater 0
M143 H0 S80 ; Set temperature limit for heater 0 to 80C
M305 P1 T100000 B4725 C7.060000e-8 R4700 ; Set thermistor + ADC parameters for heater 1
M143 H1 S240 ; Set temperature limit for heater 1 to 220C; Fans
M106 P0 S0 I0 F500 H-1 ; Set fan 0 value, PWM signal inversion and frequency. Thermostatic control is turned off
M106 P1 S1 I0 F500 H1 T100 ; Set fan 1 value, PWM signal inversion and frequency. Thermostatic control is turned on
M106 P2 S0 I0 F500 H-1 ; Set fan 2 value, PWM signal inversion and frequency. Thermostatic control is turned off; Tools
M563 P0 D0 H1 F2 ; Define tool 0
G10 P0 X0 Y0 Z0 ; Set tool 0 axis offsets
G10 P0 R0 S0 ; Set initial tool 0 active and standby temperatures to 0C; Automatic saving after power loss is not enabled
; Custom settings are not configured
M307 H3 A-1 C-1 D-1 ;
M558 P5 X0 Y0 Z1 H9 F200 T6000
G31 X-48.8 Y-18.2 Z2.3 P25; Miscellaneous
M501
T0 ; Select first tool -
Here it is with your setting now it's at 2000.
; Configuration file for Duet WiFi (firmware version 1.20 or newer)
; executed by the firmware on start-up
;
; generated by RepRapFirmware Configuration Tool on Sat Mar 03 2018 14:29:05 GMT-0500 (Eastern Standard Time); General preferences
G90 ; Send absolute coordinates...
M83 ; ...but relative extruder moves; Network
M550 P"Black Widow" ; Set machine name
M552 S1 ; Enable network
M587 S"NETWORKNAMEHERE" P"NETWORKPASSWORDHERE" ; Configure access point. You can delete this line once connected
M586 P0 S1 ; Enable HTTP
M586 P1 S0 ; Disable FTP
M586 P2 S0 ; Disable Telnet; Drives
M569 P0 S1 ; Drive 0 goes forwards X
M569 P1 S0 ; Drive 1 goes backwards Y
M569 P2 S0 ; Drive 2 goes backwards Z
M569 P3 S1 ; Drive 3 goes forwards EM350 X16 Y16 Z16 E16 I1 ; Configure microstepping with interpolation
M92 X80 Y80 Z1600 E427 ; Set steps per mm for 16x microstepping
M566 X900 Y900 Z12 E10 ; Set maximum instantaneous speed changes (mm/min)
M203 X6000 Y6000 Z500 E1200 ; Set maximum speeds (mm/min)
M201 X500 Y150 Z300 E200 ; Set accelerations (mm/s^2)
M906 X1050 Y1050 Z1300 E1050 I30 ; Set motor currents (mA) and motor idle factor in per cent
M84 S30 ; Set idle timeout; Axis Limits
M208 X0 Y0 Z0 S1 ; Set axis minima
M208 X335 Y260 Z250 S0 ; Set axis maxima; Endstops
M574 X1 Y1 S0 ; Set active low endstops
M574 Z1 S2 ; Set endstops controlled by probe
M557 X0:335 Y45:260 S20 ; Define mesh grid; Heaters
M301 H0 S1.00 P32.6 I1.360 D79.4 T0.4 W180 B30 ; Use PID on bed heater (may require further tuning)
M305 P0 T100000 B4138 C0 R4700 ; Set thermistor + ADC parameters for heater 0
M143 H0 S80 ; Set temperature limit for heater 0 to 80C
M305 P1 T100000 B4066 R4700 ; Set thermistor + ADC parameters for heater 1
M143 H1 S240 ; Set temperature limit for heater 1 to 220C; Fans
M106 P0 S0 I0 F500 H-1 ; Set fan 0 value, PWM signal inversion and frequency. Thermostatic control is turned off
M106 P1 S1 I0 F500 H1 T100 ; Set fan 1 value, PWM signal inversion and frequency. Thermostatic control is turned on
M106 P2 S0 I0 F500 H-1 ; Set fan 2 value, PWM signal inversion and frequency. Thermostatic control is turned off; Tools
M563 P0 D0 H1 F2 ; Define tool 0
G10 P0 X0 Y0 Z0 ; Set tool 0 axis offsets
G10 P0 R0 S0 ; Set initial tool 0 active and standby temperatures to 0C; Automatic saving after power loss is not enabled
; Custom settings are not configured
M307 H3 A-1 C-1 D-1 ;
M558 P5 X0 Y0 Z1 H9 F200 T6000
G31 X-48.8 Y-18.2 Z2.3 P25; Miscellaneous
M501
T0 ; Select first tool -
@saltypetz said in Duet WIFI with Micron Cobra extruder temperature setting:
M92 X80 Y80 Z1600 E427 ; Set steps per mm for 16x microstepping
M566 X900 Y900 Z12 E10 ; Set maximum instantaneous speed changes (mm/min)
M203 X6000 Y6000 Z500 E1200 ; Set maximum speeds (mm/min)
M201 X500 Y150 Z300 E200 ; Set accelerations (mm/s^2)
M906 X1050 Y1050 Z1300 E1050 I30 ; Set motor currents (mA) and motor idle factor in per centChange to this:
M92 X80 Y80 Z1600 E1600 ; Set steps per mm for 16x microstepping
M566 X900 Y900 Z12 E120 ; Set maximum instantaneous speed changes (mm/min)
M203 X6000 Y6000 Z500 E1200 ; Set maximum speeds (mm/min)
M201 X500 Y150 Z300 E600 ; Set accelerations (mm/s^2)
M906 X1050 Y1050 Z1300 E800 I30 ; Set motor currents (mA) and motor idle factor in per cent
In regards to the heater problem - if the heater in DWC shows 2000° it means that the temp sensor is disconnected.
Please upload a picture of your temperature sensor. I suspect this may be a Thermocouple and not a thermistor, and in that case, that's definitely not going to work that way, and you will need either to purchase a thermocouple daughterboard for the Duet or to purchase a thermistor (cheaper and simple solution).If the temperature sensor has a braided shield that's definitely a thermocouple and not a thermistor.
Also, I am not familiar with your specific printer settings, but it looks to me that the accelerations for X and Y axis are low.
I would recommend adding to your config file the command:
M204 Pnnnn Tnnnn; Set acceleration for printing moves (Pnn), Set acceleration for printing moves (Tnn)
That would allow you to change the accelerations in mid print (so you can tune it), while never exceeding the maximum accelerations which were configured using the M201 command. -
I put a regular temperature sensor and it works perfect.
This one is a k-type with a metal shield. Also I tried 3 different one it's a daul plus they set a extra. Here is a picture of it. I don't remember the settings but I got it down to 390c.
I do have a thermocouple daughterboard. I am very new to this duet wifi board. It hard for me now but I'm sure it will get easier in time.
(https://photos.app.goo.gl/FfKThQruDtJThEFD2)Thank you for the help.
-
That's indeed Type-K thermocouple.
In that case, you will need to connect the thermocouple leads to the Thermocouple daughter board.
Polarity does matter if you connect it with reversed polarity the temperature will drop instead of rising during heating.
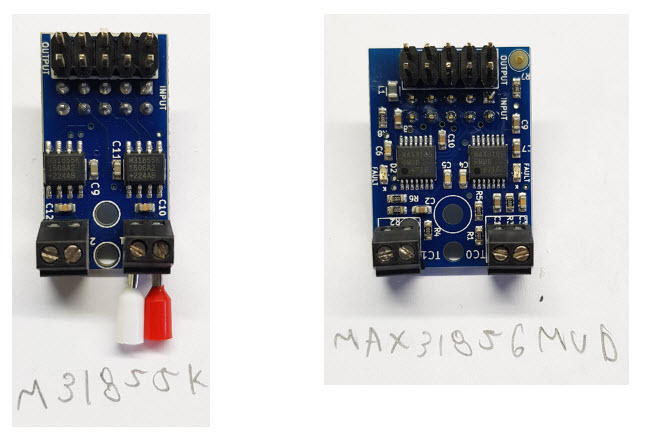
There are 2 types of thermocouple daughterboards for the Duet:- M31855K
- MAX31856MUD (Newer version)
You can identify which version you have using the following picture:
In case you have M31855K, use this command, and connect the thermocouple to channel 1
M305 P1 X100 T"K"; Set temperature sensor parameters, Heater number (Pn), Heater ADC channel (Xnnn)
for channel 2 you can use this command:
M305 P1 X101 T"K"; Set temperature sensor parameters, Heater number (Pn), Heater ADC channel (Xnnn)In case you have MAX31856MUD, use this command, and connect the thermocouple to channel 1
M305 P1 X150 T"K"; Set temperature sensor parameters, Heater number (Pn), Heater ADC channel (Xnnn)
for channel 2 you can use this command:
M305 P1 X151 T"K"; Set temperature sensor parameters, Heater number (Pn), Heater ADC channel (Xnnn)Due to the fact that thermocouples are prone to electromagnetic interference, it is highly recommended the keep the thermocouple wiring away from stepper motors wiring, and from heaters wiring, because these wires carry varying current which creates electromagnetic fields around them.
Micron E.M.E provides thermocouples which are ungrounded and have a thick braided jacket, and that helps to eliminate electromagnetic interferences.
You can read more about connecting thermocouples in the Duet Wiki:
Connecting_thermocouples -
@guyaros said in Duet WIFI with Micron Cobra extruder temperature setting:
M305 P1 X150 T"K";
This worked. I'm sure i will need a lot more help this is all new to me.
I am a newbie with this setup so I'm sure I will have a lot questions.
M305 P1 X150 T"K"; Set temperature sensor parameters, Heater number (Pn), Heater ADC channel (Xnnn)Thank you for the help
-
I'm glad I could help.
You are welcome to ask further questions. -
Next problem. The board can't handle the power the heaters needed so I have one more power supply. I using the tevo black widow mosfet and the other power supply and the wire gets reat hot to the heater. But when I hooked up the heat to the Duet WIFI the wires also got real hot. Could if be something in the config file.
Here is the config info.
; Heaters
M301 H0 S1.00 P24.54 I4.3 D34.97 T0.4 W180 B30 ; Use PID on bed heater (may require further tuning)M305 P0 T100000 B4036 C0 R4700 ; Set thermistor + ADC parameters for heater 0
M143 H0 S80 ; Set temperature limit for heater 0 to 80C
M305 P1 X150 T"K"; ; Set thermistor + ADC parameters for heater 1
M143 H1 S300 ; Set temperature limit for heater 1 to 300CThank you for the help.
-
Forgot to say this I can see the temperature going up for the WIFI page.
-
Which heater wires are getting hot: the bed heater wires, or the extruder heater wires?
What is the power rating of the heater concerned, and what thickness wires are you using?
If you are using 24V power, are you sure that the heater is a 24V heater not a 12V heater?
-
The extruder wires are getting real hot but I turned it off. The extruder is on a 12V 25A power supply.
-
This is from the Micron support page.
Electrical:
Step motor connections
Connect the motor wires according to the attached motor spec.
If you are working with 24V Power supply, reduce the driver (pololu or similar) to about 50% current. This
can be done by: disconnect PS, rotate the current pot fully counterclockwise and then about 1/8 of a turn
clockwise, connect the PS and check if the extruder stepper motor able to extrude the filament without
losing steps (don't forget to turn on the heater).
Another approach to reduce the current is in the firmware configuration, this can be done only if you have
a controller and drivers that support this.
NTC thermistor
The thermistor type is: 100K ohm EPCOS B57560G104F NTC THERMISTOR
Polarity for the NTC is not important. Connect it to the Temperature input on the
Ramps/Sanguilolu/Smoothieboard/Etc.
For Marlin firmware, the thermistor number is type 1.
Heaters
Micron 3DP extruder's heaters are rated for 12V and about 60W (120W for the dual extruder). Make sure
your board fuse can handle that.
It is possible to operate the heaters using 24V PS. In this case, reduce the power to 60 % by changing the
heaters parameters in the firmware. In case of using Marlin firmware, you should look for #define
PID_MAX 255 in configuration.h file and change it to #define PID_MAX 155
Polarity for the heater is not important; just connect it to the heater exitThank you for the help
-
Cobra extruder is available with 2 voltage configuration: 12[V] or 24[V].
the difference between the configurations is the Fan voltage rating and Heater resistance.
Also, there are several heaters options: 50[W] / 64[W] /100[W].
Duet extruder heaters can output 9[A], so for 12[V] the power output is 108[W], so no problem at all.
Please measure the resistance of the heater you have, using Digital Multi Meter, and report here.I have never experienced a situation where the heaters wiring of the Cobra got hot. Please take a picture of your wiring. This is very odd.
-
After you'll fix the "hot wires" problem you should run Heater Auto PID tuning
Please read here before tuning:
https://duet3d.dozuki.com/Wiki/Tuning_the_heater_temperature_controlTo run PID tuning in your case, use this command:
M303 H1 P1.0 S230After the PID tuning is completed, write the command
M307 H1
and write down or print screen the tuning results.then, edit your config.g file, and add this line:
M307 H1 Annnn.n Cnnn.n Dnn.n S1.0;
Replace nnn.n with the results from the PID tuning. -
So you want me to unhook the heater and put the meter on the heater wires. Is that what you want me to do?
If that is what you are asking me to do it is 600 - 700 on 2000k on the meter.
Can these extruders run off the board or should I put them on a different power supply. I don't want to burn up the board. I had them hooked up to the board and the shut down from low power. Right now I have them on a different power source with the tevo black widow mosfet. But the wires get hot hooked to the board or the mosfet.Thank you
-
@saltypetz said
So you want me to unhook the heater and put the meter on the heater wires. Is that what you want me to do?
Yes, I want you to measure the resistance of the heater.
Take a picture of your multimeter, with the measurement you did, so I can help you further.
A reading of 600-700 it's not what it suppose to read.
I don't think 2000k mode on your DMM (Digital Multi-Meter) is the correct mode.I think there is a language barrier between us, so please upload a picture.
As I said, the extruder heater supposes to be connected directly to the Duet.
But first, we need to investigate whats wrong with your wiring, because wires getting hot is not normal, and maybe you have kind of a shortage which causes a high current draw, or that you used very thin wires that aren't sufficient to handle high loads. -
There is no language barrier I understand what you want but I only have a junky meter at home. I can go get my Klein from my warehouse. But this meter will only work on 2000k nothing else.
I put a URL from photobucket but nothing shows up.
http://i1024.photobucket.com/albums/y301/loosewire1234/20180422_110352_zpshbnvi6rf.jpg
I am still trying to up load the picture but it is a Greenlee DM-20.
If I need to I will go pick up the meter now. KleinThank you for your help
-
Set the DMM to 200[ohm] mode.
The resistance of heaters (in general) is in range of 1.5 to 6[ohm], so you will need to use the minimal range of your meter which is 200 in your case.
If it's a faulty meter, then throw it away and get a new one.I'm trying to figure out what causing the wires to get hot.
so please upload pictures of your wiring and connections to the Duet, this may help. -
Here are the pictures and I think it what you are asking me to do. I'm not a great electronics guy but i will try my best.
http://i1024.photobucket.com/albums/y301/loosewire1234/20180423_144447_zpsj3ljlw1p.jpg
http://i1024.photobucket.com/albums/y301/loosewire1234/20180423_144440_zpski3b8rjj.jpg
In the wifi software when I try to turn on the heater where it says Sensors it drop down to 5 vovlt and the fan on the power supply shuts off. Do I need to go get a Atx power supply. If so what Atx sould I buy. With nothing on there It's only 18.9 volts. Could this be the whole problem.