Tevo Little Monster - mesh grid results
-
@dc42 said in Tevo Little Monster - mesh grid results:
You need to first calibrate your Z probe, see https://duet3d.dozuki.com/Wiki/Test_and_calibrate_the_Z_probe, and then run delta calibration, see https://duet3d.dozuki.com/Wiki/Calibrating_a_delta_printer#Section_Setting_up_your_initial_delta_parameters and the following section. If you use 8-factor compensation then the beld tilt will also be taken care of.
Hello dc42,
thanks for your reply.
i have now determine the Z offset (0.26 mm) and placed the value in config.g
the configuration tool and Escher 3D only showing 7-factor. have i something overlooked?

-
You can select 6- or 7-factor, then change S6 or S7 on the final G30 command to S8.
-
I have changed from S7 to S8
; bed.g
; called to perform automatic delta calibration via G32
;
; generated by RepRapFirmware Configuration Tool on Sat Apr 28 2018 20:28:56 GMT+0200 (Mitteleuropäische Sommerzeit)
M561 ; clear any bed transform; bed.g file for RepRapFirmware, generated by Escher3D calculator
; 16 points, 7 factors, probing radius: 130, probe offset (0, 19.5)
M98 Pdeployprobe.g ; deploy mechanical Z probe
G30 P0 X0.00 Y113.04 Z-99999 H0
G30 P1 X74.67 Y88.99 Z-99999 H0
G30 P2 X123.50 Y21.78 Z-99999 H0
G30 P3 X112.58 Y-65.00 Z-99999 H0
G30 P4 X44.46 Y-122.16 Z-99999 H0
G30 P5 X-44.46 Y-122.16 Z-99999 H0
G30 P6 X-112.58 Y-65.00 Z-99999 H0
G30 P7 X-123.50 Y21.78 Z-99999 H0
G30 P8 X-74.67 Y88.99 Z-99999 H0
G30 P9 X0.00 Y50.00 Z-99999 H0
G30 P10 X47.75 Y27.57 Z-99999 H0
G30 P11 X56.29 Y-32.50 Z-99999 H0
G30 P12 X0.00 Y-65.00 Z-99999 H0
G30 P13 X-56.29 Y-32.50 Z-99999 H0
G30 P14 X-47.75 Y27.57 Z-99999 H0
G30 P15 X0 Y0 Z-99999 S8
M98 Pretractprobe.g ; retract mechanical Z probe; Use S-1 for measurements only, without calculations. Use S4 for endstop heights and Z-height only. Use S6 for full 6 factors
; If your Z probe has significantly different trigger heights depending on XY position, adjust the H parameters in the G30 commands accordingly. The value of each H parameter should be (trigger height at that XY position) - (trigger height at centre of bed)i ran the auto delta calibration and saved all to the config-override.g with M500.
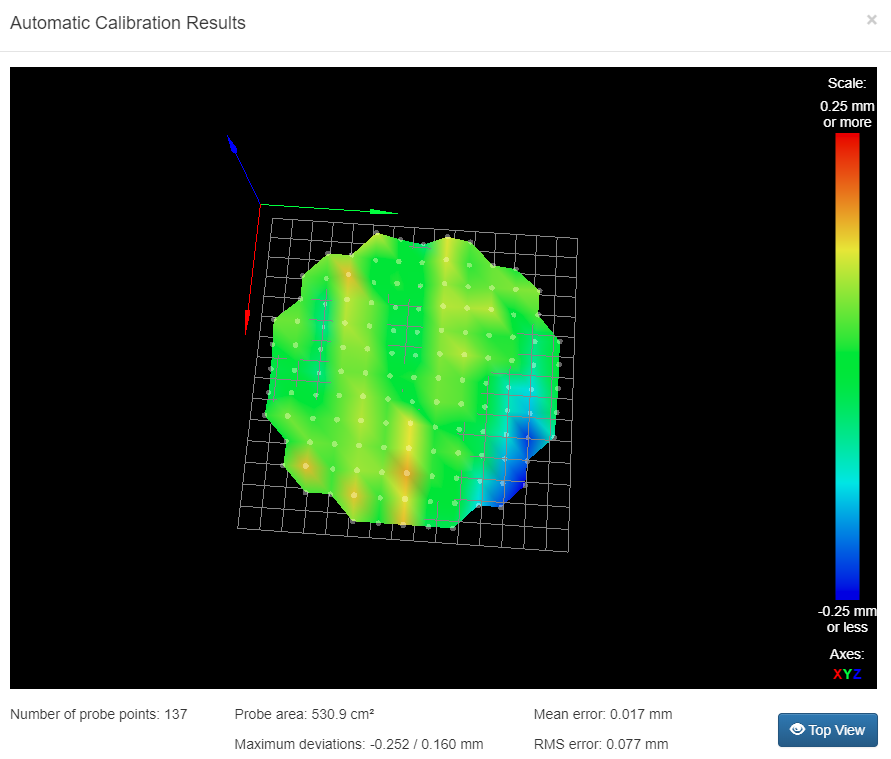
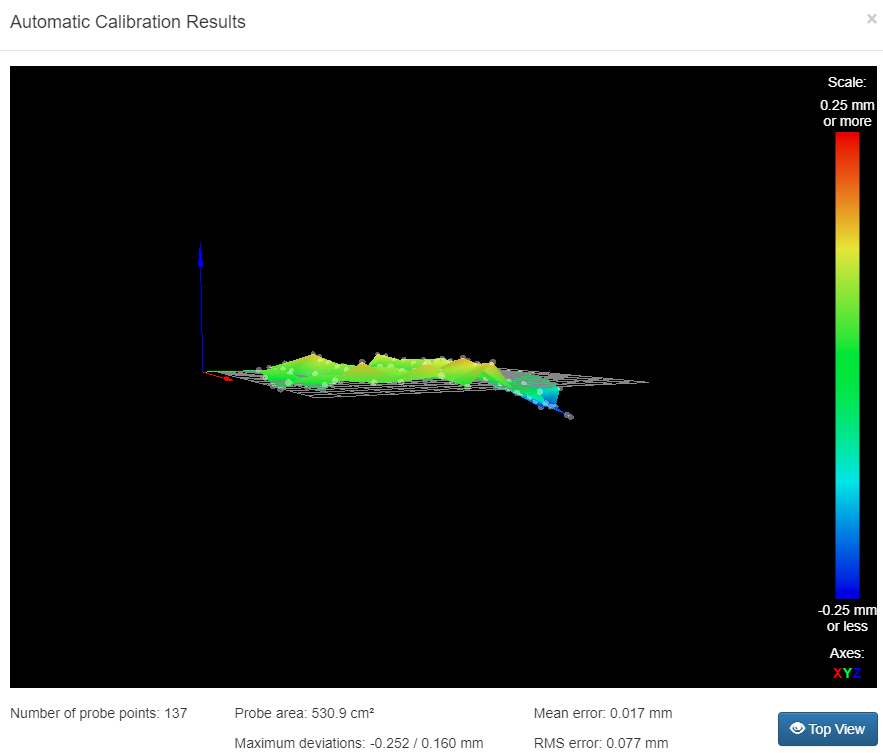
After auto calibration i have ran the mesh grid compensation and it looks much better then before


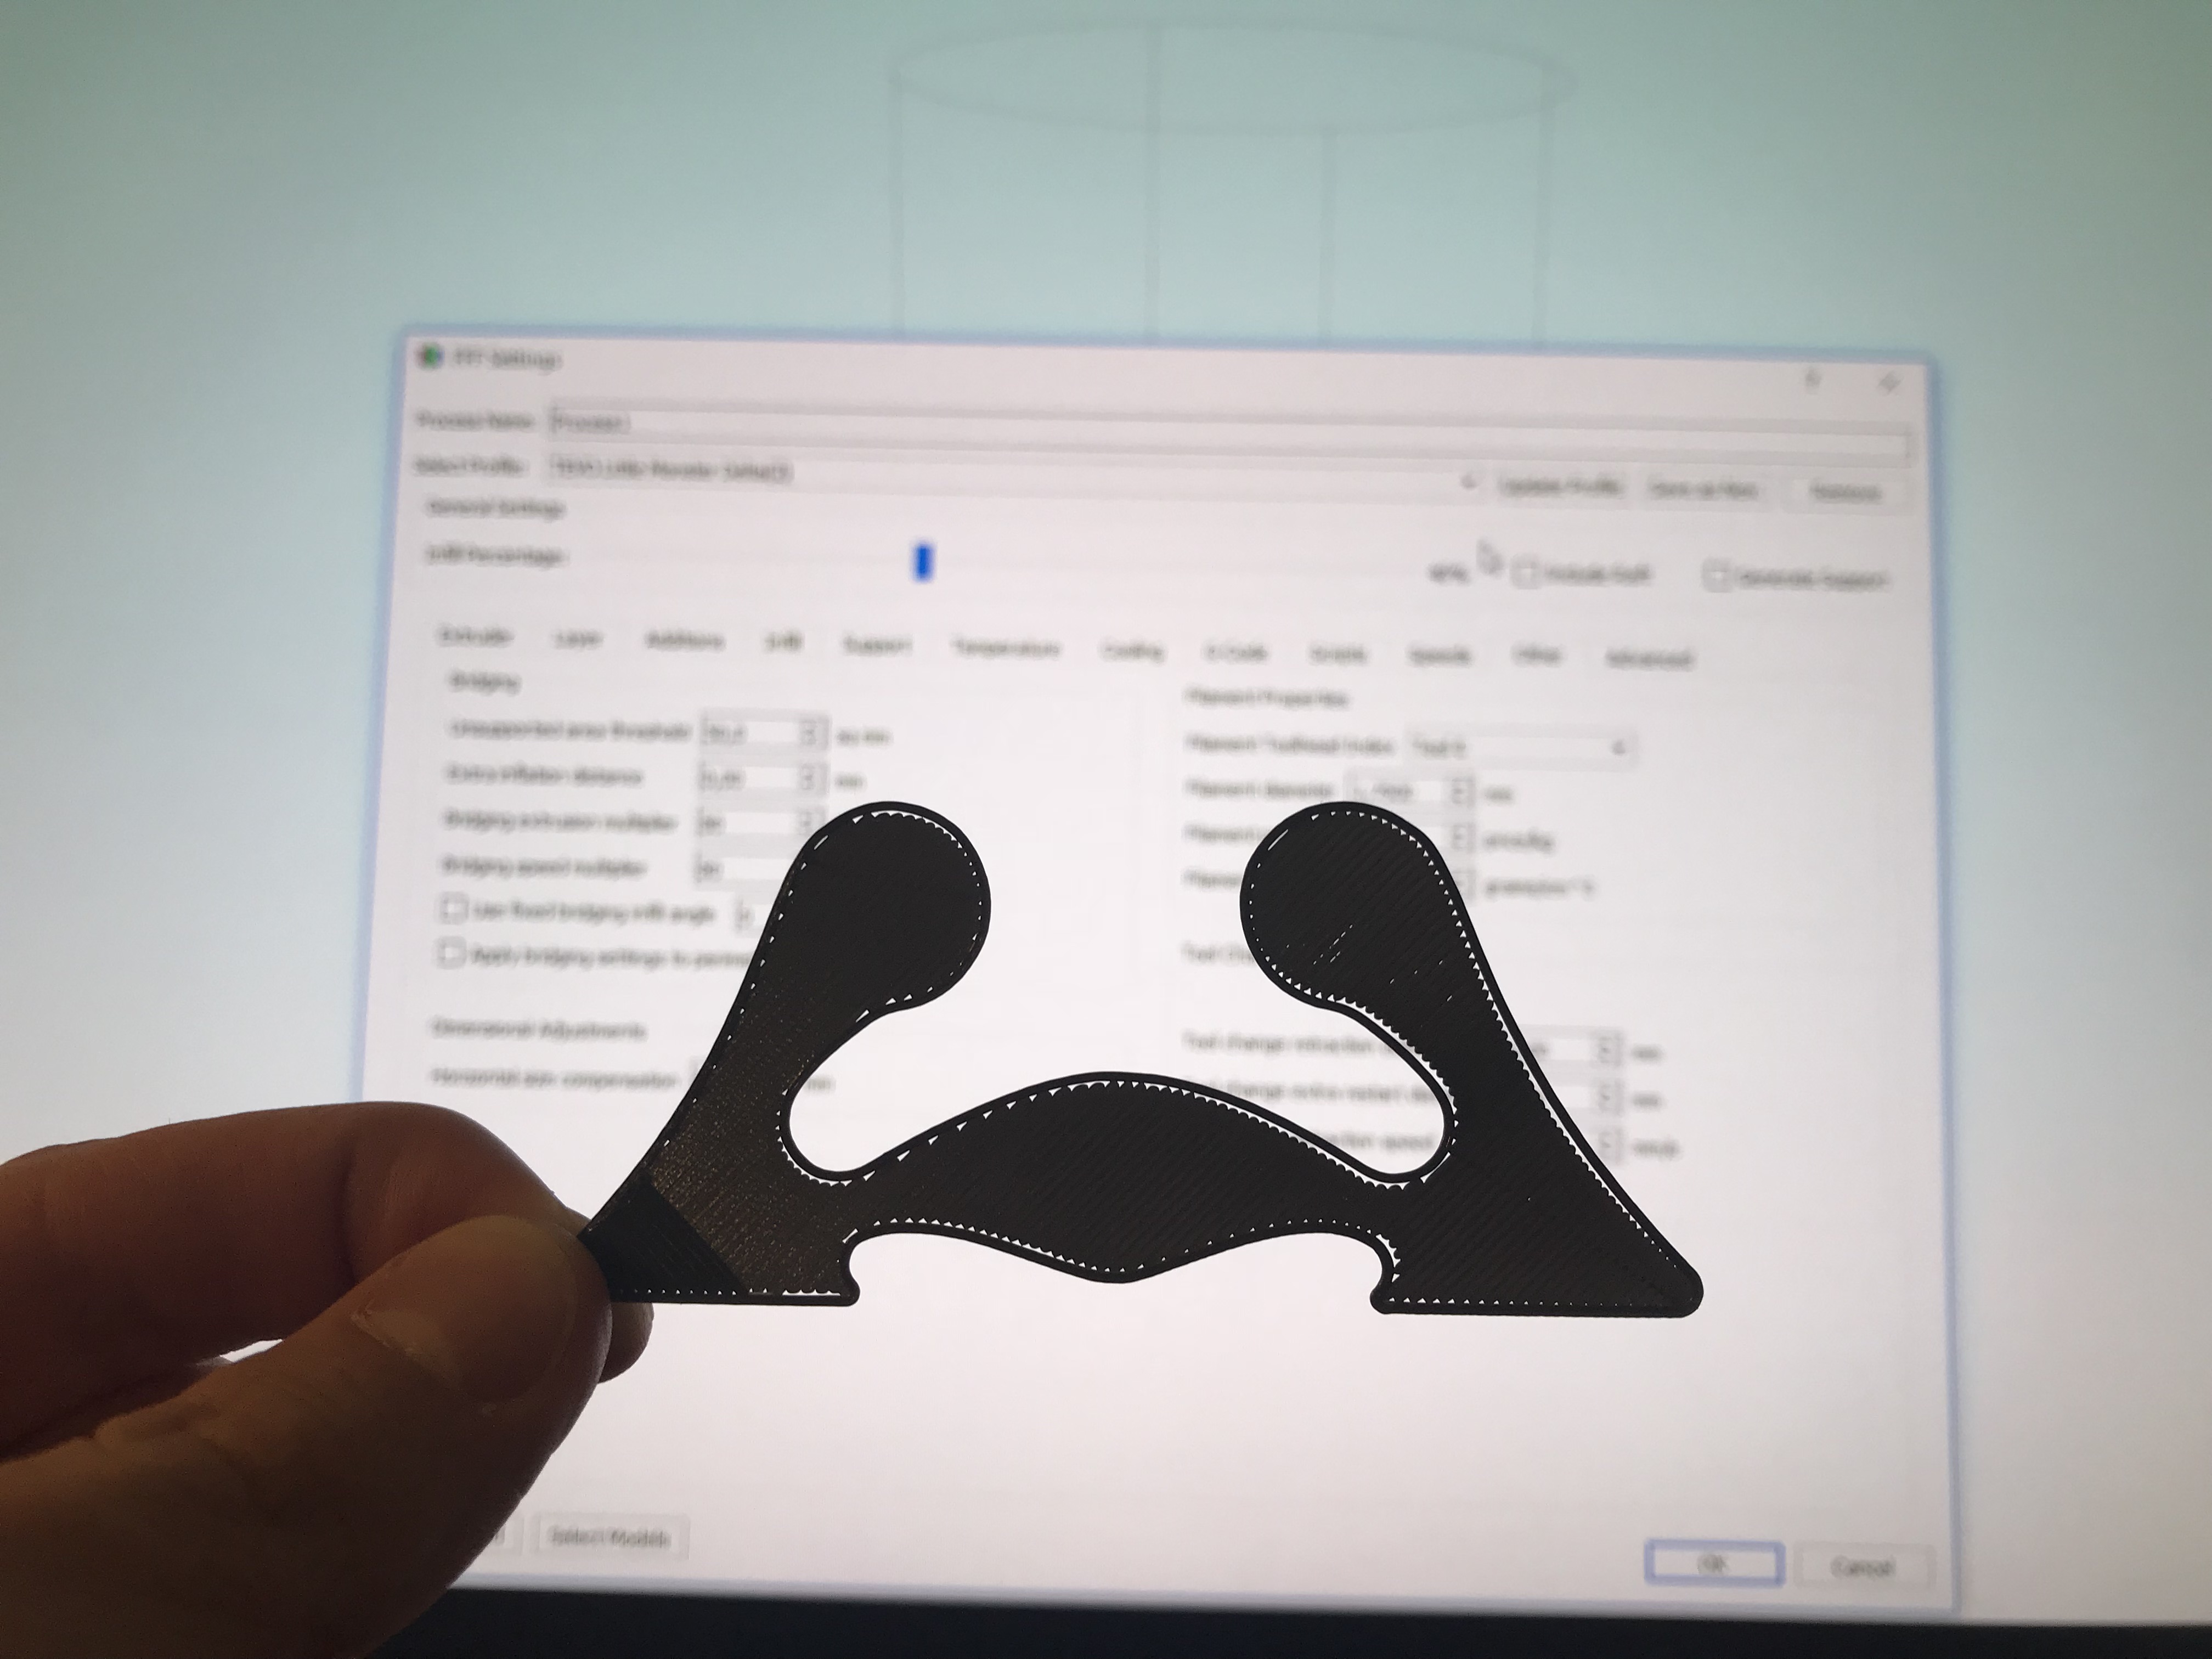
This is how the first layer is looks like

What i am doing wrong?
-
Check the hotend height with a sheet of paper when z height is 0.
Either you have the z height wrong caused by faulty trigger height, or you are underextruding so the extruder steps/mm should be checked too. -
Oh, and the mesh bed compensation values should be loaded by adding this to the slicer's start gcode section:
G29 S1 ;load and apply mesh bed calibration values -
Hello guys,
i have spent the last days to get rid of my issues with this little monster, but it seems that nothing works...
i have installed the E3D V6 instead of the volcano. i have tried 8-factor and 9-factor with mesh grid values loaded and without.
The extruder steps/mm are exact calibrated.
Always i ran the auto delta calibration with 9-factor the lenght of my rods changes between 397mm and 404mm.
The heightmap also looks always different anytime i ran the mesh compansation.i thought about to purchase the full kit of the smart effector + magballs rods with 360mm length, but i dont know if this going to help.

The first layer always looks different. My settings in Simplify are with 30% ouline overlap but in the picture it seems like i have to change to 100% overlap to reach the outline in the right part.
I am doing something heavily wrong and i dont know what it is...
Should i get the smart effector?
Should i get rid of the tilt in my heatbed?
-
What type of Z probe does the TLM use? For delta printers, a nozzle contact Z probe is recommended. Any type of Z probe that is offset from the nozzle Neill be sensitive to varying effector tilt, which his hard to eliminate completely on a delta printer.
Eliminating the bed tilt is a good idea, if you can do it easily e.g. by putting shims under the bed supports.
-
hello dc42,
the TLM uses the BLTouch as Z probe and the Y offset to the Nozzle is approximately 19mm.
The Heatbet is glued with silicone...
 I am going to try in the next step to remove it carefully to get the heatbed as leveled as possible.
I have just started the same print twice and i noticed that the second print slightly shifted in X direction.

-
@malkem
I originally had a microswitch based z probe sensor
The microswitch was inaccurate mainly because it deformed the bed on contact quite a bit.Then I changed to an inductive sensor, which was even more inaccurate because of the effector tilt.
Then changed to smart effector:
The smart effector -according to my experience- is very precise, and needs a wey small tap to activate, it does not deform the bed in any meaningful way.BTW, I have/had the same disconnected wall problem with cura 3.2.1 Increased the flow rate to 105% and set one more wall on every second layer, which seem to solve the problem for me.
-
No matter what i do, i got always the same gaps if printing from the left to the right side. left side looks perfect while printing to the right side i got gaps between the printed lines.
it seems like i have a mechanical issue, but i cant figure out what it is. maybe one of the stepper motor loosing steps?
I cant believe this is just because of the z probe.My heated bed are now flat and not tilted anymore.
-
@malkem said in Tevo Little Monster - mesh grid results:
No matter what i do, i got always the same gaps if printing from the left to the right side. left side looks perfect while printing to the right side i got gaps between the printed lines.
it seems like i have a mechanical issue, but i cant figure out what it is. maybe one of the stepper motor loosing steps?
I cant believe this is just because of the z probe.That's probably due to varying effector tilt. See https://duet3d.dozuki.com/Wiki/Calibrating_a_delta_printer. Mounting a bulls eye spirit level on the effector is a good way to detect effector tilt.
-
I am going to place a order for the smart effector and the magball arms and just give it a try.
Anyone knows if 360mm arms enough for the tevo little monster? i cant find 400mm arms in the duet3d shop
-
If you need 400mm arms you can order them directly from Haydn Huntley.
-
Now its done. i have ordered the smart effector and the 400 mm arms by Haydn Huntley. i hope the delivery doesnt take too much time and hopefully its gonna improve my prints.
thanks so far for your help! i will keep you guys updated.