Robo3d R1 Plus AutoLevel
-
The Robo3d r1 plus uses microswitch endstops on the x axis gantry that trigger when the nozzle touches the bed. My goal is to keep this autolevel procedure. I saw someone was able to do it https://forum.duet3d.com/topic/4737/zprobe-robo3d-r1.
But it wasnt very clear how they did it.
The 2 microswitch endstops are wire to one connector that is currently plugged into E0 endstop port p4 i1 in the config.g and g29 at the end of bed.g file as recommended in this forum https://forum.duet3d.com/topic/4737/zprobe-robo3d-r1
I have gone through the mesh bed leveling instructions.
When I run a test print it homes all then moves to the front left of the machine (x axis seems to crash) then begins mesh grid leveling sequesnce.
Then it homes the x and y and heats the extruder. It seems to be printing too close to the bed.
here are my config.g , homez.g, homeall.g and bed.g files.
Im not sure how many things I am doing wrong here but I am sure Im doing something wrong.; Drives
M569 P0 S0 ; Drive 0 goes forwards
M569 P1 S1 ; Drive 1 goes forwards
M569 P2 S0 ; Drive 2 goes forwards
M569 P3 S1 ; Drive 3 goes forwards
M350 X32 Y32 Z32 I0 ; Configure microstepping without interpolation
M350 E16 I1 ; Configure microstepping with interpolation
M92 X160 Y160 Z1600 E723.38 ; Set steps per mm
M566 X900 Y900 Z12 E120 ; Set maximum instantaneous speed changes (mm/min)
M203 X30000 Y30000 Z300 E1500 ; Set maximum speeds (mm/min)
M201 X500 Y500 Z250 E250 ; Set accelerations (mm/s^2)
M906 X1000 Y1000 Z1000 E800 I30 ; Set motor currents (mA) and motor idle factor in per cent
M84 S30 ; Set idle timeout; Axis Limits
M208 X0 Y0 Z0 S1 ; Set axis minima
M208 X230 Y254 Z200 S0 ; Set axis maxima; Endstops
M574 Z1 S0 ; Set active low endstops
M574 X2 Y2 S1 ; Set active high endstops; Z-Probe
M574 Z1 S2 ;
M558 P0 I1 H5 F120 T6000 ; Set Z probe type to unmodulated and the dive height + speeds
G31 P500 X0 Y0 Z-1 ; Set Z probe trigger value, offset and trigger height
M557 X15:215 Y15:239 S50 ; Define mesh grid; Heaters
M305 P0 T100000 B4138 C0 R4700 ; Set thermistor + ADC parameters for heater 0
M143 H0 S110 ; Set temperature limit for heater 0 to 110C
M305 P1 T100000 B4138 C0 R4700 ; Set thermistor + ADC parameters for heater 1
M143 H1 S300 ; Set temperature limit for heater 1 to 300C; Fans
M106 P0 S0.6 I0 F500 H-1 ; Set fan 0 value, PWM signal inversion and frequency. Thermostatic control is turned off
M106 P1 S1 I0 F500 H1 T45 ; Set fan 1 value, PWM signal inversion and frequency. Thermostatic control is turned on
M106 P2 S1 I0 F500 H-1 ; Set fan 2 value, PWM signal inversion and frequency. Thermostatic control is turned off; Tools
M563 P0 D0 H1 ; Define tool 0
G10 P0 X0 Y0 Z0 ; Set tool 0 axis offsets
G10 P0 R0 S0 ; Set initial tool 0 active and standby temperatures to 0C; Automatic saving after power loss is not enabled
; Custom settings are not configured
; homez.g
; called to home the Z axis
;
; generated by RepRapFirmware Configuration Tool on Tue Oct 30 2018 18:50:03 GMT+0800 (中国标准时间)
G91 ; relative positioning
G1 Z5 F4000 S2 ; lift Z relative to current position
G90 ; absolute positioning
G1 X25 Y25 F4000 ; go to first probe point
G30 ; home Z by probing the bed; Uncomment the following lines to lift Z after probing
;G91 ; relative positioning
;G1 S2 Z5 F1000 ; lift Z relative to current position
;G90 ; absolute positioning; homeall.g
; called to home all axes
;
; generated by RepRapFirmware Configuration Tool on Sun Oct 28 2018 16:32:40 GMT-0700 (Pacific Daylight Time)
G91 ; relative positioning
G1 Z5 F6000 S2 ; lift Z relative to current position
G1 S1 X235 Y259 F4000 ; move quickly to X and Y axis endstops and stop there (first pass)
G1 X-5 Y-5 F5000 ; go back a few mm
G1 S1 X235 Y259 F3000 ; move slowly to X and Y axis endstops once more (second pass)
G1 S1 Z-205 F1800 ; move Z down stopping at the endstop
G90 ; absolute positioning
G1 X15 Y15 F2000 ; put head over the centre of the bed, or wherever you want to probe
G30 ; lower head, stop when probe triggered and set Z to trigger height; Uncomment the following lines to lift Z after probing
;G91 ; relative positioning
;G1 S2 Z5 F100 ; lift Z relative to current position
;G90 ; absolute positioning; bed.g
; called to perform automatic bed compensation via G32
;
; generated by RepRapFirmware Configuration Tool on Sun Oct 28 2018 16:32:40 GMT-0700 (Pacific Daylight Time)
M561 ; clear any bed transform
G28 ;
; Probe the bed at 4 points
G30 P0 X15 Y15 H0 Z-99999
G30 P1 X15 Y239 H0 Z-99999
G30 P2 X215 Y239 H0 Z-99999
G30 P3 X215 Y15 H0 Z-99999 S2
G29 ; -
First of all, I just want to give you some encouragement that this is a nice post, informative and has the details people will need to be able to assist. A lot better than the previous 170+ post monstrosity! It is always good to make a new post when the problem is different.
Having said that, a few comments:
It looks like you're currently using Mode0. This is if you aren't using a Z-probe at all. As a side note, it is always better to actually understand the options, rather than just guessing at things and trying to piece together what might or might not work from random forum posts. Since you are trying to Z-probe, Mode 0 is not appropriate. Since you have switches connected to an Endstop input, Mode 4 seems appropriate (and indeed, is what the poster in the thread you linked is using).
https://duet3d.dozuki.com/Wiki/Connecting_a_Z_probe
You still need to choose whether the signal is high or low when triggered, this is done with:
"In firmware 1.16 and later, use I1 in the M558 command to select active low, otherwise it defaults to active high."
You need to look at the value of the sensor in Duet Web Control when triggered/not triggered to determine if it is active high or active low. I suspect it is active low (meaning you need I1 in the M558 command), but am unsure as I don't have that printer.
The next item I see is your negative Z-probe trigger height. This is generally not reasonable (having a negative value), however it might be right in this case, since your printer has to drive the bed down to trigger the "probes". @dc42 is better suited to comment here.
Once that's sorted out, re-post your config file. Then we can go on to homeall.g and bed.g.
-
Thanks for your input. I have changed back to p4 but as you recommend I will wait for the administrators comments before carrying on.
-
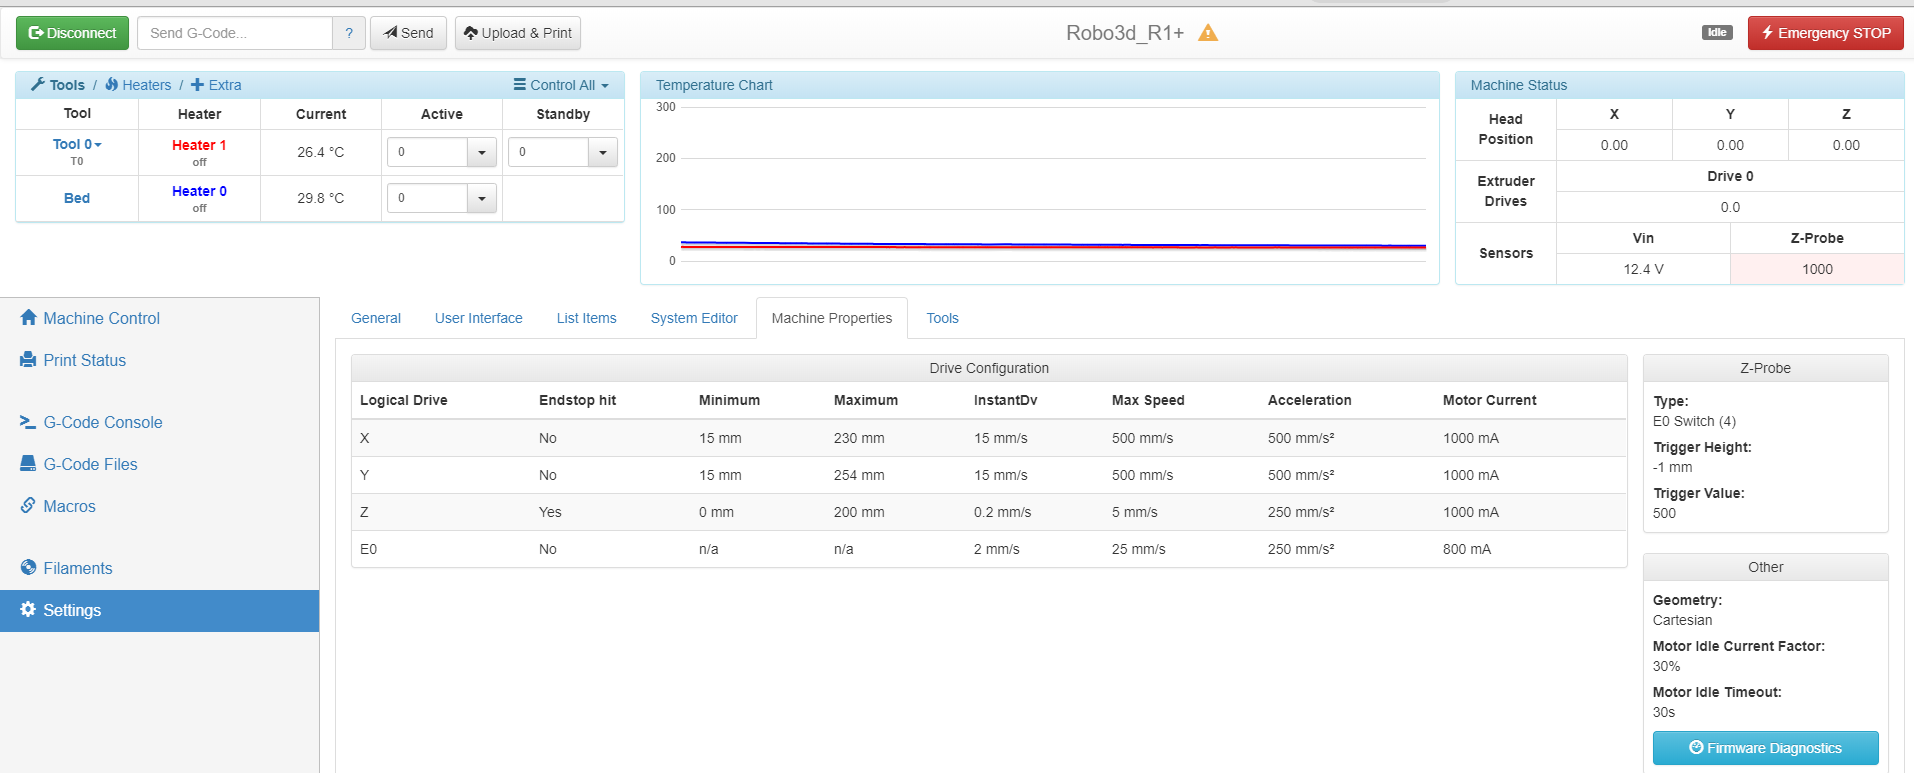
It'd be good in the meantime to also sort out active high vs active low. Take screenshots of Duet Web Control with the switch pressed and not pressed, if confused.
Also good to re-post config.g when you make changes, so we can refer to the latest copy that you're using.
-
Here is the current config.g
; Drives
M569 P0 S0 ; Drive 0 goes forwards
M569 P1 S1 ; Drive 1 goes forwards
M569 P2 S0 ; Drive 2 goes forwards
M569 P3 S1 ; Drive 3 goes forwards
M350 X32 Y32 Z32 I0 ; Configure microstepping without interpolation
M350 E16 I1 ; Configure microstepping with interpolation
M92 X160 Y160 Z1600 E723.38 ; Set steps per mm
M566 X900 Y900 Z12 E120 ; Set maximum instantaneous speed changes (mm/min)
M203 X30000 Y30000 Z300 E1500 ; Set maximum speeds (mm/min)
M201 X500 Y500 Z250 E250 ; Set accelerations (mm/s^2)
M906 X1000 Y1000 Z1000 E800 I30 ; Set motor currents (mA) and motor idle factor in per cent
M84 S30 ; Set idle timeout; Axis Limits
M208 X15 Y15 Z0 S1 ; Set axis minima
M208 X230 Y254 Z200 S0 ; Set axis maxima; Endstops
M574 Z1 S0 ; Set active low endstops
M574 X2 Y2 S1 ; Set active high endstops; Z-Probe
M574 Z1 S2 ;
M558 P4 I1 H5 F120 T6000 ; Set Z probe type to unmodulated and the dive height + speeds
G31 P500 X0 Y0 Z-1 ; Set Z probe trigger value, offset and trigger height
M557 X15:215 Y15:239 S50 ; Define mesh grid; Heaters
M305 P0 T100000 B4138 C0 R4700 ; Set thermistor + ADC parameters for heater 0
M143 H0 S110 ; Set temperature limit for heater 0 to 110C
M305 P1 T100000 B4138 C0 R4700 ; Set thermistor + ADC parameters for heater 1
M143 H1 S300 ; Set temperature limit for heater 1 to 300C; Fans
M106 P0 S0.6 I0 F500 H-1 ; Set fan 0 value, PWM signal inversion and frequency. Thermostatic control is turned off
M106 P1 S1 I0 F500 H1 T45 ; Set fan 1 value, PWM signal inversion and frequency. Thermostatic control is turned on
M106 P2 S1 I0 F500 H-1 ; Set fan 2 value, PWM signal inversion and frequency. Thermostatic control is turned off; Tools
M563 P0 D0 H1 ; Define tool 0
G10 P0 X0 Y0 Z0 ; Set tool 0 axis offsets
G10 P0 R0 S0 ; Set initial tool 0 active and standby temperatures to 0C; Automatic saving after power loss is not enabled
; Custom settings are not configured
Here are the screenhots


-
That's great, and will be useful. Is the first screenshot (Z-Probe 0) with you activating the switch, or with hands off, switch not activated?
-
zprobe 0 (or the first picture) is without me lifting and activating the trigger. Z probe 100 is when i trigger it by hand.
-
@sleepless said in Robo3d R1 Plus AutoLevel:
zprobe 0 (or the first picture) is without me lifting and activating the trigger. Z probe 100 is when i trigger it by hand.
I presume you mean it reads 1000 when you trigger it by hand. As it also reads zero when you don't trigger it, your Z probe seems to be configured correctly.
You've mentioned two problems:
-
"X axis seems to crash". Do you mean that it is driving into the hard endstop? If so then I think you need to adjust the X parameter in your M208 S0 command. The X2 parameter in your M574 command indicates that you are homing X to the high-X (which I presume is the right hand) end of the axis, and your M208 S0 X parameter is 230. So when the endstop switch triggers, it will set X to 230. I think you need to reduce that 230 value so that after homing, if you send G1 X0 F1000 then it moves the head to the left hand edge of the bed. Or, if it can't reach the left hand edge of the bed because it hits the hard endstop first, you want it to move to a point a few mm before it hits the hard endstop. See https://duet3d.dozuki.com/Wiki/Centering_the_bed_or_setting_the_bed_origin for more.
-
If it prints too close to the bed, then you need to make the G31 Z parameter more negative than it already is. For example, if you change it from Z-1 to Z-1.1 then your prints will start 0.1mm higher.
However, I am concerned that in the video you posted in the other thread, when you probed at the left or right hand edge of the bed, the bed tilted rather a lot. This leads me to believe that the trigger height may be a lot more negative at the edges of the bed than in the centre. If that is the case, then you may need to change the M557 command to restrict the mesh to a smaller area of the bed.
You might like to send a direct message to the author of the thread https://forum.duet3d.com/topic/4737/zprobe-robo3d-r1/9 to ask him if he can share his config.g and homing files with you.
HTH David
-
-
Yes the z probe reads 1000 not 100. Sorry for now being nore clear the x axis crashes into the end of the rail opposite of the endstop. Usually dies this right before a print starts. I will use your recommendation and adjust the settings fir this.
Your concern. About the probing of the bed is valid as its a problem that plaugues the robo3d r1 plus. I will manual level it again to try to ease this a bit.
I have tried contacting the author of that thread but havent heard back. -
Just to clarify... All axis home properly.
The x axis crashes into the left of the gantry before beginning a print. or when I run this
" G1 X0 F1000 then it moves the head to the left hand edge of the bed" -
The auto level is not going to the back of the bed here is a video( you can fast forward to 1min 40sec) https://www.youtube.com/watch?v=NDrzoygZaHA
-
I fixed the X axis cashing issue... Problem was in the gcode, G1 X0 instead of G1 X15. Now it no longer crashes.
-
I'm glad you managed to fix it. Are the problems you reported at the start of this thread resolved now, or do you still have a problem with Z probing?
-
Itstill does not go to the back of the bed for auto level everything else is ok for auto level. Now I am having issues with the heated bed causing prints to cancel but I will start a new thread fro that problem
-
The reason it isn't going right to the back is that it will omit any probe points that would put the nozzle outside the reachable area set by your M208 commands. Assuming that the back of the bed is max Y, you may need to increase your M208 S0 Y parameter a little to that the nozzle can move as far back (or the bed as far forward) as physically possible.
-
Thanks ill give that a try
-
I am still having some issues. It is printing too high in the front right to middle right of the machine. Everything else is a perfect layer. I was wondering If there is something I can do to fix this?
-
Get a proper Z probe and use mesh grid compensation.
-
@sleepless said in Robo3d R1 Plus AutoLevel:
I am still having some issues. It is printing too high in the front right to middle right of the machine. Everything else is a perfect layer. I was wondering If there is something I can do to fix this?
If the amount by which the bed gives before triggering the microswitch varies with XY position, then I suggest you make the bed more rigid or use a Z probe that applies less force the the bed before it triggers.
-
OK I WILL LOOK INTO ADDING A BLTOUCH