Layer change bumps
-
During layer change I am getting small bumps. Yes, I know this may be normal. I am wondering if there is a way to reduce this. My test was to print a small cylinder, one layer thick with no retraction during layer change. When the nozzle changes layers, there is a small over extrusion. It looks like the nozzle pauses as it moves up one layer. This pause causes some extra extrusion that causes the bump.
This picture shows the bump(s):
This picture shows the side view:

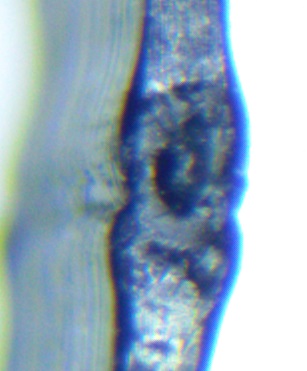
This picture shows an angled view:

I get the exact same symptoms with:
- Simplify3D 4.0.1
- Cura 3.6
- Slic3r 1.3.0
I have tried - Speed 25/mms - 50/mms - 100/mms
- Z speed 50/mms - 100/mms - 150/mms
- Z jerk 1000 - 2000 - 5000 - 10,000
- Z Accel 1000 - 2000 - 3000
- Temperature (PLA) 205 - 215 - 225
My machine:
- Delta (was a Rostock Max v3 but most components have been replaced)
- Duet 2 WiFi 2.02RC4
- .9 Steppers
- E3D V6 Gold 24v
- Olsson Ruby .4 nozzle
- Bondtech - QR Extruder
- Carbon fiber arms
- FSR bed leveling
I get great prints except for the layer change bumps.
From what I can see, when the nozzle stops its horizontal motion it over extrudes a small amount. The nozzle then moves up one layer. Extrusion and motion start again but a small over extrusion occurs causing another small bump. As Simplify3D, Cura and Slic3r all cause this, I don't see this being a slicer problem. Or is it a common slicer problem?
-
Is the problem as noticeable on normal models? Your test is basically a worst case scenario for trying to hide the layer seam. Normally it's suggested to print with at least 2 perimeters (aside from vase mode) and to print internal perimeters before external perimeters so that the layer change bulge can be better hidden inside the model.
Enabling retract on layer change and retract before outer layer should help. There's also wipe on retraction. It can also help to have quick enough jerk and acceleration on your z axis and extruder so that there is very little pause between the end of the layer and the move to the next layer.
Also, are you using pressure advance? This can help greatly to reduce the built up pressure at the end of an extrusion line so that bulges like that don't occur.
-
I still have a similar issue with two perimeters. I will post a picture when I can.
As this test is with no retraction on layer change, Pressure Advance should not come into play. I did try M572 D0 S0.2 and there was no change. Even on "retract on layer change", there was no change.
If I do a "retract on layer change", I can reduce the 2nd bulge (after the layer change) by using wipe. Wipe often gives other issues. The first bulge (when horizontal motion stops) is still there. Even using "coast" and/or "pressure advance" I still get the first bulge.
Thanks for your info. I am doing more tests.
-
Disable coast when using pressure advance. If you still get a bulge at the end of extrusion, increase the amount of pressure advance.
Also, you didn't mention what your retraction distance and speed is.
I assume you have a bowden tube setup. How long is it?
-
Testing larger pressure advance. My bowden is 82cm long. I use 6mm retraction. I get stringing if I go much lower. (may try lower as a test)
-
I tried M572 D0 S1.0 just to see what it does and I don't see any change... My test was:
- Two perimeter hollow cylinder
- Outside first
- Retract on layer change
Strange that M572 D0 S1.0 shows no difference to S0.0.... both print exactly the same.
Note: I do see a "pause" between the Outer Layer and the Inner Layer. This pause is where the bump occurs. All it is doing at this "pause point" is moving from the outer perimeter to the inner perimeter.
-
maybe try increase z-axis acl and jerk? this helped my a little bit with seam
-
Can you post your config.g to see the speeds set, as well as a the gcode file of the printed object. Also you slicer speed settings. The pause should barely be noticeable ideally.
-
@dragonn I think I already have my Z acl and jerk high. I am going to post my config.g file right away
-
Here are my speeds:

Attached is the GCode of my single wall test that shows a define pause at layer changes (no retractions are done in this file). 0_1543692390360_Test5.gcode
Below is my config.g file.
; Configuration file for SeeMeCNC Rostock MAX V3 SINGLE
; SINGLE
; Communication and general
M111 S0 ; Debug off
M550 MaxV3 ; Machine name and Netbios name (can be anything you like);*** If you have more than one Duet on your network, they must all have different MAC addresses, so change the last digits
M540 P0xBE:0xEF:0xDE:0xAD:0xFE:0xEA ; MAC AddressM552 S1 ; Enable WiFi
M555 P2 ; Set output to look like Marlin
M575 P1 B57600 S1 ; Comms parameters for PanelDueG21 ; Work in millimeters
G90 ; Send absolute coordinates...
M83 ; ...but relative extruder moves;Heater settings
M307 H0 A116.1 C59.9 D2.1 S1.00 V24.1 B0
M307 H1 A582.5 C284.1 D3.6 S1.00 V24.1 B0; Axis and motor configuration
M569 P0 S1 ; Drive 0 goes forwards
M569 P1 S1 ; Drive 1 goes forwards
M569 P2 S1 ; Drive 2 goes forwards
M569 P3 S0 ; Drive 3 goes forwards Print Head 1
M569 P4 S1 ; Drive 4 goes forwards Print Head 2
M574 X2 Y2 Z2 S1 ; set endstop configuration (all endstops at high end, active high);*** The homed height is deliberately set too high in the following - you will adjust it during calibration
;M665 R144.158 L300.00 B132.5 H380 X0 Y0 Z0 ; set delta radius, diagonal rod length, printable radius and homed height
;M666 X0 Y0 Z0 ; put your endstop adjustments here, or let auto calibration find them
M665 L300.000 R132.5 H370 B132.5 X-0.569 Y-0.306 Z0.000
M666 X-0.14 Y0.29 Z-0.15M350 X16 Y16 E16 I1 ; Set 16x microstepping with interpolation
M92 X200 Y200 Z200 ; Set axis steps/mm
M906 X1000 Y1000 Z1000 E900 I60 ; Set motor currents (mA) and increase idle current to 60%;Rostock MAX settings
;M906 X1000 Y1000 Z1000 E800 I60 ; Set motor currents (mA) and increase idle current to 60%
;M201 X1000 Y1000 Z1000 E1000 ; Accelerations (mm/s^2)
;M203 X20000 Y20000 Z20000 E3600 ; Maximum speeds (mm/min)
;M566 X1200 Y1200 Z1200 E1200 ; Maximum instant speed changes mm/minute;Working
;M203 X20000 Y20000 Z20000 E10000 ; Maximum speeds (mm/min)
;M566 X1200 Y1200 Z2000 E6000 ; Maximum jerk speeds mm/minute
;M201 X1000 Y1000 Z1500 E6000 ; Accelerations (mm/s^2);Test
M203 X20000 Y20000 Z20000 E20000 ; Maximum speeds (mm/min)
M566 X1200 Y1200 Z10000 E10000 ; Maximum jerk speeds mm/minute
M201 X1000 Y1000 Z3000 E10000 ; Accelerations (mm/s^2)M572 D0 S0.2 ; Pressure Advance, acts like 'coast' in Simplify 3D
M572 D1 S0.2;M207 S5.7 R0 F3600 T3600 Z0.1 ; Firmware Retraction : Positive S retracts, negative R unretracts (possitive R extra-extrudes),
; F retract speed, T unretract speed, Z zlift - Slicer must insert G10 & G11; Thermistors
M305 P0 S"Bed Heater" T100000 B3950 R4700 H30 L0 ; Put your own H and/or L values here to set the bed thermistor ADC correction
;M305 P1 T100000 B3974 R4700 H30 L0 ; Put your own H and/or L values here to set the first nozzle thermistor ADC correction
M305 P1 X200
M570 S180 ; Hot end may be a little slow to heat up so allow it 180 seconds; Fans
;M106 P1 H-1 ; disable thermostatic mode for fan 1
M106 P1 T70 S1 H1:2
M106 P0 F50 L0.4 B0.1 ; Cooling fan; Bed temp
;M140 S100; Tool definitions
M563 P0 D0 H1 ; Define tool 0
G10 P0 X0.0 Y0.0 S0 R200 ; Set tool 0 operating and standby temperatures
;*** If you have a single-nozzle build, comment the next 2 lines
;M563 P1 D1 H2 ; Define tool 1
;G10 P1 X4.15 Y8.08 S0 R200 ; Set tool 1 operating and standby temperatures (T1 .26 too far back . old was 7.95)
T-1M92 E469:469 ; Set extruder steps per mm
; grid compensation
M557 R110 S15; Z probe and compensation definition
M558 P4 X0 Y0 Z0 F500 T40000 ; Z probe is a switch and is not used for homing any axes
G31 X0 Y0 Z-0.34 P500 ; Set the zprobe height and threshold (put your own values here)
;G31 T4 P500 X0.0 Y0.0 Z0.5;*** If you are using axis compensation, put the figures in the following command
M556 S78 X0 Y0 Z0 ; Axis compensation hereM143 H0 S130 ;Max temperature for bed
M501 ;Load config-override.g
G29 S1 ;Load mesh compensation fileT0 ; select first hot end
-
Sorry, the gcode was for a double wall test. Still pauses. Attached is the single wall test.
0_1543692697792_Test6.gcode Single Wall test print -
Did you find the reason?
I have the same issue. But i am pretty sure that this bumbs com from the start of the perimeter loop.tried some retraction and negativ "extra restart retraction" settings. Nothing effects to this result.