Robotic kinematics
-
@JoergS5
Hi ! what is the current situation on the robot? have you started building a new one?
-
@tony73 I have some time next weekend, I gather my activities and make images or change the descriptions. I'll strip down https://forum.duet3d.com/topic/20209/robot-type-1-45-cm-belt-gear-direct-drive-r0 to a minimum (only describing the construction, some images, videos, 3D print results), if you need information from there, please copy it. I have not received any feedback as to whether the information on craft and safety is of use to anyone, so I would like to remove that. Safety information always has the risk that it could be wrong. That's why I better remove it again. (Especially in #6).
-
@joergs5
good morning! have you done any other tests? is there any news? -
@tony73 please give me a few additional days. I am currently building three robots, one for Duet 2, one Duet 3 and one Mini 5+, so I can better compare the different construction ideas. I was not able to buy Maestro, they are out of stock (I wanted to see the performance for the board without FPU). If someone builds a Maestro supported robot, please tell me whether the performance of the kinematics is sufficient. I'll post an update after next weekend. I can currently only proceed at the weekends.
-
@joergs5
all the time you need! no problems! I'm just trying to figure out where you are, so let's keep in touch! I have recovered several reader heads (vhs)! I'm putting together a robot with these! let's see how it will go! -
@tony73 thats good. I expect that they run very smooth.
Looking around, there are a lot of motors which could be used as actuators, eg I gathered the last defect electric teeth brushes, they have powerful motors, and small. Could be used for toolchangers or to generate vibration.
-
@3DPotter you asked (in chat) about https://www.aliexpress.com/item/32976011942.html?spm=a2g0o.productlist.0.0.68797987WMLq56&algo_pvid=46319237-5fa5-4dc3-8552-8bf06331e261&algo_expid=46319237-5fa5-4dc3-8552-8bf06331e261-0&btsid=0b0a555f16170320625218222eb53f&ws_ab_test=searchweb0_0,searchweb201602_,searchweb201603_ for using it with the robot kinematics. I think it can work with R2 mode, please check the documentation in https://duet3d.dozuki.com/Wiki/Configuring_RepRapFirmware_for_a_FiveAxisRobot?revisionid=HEAD
R2 mode means the axis 4 is always vertical, and there is no axis 5, a rotation of the hotend. So the configuration is with 3 actuators (steppers), like in the description of the product.If you are not used to compile firmware, I can provide you a binary, if you tell me the duet hardware you're using. We can discuss how to setup the config file also.
I should add that the firmware is still in beta and may contain errors (which I will fix when I have become aware of them). It is not part of the production firmware yet.
-
@joergs5 Thankyou for the help. I am trying to configure the robot using 3 motors and the duet 2 wifi. Additionally the limit switches are normally closed. the main thing I need it ow to configure the kinematic line and the compiled firmware since I am unfamiliar with compiling.
https://3dpotter.com/
The only dedicated 3D ceramic printer using real clay.https://www.instagram.com/3dpotter/
https://www.youtube.com/c/3dpotter/
https://www.facebook.com/3dpotter/
https://www.reddit.com/user/3D_Potterbot -
@3dpotter to create a configuration file, please start with the RRF configurator in https://configtool.reprapfirmware.org/Start
This gives you a start config for the 3 steppers, endstops, extruder and optionally probes and bed heater. From this point you can modify it with the robot specific config, mainly the M669 line.
I'll give you a binary for Duet 2, based on RRF release 3.1. You should install 3.1 from production and only replace the bin file from me after uploading the package. Binaries are available in https://github.com/Duet3D/RepRapFirmware/releases
Maybe I can make a 3.2.2 binary also, I'll have to check it. -
@3dpotter the M669 is like:
in your case R2:
M669 K13 X20.0:5.0 Y0.0:10.0 Z50.0 L300.0:400.0:0.0:0.0 R2 P0 C0
and adding the A parameter with a lot of parameters. A must have 15 values, dummy values for axis 4 and 5 also. The A is necessary to tell the firmware where the endstop angles are.
-
@joergs5 I have the configuration setup and here is a video of the axis moving and how "+" and "-" effect each in cartesian mode (without m669 set up). and the attached photo is the measured lengths of each section from from the center of the joints. Additionally i have the board flashed to 3.0 and still need the 3.1 binary, all I saw in your last post was official releases/beta I'm not sure if your firmware is different. config (14).g ------------- https://youtu.be/WrY0Ke8HtMY

https://3dpotter.com/
The only dedicated 3D ceramic printer using real clay.https://www.instagram.com/3dpotter/
https://www.youtube.com/c/3dpotter/
https://www.facebook.com/3dpotter/
https://www.reddit.com/user/3D_Potterbot -
@3dpotter please update your binary other files to 3.1, please see my next post how to proceed.
One thing I don't understand is how your robot manages to keep the hotend part horizontal without a fourth stepper. Is it a mechanical solution? (Parallelogram?)
When using the robot firmware, M92 will need other values than you used in your config, please check https://duet3d.dozuki.com/Wiki/Configuring_RepRapFirmware_for_a_FiveAxisRobot?revisionid=HEAD#Section_Other_config_parameters , the values are based on degrees instead of mm.
-
@3dpotter I've compiled the firmware for Duet 2 and Duet 3 now, and uploaded them to a new github repository:
https://github.com/JoergS5/RepRapFirmware_Robot_binaries
They are based on the sources of tagged releases 3.1.0
Install the 3.1.0 file Duet2and3Firmware-3.1.0.zip (this contains many files which are necessary, additionally to the bin) from https://github.com/Duet3D/RepRapFirmware/releases/tag/3.1.0 first, then the bin of my repository for Duet 2.
-
@joergs5 Thankyou I Have flashed your firmware now. I know about changing the M92 to steps per degree, I just haven't set that up yet. In the process of doing that right now.
https://3dpotter.com/
The only dedicated 3D ceramic printer using real clay.https://www.instagram.com/3dpotter/
https://www.youtube.com/c/3dpotter/
https://www.facebook.com/3dpotter/
https://www.reddit.com/user/3D_Potterbot -
@3dpotter please don't be surprised if something doesn't work correctly. I tested the kinematics with simulated calculations, but I don't have a R2 mode based robot, so something may not work. I'll fix any bugs however fast, if you tell me problems.
-
@3dpotter
Hello! how does the little robot work? can it be configured with five axis robot? -
@tony73 Haven't had time to get it fully configured, working on it today and I will update you.
-
@tony73 @JoergS5 I got everything set up and working accept the m669 command. I read the documentation and am unsure that I need to do and what the values mean for my specific machine. here is a copy of the config. config (15).g
https://3dpotter.com/
The only dedicated 3D ceramic printer using real clay.https://www.instagram.com/3dpotter/
https://www.youtube.com/c/3dpotter/
https://www.facebook.com/3dpotter/
https://www.reddit.com/user/3D_Potterbot -
@3dpotter the config looks ok, only the angle settings parameter A are missing in M669:
If you start the Duet, it needs to know where the homing*) positions are located. This task is done by the endstops and the information in config.g file and the homeall.g file:
- endstops trigger when homing location is reached for a specific axis (for robots, it is a specific angle of the arm, actuator, stepper position)
- config tells in parameter A of M669 which angle the robot arm has when the endstop triggers. Parameter A specifies min, endstop and max angles for every axis, 5 axes with optional rail, 15 values.
- homeall.g are commands to move the axes so the enstops are triggered. Please see example homeall.g files for CoreXY or other 3D printers how this is done (G1 moves with H1, H2 etc.)
*) homing means: when the Duet starts, it doesn't know where your arms and stepper positions are located. The homing procedure finds out by rotating the arms until the endstops are triggered. Together with the angle information in parameter A of M669 the controller then knows when the arm triggers at the endstop, that the arm has angle 34 degree at the endstop position (as example). Together with the M92 information Duet knows how much to move the stepper to change by x degrees.
To decide how to make the homing is one of the most difficult parts.
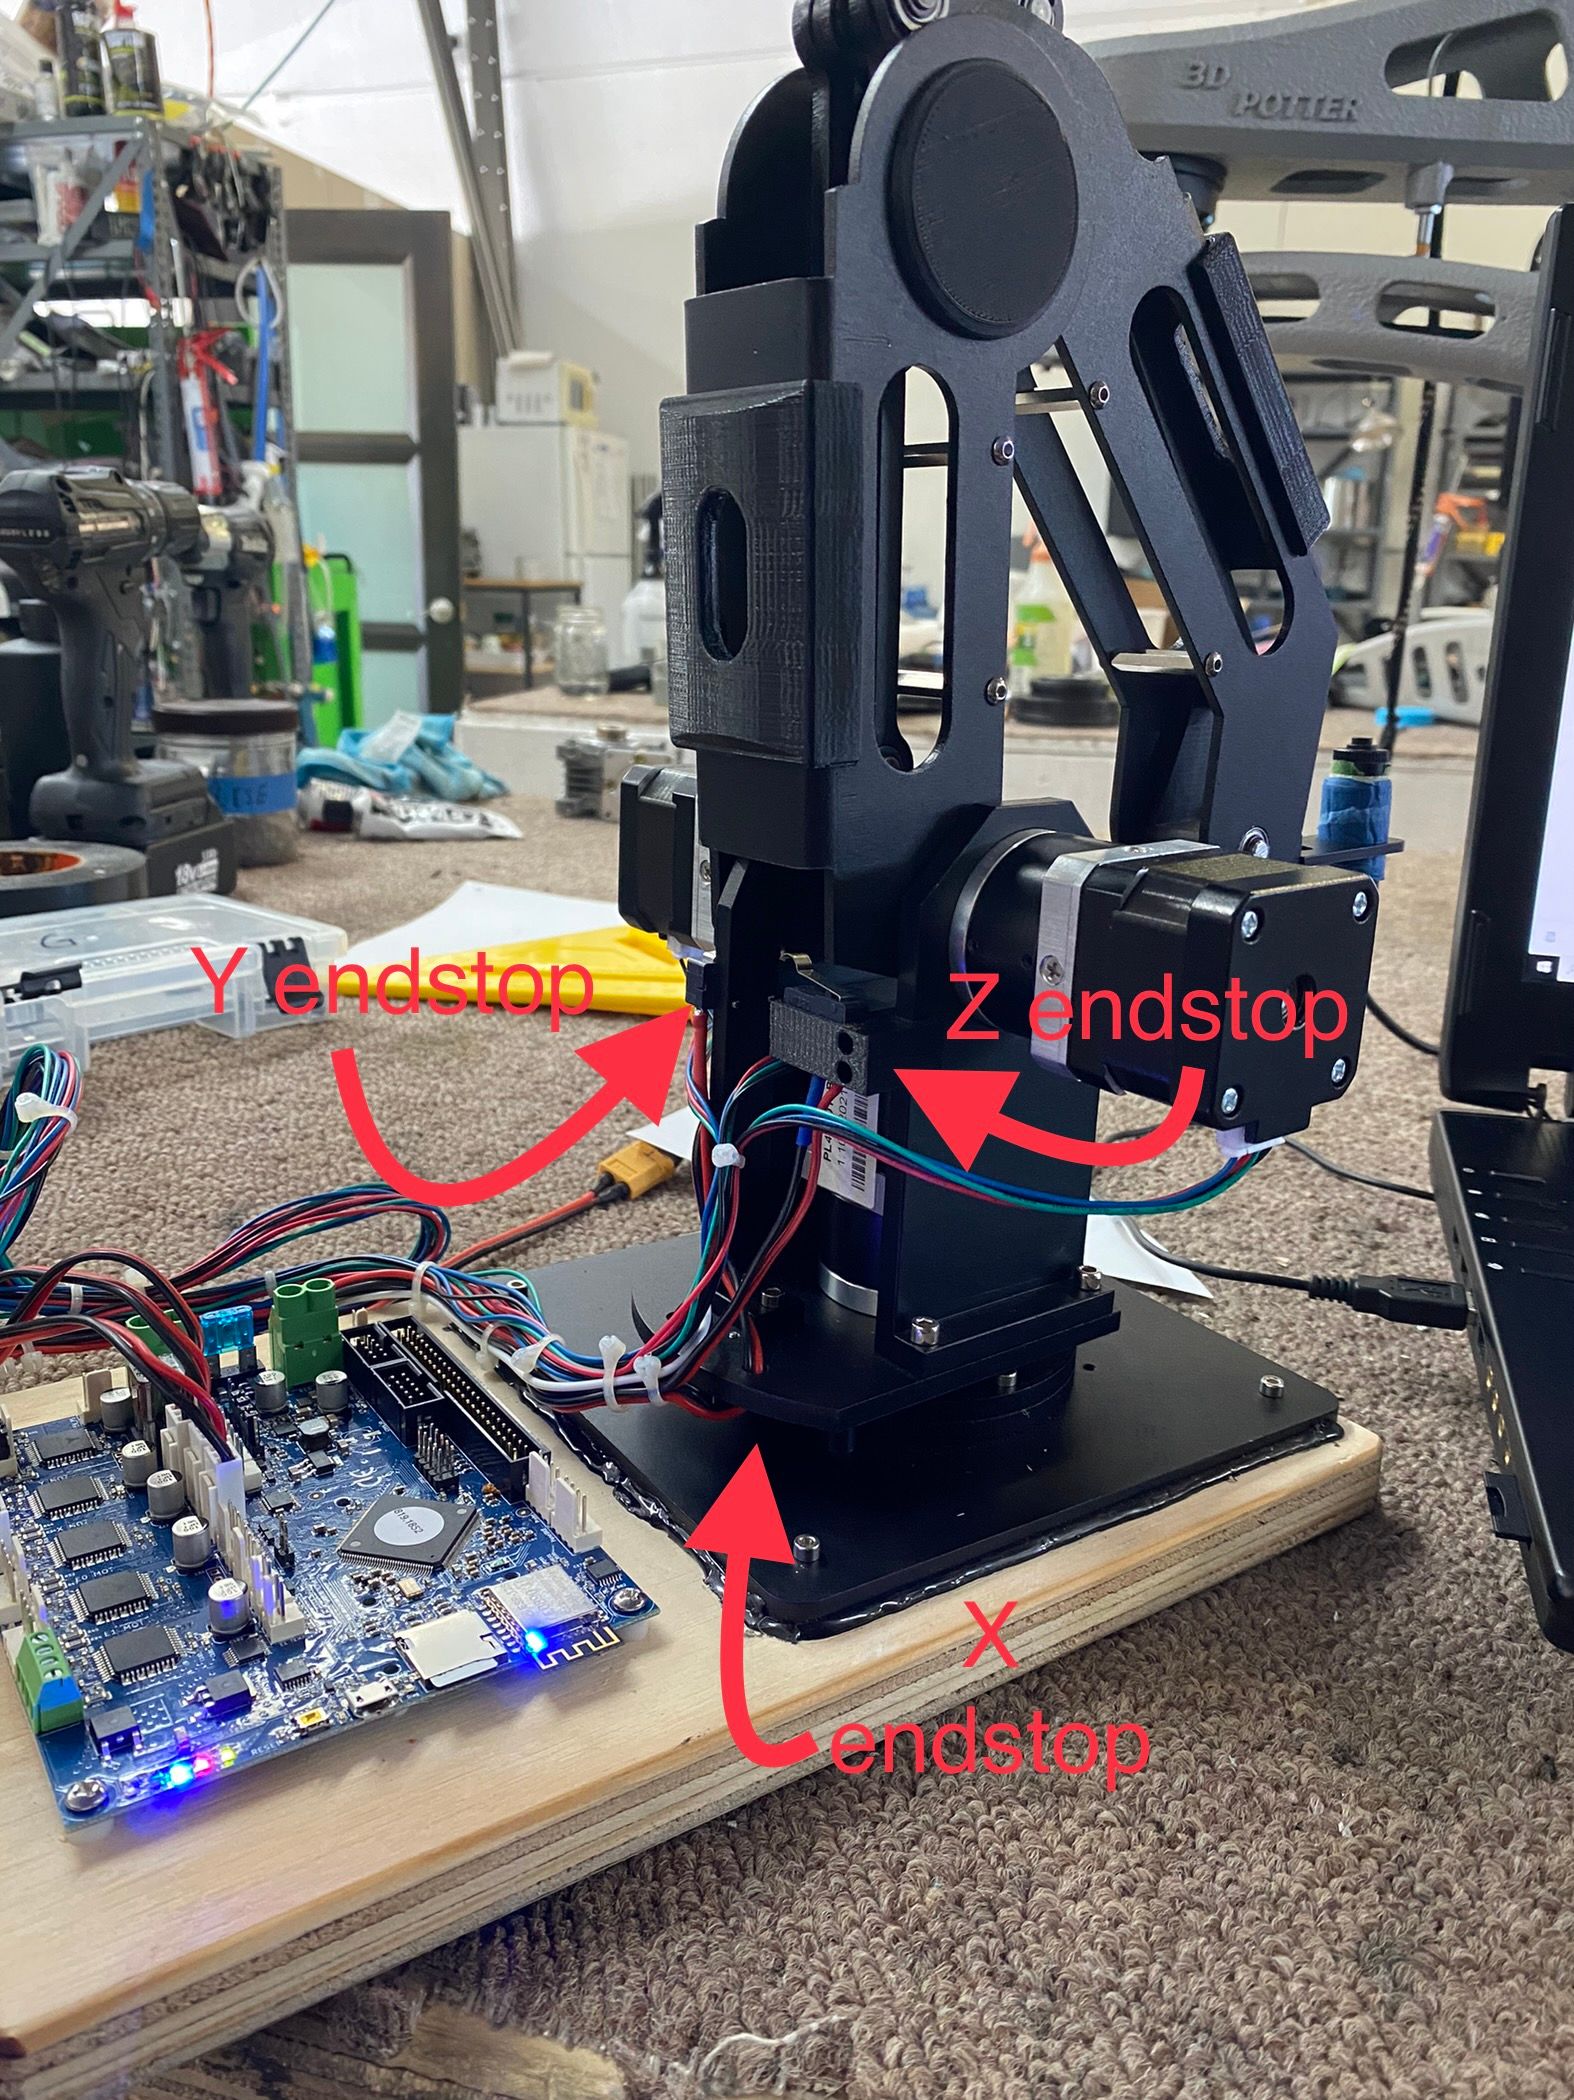
If you tell me where your endstops are located, we can discuss which value to set for the angles. You can describe by making images of the 3 actuators (axis 1 is the rotation horizontally, 2 and 3 the arms) and paint the locations of the endstops into the image.
The M208 settings in config.g are ignored in the robot kinematics, because the original meaning of M208 is to restrict the print area to a xyz area. A robot has a print area which looks a bit like a donut, so it doesn't fit this original idea of a cubic print area. So I calculate the print area in the code directly to decide whether a coordinate is reachable by the robot arms.
If you don't understand M669, please tell me which parameter is unclear for you.
For the A parameter of M669, please check documentation. The example
Default is A-45:0:45:0:0:70:-70:0:0:-170:-90:0:-225:0:225[:0:0:1000]
means: -45 and 45 are the min and max angles of axis 1. The second parameter is important for the homing of axis 1 and means when endstops triggers, Duet sets the axis 1 position to 0 degree. And so on. I programmed so that 15 or 18 parameters must be set (without or with rail). Even if you have only 3 actuators with 9 settings, you need to spedify 15 parameters (the last 6 ones dummy values). I'll change that in a future release. -
@joergs5 said in Robotic kinematics:
where your endstops are located, we can discuss which value to set for the angles. You can describe by making images of the 3
I started to set up the axis angle limits and homing offset for the arm. as shown in the first video the axis seem to be moving incorrectly. The second video explains where the endstops are located and how the machine triggers them.
https://3dpotter.com/
The only dedicated 3D ceramic printer using real clay.https://www.instagram.com/3dpotter/
https://www.youtube.com/c/3dpotter/
https://www.facebook.com/3dpotter/
https://www.reddit.com/user/3D_Potterbot