Multiple Axis moving at the same time on Cartesian Printer
-
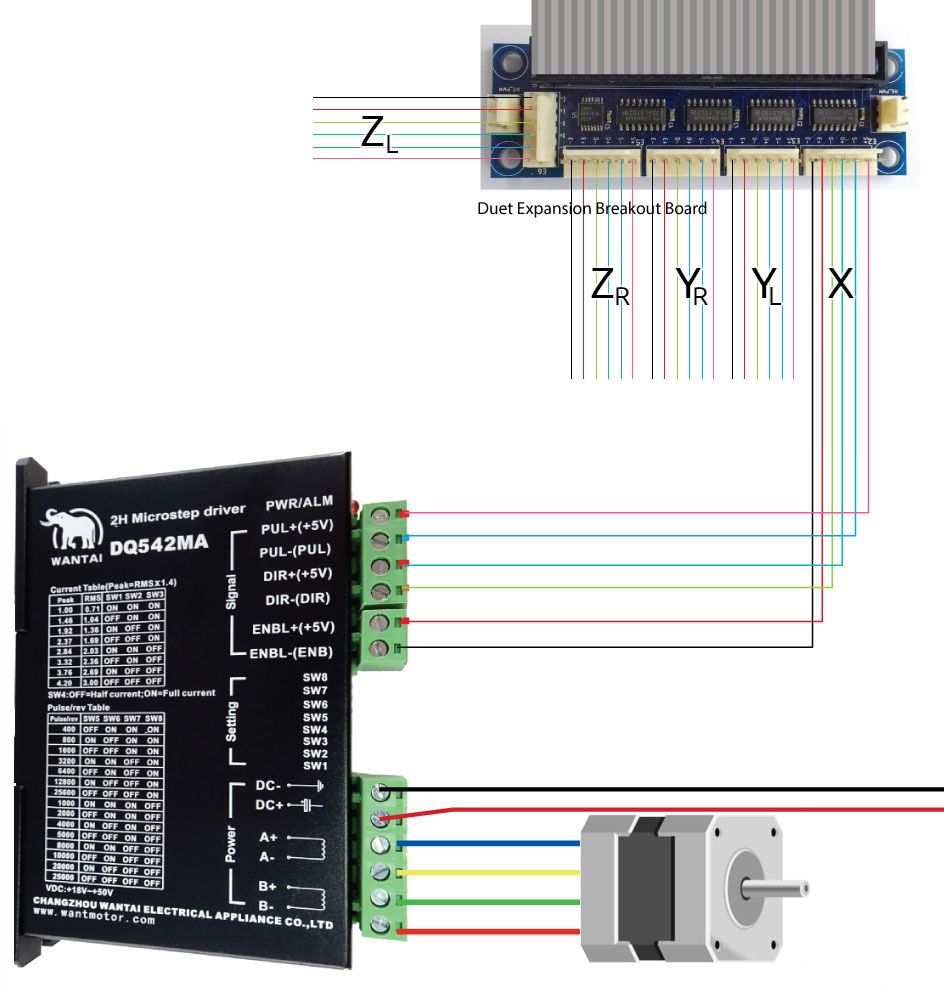
I have wired up 5 Wantai DQ542MA Stepper Motor Drivers to a Duet WiFi with a Duet Expansion Breakout Board attached.
- The X-Axis Motor is connected to the E2 Motor / Drive 5 Connector on the Expansion Board
- The Y-Axis Motors are connected to the E3 / Drive 6 and E4 / Drive 7 Connectors on the Expansion Board
- The Z-Axis Motors are connected to the E5 / Drive 8 and E6 / Drive 9 Connectors on the Expansion Board
- The First Extruder Motor is connected to the E0 Connector on the Duet WiFi
- The Second Extruder Motor is connected to the E1 Connector on the Duet WiFi
I am using the 3.1.1 Firmware on the Duet and am still trying to simply do some raw movements.
When using
G91to do relative movements and thenG1 H1 X10via DWC, both the X-Axis and the Y-Axis move. The same happenes when I go forG1 H1 Y10instead.Here is my config.g:
; General preferences
G90                                             ; send absolute coordinates...
M83                                             ; ...but relative extruder moves
M550 P"My 3D-Printer"                      ; set printer name
M669 K0                                         ; set cartesian mode

; Network
M552 S1                                         ; enable network
M586 P0 S1                                      ; enable HTTP
M586 P1 S0                                      ; disable FTP
M586 P2 S0                                      ; disable Telnet

; Drives
M569 P0 S1 R0                                   ; physical drive 0 is disabled (R0)
M569 P1 S1 R0                                   ; physical drive 1 is disabled (R0)
M569 P2 S1 R0                                   ; physical drive 2 is disabled (R0)
M569 P3 S1                                      ; physical drive 3 goes forwards (E0)
M569 P4 S1                                      ; physical drive 4 goes forwards (E1)
M569 P5 S1                                      ; physical drive 5 goes forwards (X)
M569 P6 S1                                      ; physical drive 6 goes forwards (Y-Left)
M569 P7 S1                                      ; physical drive 7 goes forwards (Y-Right)
M569 P8 S1                                      ; physical drive 8 goes forwards (Z-Left)
M569 P9 S1                                      ; physical drive 9 goes forwards (Z-Right)
M584 X5 Y6:7 Z8:9 E3:4                          ; set drive mapping
M350 X1 Y1 Z1 E16:16 I0                         ; configure microstepping with interpolation off
M92 X80.00 Y80.00 Z400.00 E420.00:420.00        ; set steps per mm
M566 X900.00 Y900.00 Z12.00 E120.00:120.00      ; set maximum instantaneous speed changes (mm/min)
M203 X6000.00 Y6000.00 Z180.00 E1200.00:1200.00 ; set maximum speeds (mm/min)
M201 X500.00 Y500.00 Z20.00 E250.00:250.00      ; set accelerations (mm/s^2)
M906 X800 Y800 Z800 E800:800 I30                ; set motor currents (mA) and motor idle factor in per cent
M84 S30                                         ; Set idle timeout

; Axis Limits
M208 X0 Y0 Z0 S1                                ; set axis minima
M208 X284 Y333 Z370 S0                          ; set axis maxima

; Endstops
M574 X1 S1 P"xstop"                             ; configure active-high endstop for low end on X via pin xstop
M574 Y1 S1 P"ystop"                             ; configure active-high endstop for low end on Y via pin ystop
M574 Z1 S1 P"zstop"                             ; configure active-high endstop for low end on Z via pin zstop

[ skipping the heater, fan and tools sections ]
I have read some posts that recommend using the
T-Parameter on the Drives connected to a Wantai Stepper Motor Drivers like soM569 P6 S1 T6:6:5:0however I have no Idea where I would get those values from and moreover I don't think there is any relation between the timing settings and the issue of the axis moving at the same time (but I could be completely wrong)..!I have no clue why this might happen..

-
Can you post your entire config.g in case there is something later in the file that may be changing something earlier in the file.
If you send G92 X100 Y100 and then try to move an axis with the jog controls do they work correctly then?
-
Here is my entire config.g:
; General preferences
G90                                            ; send absolute coordinates...
M83                                            ; ...but relative extruder moves
M550 P"My 3D-Printer"                          ; set printer name

; Network
M552 S1                                        ; enable network
M586 P0 S1                                     ; enable HTTP
M586 P1 S0                                     ; disable FTP
M586 P2 S0                                     ; disable Telnet

; Drives
M569 P0 S1 R0                                  ; physical drive 0 is disabled (R0)
M569 P1 S1 R0                                  ; physical drive 1 is disabled (R0)
M569 P2 S1 R0                                  ; physical drive 2 is disabled (R0)
M569 P3 S1                                     ; physical drive 3 goes forwards (E0)
M569 P4 S1                                     ; physical drive 4 goes forwards (E1)
M569 P5 S1 R1                                  ; physical drive 5 goes forwards (X)
M569 P6 S1 R1                                  ; physical drive 6 goes forwards (Y-Left)
M569 P7 S1 R1                                  ; physical drive 7 goes forwards (Y-Right)
M569 P8 S1 R1                                  ; physical drive 8 goes forwards (Z-Left)
M569 P9 S1 R1                                  ; physical drive 9 goes forwards (Z-Right)
M584 X5 Y6:7 Z8:9 E3:4                         ; set drive mapping
M350 X1 Y1 Z1 E16 I0                           ; configure microstepping with interpolation off
M92 X80.00 Y80.00 Z400.00 E420.00              ; set steps per mm
M566 X900.00 Y900.00 Z12.00 E120.00            ; set maximum instantaneous speed changes (mm/min)
M203 X6000.00 Y6000.00 Z180.00 E1200.00        ; set maximum speeds (mm/min)
M201 X500.00 Y500.00 Z20.00 E250.00            ; set accelerations (mm/s^2)
M906 X800 Y800 Z800 E800 I30                   ; set motor currents (mA) and motor idle factor in per cent
M84 S30                                        ; Set idle timeout

; Axis Limits
M208 X0 Y0 Z0 S1                               ; set axis minima
M208 X284 Y333 Z370 S0                         ; set axis maxima

; Endstops
M574 X1 S1 P"xstop"                            ; configure active-high endstop for low end on X via pin xstop
M574 Y1 S1 P"ystop"                            ; configure active-high endstop for low end on Y via pin ystop
M574 Z1 S1 P"zstop"                            ; configure active-high endstop for low end on Z via pin zstop

; Z-Probe
M558 P2 C"zprobe.in+zprobe.mod" H5 F120 T3000  ; set Z probe type to modulated and the dive height + speeds
G31 P500 X0 Y0 Z2.5                            ; set Z probe trigger value, offset and trigger height
M557 X15:215 Y15:195 S20                       ; define mesh grid

; Heaters
M308 S0 P"bedtemp" Y"thermistor" T100000 B4138 ; configure sensor 0 as thermistor on pin bedtemp
M950 H0 C"bedheat" T0                          ; create bed heater output on bedheat and map it to sensor 0
M307 H0 B0 S1.00                               ; disable bang-bang mode for the bed heater and set PWM limit
M140 H0                                        ; map heated bed to heater 0
M143 H0 S145                                   ; set temperature limit for heater 0 to 145C
M308 S1 P"e0temp" Y"thermistor" T100000 B4138  ; configure sensor 1 as thermistor on pin e0temp
M950 H1 C"e0heat" T1                           ; create nozzle heater output on e0heat and map it to sensor 1
M307 H1 B0 S1.00                               ; disable bang-bang mode for heater  and set PWM limit
M308 S2 P"e1temp" Y"thermistor" T100000 B4138  ; configure sensor 2 as thermistor on pin e1temp
M950 H2 C"e1heat" T2                           ; create nozzle heater output on e1heat and map it to sensor 2
M307 H2 B0 S1.00                               ; disable bang-bang mode for heater  and set PWM limit

; Fans
M950 F0 C"fan0" Q500                           ; create fan 0 on pin fan0 and set its frequency
M106 P0 S1 H-1                                 ; set fan 0 value. Thermostatic control is turned off
M950 F1 C"fan1" Q500                           ; create fan 1 on pin fan1 and set its frequency
M106 P1 S1 H-1                                 ; set fan 1 value. Thermostatic control is turned off

; Tools
M563 P0 S"Main Extruder" D0 H1 F0              ; define tool 0
G10 P0 X0 Y0 Z0                                ; set tool 0 axis offsets
G10 P0 R0 S0                                   ; set initial tool 0 active and standby temperatures to 0C
M563 P1 S"Support Extruder" D1 H2 F1           ; define tool 1
G10 P1 X0 Y0 Z0                                ; set tool 1 axis offsets
G10 P1 R0 S0                                   ; set initial tool 1 active and standby temperatures to 0C

; Custom settings are not defined


; Miscellaneous
M575 P1 S1 B57600                              ; enable support for PanelDue
T0                                             ; select first tool
I tried your suggestion using
G92 X100 Y100, unfortunately still both axis move as before. -
@t0bias said in Multiple Axis moving at the same time on Cartesian Printer:
M584 X5 Y6:7 Z8:9 E3:4 ; set drive mapping M350 X1 Y1 Z1 E16 I0 ; configure microstepping with interpolation off
Are you sure you have the motors plugged into the right drivers and have the right drivers mapped to the right axis?
Also, probably not a good idea to use 1x microstepping. Use x16 with interpolation enabled (
I1)Are you sure this is a cartesian printer and not a corexy? Photo?
-
If I do use microstepping, the motors connected to the Wantai Drivers move really stuttery..?
To my understanding this is a cartesian printer, it has separate motors and belts for the x and y axis and threaded rods to move the bed?

This is how the motors are wired (so I don't think they are connected correctly):
-
@t0bias said in Multiple Axis moving at the same time on Cartesian Printer:
When using G91 to do relative movements and then G1 H1 X10 via DWC, both the X-Axis and the Y-Axis move. The same happenes when I go for G1 H1 Y10 instead.
Odd, it sounds as if the printer is in CoreXY mode. Please send M669 without parameters and report the response.
-
Have you seen this page on using external stepper drivers?
https://duet3d.dozuki.com/Wiki/Using_external_stepper_motor_drivers
Do you have anything in your tool change files? tpre tpost etc
-
Are you sure you don't have the drivers for the dual Y actually using one Y motor and one X motor?
-
Ok, figured it out, but well, it's totally embarassing..

I misslabeled some of the individual strands connecting the drivers to the extension breakout, basically wiring one of the Y-Motors Pulse pins to the X-Motors Enable pins.
I still don't quite understand, why this would result in such erratic/arbitrary moves, but hey - at least it works now!
Sorry for the bummer!