Prints are warping
-
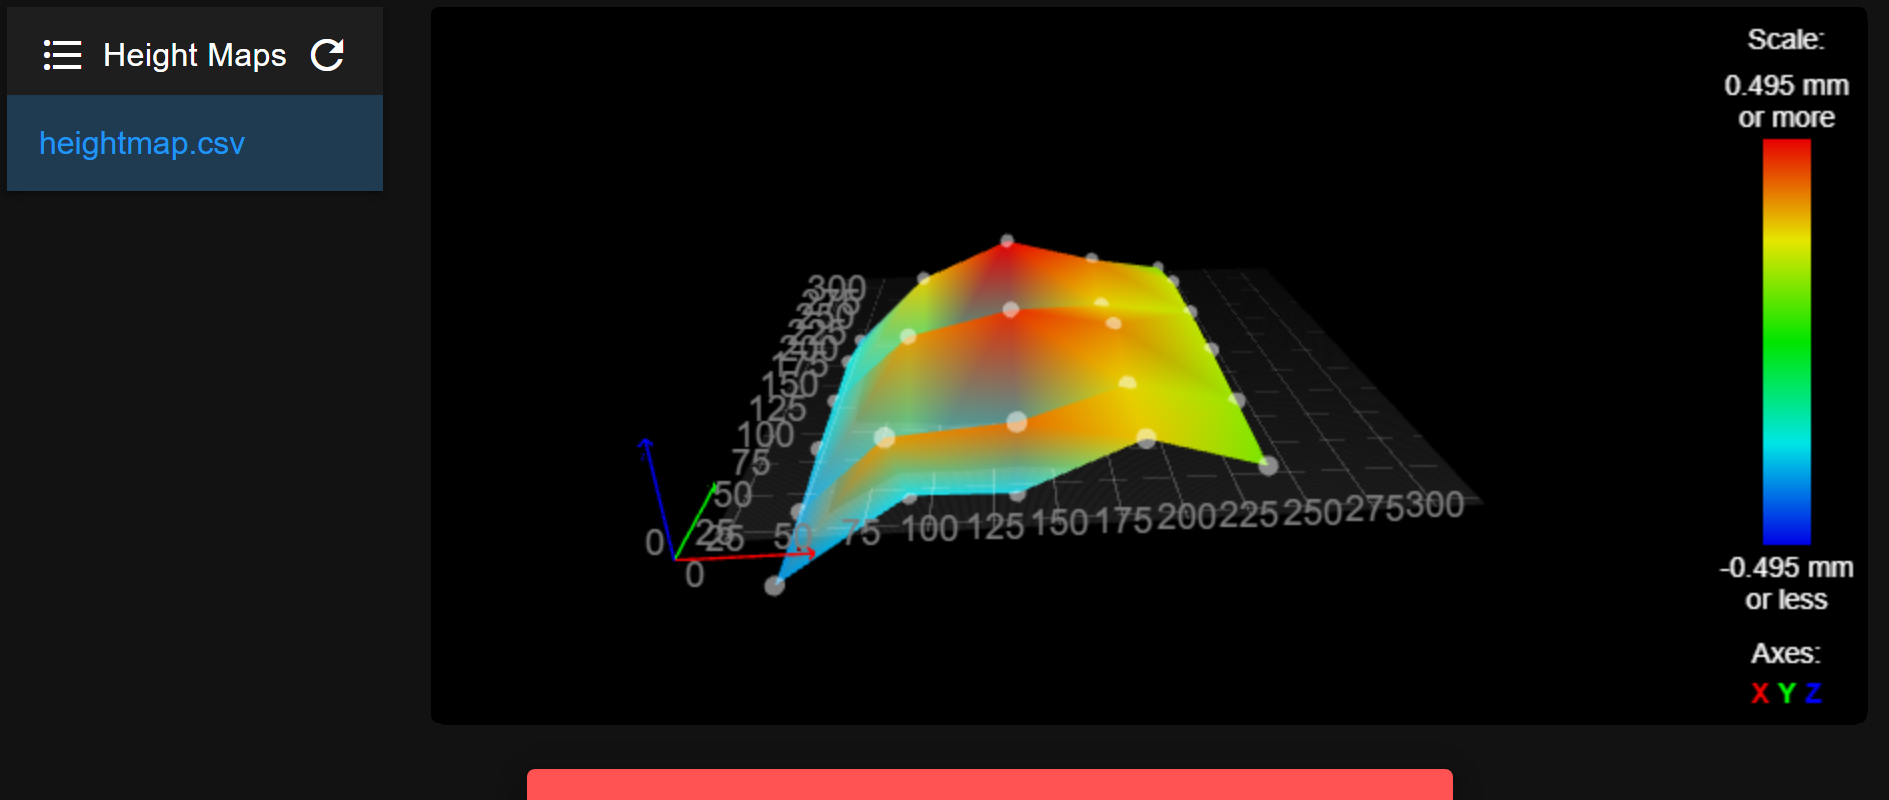
@günter-jibben I fixed the bent BL Touch and this height map is after the replacement tip. Also, I just installed a magnetic PEI sheet and the height map for the PEI sheet and Glass plate look similar. MY Z-Probe config:
M950 S0 C"exp.heater3" ; create servo pin 0 for BLTouch M558 P9 C"^zprobe.in" H5 F1800 T12000 ; set Z probe type to bltouch and the dive height + speeds G31 P500 X-41 Y-2 Z.64 ; set Z probe trigger value, offset and trigger height, 1.7 for 0.6mm Nozzle, 2,32,0.631 M557 X35:275 Y35:295 S50 -
@infiniteloop I don't think I have enough space for 300-400 points.
-
@infiniteloop @Günter-Jibben Updated height map, where I changed the F parameter to 600 instead of 1800
-
@tratoon Reduced probing points

-
@tratoon Keep in mind my build plate used to be level before I installed a magnetic sheet and PEI Sheet, so maybe the magnetic sheet cuased issues? I'm not sure.
-
@tratoon Increased number of probe points:

-
@tratoon said in Prints are warping:
I don't think I have enough space for 300-400 points.
Sure you have. Just narrow your mesh down. Have a look at the documentation to see how to do this:
Here's M557. With the X and Y parameters, you define the size of the probing area, with S, you set the probe point spacing. Alternatively, you use P to set the number of points to probe on both axes.
-
@tratoon said in Prints are warping:
Increased number of probe points:
The graph doesn't represent your bed. Instead, the sawtooth pattern reveals mechanical problems with your motion system. The first thing to do is to lower speeds of all movements.
-
Does the gantry or bed move in the Y axis? I agree, it really seems repetitive and I'm wondering if you have some shmutz (or a bad bearing) on the at least one wheel, which hits every time it makes a revolution. The fact that it more or less tapers on one side would indicate that one side of the bed/gantry is lifting up a little when it hits that point.
-
@tratoon said in Prints are warping:
@günter-jibben I fixed the bent BL Touch and this height map is after the replacement tip. Also, I just installed a magnetic PEI sheet and the height map for the PEI sheet and Glass plate look similar. MY Z-Probe config:
M950 S0 C"exp.heater3"                                 ; create servo pin 0 for BLTouch
M558 P9 C"^zprobe.in" H5 F1800 T12000                  ; set Z probe type to bltouch and the dive height + speeds
G31 P500 X-41 Y-2 Z.64                             ; set Z probe trigger value, offset and trigger height, 1.7 for 0.6mm Nozzle, 2,32,0.631
M557 X35:275 Y35:295 S50
F1800 is way too fast.
I would change it to F120 and maybe try F200:120 as well.
You should not go over F120 in the second measurement.
My speed is at F60.
The MBL takes longer, but it also becomes more accurate in the measurements, the repeatability is increased, and that's what matters.You can also enforce a tolerance between the first measurement and the second measurement.
To do this, add the parameters A and S to the M558 line.
The standard value is S0.03, which means that the difference between the first and second measurement must not be more than 0.03mm, otherwise the measurement is repeated.
And parameter A says how often it can be repeated.
If A3 is there, then after the 3rd measurement, this tolerance of 0.03mm would not be reached, an error would be displayed and the measurement would be aborted.The BLTouch should also calm down a bit before each measurement from driving from measurement point to measurement point.
The parameter R is responsible for this (R0.4 would be a rest time of 0.4 seconds).Your command line could then look like this...
M558 P9 C"^zprobe.in" H5 F200:120 T12000 A3 S0.03 R0.4If you stay with 36 measuring points, it should be completely sufficient.
Sorry @infiniteloop but I think 400 measuring points (With a print bed size of 350x350mm) is absolute overkillThe weird thing about all your heightmaps is this jagged pattern in the Y direction.
Whether with 3, 5 or 13 measuring points... it's always an up and down.
Very strange.
A print surface cannot change like that, so the problem is not with the print surface but with the BLTouch or its setting (or a mechanical problem as mentioned here).
The measurements taken from left to right are ALWAYS higher than the measurements taken from right to left.
Also check all screws for tightness and a good belt tension of your printer.
Adjust the rollers on the print head meticulously so that the print head has no play.set Z probe trigger value, offset and trigger height, 1.7 for 0.6mm NozzleYou shouldn't do that, i.e. use the previously measured height again when changing the nozzle.
After every nozzle change, you should measure the Z offset again.
A comment from me may help you further by explaining how I do it with the help of macros.These macros can later be used to level the printing plate manually using the BLTouch without having to put anything between the nozzle and the printing bed.
Start the macro and set the bed level screws based on the measured values displayed on the screen, the closer to 0,000mm the more precisely the level screw has been set.Click here for the comment... Click me
VERY IMPORTANT ! You just have to adjust the macros on your printer.Google Translate
----- Original Text -----F1800 ist viel zu schnell.
Ich würde es auf F120 ändern und eventuell auch F200:120 ausprobieren.
Über F120 bei der zweiten Messung solltest Du nicht gehen.
Meine Geschwindigkeit liegt bei F60.
Das MBL dauert zwar länger aber es wird auch genauer in den Messungen, die Wiederholgenauigkeit wird erhöht, und darauf kommt es an.Du kannst auch eine Toleranz zwischen der ersten Messung und der zweiten Messung erzwingen.
Dazu fügst Du den Parameter A und S in die M558 Zeile mit ein.
Der Standartwert ist S0,03 der aussagt dass zwischen der ersten und der zweiten Messung nicht mehr als 0,03mm Unterschied liegen darf, ansonsten wird die Messung wiederholt.
Und wie oft Wiederholt werden darf, sagt der Parameter A aus.
Steht dort A3 dann würde nach der 3. Messung die diese Tolleranz von 0,03mm nicht erreicht, ein Fehler angezeigt werden und die Messung würde abgebrochen werden.Auch sollte sich der BLTouch vor jeder Messung etwas beruhigen von der Fahrt von Messpunkt zu Messpunkt.
Dazu ist der Parameter R zuständig (R0.4 wäre eine Ruhezeit von 0,4 Sekunden).Deine Kommandozeile könnte dann wie folgt aussehen...
M558 P9 C"^zprobe.in" H5 F200:120 T12000 A3 S0.03 R0.4Wenn Du bei 36 Messpunkten bleibst, sollte es vollkommen ausreichen.
Sorry @infiniteloop aber 400 Messpunkte (Bei einer Druckbettgröße von 350x350mm) halte ich für absoluten OverkillDas merkwürdige an all Deinen Heightmaps ist dieses Zackenmuster in Y-Richtung.
Ob bei 3, 5 oder 13 Messpunkten... es ist immer ein Auf und Ab.
Sehr merkwürdig.
Eine Druckoberfläche kann sich ja nicht so ändern, also liegt das Problem nicht an der Druckoberfläche sondern am BLTouch beziehungsweise an seiner Einstellung (oder ein mechanisches Problem, wie hier bereits erwähnt).
Die Messungen die von Links nach Rechts verlaufen sind IMMER höher als die Messungen die von Rechts nach Links gemessen werden.
Überprüfe auch mal alle Schrauben auf festen Sitz und auf eine gute Riemenspannung Deines Druckers.
Die Rollen am Druckkopf penibel einstellen damit der Druckkopf keinerlei Spiel hat.set Z probe trigger value, offset and trigger height, 1.7 for 0.6mm NozzleDas solltest Du nicht machen, also bei einem Düsenwechsel die vormals gemessene Höhe wieder zu verwenden.
Nach jedem Düsenwechsel solltest Du den Z-Offset neu ausmessen.
Dazu hilft Dir eventuell ein Kommentar von mir weiter, indem ich erkläre wie ich es bei mir mache mit Hilfe von Macros.Diese Macros können später dazu verwendet werden die Druckplatte manuell mit hilfe des BLTouch zu leveln ohne etwas zwischen Düse und Druckbett legen zu müssen.
Macro starten und die Bettlevelschrauben anhand der angezeigten Messwerte auf dem Bildschirm einstellen, je näher an 0,000mm desto genauer ist die Levelschraube eingestellt worden.Hier geht es zu dem Kommentar... Klick mich
SEHR WICHTIG ! Du musst nur die Macros an Deinem Drucker anpassen.DDA5X... 0.9° Stepper... Linearrails... Duet 2 Wifi... PT100 Board... Duet IR-Probe... Dyze Pro Kit up to 500°C.. etc
Thingiverse -
@günter-jibben I used the M558 command you posted, hee is the result:

-
@tratoon
At first glance it looks better, but to judge it more precisely you would have to be able to see the map from the side.Before the next leveling, check the rollers of the print head and adjust them very precisely so that the print head has no play but does not run heavily.
You should also check all the screws and the belt tension.Google Translate
----- Original Text -----Auf den ersten Blick sieht es schon besser aus, aber um es genauer zu beurteilen müsste man die Map schräg von der Seite sehen können.
Kontrolliere vor dem nächsten Leveln mal die Rollen vom Druckkopf und stelle diese sehr genau ein so dass der Druckkopf keinerlei Spiel hat aber auch nicht schwer läuft.
Auch alle Schrauben solltest Du mal prüfen und auch die Riemenspannung.DDA5X... 0.9° Stepper... Linearrails... Duet 2 Wifi... PT100 Board... Duet IR-Probe... Dyze Pro Kit up to 500°C.. etc
Thingiverse -
@günter-jibben I just got this height map after adjusting on of the X-Axis eccentric nuts:
 Along with a substantial Z-Offset Message
 -
@günter-jibben said in Prints are warping:
I think 400 measuring points (With a print bed size of 350x350mm) is absolute overkill
That depends: to verify the surface of your print bed, it's fine, but I agree that it consumes way too much time if you create a new mesh frequently, e.g. from your start.g.
Gruß von der Küste
-
@tratoon
Found a bug I would say.
Bravo
Have a look at the linked thread, where I determine the Z offset with macros.
I think then your printer will be a bit more precise and the manual leveling is more accurate and also more fun.If you have decided to use the macro method, please send us some screenshots and tell us what you think of it.
Google Translate
----- Original Text -----Fehler gefunden würde ich mal sagen.
BravoGuck Dir den verlinkten Thread gerne mal an, dort wo ich den Z-Offset mit Macros ermittle.
Ich denke dann wird Dein Drucker noch etwas präziser werden und das manuelle leveln ist genauer und macht auch mehr Spaß.Schick gerne mal ein paar Screenshots falls Du Dich entschieden hast die Macro-Methode zu nehmen und erzähle was Du davon hältst.
DDA5X... 0.9° Stepper... Linearrails... Duet 2 Wifi... PT100 Board... Duet IR-Probe... Dyze Pro Kit up to 500°C.. etc
Thingiverse -
@günter-jibben I do MBL by sending G32 and defining where my adjusting screws are in Bed.g
-
@tratoon said in Prints are warping:
I just got this height map after adjusting on of the X-Axis eccentric nuts
That looks much better. If you now level your bed more precisely, you're done.
-
@günter-jibben And by maco method, you refer to the Post you linked in one of your previous posts, right?
-
And the macro method is used to level the bed right?
-
@infiniteloop said in Prints are warping:
@günter-jibben said in Prints are warping:
I think 400 measuring points (With a print bed size of 350x350mm) is absolute overkill
That depends: to verify the surface of your print bed, it's fine, but I agree that it consumes way too much time if you create a new mesh frequently, e.g. from your start.g.
Gruß von der Küste
I agree.
It's too much for everyday use, but to find out exactly how my record looks, especially if you plan to grind the record to see where you can grind more and where not... then I would also go to more measuring points to tend.Greetings back from the North Sea coast

Google Translate
----- Original Text -----Sehe ich auch so.
Für den Alltag ist es zu viel, aber um mal zu erfahren wie genau meine Platte aussieht, besonders wenn man vor hat die Platte zu schleifen, um zu erkennen wo man mehr schleifen darf und wo nicht... dann würde ich auch zu mehr Messpunkten tendieren.Grüße zurück von der Nordseeküste
DDA5X... 0.9° Stepper... Linearrails... Duet 2 Wifi... PT100 Board... Duet IR-Probe... Dyze Pro Kit up to 500°C.. etc
Thingiverse