CR-10S5 Firmware
-
@PaulHew thanks for the help. However the Y motor seems to be fighting against itself (it vibrates/slightly turns in one direction then reverses). As for Z moving slightly will allow the axis to move together, however when Y+10 the motors stair step (Only one axis moves upwards while the other stays in place then they reverse direction).
-
Also none of the endstops are working.
-
Current config.g please
Lets see if we can assist further to get the endstops working.
Its nearly midnight here in the UK! -
@Gost101 said in CR-10S5 Firmware:
@PaulHew thanks for the help. However the Y motor seems to be fighting against itself (it vibrates/slightly turns in one direction then reverses). As for Z moving slightly will allow the axis to move together, however when Y+10 the motors stair step (Only one axis moves upwards while the other stays in place then they reverse direction).
If the Y axis motor is doing that, it's more than likely that it is not wired up properly, you need to find the base pairs for coil A and B to find the base pair unplug the connector and you can probe the connector using a multimeter set to continuity probe two wires when you get a beep you have found one pair, the other two wires are the second pair, if i was you I would find the base pairs on all the motors to be on the safe side.
-
; Configuration file for Duet WiFi (firmware version 2.03) ; executed by the firmware on start-up ; ; generated by RepRapFirmware Configuration Tool v2.0.3 on Wed Sep 11 2019 20:24:24 GMT-0600 (Mountain Daylight Time) ; General preferences G90 ; send absolute coordinates... M83 ; ...but relative extruder moves M550 P"A.C.E." ; set printer name M669 K0 ; select Cartesian mode ; Network M551 P"12345" ; set password M552 S1 ; enable network M586 P0 S1 ; enable HTTP M586 P1 S0 ; disable FTP M586 P2 S0 ; disable Telnet ; Drives M569 P0 S1 ; X physical drive 0 goes forwards M569 P1 S1 ; Y physical drive 1 goes forwards M569 P2 S0 ; Z physical drive 2 goes backwards M569 P3 S1 ; E physical drive 3 goes forwards M584 X0 Y1 Z2 E3 ; set drive mapping M350 X16 Y16 Z16 E16 I1 ; configure microstepping with interpolation M92 X80.00 Y80.00 Z4000.00 E420.00 ; set steps per mm M566 X900.00 Y900.00 Z12.00 E120.00 ; set maximum instantaneous speed changes (mm/min) M203 X6000.00 Y6000.00 Z180.00 E1200.00 ; set maximum speeds (mm/min) M201 X500.00 Y500.00 Z20.00 E250.00 ; set accelerations (mm/s^2) M906 X800 Y800 Z800 E800 I30 ; set motor currents (mA) and motor idle factor in per cent M84 S30 ; Set idle timeout ; Axis Limits M208 X0 Y0 Z0 S1 ; set axis minima M208 X0:500 Y0:500 Z0:500 ; set axis maxima ; Endstops M574 X1 Y1 Z1 S0 ; set active low and disabled endstops ; Z-Probe M558 P0 H5 F120 T6000 ; disable Z probe but set dive height, probe speed and travel speed M557 X15:215 Y15:195 S20 ; define mesh grid ; Heaters M305 P0 T100000 B4138 R4700 ; set thermistor + ADC parameters for heater 0 M143 H0 S120 ; set temperature limit for heater 0 to 120C M305 P1 T100000 B4138 R4700 ; set thermistor + ADC parameters for heater 1 M143 H1 S280 ; set temperature limit for heater 1 to 280C ; Fans M106 P0 S0 I0 F500 H-1 ; set fan 0 value, PWM signal inversion and frequency. Thermostatic control is turned off M106 P1 S1 I0 F500 H1 T45 ; set fan 1 value, PWM signal inversion and frequency. Thermostatic control is turned on ; Tools M563 P0 D0 H1 F0 ; define tool 0 G10 P0 X0 Y0 Z0 ; set tool 0 axis offsets G10 P0 R0 S0 ; set initial tool 0 active and standby temperatures to 0C ; Custom settings are not defined -
@Gost101 said in CR-10S5 Firmware:
; Axis Limits
M208 X0 Y0 Z0 S1 ; set axis minima
M208 X0:500 Y0:500 Z0:500 ; set axis maximaYou've still got two competing formats here for the minima and maxima. Just delete the first line with the S1 since the second line includes both the minima and maxima range in one line.
You can use this procedure to determine the phases of the motor wiring. https://duet3d.dozuki.com/Wiki/Choosing_and_connecting_stepper_motors#Section_Identifying_the_stepper_motor_phases
-
Still having trouble getting the Y motor to work. Its wired just as all the other motors. In addition could someone send me to the appropriate link for endstop switch gcode. Acording to this guide: https://duet3d.dozuki.com/Guide/Ender+3+Pro+and+Duet+Maestro+Guide+Part+3:+Commissioning/39 "If the values for X, Y, and Z show "Yes" by default, and "No" when triggered, you chose the wrong switch type in the configurator." I'm doing it wrong.
-
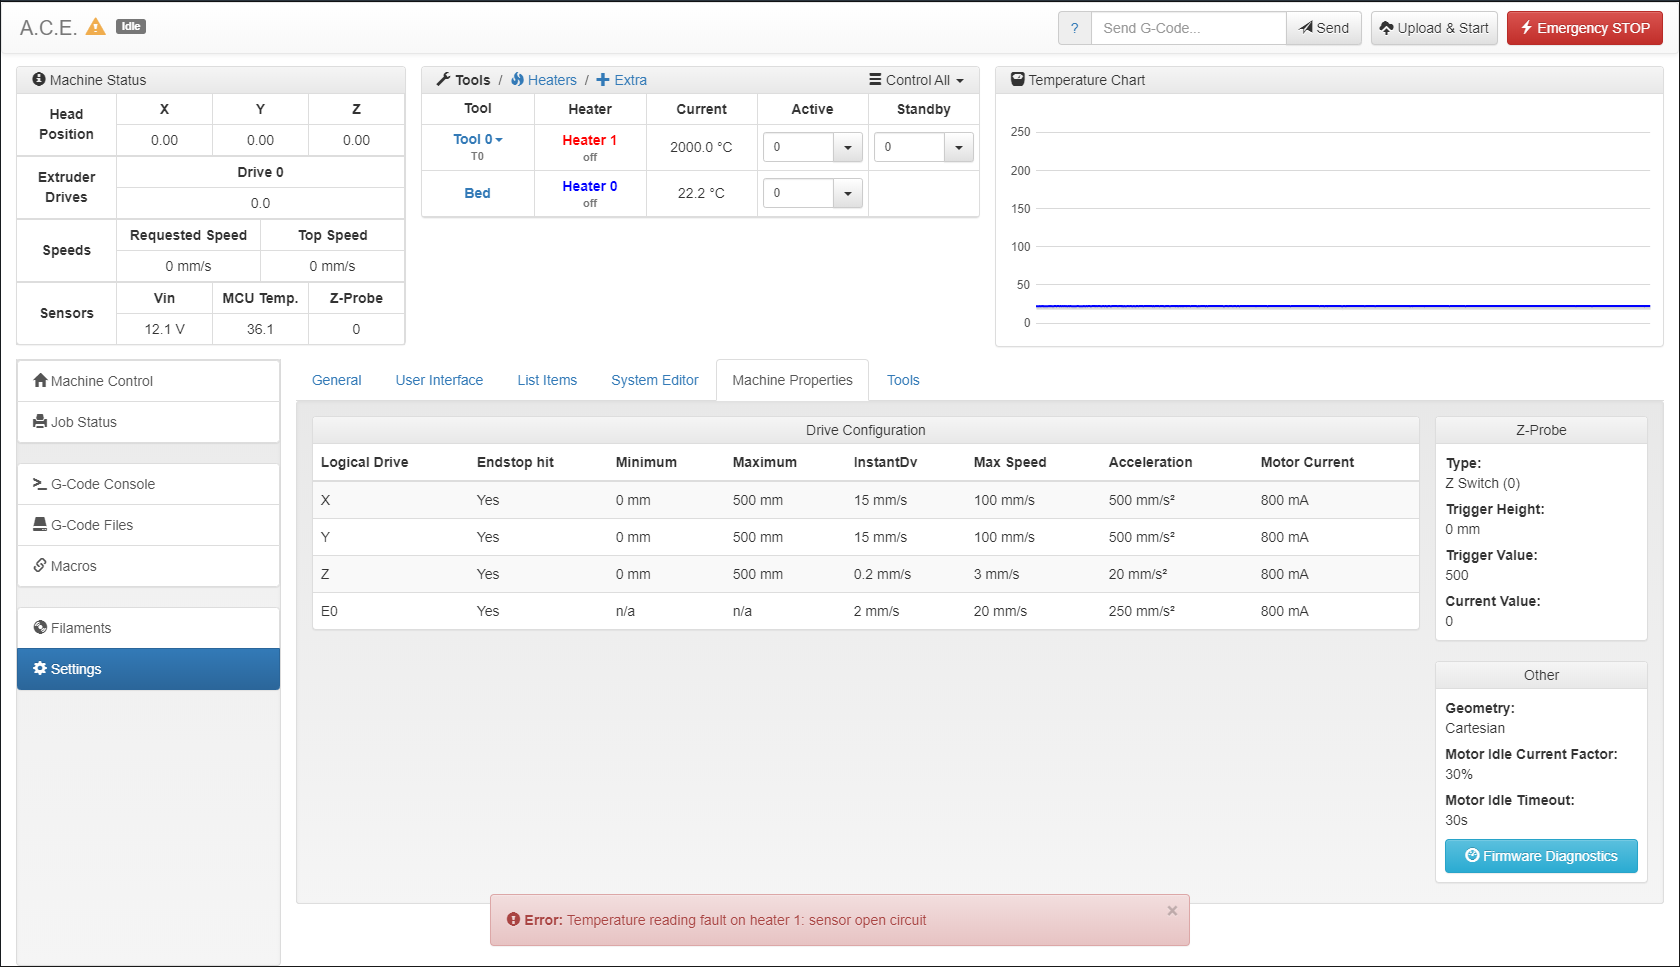 I also cannot get my hot end to heat up, or the fan to turn on.
 -
Endstops.
If your bed is all the way to the back, the hot end all the way to the left and fully down, then they will show yes yes yes.
Power down and slowy move the hotend to the centre of X axis, move the bed central, and wind the Z zxis up about 10mm
Power up, look at that screen again and it should of changed to no no no. Press the individual switches to confirm that its status changes from no to yes. If that works then...press the individual homing buttons, X Y then Z
If they are still not working do the below.- Please make sure you are using the 2 outer pins on each endstop connector.
- Use a multimeter to confirm that the endstop switchs are working. You can insert a paper clip into the connector on each side of the new plug you have crimped to your multimeter and press each switch.
Make sure it is on short or beep test. if your probes are thin enough you might get them to touch the contacts from where your wire goes into the connector. Make sure you are not plugged into the board. - double and double check your crimps on those terminals, gently pull the wire to see if it comes comes away.
I have had issue where I did not crimp them properly and the wire fell out or the connector had not clipped in properly or I had crimped the insulator!
Hotend.
The hotend will not heatup whilst it is reading 2000 degrees!
Again check your wiring and crimps. You can also use your multimeter to see if you can get a resistance from the thermistor.Finally as mentioned before, you need a Z probe. especially with 2 Z axis motors.
I suggest you get the Creality BL Touch kit as it comes with the bracket and long cables for connecting to the Duet and also comes with a proper BL Touch.HTH. Paul
-
Struggled to find a spec for the motors are they all creality 42-40? If so do they match the resistance of the following link?
If so your current settings are low. 80% of a 1.68A motor is 1.344A, not 0.8. Not likely to make the motion juttery unless the acis is stiff.
Please make sure the motor pairs are wired right to the board (different manufacturers change the cable orders) before upping the current. You may be getting away woth it at low current but you may fry your board if you up the current with the motors wired wrong.
-
@DocTrucker said in CR-10S5 Firmware:
Struggled to find a spec for the motors are they all creality 42-40? If so do they match the resistance of the following link?
check this
https://gist.github.com/knoopx/e6c40a009e796203b93a75a3ed6a5ab8 -
@Veti the JK42HS42-1704 motor linked on that page is 1.7A. Looks like there is some variation on what creality strapped to their machines?
Perhaps their board doesn't work well at higher currents?
Edit: There are 4 JK42HS40-* motors. A resistance check should confirm which it is. The 30ohm resistance is unlikely. They come in 1.7, 1.3, and 1.2A rated models.
Note for the original poster. Don't change current without confirming which motors are strapped to your machine. If in doubt, leave as is.
-
All of the endstops switch to NO upon being at zero, however the endstop is not stoping the axis from wanting to move after the endstop has been triggered. They Y motor moves now perfectly, seemed to be a loose wire on the connector attached to the motor.
-
Endstops are only active when doing a homing move with G1 S1
-
Cool beans, that is the next task. I need to fix the homing functions next, as they don't move the intended motor. I'm also still having a probelm with syncing the z axis. Going down is fine, however going up will produce a stair case affect (one motor will spin while the other doesnot then the motors switch and do the same thing)
-
All of the homing functions are fixed, I'm at a restaurant right now, but I will post the config and home files when I get back. Is there a way to make the z move fast on the way down, but slow on the way up?
-
Home ALL homeall (1).g
; homeall.g
; called to home all axes
;
; generated by RepRapFirmware Configuration Tool v2.0.3 on Wed Sep 11 2019 20:24:24 GMT-0600 (Mountain Daylight Time)
; Y
G91               ; relative positioning
G1 S1 Y-505 F1800 ; move quickly to Y axis endstop and stop there (first pass)
G1 Y5 F6000       ; go back a few mm
G1 S1 Y-505 F360  ; move slowly to Y axis endstop once more (second pass)
G90               ; absolute positioning
; X
G91               ; relative positioning
G1 S1 X-505 F1800 ; move quickly to X axis endstop and stop there (first pass)
G1 X5 F6000       ; go back a few mm
G1 S1 X-505 F360  ; move slowly to X axis endstop once more (second pass)
G90               ; absolute positioning
; Z
G91               ; relative positioning
M92 Z400.00      ; Move Z Fast
G1 S1 Z-505 F3000 ; move Z down until the endstop is triggered
G92 Z0            ; set Z position to axis minimum (you may want to adjust this)
G1 Z1 F6000       ; go back a few mm
M92 Z80		  ; Move Slow
G1 S1 Z-505 F400 ; move slowly to X axis endstop once more (second pass)
G90               ; absolute positioning
Home X homex.g
; homex.g
; called to home the X axis
;
; generated by RepRapFirmware Configuration Tool v2.0.3 on Wed Sep 11 2019 20:24:24 GMT-0600 (Mountain Daylight Time)
G91               ; relative positioning
G1 S1 X-505 F1800 ; move quickly to X axis endstop and stop there (first pass)
G1 X5 F6000       ; go back a few mm
G1 S1 X-505 F360  ; move slowly to X axis endstop once more (second pass)
G90               ; absolute positioning
Home Y homey.g
; homey.g
; called to home the Y axis
;
; generated by RepRapFirmware Configuration Tool v2.0.3 on Wed Sep 11 2019 20:24:24 GMT-0600 (Mountain Daylight Time)
G91               ; relative positioning
G1 S1 Y-505 F1800 ; move quickly to Y axis endstop and stop there (first pass)
G1 Y5 F6000       ; go back a few mm
G1 S1 Y-505 F360  ; move slowly to Y axis endstop once more (second pass)
G90               ; absolute positioning
Home Z homez (1).g
; homez.g ; called to home the Z axis ; ; generated by RepRapFirmware Configuration Tool v2.0.3 on Wed Sep 11 2019 20:24:24 GMT-0600 (Mountain Daylight Time) G91 ; relative positioning M92 Z400.00 ; Move Z Fast G1 S1 Z-505 F3000 ; move Z down until the endstop is triggered G92 Z0 ; set Z position to axis minimum (you may want to adjust this) G1 Z1 F6000 ; go back a few mm M92 Z80 ; Move Slow G1 S1 Z-505 F400 ; move slowly to X axis endstop once more (second pass) G90 ; absolute positioning -
I just got my BLTouch in today, but I will have to print out the mount once this can print.
What I have to do next:
Either figure out:
Why my hot end thermister is not working.
-Possibly rewire
Why my hotend will not heat up.
-Possibly rewire
-Wait for the new one to arrive: Here
Figure out how to use a filament sensor
Replace Main Hotend fan for a Noctua fan: Here -
@Gost101 said in CR-10S5 Firmware:
M92 Z400.00 ; Move Z Fast
M92 Z80 ; Move SlowNope, this isn't right. You're changing the steps per mm value for the axis, which isn't changing the speed it's changing how far it's moving per rotation. Not sure what the intention is there.
-
@Gost101 said in CR-10S5 Firmware:
I just got my BLTouch in today, but I will have to print out the mount once this can print.
When you switch to a z probe you can follow the guidance here for setting up the probe and the Z homing macro:
https://duet3d.dozuki.com/Wiki/Connecting_a_Z_probe#Section_BLTouch