calibration wow!
-
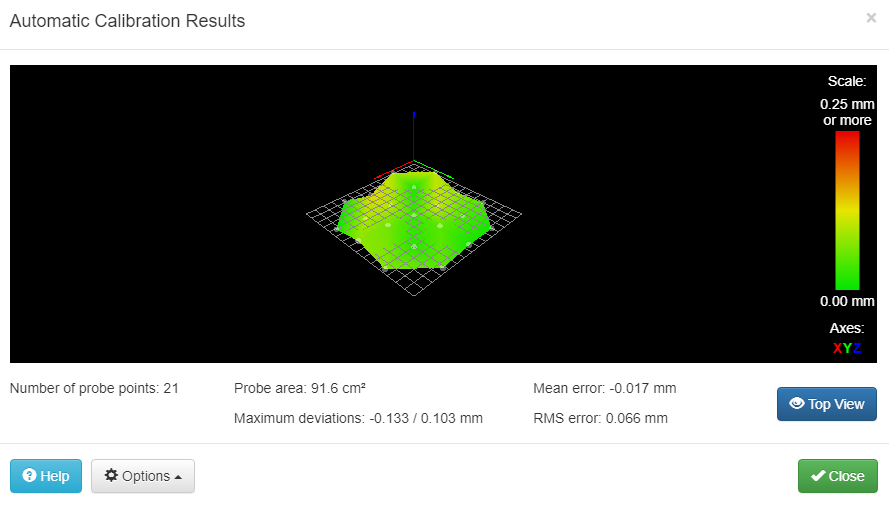
been working on calibration for about 2 hrs, mostly 3 factor, keeping it simple, then moved onto 6 factor. 1st height map shown here. I am astounded. For a printer I paid less than £90 for (then spent much more on some decent upgrades) I am seriously impressed.
-
So..................
beautifully calibrated delta, great terrain map, can't get a print.
I've looked through the forum using a search for 1st layer adhesion and mid air printing but can't seem to find anything jump at me as to why my prints are starting 4-5mm above the bed.
Typically this machine likes a tool offset of about Z0.28 which I have set in my tool set up in the config using G10, but I cant see anything that leads me to print mid air. Help!
My config:
; Configuration file for Duet Maestro (firmware version 2.03)
; executed by the firmware on start-up
;
; generated by RepRapFirmware Configuration Tool v2.0.3 on Sat Sep 14 2019 00:35:56 GMT+0100 (British Summer Time); General preferences
G90 ; send absolute coordinates...
M83 ; ...but relative extruder moves
M550 P"My Printer" ; set printer name
M665 R62 L121 B50 H124.12 ; Set delta radius, diagonal rod length, printable radius and homed height
M666 X0 Y0 Z0 ; put your endstop adjustments here, or let auto calibration find them; Network
M552 P0.0.0.0 S1 ; enable network and acquire dynamic address via DHCP
M586 P0 S1 ; enable HTTP
M586 P1 S0 ; disable FTP
M586 P2 S0 ; disable Telnet; Drives
M569 P0 S0 ; physical drive 0 goes backwards
M569 P1 S0 ; physical drive 1 goes backwards
M569 P2 S0 ; physical drive 2 goes backwards
M569 P3 S1 ; physical drive 3 goes forwards
M584 X0 Y1 Z2 E3 ; set drive mapping
M350 X16 Y16 Z16 E16 I1 ; configure microstepping with interpolation
M92 X100.00 Y100.00 Z100.00 E101.00 ; set steps per mm
M566 X1200.00 Y1200.00 Z1200.00 E1200.00 ; set maximum instantaneous speed changes (mm/min)
M203 X18000.00 Y18000.00 Z18000.00 E1200.00 ; set maximum speeds (mm/min)
M201 X1000.00 Y1000.00 Z1000.00 E1000.00 ; set accelerations (mm/s^2)
M906 X1000 Y1000 Z1000 E800 I30 ; set motor currents (mA) and motor idle factor in per cent
M84 S30 ; Set idle timeout; Axis Limits
M208 Z0 S1 ; set minimum Z; Endstops
M574 X2 Y2 Z2 S0 ; set active low and disabled endstops; Z-Probe
M558 P5 H5 I1 F360 T6000 ; set Z probe type to switch and the dive height + speeds
G31 p0001 X0 Y0 Z0 ; set Z probe trigger value, offset and trigger height
M557 R54 S20 ; define mesh grid; Heaters
M307 H0 B1 S1.00 ; enable bang-bang mode for the bed heater and set PWM limit
M305 P0 T100000 B4092 R2200 ; set thermistor + ADC parameters for heater 1
M143 H0 S120 ; set temperature limit for heater 1 to 120C
M305 P1 T100000 B4092 R2200 ; set thermistor + ADC parameters for heater 2
M143 H1 S280 ; set temperature limit for heater 2 to 280C; Fans
M106 P0 S0 I0 F255 H1 T45 ; set fan 0 value, PWM signal inversion and frequency. Thermostatic control is turned on
M106 P1 S1 I0 F255 H1 T45 ; set fan 1 value, PWM signal inversion and frequency. Thermostatic control is turned on; Tools
M563 P0 D0 F0 H1 ; define tool 1
G10 P0 X0 Y0 Z0.28 ; set tool 1 axis offsets
G10 P0 R0 S0 ; set initial tool 1 active and standby temperatures to 0C; Custom settings are not defined
; Miscellaneous
M501 ; load saved parameters from non-volatile memoryMy config override is:
; config-override.g file generated in response to M500 at 2019-09-14 21:24
; This is a system-generated file - do not edit
; Delta parameters
M665 L121.000:121.000:121.000 R62.151 H130.213 B50.0 X-0.230 Y-1.103 Z0.000
M666 X0.147 Y0.090 Z-0.237 A0.00 B0.00
; Heater model parameters
M307 H0 A90.0 C700.0 D10.0 S1.00 V0.0 B1
M307 H1 A340.0 C140.0 D5.5 S1.00 V0.0 B0
M307 H2 A340.0 C140.0 D5.5 S1.00 V0.0 B0
G10 L2 P1 X0.00 Y0.00 Z0.00
G10 L2 P2 X0.00 Y0.00 Z0.00
G10 L2 P3 X0.00 Y0.00 Z0.00
G10 L2 P4 X0.00 Y0.00 Z0.00
G10 L2 P5 X0.00 Y0.00 Z0.00
G10 L2 P6 X0.00 Y0.00 Z0.00
G10 L2 P7 X0.00 Y0.00 Z0.00
G10 L2 P8 X0.00 Y0.00 Z0.00
G10 L2 P9 X0.00 Y0.00 Z0.00 -
@Dugee said in calibration wow!:
I've looked through the forum using a search for 1st layer adhesion and mid air printing but can't seem to find anything jump at me as to why my prints are starting 4-5mm above the bed.
Have you calibrated the trigger height of the Z probe? I suspect not, because you have set it to zero in the G31 command in config.g. What type of probe is it?
-
If this is a delta you should try using firmware 2.04rc1 due to some delta bugs in 2.03 that may be causing you issues.
-
I had done it earlier, but as you say, it is now set to 0.
I'm using the bed switches on a monoprice Mini delta, wired in parallel instead of individually, which is actually giving me me amazing repeatability, Over a sequence of 5 probes, I'm almost always having the last 4 the same to 3 decimal places and the 1st probe +0.02mm greater., all around the +/- 0.5mm mark.
I'm giving up for tonight but tomorrow I'll do the G31 probing again and check I have the correct figure again, and as suggested by @Pheadrux I'll also move to firmware 2.04rc1.
I knew it must be something straightforward as I had a couple of prints last week, but I've been staring too much at it today. Beginning to go fuzzy!
thanks for the help
edited to change wiring of bed switches