BL Touch Question
-
Where are you loading the saved height map?
Can you post your homing files and config.g to see what the issue may be. -
Config.g
; Configuration file for Duet WiFi (firmware version 1.21)
; executed by the firmware on start-up
;
; generated by RepRapFirmware Configuration Tool v2 on Wed May 01 2019 14:56:47 GMT-0500 (CDT); General preferences
G90 ; Send absolute coordinates...
M83 ; ...but relative extruder moves; Network
M550 PBearcat ; Set machine name
M552 S1 ; Enable network
;*** Access point is configured manually via M587
M586 P0 S1 ; Enable HTTP
M586 P1 S1 ; Enable FTP
M586 P2 S1 ; Enable Telnet; Drives
M569 P0 S1 ; Drive 0 goes forwards: X Axis
M569 P1 S0 ; Drive 1 goes backwards: Y Axis
M569 P2 S1 ; Drive 2 goes forwards: Z Axis
M569 P3 S1 ; Drive 3 goes forwards: E Axis
M569 P4 S1 ; Drive 4 goes forwards: Z Axis (at E1)
M350 X16 Y16 E16 Z16 I1 ; Configure microstepping with interpolation
M92 X100.00 Y100.00 Z400.00 E475.00 ; Set steps per mm
M566 X420.00 Y420.00 Z12.00 E300.00 ; Set maximum instantaneous speed changes (mm/min)
M203 X10000.00 Y10000.00 Z720.00 E1500.00 ; Set maximum speeds (mm/min)
M201 X2000.00 Y2000.00 Z200.00 E2000.00 ; Set accelerations (mm/s^2)
M906 X720.00 Y720.00 Z450.00 E550.00 I10 ; Set motor currents (mA) and motor idle factor in percent
M84 S30 ; Set idle timeout; Motor remapping for dual Z
M584 X0 Y1 Z2:4 E3 ; two Z motors connected to driver outputs Z and E1
M671 X-37:287 Y0:0 S10 ; leadscrews at left (connected to Z) and right (connected to E1) of X axis; Axis Limits
M208 X0 Y-4 Z-2 S1 ; Set axis minima
M208 X250 Y210 Z210 S0 ; Set axis maxima; Endstops
M574 X1 Y1 S3 ; Set endstops controlled by motor load detection; Stallgaurd Sensitivy
M915 X S3 F0 H200 R0 ; Set X axis Sensitivity
M915 Y S3 F0 H200 R0 ; Set y axis Sensitivity; Z-Probe
M574 Z1 S2 ; set endstops controlled by probe
M307 H7 A-1 C-1 D-1 ; disable heater on PWM channel for BLTouch
M558 P5 H5 F500 T4000 ; set Z probe type to bltouch and the dive height + speeds
G31 P500 X15 Y0 Z0.64 ; set Z probe trigger value, offset and trigger height
M557 X15:215 Y19:195 S20 ; define mesh grid; Heaters
M307 H7 A-1 C-1 D-1 ; disable heater on PWM channel for BLTouch
M307 H0 B0 S1.00 ; Disable bang-bang mode for the bed heater and set PWM limit
M305 P0 T100000 B4138 R4700 ; Set thermistor + ADC parameters for heater 0
M143 H0 S120 ; Set temperature limit for heater 0 to 120C
M305 P1 T500000 B4723 C1.196220e-7 ; Set thermistor + ADC parameters for heater 1
M143 H1 S350 ; Set temperature limit for heater 1 to 350C; Fans
M106 P1 T45 I0 S255 H1 F250 ; Set fan 0 value, PWM signal inversion and frequency. Thermostatic control is turned on
M106 P0 I0 H-1 F250 ; Set fan 1 value, PWM signal inversion and frequency. Thermostatic control is turned off; Tools
M563 P0 D0 H1 F0 ; Define tool 0
G10 P0 X0 Y0 Z0 ; Set tool 0 axis offsets
G10 P0 R0 S0 ; Set initial tool 0 active and standby temperatures to 0C; Automatic saving after power loss is not enabled
; Custom settings are not configured
-
Hi,
And post your heightmap.csv file as well.
Frederick
-
@Phaedrux - Homeall.g
; homeall.g
; called to home all axes
;
; generated by RepRapFirmware Configuration Tool v2 on Wed May 01 2019 14:56:47 GMT-0500 (CDT)
G91 ; relative positioning
G1 Z5 F6000 S2 ; lift Z relative to current position
G1 S1 X5 F1000 ; move slowly away
M913 X50 Y50 ; Lower motor current to 50% for sensorless homing
G1 S1 X-255 F2800 ; move quickly to X axis endstop and stop there (first pass)
G1 X5 F6000 ; go back a few mm
G1 S1 X-255 F2800 ; move slowly to X axis endstop once more (second pass)
G1 S1 Y5 F1000 ; move slowly away
G1 S1 Y-255 F2400 ; move quickly to Y axis endstop and stop there (first pass)
G1 Y5 F6000 ; go back a few mm
G1 S1 Y-255 F2400 ; move slowly to Y axis endstop once more (second pass)
M913 X100 Y100 ; Return motor current to 100%
G90 ; absolute positioning
G30 ; set z height based on trigger height; Uncomment the following lines to lift Z after probing
;G91 ; relative positioning
;G1 S2 Z5 F100 ; lift Z relative to current position
;G90 ; absolute positioning -
Hi,
I checked your homeall.g and note that it was generated for you.
One thing that I don't understand is the G30 command. A G30 by itself probes at the current X,Y position and that appears to be at Xmin,Ymin.
Is that what you desired? I normally probe for Z=0 at the center of the bed.
Frederick
-
Yes, you should add a G1 X Y move before the G30 to position your probe at bed center.
Next question is how and when are you running G29 to do the mesh compensation probing?
Are you doing it before every print? Or are you loading a saved heightmap?
What does your slicer start gcode look like?
If you intend to save a heightmap and reload it rather than reprobe the whole bed everytime you can use G29 S1 to load it in your homeall.g after the G30.
https://duet3d.dozuki.com/Wiki/Gcode#Section_G29_Mesh_bed_probe
https://duet3d.dozuki.com/Wiki/Using_mesh_bed_compensation -
@Phaedrux Currently, I am just running the G29 to try to get the bed as level as possible when I start out. I will certainly change my initial probe to be at the center when I get everything squared away.
-
@dismania said in BL Touch Question:
M558 P5 H5 F500
For the BLTouch you should use M558 P9 for the probe type, and you'll get more repeatable results if you slow down the probing speed greatly. Try F120.
-
-
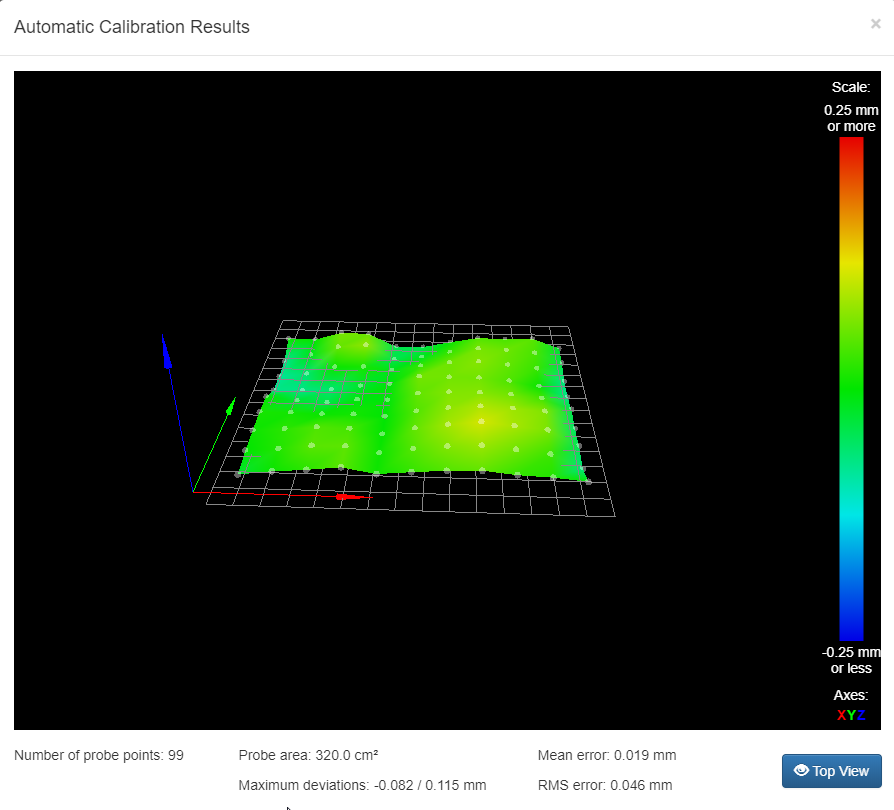
@Phaedrux thanks so much! I am trying it now. I have aPrisa MK3 that I am upgrading to the Bear frame and using the new board. I want to get things as perfect as possible before compensation. So, I know that the center screw on the bed is tightened to a set point, the rest are adjustable in my scenario, so I have set the Z probe to trigger directly over that fixed point and then I should be able to adjust the edges up and down to get something very flat. What range am I looking for in terms of deviation?
-
Is this calibration map close enough or would you tweak it more?
-
That's pretty good. The mesh compensation should have no problem dealing with that surface deviation. And more importantly it appears to be level.
A good way to test the effectiveness of esh compensation is to print a test file like this that covers the entire reach of the bed. Print it twice, once with mesh active, and once disabled. You should be able to see an improvement.
bedlevel_nozzle_0.4_200x200-0.3-0.8.stl
Scale it to fit your bed. Single layer height. There should be two perimeters so that you can see if they mesh nicely or are too loose, or two squished. It's most effective if your extruder is already calibrated.
-
@Phaedrux for the gcode, what should I have in it?
G80
G29I am a bit confused as to what triggers the mesh leveling and bed compensation.
-
G28 calls homeall.g
G29 runs mesh compensation probing, saves the result, and enables the compensation when it's done.
G29 S1 loads a saved heightmap from a previous probing.
Either way you do it the printer should be homed first.
-
@Phaedrux one last question. I printed what you shared (thank you). But, when printing, I had to baby step down to -.480 to get it to be correct on the bed. Where do I make this adjustment? In my gcode for printing or in my offset in config.g? I expected it to be right on, but it was not.
-
Well if you've followed these steps the trigger height should be largely correct. It may still be necessary to use a slight amount of baby stepping to get it perfect, but 0.48mm is quite a lot on a first layer.
I'd redo the probe calibration making sure to keep the following in mind
- Get the X Y offset as close as possible
- Measure the Z trigger height with the bed and nozzle at printing temp to account for thermal expansion and warp.
- Make sure that the point you're testing the probe trigger height with G30 S-1 is the same point you're setting G92 Z0 as with the nozzle touching the bed.
- Make sure the extruder e steps is calibrated and your material flow rate in the slicer dialed in with accurately measured filament diameter.