Erase and rewind (So to speak)
-
Sooo, I am considering "starting over" from a config point of view on my main machine.
I've got a delta built pretty much as the "Precision Delta" that dc42 outlines here https://miscsolutions.wordpress.com/dc42s-large-kossel-build/
It works well enough and I have not really tinkered with it the last year. But i am also noticing that there are just all these minor little naggles printwise. Mostly due from the fact that both firmware and Cura has been messed with contiously.
")
I'm therefore as I said considering wiping and starting over. But what is really a good strategy in tuning a machine from the start?
I've got a e3d on a Smart Effector driven by a Zesty Nimble and a BerdAir.
I have both Cura and Simplify3d at my disposal (but i have been using Cura almost texclusively the last 18 months since i feel that S3D just isnt trying to maintain a decent release/fix-schedule anymore.Where should I start really?

-
I wouldn't necessarily totally wipe config.g. Instead, I'd use the online tool (which was just refreshed) to generate a new one, and compare that to the existing one, thinking about each line in the existing one, looking up the g-code and options, and use that whole process to build a new config.g.
I also use Cura in favor of S3D... on the Cura side, I'd just un-install everything, all directories, then install the latest download, and config your printer. Add materials back as you go.
I have done that several times with Cura.
-
And, for what it is worth, this is my config.g for a 600mm x/y 620+ z, custom Delta. Not saying it is perfect... just maybe another reference point.
; Configuration file for Duet WiFi (firmware version 1.20 or newer) ; executed by the firmware on start-up ; ; generated by RepRapFirmware Configuration Tool on Fri Jan 12 2018 20:07:04 GMT-0600 (Central Standard Time) ; General preferences M111 S0 ; Debugging off G21 ; Work in millimetres G90 ; Send absolute coordinates... M83 ; ...but relative extruder moves M555 P2 ; Set firmware compatibility to look like Marlin M911 S21.0 R23.0 P"E-1" ; Automatic saving after power loss ; Delta parameters M665 L720.280 R329.847 H626.751 B304.0 X-0.047 Y0.425 Z0.000 M666 X-0.023 Y0.267 Z-0.244 A0.00 B0.00 ;M665 R321.08 L720 B304 H625 ; Set delta radius, diagonal rod length, printable radius and homed height ;M666 X0 Y0 Z0 ; Put your endstop adjustments here, or let auto calibration find them M208 Z0 S1 ; Set minimum Z ; Endstops M574 X2 Y2 Z2 S1 ; 2= Endstops at "top" of axis, S1= active high ; Probing M558 P5 R0.5 H5 F500 T18000 ; P5=Effector. R0.4 = Recovery time after each probe. H5 = Height from which to probe. F500 = Feedrate mm/min T18000 = rapid between probes, mm/min G31 P100 X0 Y0 Z-0.1 ; Set Z probe trigger value, offset and trigger height M557 R300 S75 ; Define mesh grid ; Drives M569 P0 S1 ; Drive 0 goes forwards M569 P1 S1 ; Drive 1 goes forwards M569 P2 S1 ; Drive 2 goes forwards M569 P3 S0 ; Drive 3 goes reverse (Bondtech Extruder) M350 X16 Y16 Z16 E16 U16 I1 ; Configure microstepping with interpolation M92 X200 Y200 Z200 E415 ; Set steps per mm M566 X1200 Y1200 Z1200 E1200 ; Set maximum instantaneous speed changes (mm/min) M203 X18000 Y18000 Z18000 E1200 ; Set maximum speeds (mm/min) M201 X4000 Y4000 Z4000 E2000 ; Set accelerations (mm/s^2) M906 X1200 Y1200 Z1200 E1800 I30 ; Set motor currents (mA) and motor idle factor in per cent. DE 2018 02 02 M84 S30 ; Set idle timeout ; Heaters M305 P0 T100000 B4138 C0 R4700 ; Bed. Set thermistor + ADC parameters for heater 0 M143 H0 S100 ; Bed, Set temperature limit for heater 0 to 100C M305 P1 T100000 B4138 C0 R4700 H-10 ; Hot End. Set thermistor + ADC parameters for heater 1. H is offset correction at High resistance (low temps). DE 2018 01 28 M143 H1 S280 ; Hot End. Set temperature limit for heater 1 to 280C ;M141 H2 ; Chamber Heater. ;M305 P2 T00000 B4138 R4700 ; Thermistor parms ;M307 H2 B1 C320 D120 ; use bang-bang ; Network M550 PDanal's BFD ; Set machine name M551 P ; Set password M552 S1 ; Enable network ;*** Access point is configured manually via M587 M586 P0 S1 ; Enable HTTP M586 P1 S0 ; Disable FTP M586 P2 S0 ; Disable Telnet ; Fans M106 P2 S0 I0 F500 H-1 ; Part cooling fan. DE 2018 01 24 M106 P1 S1 I0 F500 H1 T80 ; Hot end cooling fan (and LEDs). DE 2018 01 24 ;M106 P2 I0 F20 H100:101:102 T40:65 L0.5 B1 ; Board/Driver chip cooling fan. DE 2018 02 02 H=CPU:drivers:drivers T=Speed propo across 40:65, L=Min speed 50%, B= blip, full speed for 1 second. ;M106 P2 S.5 I0 F020 H1 T200 B1 ; Run it 1/2 speed when hot end is hot. DE 2019 06 25 ; Tools M563 P0 D0 H1 F2 ; Define tool 0, extruder 0, heater 1, and fan 0 G10 P0 X0 Y0 Z0 ; Set tool 0 axis offsets G10 P0 R0 S0 ; Set initial tool 0 active and standby temperatures to 0C ; Custom settings T0 ; Select Tool 0 M501 ; Load config_override.g ;M591 D0 P2 C3 S1 ; Filament sensor for D= Extruder 0, P1= Low when filament present, C3= Wired to E0 Endstop switch, S1 = Enabled -
And the homedelta for the same printer.
; homedelta.g ; called to home all towers on a delta printer ; ; generated by RepRapFirmware Configuration Tool on Fri Jan 12 2018 20:07:04 GMT-0600 (Central Standard Time) G91 ; relative positioning G1 S1 X955 Y955 Z955 F1800 ; move all towers to the high end stopping at the endstops (first pass) G1 X-5 Y-5 Z-5 F1800 S2 ; go down a few mm G1 S1 X15 Y15 Z15 F360 ; move all towers up once more (second pass) G1 Z-10 F6000 ; move down a few mm so that the nozzle can be centred G90 ; absolute positioning G1 X0 Y0 F6000 ; move X+Y to the centre -
@janjoh if its printing fairly well i would not necessarily wipe everything and start again. rather i would methodically work though the areas you find you have issues. In the end you many need to iterate over this, for example you can't fine tune the motion elements by comparing prints, until you have got the heating/extrusion working so you can print. Looks like you have done at least one round of this iteration so it should be quicker.
Personally I do something like the following, but its not fully formalised:
- Get the Delta motion working and Z probing working well - this is important because delta calibration is an utter PITA without the ability to probe accurately.
- get heating and extrusion working well (measure exact steps/mm) for the setup
- Start printing and get cooling working as well as possible (this is huge topic as many factors intersect: print temperature, filament type, cooling type, ambient temperature, model geometry etc).
- Work on "advanced tuning" such as getting pressure advance tuned right, Dynamic acceleration adjustment etc.
- add the nice to have and test them (like filament monitoring, power fail resume etc).
- Iterate on 1-4 (although in the end it tends to be 3-4 mainly)
Throughout steps 1-4 I would keep the printed models as simple as possible. Single walled cubes, bridging tests, overhang tests, fine detail tests (there are loads of models on your (least) favourite 3d file sharing site). Try and only tune one parameter at a time, for 1 filament. While the 3d benchies etc are cool to show a well tuned printer they take a long time to print and combine a bunch of different features so actually make the tuning process harder.
-
@T3P3Tony said in Erase and rewind (So to speak):
@janjoh if its printing fairly well i would not necessarily wipe everything and start again. rather i would methodically work though the areas you find you have issues. In the end you many need to iterate over this, for example you can't fine tune the motion elements by comparing prints, until you have got the heating/extrusion working so you can print. Looks like you have done at least one round of this iteration so it should be quicker.
Personally I do something like the following, but its not fully formalised:
- Get the Delta motion working and Z probing working well - this is important because delta calibration is an utter PITA without the ability to probe accurately.
- get heating and extrusion working well (measure exact steps/mm) for the setup
- Start printing and get cooling working as well as possible (this is huge topic as many factors intersect: print temperature, filament type, cooling type, ambient temperature, model geometry etc).
- Work on "advanced tuning" such as getting pressure advance tuned right, Dynamic acceleration adjustment etc.
- add the nice to have and test them (like filament monitoring, power fail resume etc).
- Iterate on 1-4 (although in the end it tends to be 3-4 mainly)
Throughout steps 1-4 I would keep the printed models as simple as possible. Single walled cubes, bridging tests, overhang tests, fine detail tests (there are loads of models on your (least) favourite 3d file sharing site). Try and only tune one parameter at a time, for 1 filament. While the 3d benchies etc are cool to show a well tuned printer they take a long time to print and combine a bunch of different features so actually make the tuning process harder.
-
I am quite happy there (and smart effector helps), i may be "underly aggressive" on my speeds and accels even. (Away for a cpl of days so cannot share my config right now)
-
Yeah, lets start there. What is a recommended jig to be able to measure this in a rather exakt manner? I have tried a few, but have not found one that I actually like.
-
@janjoh for 2. I use a set of calipers locked to 100mm and a fine felt tip marker to show exactly 100mm. then extrude until its just at the entry into the extruder. that gives me an accuracy within the width of the fine marker over 100mm so better than 0.5%
-
@T3P3Tony said in Erase and rewind (So to speak):
@janjoh for 2. I use a set of calipers locked to 100mm and a fine felt tip marker to show exactly 100mm. then extrude until its just at the entry into the extruder. that gives me an accuracy within the width of the fine marker over 100mm so better than 0.5%
Heh... In it's simplicity, that is probably one of the best ideas so far... despite the Zesty Nimble being a tad difficult to rest a caliper on AND being able to get a good read.
-
So, here is my current config. My extrusion seem to be pretty dead on (Should be, I am using the exact stepper recommended by Zesty Tech, and using their own values for it.)
Sooo, what would be the next step. I heard "Start with som single walled cubes"?
; Configuration file for Duet WiFi (firmware version 1.20 or newer)
; executed by the firmware on start-up
;
; generated by RepRapFirmware Configuration Tool on Sat Mar 10 2018 00:14:59 GMT+0100 (W. Europe Standard Time)

; General preferences
G90                             ; Send absolute coordinates...
M83                             ; ...but relative extruder moves
M665 R179.489 L360.2 B150 H451 X0.746 Y0.761 Z0     ; Set delta radius, diagonal rod length, printable radius and homed height
M666 X0.85 Y-0.81 Z-0.04 A0 B0                   ; Put your endstop adjustments here, or let auto calibration find them

; Network
M550 PFullMetalDelta          ; Set machine name
M552 S1                         ; Enable network
;*** Access point is configured manually via M587
M586 P0 S1                      ; Enable HTTP
M586 P1 S0                      ; Disable FTP
M586 P2 S0                      ; Disable Telnet

; Drives
M569 P0 S1                      ; Drive 0 X goes forwards
M569 P1 S1                      ; Drive 1 Y goes forwards
M569 P2 S1                      ; Drive 2 Z goes forwards
M569 P3 S0                      ; Drive 3 E0 goes backwards, Zesty Nimble
;M569 P3 S1                      ; Drive 3 E0 goes backwards, Titan Extruder

M350 X16 Y16 Z16 E16 I1         ; Configure microstepping with interpolation
M92 X200 Y200 Z200

;M92 E418.5            ; Set steps per mm (Titan)
;M92 E2855		; Set steps per mm (Zesty)
M92 E2700

;M566 X1200 Y1200 Z1200 E1200    ; Set maximum instantaneous speed changes (mm/min) Titan
M566 X1200 Y1200 Z1200 E60    ; Set maximum instantaneous speed changes (mm/min) Zesty
M203 X18000 Y18000 Z18000 E1200 ; Set maximum speeds (mm/min)
;M201 X1000 Y1000 Z1000 E1000		    ; Set accelerations (mm/s^2) Titan
M201 X1000 Y1000 Z1000 E120		    ; Set accelerations (mm/s^2)  Zesty
M906 X1000 Y1000 Z1000 E500 I30 ; Set motor currents (mA) and motor idle factor in per cent
M84 S30                         ; Set idle timeout

; Axis Limits
M208 Z0 S1                      ; Set minimum Z

; Endstops
M574 X2 Y2 Z2 S1                   ; Set active high endstops

; Z-Probe
M558 P5 R0.4 F1400 H3 A5		; Smart Effector
G31 P100 X0 Y0 Z-0.176
M557 R148 S20                   ; Define mesh grid

; Heaters
;M305 P0 T99670 B4471 C8.262085e-8 R4700  ; Set thermistor + ADC parameters for heater 0 Keenovo heater
M305 P0 T100000 B3950 R4700  ; Set thermistor + ADC parameters for heater 0 Clever3d heater
M143 H0 S120                    ; Set temperature limit for heater 0 to 120C
M305 P1 T100000 B4725 C7.060000e-8 R4700  ; Set thermistor + ADC parameters for heater 1
M143 H1 S280                    ; Set temperature limit for heater 1 to 280C

; Fans
;M106 P0 S0 I0 F10 H-1        ; Set fan 0 value, PWM signal inversion and frequency. Thermostatic control is turned off
M106 P0 S0 I1 F100 H-1 L0.3       ; Set fan 0 value, PWM signal inversion and frequency. Thermostatic control is turned off
M106 P1 S1 I0 F500 H1 T45       ; Set fan 1 value, PWM signal inversion and frequency. Thermostatic control is turned on
;M106 P2 S1 I0 F500 H1 T45       ; Set fan 2 value, PWM signal inversion and frequency. Thermostatic control is turned on
M106 P2 I1 H100:101 T45:55 L0.3

; Tools
M563 P0 D0 H1                   ; Define tool 0
G10 P0 X0 Y0 Z0                 ; Set tool 0 axis offsets
G10 P0 R0 S0                    ; Set initial tool 0 active and standby temperatures to 0C

;M572 D0 S0.03			; Pressure advance

M912 P0 S-22		; Temperature offset.

; Automatic saving after power loss is not enabled

; Custom settings are configured
M501

;Load mesh calibration
G29 S1
; bed.g file for RepRapFirmware, generated by Escher3D calculator ; 10 points, 6 factors, probing radius: 148, probe offset (0, 0) G28 G30 P0 X0.00 Y148.00 Z-99999 H0 G30 P1 X128.17 Y74.00 Z-99999 H0 G30 P2 X128.17 Y-74.00 Z-99999 H0 G30 P3 X0.00 Y-148.00 Z-99999 H0 G30 P4 X-128.17 Y-74.00 Z-99999 H0 G30 P5 X-128.17 Y74.00 Z-99999 H0 G30 P6 X0.00 Y74.00 Z-99999 H0 G30 P7 X64.09 Y-37.00 Z-99999 H0 G30 P8 X-64.09 Y-37.00 Z-99999 H0 G30 P9 X0 Y0 Z-99999 S6 -
@janjoh Ah, and also my config-override .. looking at it, i am not certain why i have so many heaters.. Hm
; config-override.g file generated in response to M500 at 2019-01-12 17:07 ; This is a system-generated file - do not edit ; Delta parameters M665 L360.200 R179.538 H454.035 B150.0 X0.094 Y-0.102 Z0.000 M666 X-0.479 Y0.105 Z0.373 A0.00 B0.00 ; Heater model parameters M307 H0 A191.5 C361.9 D2.0 S1.00 V12.2 B0 M307 H1 A409.2 C206.7 D4.6 S1.00 V12.0 B0 M307 H2 A340.0 C140.0 D5.5 S1.00 V0.0 B0 M307 H3 A340.0 C140.0 D5.5 S1.00 V0.0 B0 M307 H4 A340.0 C140.0 D5.5 S1.00 V0.0 B0 M307 H5 A340.0 C140.0 D5.5 S1.00 V0.0 B0 M307 H6 A340.0 C140.0 D5.5 S1.00 V0.0 B0 M307 H7 A340.0 C140.0 D5.5 S1.00 V0.0 B0 G10 L2 P1 X0.00 Y0.00 Z0.00 G10 L2 P2 X0.00 Y0.00 Z0.00 G10 L2 P3 X0.00 Y0.00 Z0.00 G10 L2 P4 X0.00 Y0.00 Z0.00 G10 L2 P5 X0.00 Y0.00 Z0.00 G10 L2 P6 X0.00 Y0.00 Z0.00 G10 L2 P7 X0.00 Y0.00 Z0.00 G10 L2 P8 X0.00 Y0.00 Z0.00 G10 L2 P9 X0.00 Y0.00 Z0.00 -
@janjoh said in Erase and rewind (So to speak):
Yeah, lets start there. What is a recommended jig to be able to measure this in a rather exakt manner? I have tried a few, but have not found one that I actually like.
You are WAY over thinking this... Let's assume you find a way to get extrusion steps/mm set to within a few microns. You will STILL need to adjust extrusion % to get 'best' prints. For many reasons.
Therefore, get steps/mm within a percent, meaning 1mm over the span of 100mm, which is very easy to do by eye and a 'Razor Sharpie', and don't change it again (unless something on the printer changes). If you really want, get it within 1mm over 1000mm and you'll be within 0.1%. Not that this accomplishes anything in the real world, but it may make some folks feel better.
Then tune extrusion percentages for various print operations.
-
@Danal Yeah, i know. And as I wrote, it was pretty much "spot on" from an extrusion point of view it turns out from last time I did to an E-cal.
-
@janjoh said in Erase and rewind (So to speak):
i am not certain why i have so many heaters.. Hm
The firmware just writes its entire heater array to config_override. Whether those heaters exist or not (exist = 'are in the configuration').
Same thing with G10 (workplace coordinate offset). It will set them all, whether you ever use them or not.
-
@Danal Ah. Thank you for the clarification.
I decided that I'd see what happen if i use a "default" Cura profile and just change retracts and temps. Just to see what it will do.
I have a feeling that 3 years of "tinkering" probably has accumulated a lot of issues and "tweaks for issues that causes new issues" ... so to speak
-
Right..
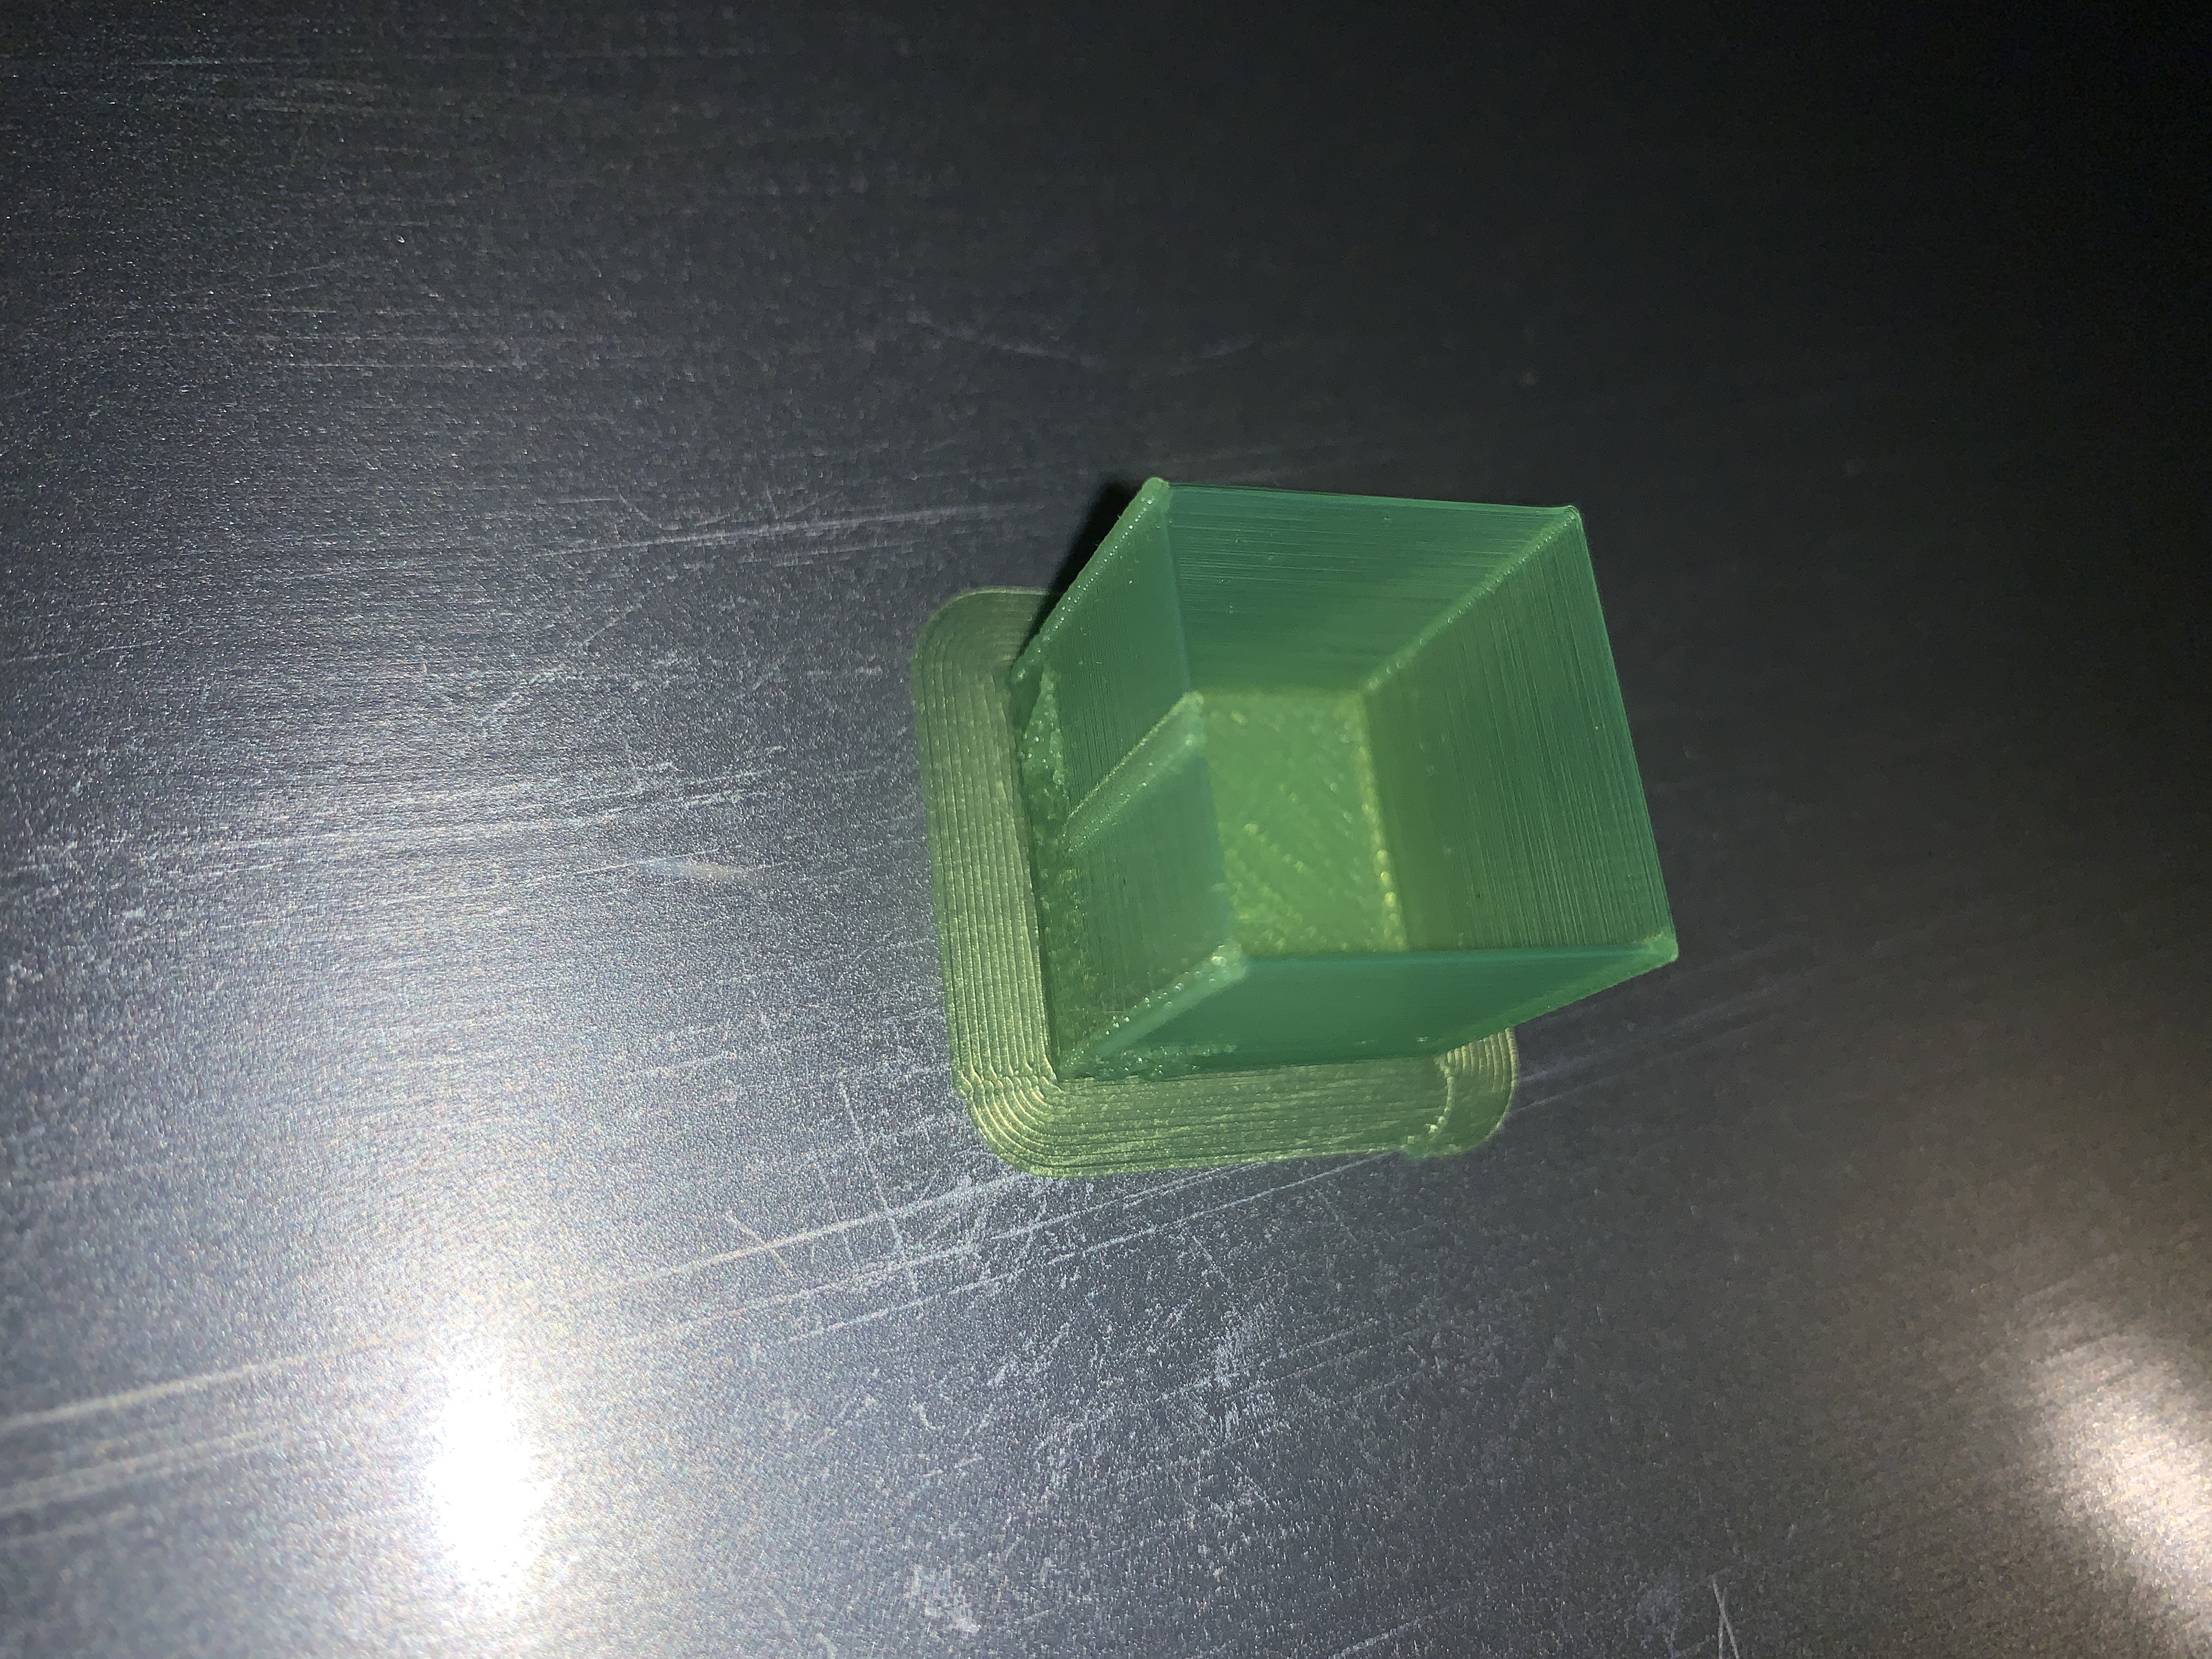
So, again, I started with a completely blank Cura, and changed speeds and temps. Base speed set to 60mm/s (it looks so slow after seeing it perform at 400mm/s)As we can see, I'm getting a nasty Z-seam and what appears to be artifacts from the lack of both coasting and pressure advance in the corners. Which issue should I tackle first ya'think?
;FLAVOR:RepRap
;TIME:687
;Filament used: 0.486841m
;Layer height: 0.15
;MINX:-14.8
;MINY:-14.805
;MINZ:0.3
;MAXX:15.2
;MAXY:15.195
;MAXZ:19.95
;Generated with Cura_SteamEngine 4.3.0
[Removed gcode]
;End of Gcode
;SETTING_3 {"extruder_quality": ["[general]\\nversion = 4\\nname = Torwell PLA\\
;SETTING_3 ndefinition = deltabot\\n\\n[metadata]\\nquality_type = fast\\ntype =
;SETTING_3  quality_changes\\nposition = 0\\nsetting_version = 9\\n\\n[values]\\
;SETTING_3 nbrim_width = 5\\nfill_outline_gaps = True\\nmaterial_final_print_tem
;SETTING_3 perature = 210\\nmaterial_initial_print_temperature = 210\\nmaterial_
;SETTING_3 print_temperature = 210\\nretraction_amount = 1\\nspeed_print = 60\\n
;SETTING_3 \\n"], "global_quality": "[general]\\nversion = 4\\nname = Torwell PL
;SETTING_3 A\\ndefinition = deltabot\\n\\n[metadata]\\nquality_type = fast\\ntyp
;SETTING_3 e = quality_changes\\nsetting_version = 9\\n\\n[values]\\nacceleratio
;SETTING_3 n_enabled = False\\nmaterial_bed_temperature = 65\\n\\n"}