• Tags
  • Documentation
  • Order
  • Register
  • Login
Duet3D Logo Duet3D
  • Tags
  • Documentation
  • Order
  • Register
  • Login

Smart Effector: Cannot mount stock cooling fan

Scheduled Pinned Locked Moved
Smart effector for delta printers
6
14
648
Loading More Posts
  • Oldest to Newest
  • Newest to Oldest
  • Most Votes
Reply
  • Reply as topic
Log in to reply
This topic has been deleted. Only users with topic management privileges can see it.
  • undefined
    dgrat
    last edited by dgrat 10 Jun 2019, 19:26 6 Oct 2019, 19:17

    Beside minor issues e.g. 1) the two press clamps where too wide, 2) the version number is lower in comp. to the web-shops image, the magnetic rods 3) are not centered..

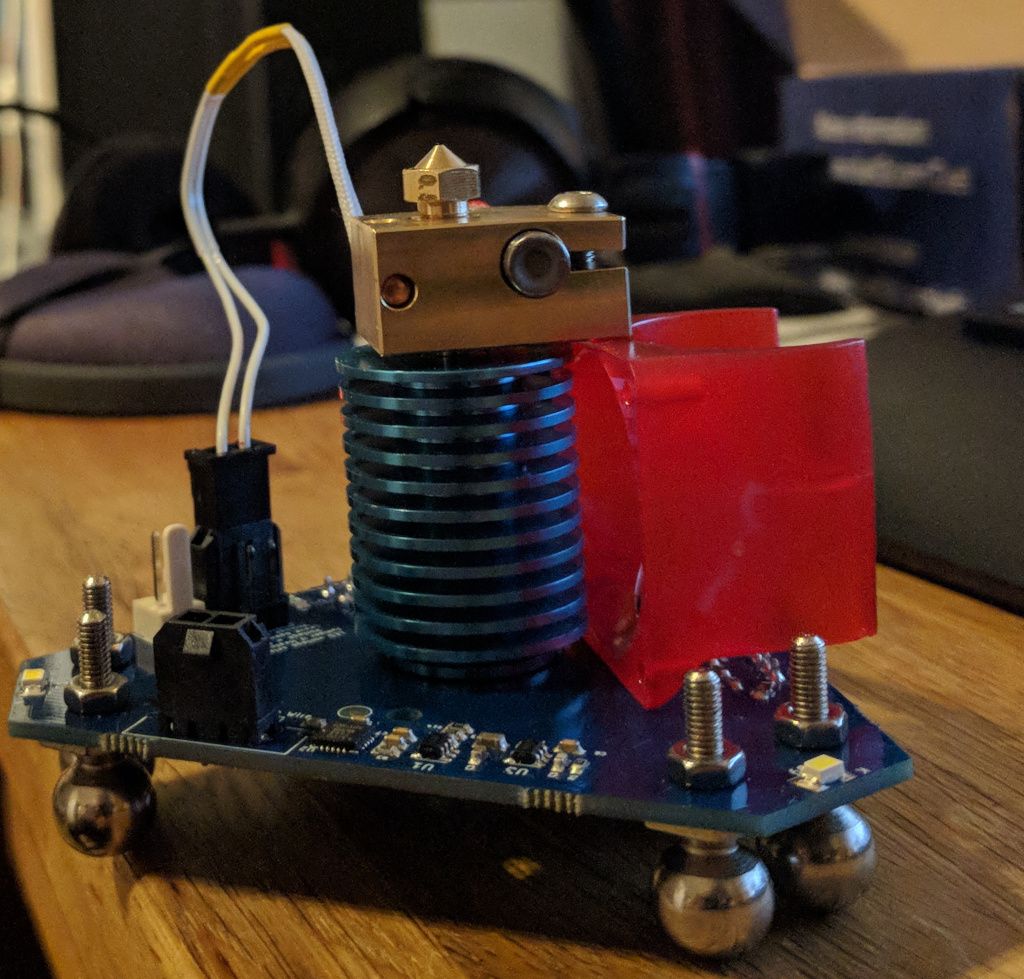
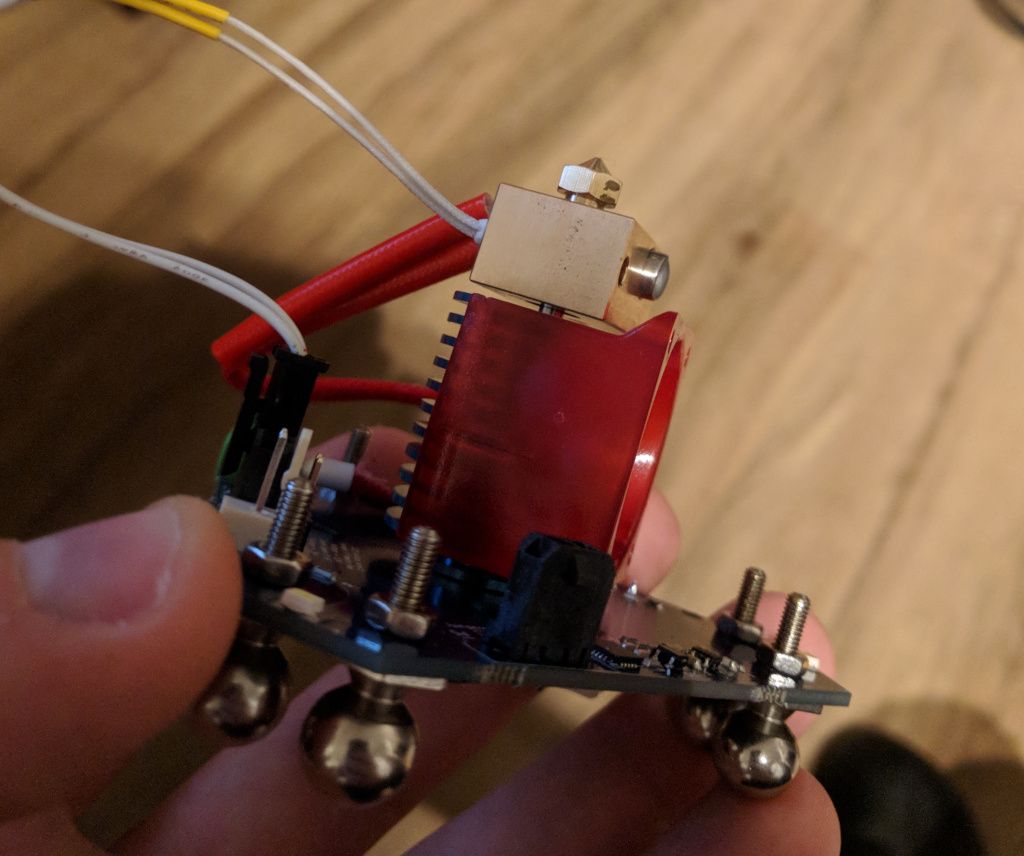
    .. my smart effector heat sink is not sufficiently spaced to mount a E3D stock cooling fan (or a clone and I have both). The length of the heatsink itself is not the issue, but the missing spacer.
    The only way to make it somehow fit, is to mount the fan in the wrong orientation and risk contact with the heating block.

    Am I missing something? Is this really the product design or just a prototype I got, by chance?

    IMG_20191006_211252.jpg .

    IMG_20191006_210136.jpg

    undefined 1 Reply Last reply 6 Oct 2019, 20:00 Reply Quote 0
    • undefined
      tech-raton
      last edited by tech-raton 10 Jun 2019, 19:47 6 Oct 2019, 19:41

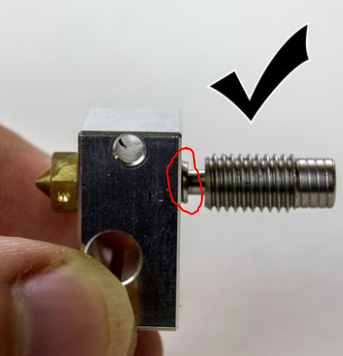
      Your nozzle and heater block aren't right. The nozzle should be almost touching the heater block. Check the e3d documentation.

      https://e3d-online.dozuki.com/Guide/V6+Assembly/6?lang=en

      1 Reply Last reply Reply Quote 0
      • undefined
        dgrat
        last edited by dgrat 10 Jun 2019, 19:58 6 Oct 2019, 19:55

        The spacing of the nozzle will not solve the issue. Because a correctly mounted fan, will be in line with the heating fins, not the heating block. So this idea would only work if I mount the fan the wrong way, but space is still not sufficient.

        1 Reply Last reply Reply Quote 0
        • undefined
          T3P3Tony administrators @dgrat
          last edited by 6 Oct 2019, 20:00

          @dgrat I use it as you have it in the second picture. never had an issue with it touching the heater block

          www.duet3d.com

          undefined 1 Reply Last reply 6 Oct 2019, 20:01 Reply Quote 1
          • undefined
            dgrat @T3P3Tony
            last edited by dgrat 10 Jun 2019, 20:02 6 Oct 2019, 20:01

            @T3P3Tony Thanks for the reply. Sounds 😕 for me.

            undefined undefined 2 Replies Last reply 6 Oct 2019, 20:03 Reply Quote 0
            • undefined
              T3P3Tony administrators @dgrat
              last edited by 6 Oct 2019, 20:03

              @dgrat its a rather right fit to get everything in under the smart effector. We could have asked e3d to make a longer, custom, heatsink but because it works the way you have show it we went with the standard length.

              www.duet3d.com

              1 Reply Last reply Reply Quote 0
              • undefined
                boldnuts @dgrat
                last edited by 6 Oct 2019, 20:31

                @dgrat I have also been using mine for the last few years as shown in picture two with no issues at all.

                1 Reply Last reply Reply Quote 1
                • undefined
                  dgrat
                  last edited by 7 Oct 2019, 10:42

                  Well, I will give it a try but I still think this could be problematic, because there is not much physical hindrance that impairs contact with the hotend.
                  Another small remark: Would it be possible to shift the PCB assembly stuff (resistors, caps, ..) to the top? This would slightly increase the distance by 1 mm and lowers the chance for accidents.

                  1 Reply Last reply Reply Quote 0
                  • undefined
                    dc42 administrators
                    last edited by dc42 10 Jul 2019, 15:08 7 Oct 2019, 12:23

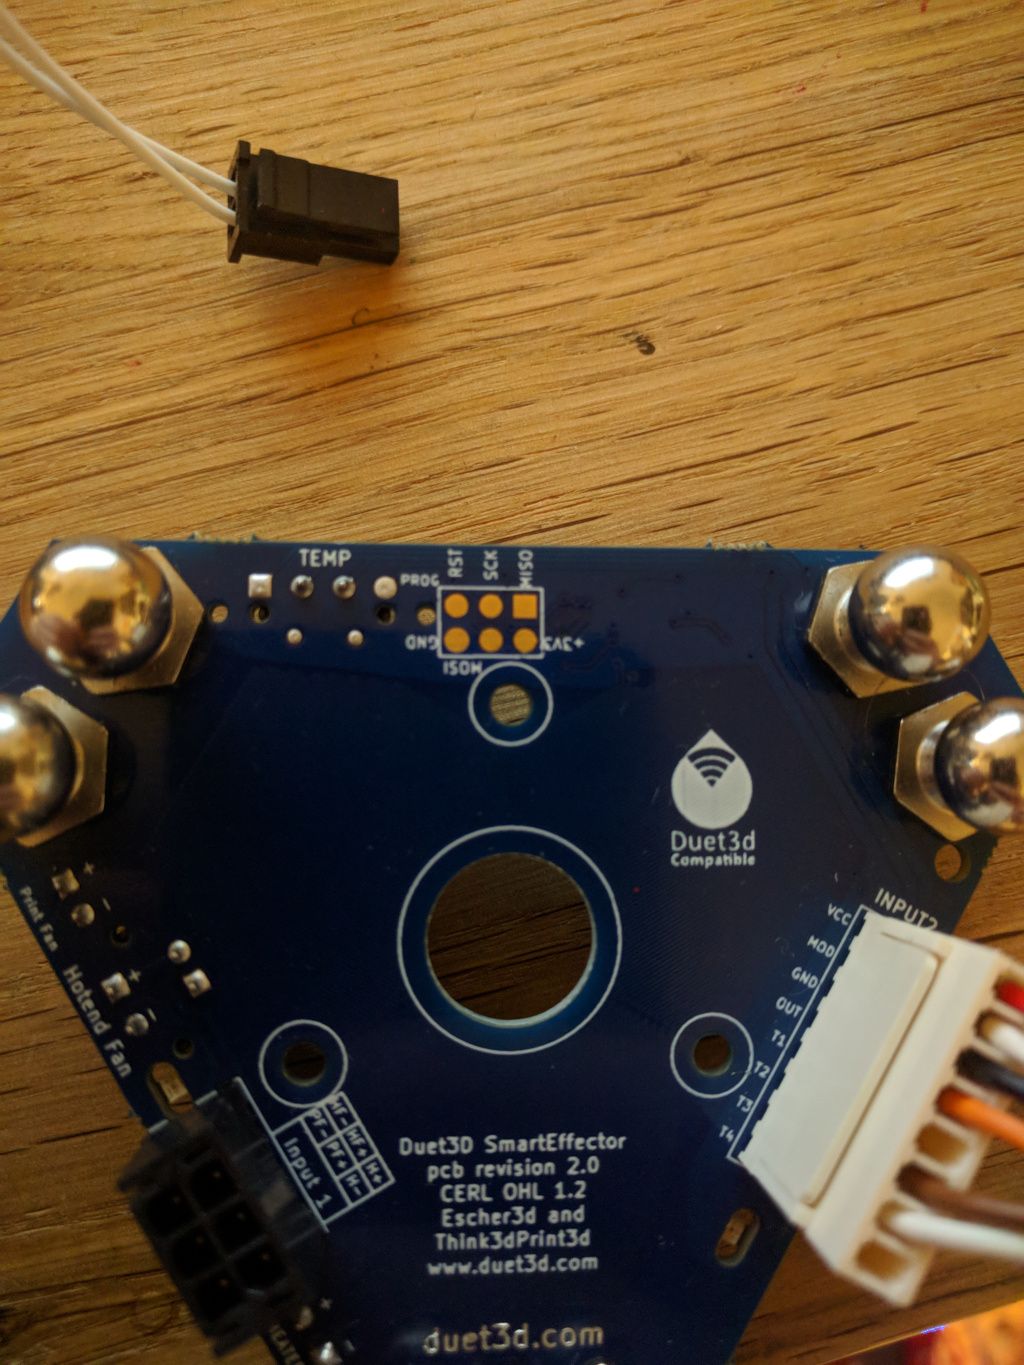
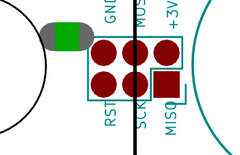
                    Item #10 at https://duet3d.dozuki.com/Wiki/Smart_effector_and_carriage_adapters_for_delta_printer#Section_Assembly says:

                    Clip the hot end fan assembly on to the heatsink. The overhang must be at the nozzle end of the heatsink.

                    The silicone sock on the heater block will prevent any direct contact. Putting the SMD components on the underside leaves room on the top side for a small circular spirit level.

                    Duet WiFi hardware designer and firmware engineer
                    Please do not ask me for Duet support via PM or email, use the forum
                    http://www.escher3d.com, https://miscsolutions.wordpress.com

                    1 Reply Last reply Reply Quote 0
                    • undefined
                      Danal
                      last edited by Danal 10 Jul 2019, 13:37 7 Oct 2019, 13:30

                      Mine also works as shown.

                      And... setting the nozzle correctly (as suggested above) will have the side effect of moving the heater block a bit further down, away from the fan shroud. This also helps avoid jams, because it makes the heat break a bit more clear of the heat block.

                      Compare this to yours:

                      6154d360-4b87-4b5e-ba84-f5652ae50bce-image.png

                      Delta / Kossel printer fanatic

                      1 Reply Last reply Reply Quote 1
                      • undefined
                        dgrat
                        last edited by dgrat 17 Oct 2019, 18:54

                        I guess, I killed the smart effector. At first it z-probe was not triggering and after connection of the temperature sensor the effector was switching off occasionally (fans and led), but reporting correct temperature. After replugging the wires, the leds don't shine anymore 😕 Guess, I fried something. Didn't happen since a while.

                        undefined 1 Reply Last reply 17 Oct 2019, 18:57 Reply Quote 0
                        • undefined
                          dc42 administrators @dgrat
                          last edited by 17 Oct 2019, 18:57

                          @dgrat said in Smart Effector: Cannot mount stock cooling fan:

                          I guess, I killed the smart effector. At first it z-probe was not triggering and after connection of the temperature sensor the effector was switching off occasionally (fans and led), but reporting correct temperature. After replugging the wires, the leds don't shine anymore 😕 Guess, I fried something. Didn't happen since a while.

                          The LEDs should be on whenever the heatsink cooling fan is on. So if you have set the heatsink cooling fan to run thermostatically when the hot end is above a certain temperature, and the temperature sensor is working, the LEDs won't light until you heat the hot end.

                          Duet WiFi hardware designer and firmware engineer
                          Please do not ask me for Duet support via PM or email, use the forum
                          http://www.escher3d.com, https://miscsolutions.wordpress.com

                          undefined 1 Reply Last reply 17 Oct 2019, 19:18 Reply Quote 0
                          • undefined
                            dgrat @dc42
                            last edited by dgrat 17 Oct 2019, 19:18

                            @dc42
                            This would explain the behavior before the re-plugging, but it's over now. Duet seems still intact as old Precision Piezo triggers.

                            Edit:
                            Seems like the Effector may still work, but I fried one fuse. So 24V supply was off.

                            1 Reply Last reply Reply Quote 0
                            • undefined
                              dgrat
                              last edited by dgrat 18 Oct 2019, 16:51

                              @dc42 seems like effector may still work after swapping the fuse, but my effector also has no probe indicator led as illustrated in the docu. Is this for self soldering or are the other two leds intended to glow (which they don't)? I also tested resistors R11, R13 and R14 and they seem more or less fine. But there is still no changing Probe signal as in the beginning.

                              IMG_20191018_184449.jpg

                              c0de5170-f57d-47dd-ac78-fe89812ec560-grafik.png

                              1 Reply Last reply Reply Quote 0
                              • First post
                                Last post
                              Unless otherwise noted, all forum content is licensed under CC-BY-SA