Technical defect?
-
@GuybrushTreepwood Lovely name, I'm a Monkey Island fan too! Though it's Threepwood!
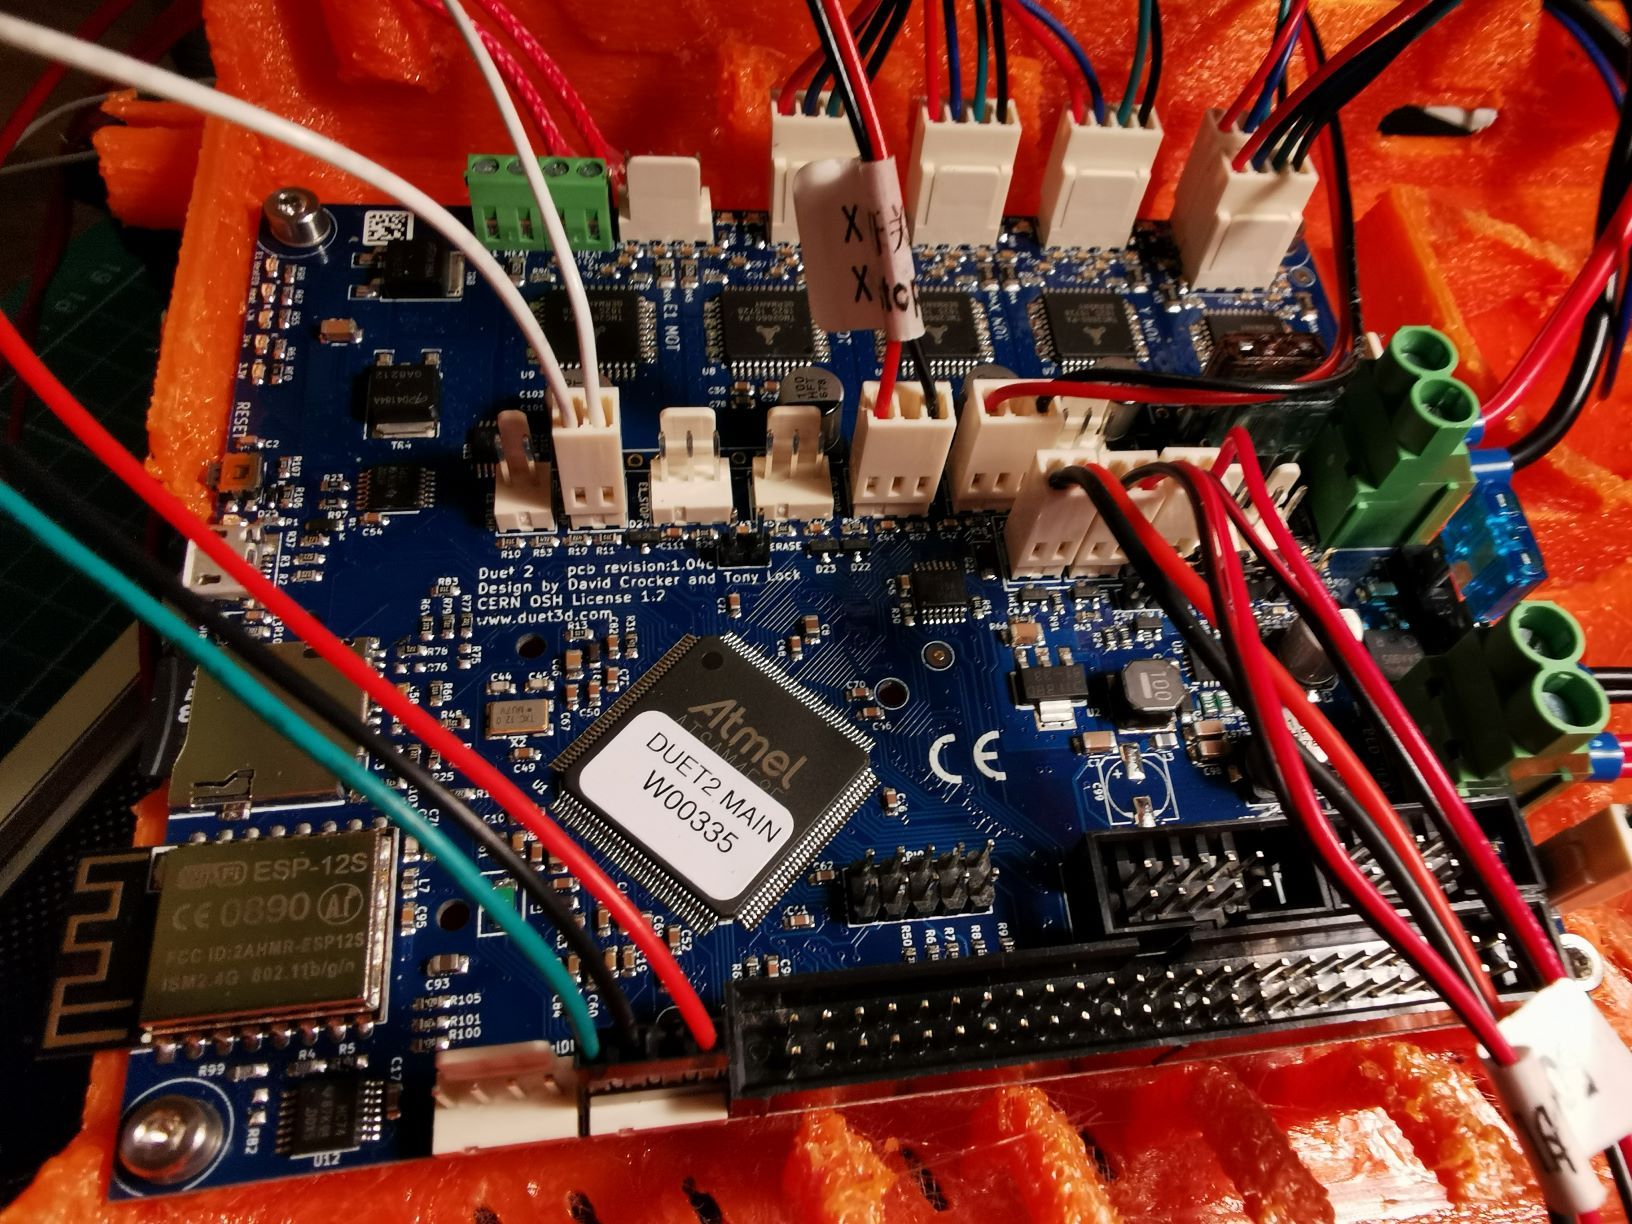
Can you post your config.g and homeall.g file? It sounds like there is an error somewhere. Please also take a picture of your Duet so we can see how wires are connected. Finally, send M115 to the Duet and post the response. This should give us the information to help diagnose the problem.
Be aware that you should ALWAYS turn off the power to your Duet board before plugging or unplugging motors into the stepper driver pins. If you don't do this, you risk damaging the stepper driver chip. Which you may already have done.
Ian
Bed-slinger - Mini5+ WiFi/1LC | RRP Fisher v1 - D2 WiFi | Polargraph - D2 WiFi | TronXY X5S - 6HC/Roto | CNC router - 6HC | Tractus3D T1250 - D2 Eth
-
Note that an axis will not move until homed. For testing, you can override this with
M564 H0
Delta / Kossel printer fanatic
-
@droftarts Yes I know about the spelling, but it´s often used and so I didn´t try. And of course the importance of turning of the board, so I hope the stepper driver are intact...
here is my config:
; Configuration file for Duet WiFi (firmware version 2.03)
; executed by the firmware on start-up
;
; generated by RepRapFirmware Configuration Tool v2.1.2 on Sat Nov 23 2019 01:39:28 GMT+0100 (Mitteleuropäische Normalzeit); General preferences
G90 ; send absolute coordinates...
M83 ; ...but relative extruder moves
M550 P"Anet A8" ; set printer name; Network
M552 S1 ; enable network
M586 P0 S1 ; enable HTTP
M586 P1 S0 ; disable FTP
M586 P2 S0 ; disable Telnet
M575 P1 B57600 S1 ; Set auxiliary serial port baud rate and require checksum (for PanelDue); Drives
M569 P0 S0 ; physical drive 0 goes backwards
M569 P1 S1 ; physical drive 1 goes forwards
M569 P2 S0 ; physical drive 2 goes backwards
M569 P3 S0 ; physical drive 3 goes backwards
M569 P4 S0 ; physical drive 4 goes backwards
M584 X0 Y4 Z2 E3 ; two Z motors connected to driver outputs Z
M671 X-85:295 Y0:0 S2 ; leadscrews at left (connected to Z) and right (connected to E1) of X axis
M350 X16 Y16 Z16 E16 I1 ; configure microstepping with interpolation
M92 X100.00 Y100.00 Z400.00 E99.5 ; set steps per mm
M566 X3000.00 Y3000.00 Z1000.00 E3000.00 ; set maximum instantaneous speed changes (mm/min)
M203 X3000.00 Y3000.00 Z1000.00 E3000.00 ; set maximum speeds (mm/min)
M201 X500.00 Y500.00 Z500.00 E500.00 ; set accelerations (mm/s^2)
M906 X700 Y900 Z700 E700 I30 ; set motor currents (mA) and motor idle factor in per cent
M84 S30 ; Set idle timeout; Axis Limits
M208 X0 Y-5 Z0 S1 ; set axis minima
M208 X208 Y225 Z285 S0 ; set axis maxima; Endstops
M574 X1 Y1 S0 ; set active low and disabled endstops
M574 Z1 S2 ; Set endstops controlled by probe (Z-endstop is Z-probe); Z-Probe
M558 P8 x0 y0 z1 I1 H2 R0.75 F150 T3000. ; Set Z probe type to switch and the dive height + speeds
G31 P250 X0 Y0 Z0 ; set threshold and offsets
M557 X0:200 Y0:200 S40 ; Define mesh grid; Heaters
M307 H1 A450.6 C132.0 D5.5 V12.4 B0 ; disable bang-bang mode for the bed heater and set PWM limit
M305 P0 T100000 B4725 C7.060000e-8 R4700 ; set thermistor + ADC parameters for heater 0
M143 H0 S130 ; set temperature limit for heater 0 to 130C
M305 P1 T100000 B4725 C7.060000e-8 R4700 ; set thermistor + ADC parameters for heater 1
M143 H1 S275 ; set temperature limit for heater 1 to 275C; Fans
M106 P0 T65:125 I0 H1:2 S0.75 C"Mitte" ; set fan 0 value, PWM signal inversion and frequency. Thermostatic control is turned on
M106 P1 S0 I0 F500 H-1 C"Rechts" ; set fan 1 value, PWM signal inversion and frequency. Thermostatic control is turned off
M106 P2 S0 I0 F500 H-1 C"Links" ; set fan 1 value, PWM signal inversion and frequency. Thermostatic control is turned off; Tools
M563 P0 D0 H1 F1:2 ; define tool 0
G10 P0 X0 Y0 Z0 ; set tool 0 axis offsets
G10 P0 R0 S0 ; set initial tool 0 active and standby temperatures to 0C; Custom settings are not defined
M501; Miscellaneous
M375 ; load height map
T0 ; select first tool -
@droftarts and here is my homeall.g
; homeall.g
; called to home all axes
;
; generated by RepRapFirmware Configuration Tool v2.1.2 on Sat Nov 23 2019 01:39:28 GMT+0100 (Mitteleuropäische Normalzeit)
G91 ; relative positioning
G1 H2 Z5 F6000 ; lift Z relative to current position
G1 H1 X-244 Y-215 F1800 ; move quickly to X and Y axis endstops and stop there (first pass)
G1 H2 X5 Y5 F6000 ; go back a few mm
G1 H1 X-10 Y-10 F360 ; move slowly to X and Y axis endstops once more (second pass)
G90
G1 H2 X100 Y100 F6000 ; go back
G30
;G1 H1 Z-265 F360 ; move Z down stopping at the endstop
;G90 ; absolute positioning
;G92 Z0 ; set Z to axis minimum (you may want to adjust this); Uncomment the following lines to lift Z after probing
;G91 ; relative positioning
;G1 S2 Z5 F100 ; lift Z relative to current position
;G90 ; absolute positioning -
-
@Danal so I´ve tested to override the homing. then sent g0 for x-axis. For positive values, the motor hasn´t moved and blocked immediately. With negative value, it moved once and then blocked, too.
-
by the way, the board operated correctly all the time. A day before the first fault it printed correctly. At next day I powered it on, tried to home all. the x and y axis homed correctly and when it had to move to the middle of the heat bed nothing happened
-
raise your motor currents in M906. Maybe 1500.
-
@Danal did it and nothing changed, except the motor is humming little bit louder. 1,5A is the limit for this motor I think. It´s a 42SHDC3025-24B
-
@GuybrushTreepwood
measure the resistance of the motor for each phase. if the motor is humming its recieving current. -
@Veti I´ve measured the resistance now. it starts with 5 MΩ on green, black and goes up to over 30MΩ.
the blue/red coil starts with 12MΩ and goes up to 20MΩ.