CNC style Pendant
-
@dc42 said in CNC style Pendant:
I've realised that I can implement passthrough for PanelDue on the Nano, because the Nano doesn't need to see the responses that the Duet sends to PanelDue. So the UTXD or IO_0_OUT pin on the Duet can be connected directly to DIN on the PanelDue, and DOUT on PanelDue can be connected to RXD on the Nano. I'll add this feature to the firmware next.
Does it mean there won't be the need for a Splitter to have the PanelDue and the Pendant simultaneously?
-
@FelixH said in CNC style Pendant:
Does it mean there won't be the need for a Splitter to have the PanelDue and the Pendant simultaneously?
Yes. However, it may be necessary to change one of the resistors on the Arduino Nano from 1K to 10K so that the PanelDue can override the RxD signal coming from the USB interface chip.
-
I've got the pass through facility working and committed the new code to github.
To use the pass through facility, you need to connect the PanelDue and CNC pendant cables to the Duet like this:
- Join all three +5V connections together
- Join all three ground connections together
- URXD or IO_0_OUT on Duet goes to PanelDue DIN
- PanelDue DOUT goes to RX0 on the Nano in the pendant (but see below)
- TX1 on the Nano goes through the 2 resistor (voltage divider) network to URXD or IO_0_IN on the Duet
I joined the 3 cables using solder sleeves. Here is the join before I put the heatshrink sleeving over it:

It's necessary to either feed the DOUT signal from the Duet through a 3.3V to 5V level shifter and connect the output of that to the Nano RX0 pin, or you can connect it directly without a level shifter if you make one or two modifications to the Nano. The modifications are:
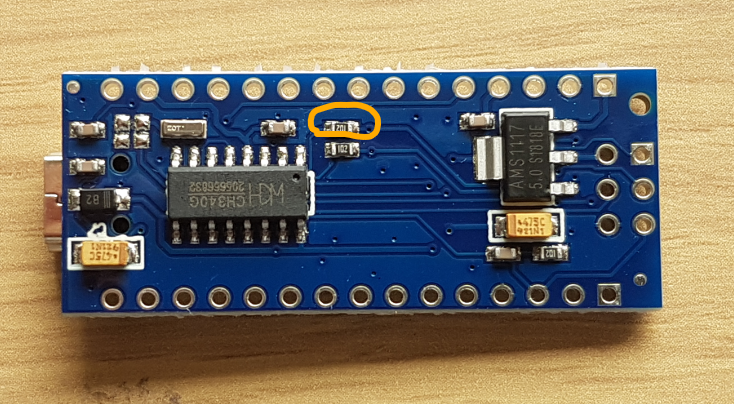
- Replace the 1K resistor between the USB-to-serial output and the RX0 pin by a 10K resistor. If you use the Arduino Nano clone that uses a CH340G USB-to-serial converter, it's this 0603 resistor:

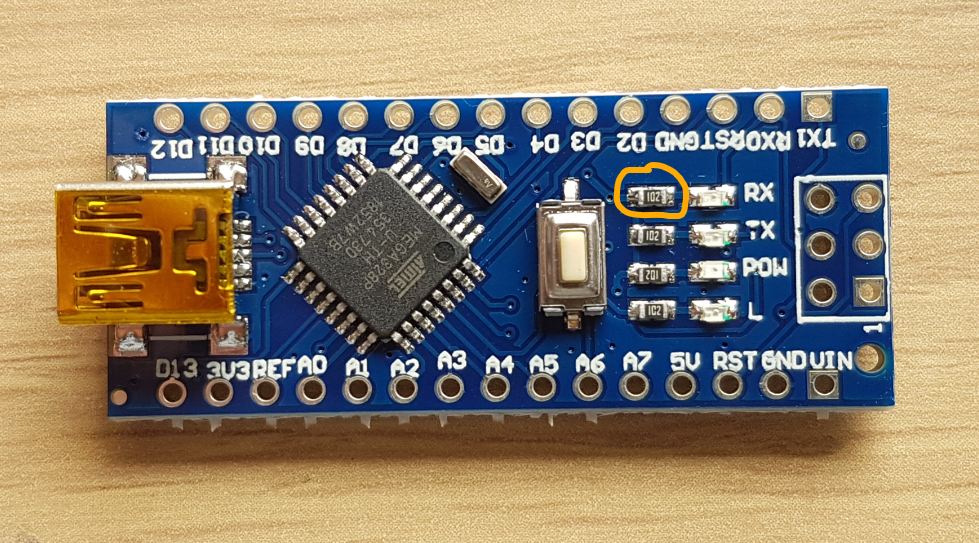
- On Arduino Nano clones using the CH340G chip, you must also remove the resistor in series with the RX LED (or you could remove the LED):

When programming the Nano over USB, you must disconnect the PanelDue. If you use a level shifter to feed PanelDue DOUT to RX0 instead of modifying the Nano, then you will need to disconnect the level shifter from RX0 to program the Nano.
I put Kapton tape over the upper two magnets in the back of the case, to make sure they don't short anything on the Nano:

-
For anyone wanting to use the passthrough facility without having to modify the Arduino Nano hardware, it appears to me that a Teensy 2.0 could be substituted for the Nano and a few pin assignments changed. On the Teensy the USB interface is separate from the UART interface, so the two won't interfere with each other.
EDIT: the Arduino Micro or Arduino Pro Micro would also be better choices than the Arduino Nano, for the same reason.
-
would the schematic displayed on the photo be correct? Is nothing connected to the Duet RX or it is connected as usual and, therefore, omitted??
Also, I am assuming that if I use a level shifter, I can also used to replace the resistor bridge, right?

-
No, that's not quite right. PanelDue DIN is connected to Duet TX, not Duet RX.
A simpler option is to use an Arduino Pro Micro instead of the Arduino Nano. You would then need just 3 resistors, and you would be able to reprogram the Arduino without disconnecting anything.
-
I've updated the code and the readme file at https://github.com/Duet3D/CNC-Pendant-Firmware to support Arduino Pro Micro as well as Arduino Nano.
-
Well, today I found the time to put that together and it doesn't work all that well.
I wired the Pendant with the Arduino Nano (clone) and a level shifter (the one in the photo above) for both Arduino pins (Rx and Tx). The Pendant works fine, it does what it has to do and it's great. However, when I plug it together with the display, the display does not get info from the Duet. It doesn't retrieve the location, macros, files, etc.
I flashed the latest firmware.
Any tips on troubleshooting?
EDIT: I re-checked the wiring and everything looks as it should...
-
I ordered a pendant just BEFORE Dave wrote his Arudino code. Which is great! Freed me up to take it in a slightly different direction:
YAP is a wireless (WiFi Network) or wired (PanelDue port) pendant based on the ESP32 (about $5 in the US). Also, the ambition is to have a small OLED display with XYZ showing.
Progress reports will be in the other thread.
-
Thank you all for your contribution! I have my cnc pendant working.
-
@FelixH said in CNC style Pendant:
Well, today I found the time to put that together and it doesn't work all that well.
I wired the Pendant with the Arduino Nano (clone) and a level shifter (the one in the photo above) for both Arduino pins (Rx and Tx). The Pendant works fine, it does what it has to do and it's great. However, when I plug it together with the display, the display does not get info from the Duet. It doesn't retrieve the location, macros, files, etc.
I flashed the latest firmware.
Any tips on troubleshooting?
EDIT: I re-checked the wiring and everything looks as it should...
Did you correct the wiring according to my previous post? Please provide a diagram showing how you have connected the parts together.
-
@dc42 here is what I wired, I think I did not miss anything, but I'm known to miss that sort of things, so...
Also, today I plugged the display (only display as usual) after the Duet on my CNC was turned on, and it did not respond either, just like with the pendant. I had to boot again. Could it have something in common with the problem?

-
Have you a datasheet on the level shifter you are using? I'm wondering whether your level shifter might not be able to drive the load on the Nano RX pin.
-
@dc42 I don't find any datasheet, but it is this one...
-
Unfortunately that design of logic level converter doesn't provide any current amplification, so it has the same problem as a PanelDue driving the RX pin of the Nano directly.
You could make the modification(s) to the Nano that I described in my post; or substitute an Arduino Pro Micro for the Nano.
-
@dc42 so in other words, the logic converter I got, doesn't convert any logic... well, that's a disappointment...
What throws me back from doing the modification to the Nano is forgetting about it and having problems in the future because of that. On the other hand, if I ever open the pendant again in the future and I see a logic converter, I will know what's up. Is a sort of future proofing the whole thing.
I guess I will try to find a better logic converter...
thanks!
-
It's probably easier to get an Arduino Pro Micro. I would have designed the pendant around that originally, had I known that it existed.
-
-
btw https://www.arduino.cc/en/Reference/softwareSerial is good for 57600baud might also solve some issues?
-
@FelixH said in CNC style Pendant:
just like this one??
I just want to be sure...
Yes, that's the one. I already have one on order to use for testing, to make sure that the changes I made for the Pro Micro are correct.
 -Logisches-Konverter-Bi-Direktional-TE291/dp/B0148BLZGE/ref=sr_1_9?dchild=1&keywords=Logic+Level+Converter&qid=1590256177&sr=8-9