Maestro Error: Short to Ground Driver 3
-
My Maestro after 2 hours gives a short to ground driver 3 error on my extruder. I have check my extruder wire with a multi tester and everything is in order. I have also switch the wires from my x axis with my extruder wires yet the error persist.
Then I started reading the forums a person suggested to pull the plug on the board while the error is happening and I press extrude and retract but the error is still there
Any suggestions?
How do I relocate E0 to E1
-
If it is new, was wired correctly and the driver failed I'd see if the Duet3D admins would authorize a warranty replacement and return it to the vendor.
To map E0 to E1 I think you just need to change
M569 P3toM569 P4andM584 E3toM584 E4in config.g (the original lines will have other parameters as well, keep those unchanged) -
My board almost 2 months with me ever since I got it had short to ground error on driver 3 intermittent error. This forum is really great help. I even bought the crisper to attach the Duet connectors because I read it here in the forum that it is usually a loose connection. After I switched all my connectors the error seldom happens but after some long prints it happens and I read somewhere that it might be the hotend clogging so I replaced it with an original e3d v6 with a titanium heatbreak but the error still happens but more seldom but after a few days of printing it comes back so I upgraded my extruder from a titan to a bmg still has the same problem.
-
@bearer
I tried what you suggested the tool disappears on the menu....
-
post your original config and someone will probably sort you out here
hmm, should have worked I just tried generating two configs with RepRapFirmware Configuration Tool. One for E0 and one for E1, the only thing that changed were those two lines.
bearer@rama:~/remape0e1$ diff -u e0.g e1.g --- e0.g 2020-06-27 17:11:18.644989588 +0200 +++ e1.g 2020-06-27 17:09:27.858243431 +0200 @@ -1,7 +1,7 @@ ; Configuration file for Duet Maestro (firmware version 2.03) ; executed by the firmware on start-up ; -; generated by RepRapFirmware Configuration Tool v3.1.3 on Sat Jun 27 2020 17:11:02 GMT+0200 (Central European Summer Time) +; generated by RepRapFirmware Configuration Tool v3.1.3 on Sat Jun 27 2020 17:06:44 GMT+0200 (Central European Summer Time) ; General preferences G90 ; send absolute coordinates... @@ -23,8 +23,8 @@ M569 P0 S1 ; physical drive 0 goes forwards M569 P1 S1 ; physical drive 1 goes forwards M569 P2 S1 ; physical drive 2 goes forwards -M569 P3 S1 ; physical drive 3 goes forwards -M584 X0 Y1 Z2 E3 ; set drive mapping +M569 P4 S1 ; physical drive 4 goes forwards +M584 X0 Y1 Z2 E4 ; set drive mapping M350 X16 Y16 Z16 E16 I1 ; configure microstepping with interpolation M92 X80.00 Y80.00 Z80.00 E663.00 ; set steps per mm M566 X1200.00 Y1200.00 Z1200.00 E1200.00 ; set maximum instantaneous speed changes (mm/min) -
@bearer
Ok
Time); General preferences
G90 ; send absolute coordinates...
M83 ; ...but relative extruder moves
M550 P"TornadoDuet88" ; set printer name
M918 P1 E4 F2000000 ; configure direct-connect display; Network
M552 P0.0.0.0 S1 ; enable network and acquire dynamic address via DHCP
M586 P0 S1 ; enable HTTP
M586 P1 S0 ; disable FTP
M586 P2 S0 ; disable Telnet; Drives
M569 P0 S1 ; physical drive 0 goes forwards
M569 P1 S1 ; physical drive 1 goes forwards
M569 P2 S0 ; physical drive 2 goes backwards
;M569 P3 S1 ; physical drive 3 goes forwards
M569 P4 S1 ; physical drive 4 goes forwards
M584 X0 Y1 Z2 E4 ; set drive mapping
M350 X16 Y16 Z16 E16:16 I1 ; configure microstepping with interpolation
M92 X80.00 Y80.00 Z400 E410.00:410.00 ; set steps per mm
M566 X900.00 Y900.00 Z12.00 E120.00:120.00 ; set maximum instantaneous speed changes (mm/min)
M203 X6000.00 Y6000.00 Z180.00 E1200.00:1200.00 ; set maximum speeds (mm/min)
M201 X500.00 Y500.00 Z20.00 E250.00:250.00 ; set accelerations (mm/s^2)
M906 X800 Y800 Z800 E800:800 I30 ; set motor currents (mA) and motor idle factor in per cent
M84 S30 ; Set idle timeout; Axis Limits
M208 X0 Y0 Z0 S1 ; set axis minima
M208 X300 Y300 Z400 S0 ; set axis maxima; Endstops
M574 X1 S1 P"!xstop" ; configure active-low endstop for low end on X via pin xstop
M574 Y1 S1 P"!ystop" ; configure active-low endstop for low end on Y via pin ystop
M574 Z1 S1 P"!zstop" ; configure active-low endstop for low end on Z via pin zstop; Z-Probe
M558 P0 H5 F120 T6000 ; disable Z probe but set dive height, probe speed and travel speed
M557 X15:215 Y15:195 S20 ; define mesh grid; Heaters
M308 S0 P"bedtemp" Y"thermistor" T100000 B4138 ; configure sensor 0 as thermistor on pin bedtemp
M950 H0 C"bedheat" T0 ; create bed heater output on bedheat and map it to sensor 0
M307 H0 B0 S1.00 ; disable bang-bang mode for the bed heater and set PWM limit
M140 H0 ; map heated bed to heater 0
M143 H0 S120 ; set temperature limit for heater 0 to 120C
M308 S1 P"e0temp" Y"thermistor" T100000 B4138 ; configure sensor 1 as thermistor on pin e0temp
M950 H1 C"e0heat" T1 ; create nozzle heater output on e0heat and map it to sensor 1
M307 H1 B0 S1.00 ; disable bang-bang mode for heater and set PWM limit
M308 S2 P"e1temp" Y"thermistor" T100000 B4138 ; configure sensor 2 as thermistor on pin e1temp
M950 H2 C"e1heat" T2 ; create nozzle heater output on e0heat and map it to sensor 2
M307 H2 B0 S1.00
M912 P0 S-12.8 ; mcu temperature calibration value
M501; Fans
M950 F0 C"fan0" Q500 ; create fan 0 on pin fan0 and set its frequency part fan
M106 P0 S0 H-1 ; set fan 0 value. Thermostatic control is turned off part fan
M950 F1 C"fan1" Q500 ; create fan 1 on pin fan1 and set its frequency
M106 P1 S1 H1:2 T45 ; set fan 1 value. Thermostatic control is turned on
;M308 S1 Y"drivers" A"DRIVERS" ; configure sensor 2 as temp warning & overheat flags on the TMC2660 on Duet
;M308 S1 Y"mcu-temp" A"MCU" ; configure sensor 3 as thermistor on pin e1temp for left stepper
M950 F2 C"fan2" Q500 ; create fan 2 on pin fan2 and set its frequency
;M106 P1 H2:3 L0.15 X1 B0.3 T40:70 ; set fan 2 value
M106 P2 S2 H1:2 T45 ; set fan 2 value. Thermostatic control is turned on; Tools
;M563 P0 D1 H1 F0 ; define tool 0
;G10 P0 X0 Y0 Z0 ; set tool 0 axis offsets
;G10 P0 R1 S0 ; set initial tool 0 active and standby temperatures to 0C
M563 P1 D1 H2 F0 ; define tool 1
G10 P1 X0 Y0 Z0 ; set tool 1 axis offsets
G10 P1 R0 S0 ; set initial tool 1 active and standby temperatures to 0C; Display
M918 P1 E4,-2,4; Custom settings are not defined
-
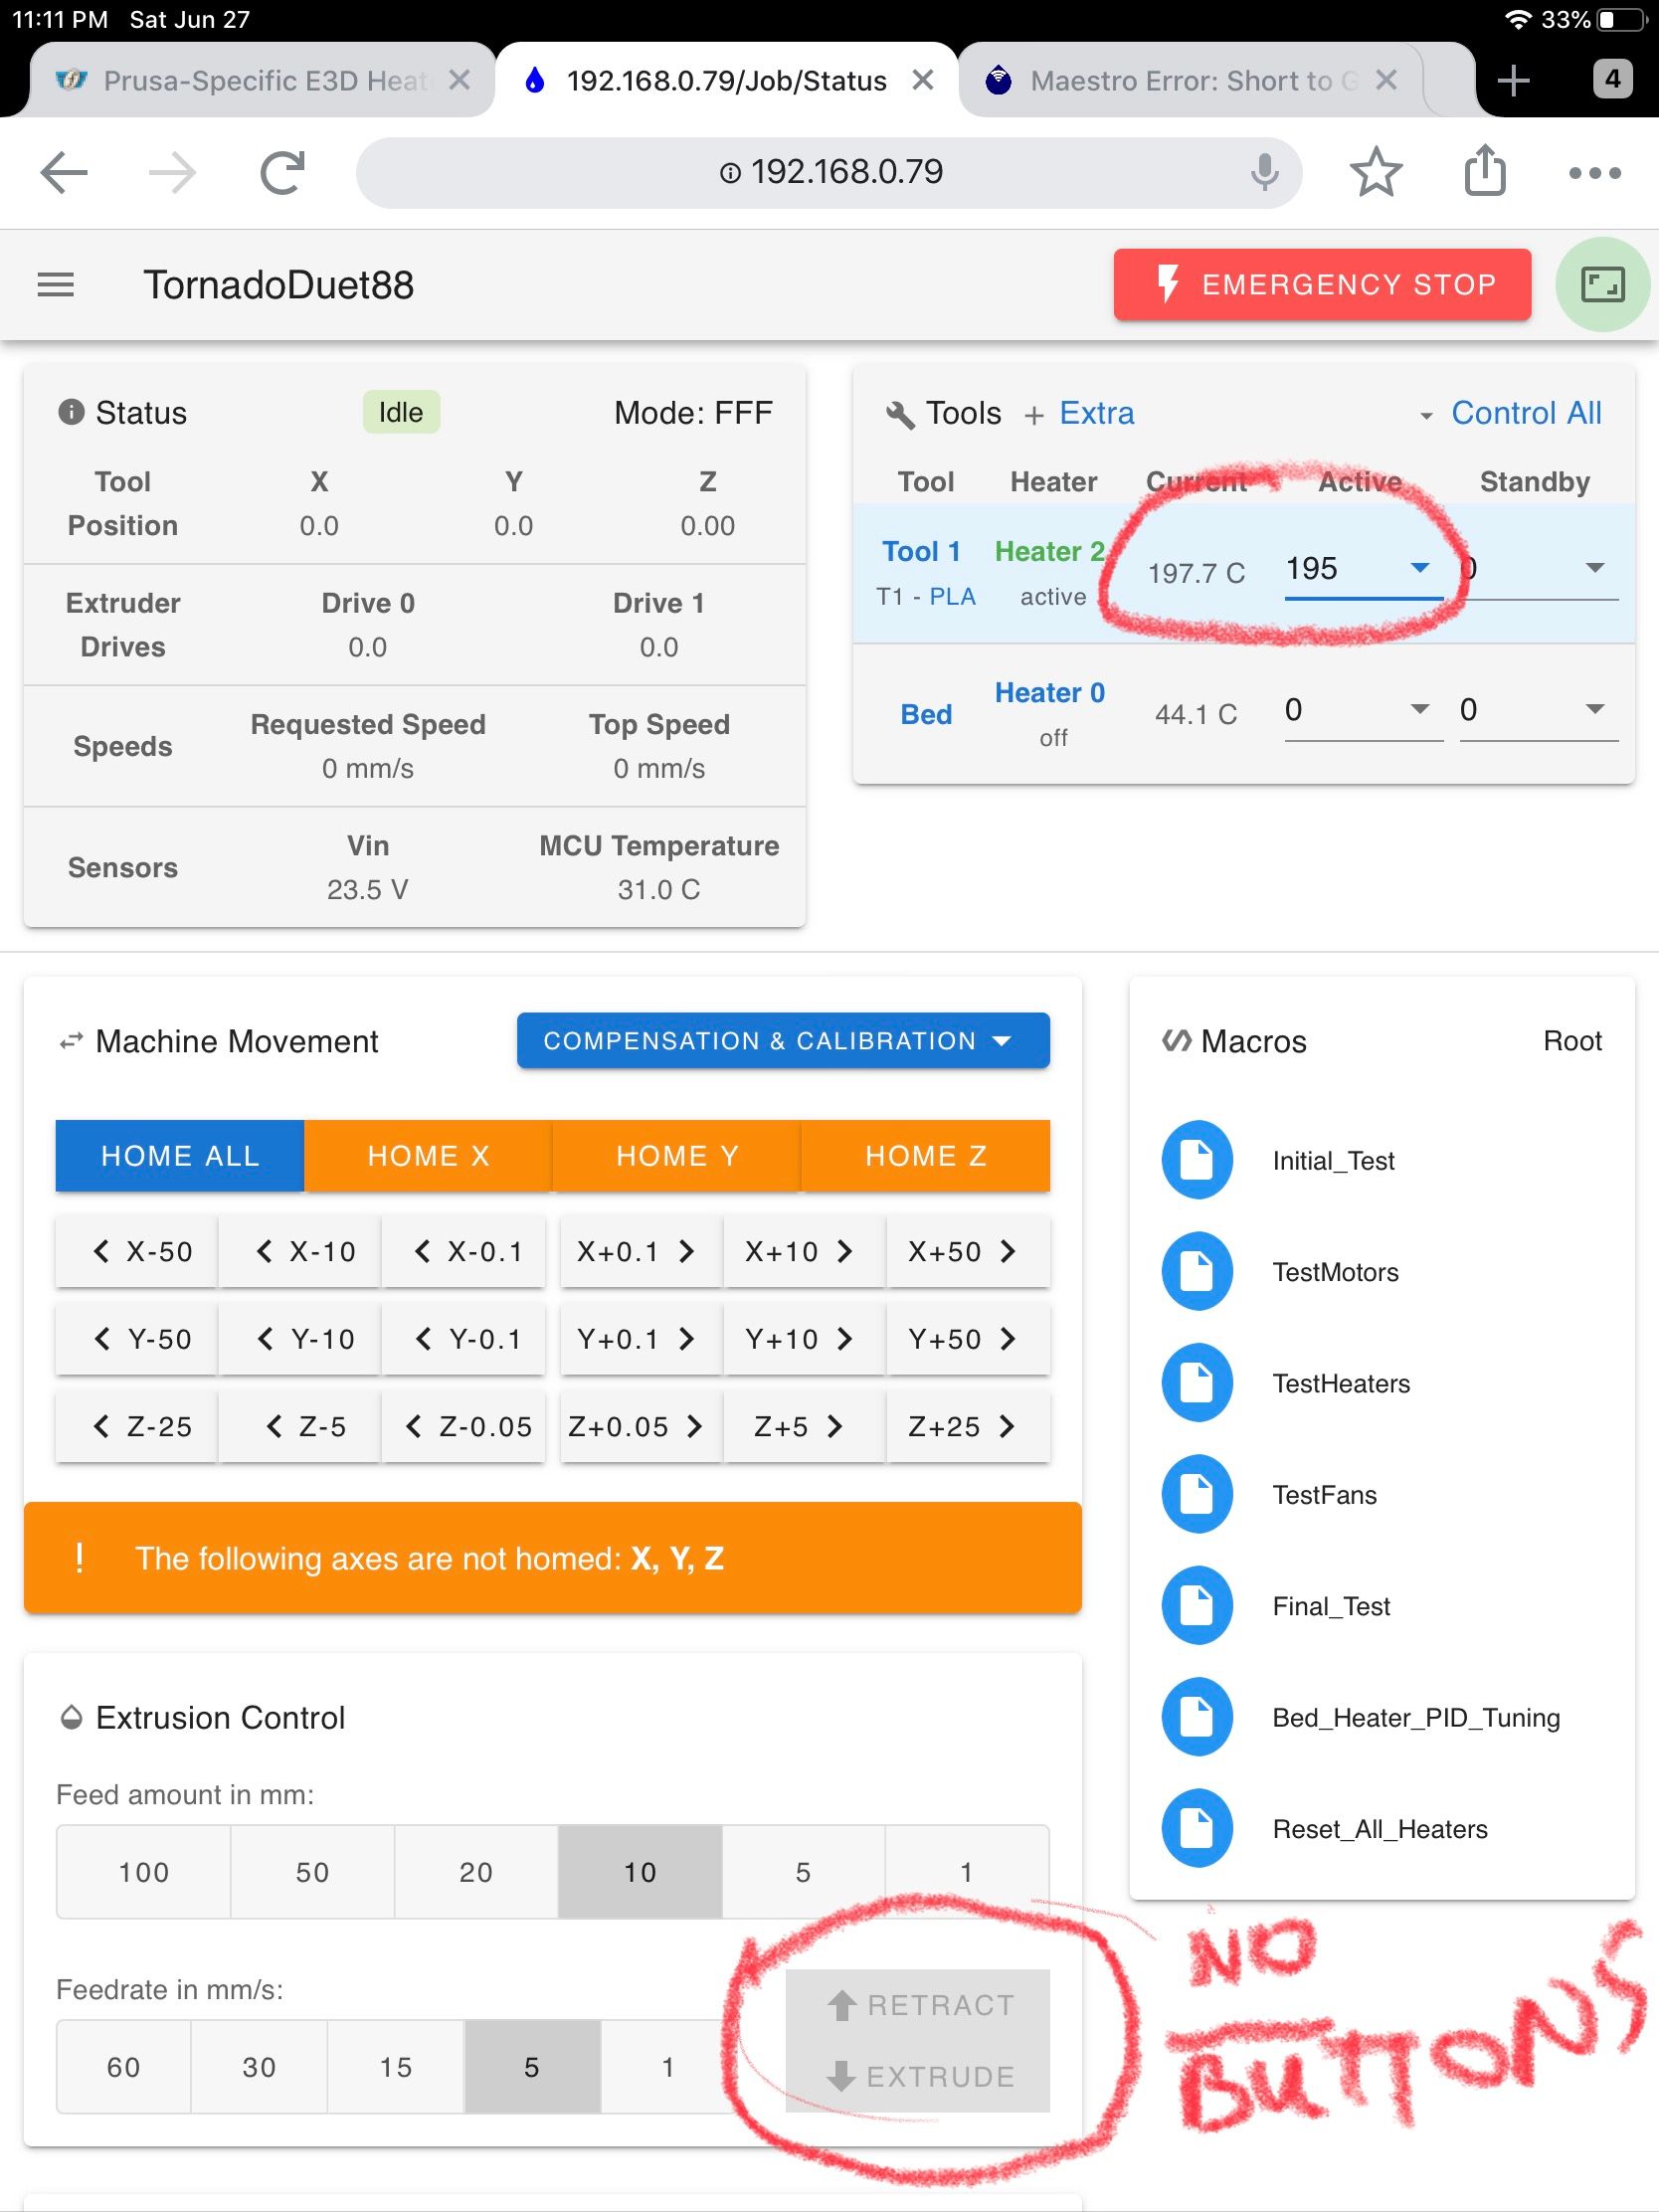
With the config below I can print the only problem now is I do not have extrusion control see picture
@vits88 ; Configuration file for Duet Maestro (firmware version 3)
; executed by the firmware on start-up
;
; generated by RepRapFirmware Configuration Tool v3.1.1 on Thu Jun 04 2020 20:10:27 GMT+0800 (Philippine Standard Time); General preferences
G90 ; send absolute coordinates...
M83 ; ...but relative extruder moves
M550 P"TornadoDuet88" ; set printer name
M918 P1 E4 F2000000 ; configure direct-connect display; Network
M552 P0.0.0.0 S1 ; enable network and acquire dynamic address via DHCP
M586 P0 S1 ; enable HTTP
M586 P1 S0 ; disable FTP
M586 P2 S0 ; disable Telnet; Drives
M569 P0 S1 ; physical drive 0 goes forwards
M569 P1 S1 ; physical drive 1 goes forwards
M569 P2 S0 ; physical drive 2 goes backwards
M569 P3 S1 ; physical drive 3 goes forwards
M569 P4 S1 ; physical drive 4 goes forwards
M584 X0 Y1 Z2 E3:4 ; set drive mapping
M350 X16 Y16 Z16 E16:16 I1 ; configure microstepping with interpolation
M92 X80.00 Y80.00 Z400 E410.00:410.00 ; set steps per mm
M566 X900.00 Y900.00 Z12.00 E120.00:120.00 ; set maximum instantaneous speed changes (mm/min)
M203 X6000.00 Y6000.00 Z180.00 E1200.00:1200.00 ; set maximum speeds (mm/min)
M201 X500.00 Y500.00 Z20.00 E250.00:250.00 ; set accelerations (mm/s^2)
M906 X800 Y800 Z800 E800:800 I30 ; set motor currents (mA) and motor idle factor in per cent
M84 S30 ; Set idle timeout; Axis Limits
M208 X0 Y0 Z0 S1 ; set axis minima
M208 X300 Y300 Z400 S0 ; set axis maxima; Endstops
M574 X1 S1 P"!xstop" ; configure active-low endstop for low end on X via pin xstop
M574 Y1 S1 P"!ystop" ; configure active-low endstop for low end on Y via pin ystop
M574 Z1 S1 P"!zstop" ; configure active-low endstop for low end on Z via pin zstop; Z-Probe
M558 P0 H5 F120 T6000 ; disable Z probe but set dive height, probe speed and travel speed
M557 X15:215 Y15:195 S20 ; define mesh grid; Heaters
M308 S0 P"bedtemp" Y"thermistor" T100000 B4138 ; configure sensor 0 as thermistor on pin bedtemp
M950 H0 C"bedheat" T0 ; create bed heater output on bedheat and map it to sensor 0
M307 H0 B0 S1.00 ; disable bang-bang mode for the bed heater and set PWM limit
M140 H0 ; map heated bed to heater 0
M143 H0 S120 ; set temperature limit for heater 0 to 120C
M308 S1 P"e0temp" Y"thermistor" T100000 B4138 ; configure sensor 1 as thermistor on pin e0temp
M950 H1 C"e0heat" T1 ; create nozzle heater output on e0heat and map it to sensor 1
M307 H1 B0 S1.00 ; disable bang-bang mode for heater and set PWM limit
M308 S2 P"e1temp" Y"thermistor" T100000 B4138 ; configure sensor 2 as thermistor on pin e1temp
M950 H2 C"e1heat" T2 ; create nozzle heater output on e0heat and map it to sensor 2
M307 H2 B0 S1.00
M912 P0 S-12.8 ; mcu temperature calibration value
M501; Fans
M950 F0 C"fan0" Q500 ; create fan 0 on pin fan0 and set its frequency part fan
M106 P0 S0 H-1 ; set fan 0 value. Thermostatic control is turned off part fan
M950 F1 C"fan1" Q500 ; create fan 1 on pin fan1 and set its frequency
M106 P1 S1 H1:2 T45 ; set fan 1 value. Thermostatic control is turned on
;M308 S1 Y"drivers" A"DRIVERS" ; configure sensor 2 as temp warning & overheat flags on the TMC2660 on Duet
;M308 S1 Y"mcu-temp" A"MCU" ; configure sensor 3 as thermistor on pin e1temp for left stepper
M950 F2 C"fan2" Q500 ; create fan 2 on pin fan2 and set its frequency
;M106 P1 H2:3 L0.15 X1 B0.3 T40:70 ; set fan 2 value
M106 P2 S2 H1:2 T45 ; set fan 2 value. Thermostatic control is turned on; Tools
;M563 P0 D1 H1 F0 ; define tool 0
;G10 P0 X0 Y0 Z0 ; set tool 0 axis offsets
;G10 P0 R1 S0 ; set initial tool 0 active and standby temperatures to 0C
M563 P1 D1 H2 F0 ; define tool 1
G10 P1 X0 Y0 Z0 ; set tool 1 axis offsets
G10 P1 R0 S0 ; set initial tool 1 active and standby temperatures to 0C; Display
M918 P1 E4,-2,4; Custom settings are not defined
-
@bearer
Your right tried it again.....so how do I inform the admin about my boardJust had to change H1 to H2 for the temp sensor to work and now I even have my Extrusion Control working....
;Tools
M563 P0 D1 H1 F0 ; define tool 0
G10 P0 X0 Y0 Z0 ; set tool 0 axis offsets
G10 P0 R1 S0
Thank you -
@vits88 said in Maestro Error: Short to Ground Driver 3:
Just had to change H1 to H2 for the temp sensor to work and now I even have my Extrusion Control working....
ah, you could have left the heater on E0, didn't occur to me to specify that.
so how do I inform the admin about my board
they generally get to it pretty soon, but it varies, could be 5 minutes, could be more, rarely more than a day.
-
@bearer
Thank you for your help so does that mean I could have used heater 1 and temp sensor 1 and also fan 1 and just moved the extruder connection to E1 and it would have worked....
I thought it had to be paired .... -
Just to confirm you troubleshooting thus far, you had a short to ground error on the E0 driver and after changing to E1 driver the error no longer occurs?
Board is 2 months old? Where was it purchased?
-
@Phaedrux
No I have a zero to ground error on driver 3 it was intermittent when I start printing it runs ok but after an hour or so the board would give me zero to ground error on driver 3. After reading the forum check the wiring which I did with my multi tester no problems with the wire. The error still occurred then I changed the connectors to that was included with the duet, I thought it becomes loose while printing and still the error occurred. I even switch the wiring used the x wiring with the extruder wire still it gave me the same error. I thought maybe the extruder motor is having a hard time pushing the filament so from a titan extruder I upgraded to a BMG extruder still the error occurs. Finally I read in the forum when the error occurs to pause the print and to pull the extruder wire from the board and see if the error would occur and it does, this meant the the error is from the board. He then described what he did was to relocate the extruder from E0 to E1 which I did and started an 11 hour print which is still running now on 9th hour And still running....
-
I bought my board from Filastruder they are great, fast delivery even when it was during the lock down.
-
@vits88 If your board was purchased within the past 6 months we approve a warranty replacement. Please contact Filastruder to initiate a warranty replacement. You can point them to this thread as authorization. Thank you for your patience and sorry for the inconvenience.
-
@Phaedrux
Great thank you and will do....