Switching from Duet Maestro to Duet WIFI
-
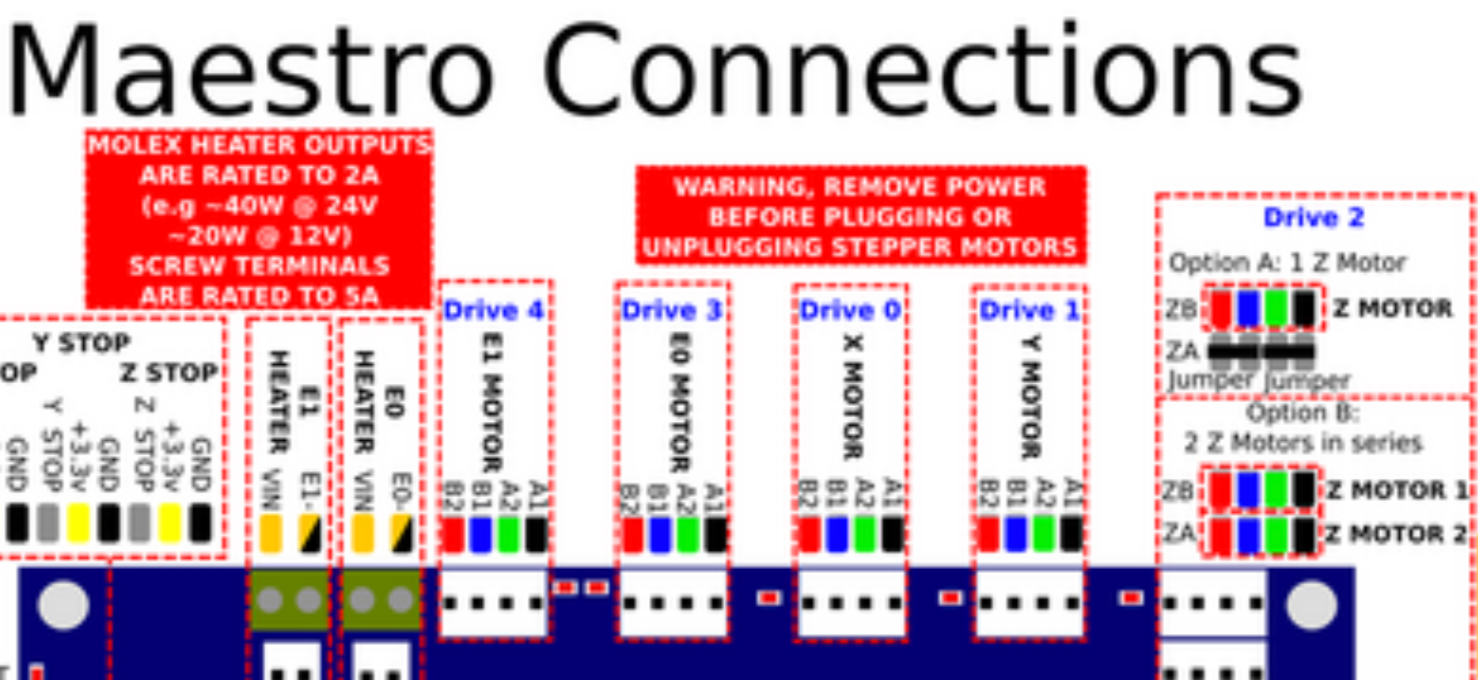
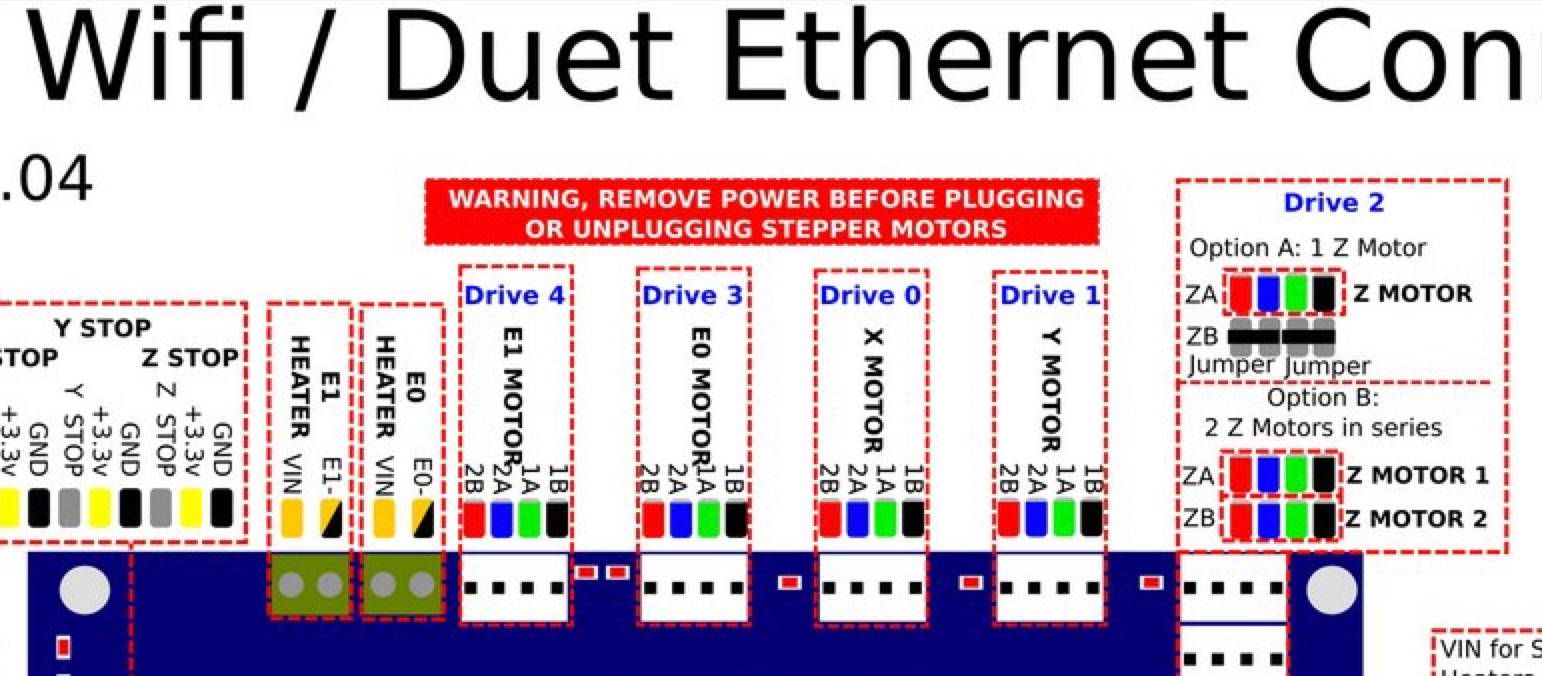
I'm switching from a Duet Maestro to a Duet Wifi and a few of the pin configurations are different. immediately you can see the power connections are reversed and opposite of a Duet Maestro as well as the E1 and E0 Motor molex connectors are reversed. The connection alignment tabs for the molex are on the top of the pins on the Maestro board and flipped down on the Duet Wifi board. Would it be easier to pop the molex pins and rewire it that way or should you / can you do it in the firmware?
You can see that on the Maestro the pins are B2 B1 A2 A1 and on the Wifi they are 2B 2A 1A 1B. Thoughts?
-
@Stephenbright Motor wiring is exactly the same for all Duets. The labelling has changed, but you still wire one motor phase to the left two pins and the other motor phase to the right two pins.
Don’t understand your comment about E0 and E1 being swapped; they clearly are not!
And don’t bother rewiring the motors for the flipped connector tab. If the motor goes the wrong way, flip it in config.g using M569.
Ian
-
That being said the Power section is definitly reversed correct? On the board the VIN and Ground are labeled in reverse and I've wired them the way the board is listed...
However flipping the E1and E0 motor connector over is literally opposite of the the Maestro as the Molex will not fit unless it is flipped. So I will keep the same pin configurations / arrangement but just flip the molex around to fit...
Thoughts on that?
Thanks !
-
That being said the Power section is definitly reversed correct?
Yes, Vin and bed heater is different on Duet 2 Maestro and Duet 2 Wifi, pay attention to the wiring diagrams/silkscreen!
but just flip the molex around to fit...
Thoughts on that?for the steppers thats fine, just invert the config if they turn the wrong way as Ian mentioned.
-
Thank you !
-
I've received this errors:
M569: Bad mode change microstep interval for driver 0
M569: Bad mode change microstep interval for driver 1
Error: M569: Driver 2 does not support mode 'stealthChop'
Error: M569: Driver 3 does not support moBadThoughts on how to fix them?
Thanks !
-
@Stephenbright please post config.g, and firmware version with M115.
Ian
-
on a general note, the stepper drivers are different and have different support, notably the wifi cannot interpolate all microsteps to 265, only from 16 and there is no stealthchop support in the wifi with 2660 drivers, maestro has 2224 drivers. caveat list may be incomplete or incorrect, or all of the above.
(i'm sorry, i completely forgot about that, as I've yet to use a wifi board for printing.)
-
2.03beta3
; CONFIGURATION FILE for Duet Maestro
; Compound Nozzle; Executed by the firmware on start-up
; Headers within parenthesis are headings in Duet3D documentation=https://duet3d.com/wiki/Configuring_RepRapFirmware_for_a_Cartesian_printer
; Visit https://reprap.org/wiki/G-code for an explanation of G-code commands; --- SECTION: GENERAL PREFERENCES ( ) ---
M564 S1 H1 ; Enables Homing Requirement For Motor Activation and set axes limits
; --- SECTION: Z-PROBE & MESH COMPENSATION ---
M98 Pmachine_zprobe.g ; configure the z probe
M98 Pmachine_bedmesh.g ; configure the bed mesh
G29 S1 ; Load heightmap after power cycle
; --- SECTION: DRIVES (MOVEMENT SECTION) & ENDSTOPS ---
M667 S1 ; Enable coreXY mode
M569 P0 S0 D2 V0 ; Drive 0 goes forwards, CoreXY_1
M569 P1 S1 D2 V0 ; Drive 1 goes forwards, CoreXY_2
M569 P2 S1 D3 V0; Drive 2 goes forwards, Z Motor
;//Gearbox Mods Settings//
M569 P3 S0 D3 V0 ; Drive 3 goes forwards, Left Extruder
M569 P4 S1 D3 V0; Drive 4 goes forwards, Right Extruder
M98 Pmachine_endstoptypes.g ; set endstop types
M98 Pmachine_steppercurrent.g ; set stepper currents
M98 Pmachine_stepperspeed.g ; set stepper speeds
M98 Pmachine_axisdimension.g ; configure the axes dimensions
M98 Pmachine_axissteps.g ; configure the axes steps per mm
M98 Pmachine_extruderstep.g ; configure the extruder steps
G21 ; Work in millimetres
G90 ; Set to absolute coordinates...
M84 S1 ; Set idle timeout; --- SECTION: HEATERS, BED & THERMISTOR ---
; H0 is bed
; H1 is left heater
; H2 is right heaterM570 H0 P25 T30 ; Allow heater to be off by as much as 30C for 25 seconds
M570 H1 P15 T30 ; Allow heater to be off by as much as 30C for 15 seconds
M570 H2 P15 T30 ; Allow heater to be off by as much as 30C for 15 seconds
M305 P0 T100000 B4138 C0 R2200 ; Set thermistor + ADC parameters for heater 0, For heated Bed thermistor
;M305 P1 X501 R2200 ; Define left side extruder PT1000
M305 P1 X201 ; Upgraded E3D Thermistor
;M305 P2 X502 R2200 ; Define right side extruder PT1000
M305 P2 X200 ; Upgraded E3D Thermistor
M307 H0 A78.9 C265.2 D9.5 S1.00 V24.0 B0 ; Forcing heated bed PID control after power-cycle. Basic bed heating auto-tune
M307 H1 A241.4 C104.5 D3.5 S1.00 V23.9 B0 ; Set PID values use M303 auto-tune calibration settings
M302 P1 ; Allow Cold extrudes
M98 Pmachine_maxtemp.g ; set bed and extruder max temperatures; --- SECTION: FANS ( ) ---
M106 P0 S1 I0 F4 H-1 L0.3 ; Filter fan. Set fan 0 value, PWM signal inversion and frequency. Thermostatic control is turned off, Minimum fan value 0.3, Speed 100%
M106 P1 S0 I0 F4 H-1 L0.3 ; Set fan 1 value, PWM signal inversion and frequency. Thermostatic control is turned off, Minimum fan value 0.3, Speed 100%
M106 P2 S0 I0 F4 H-1 L0.3 ; Nozzle fan. Set fan 1 value, PWM signal inversion and frequency. Thermostatic control is turned off, Minimum fan value 0.3, Speed 100%; --- SECTION: TOOLS ( ) ---
; Comment: Remember! H0 is the heated bed!
; Comment: D0 is the first driver after movement (X, Y and Z) drives, which is left extruder
; D1 is right extruderM98 Pmachine_ktana_tools.g ; Define ktana tools
T0 ; Automatic tool select
; --- SECTION: NETWORKS (PROLOGUE & COMMUNCATIONS SECTION) ---
M98 Pmachine_access.g ; set machine name and IP
M586 P0 S1 ; Enable HTTP
M586 P1 S0 ; Disable FTP
M586 P2 S0 ; Disable Telnet; --- SECTION: MISCELLANEOUS ---
M572 D0:1 S0.07 ; Extruder Pressure Advance
-
@Stephenbright said in Switching from Duet Maestro to Duet WIFI:
M667 S1 ; Enable coreXY mode
M569 P0 S0 D2 V0 ; Drive 0 goes forwards, CoreXY_1
M569 P1 S1 D2 V0 ; Drive 1 goes forwards, CoreXY_2
M569 P2 S1 D3 V0; Drive 2 goes forwards, Z Motor
;//Gearbox Mods Settings//
M569 P3 S0 D3 V0 ; Drive 3 goes forwards, Left Extruder
M569 P4 S1 D3 V0; Drive 4 goes forwards, Right ExtruderThe maestro has different drivers than the wifi. The drivers on the wifi do no support stealthchop. I would suggest removing the D and V parameters from those M569 commands entirely which will use the default values.
-
Also, instead of tinkering with a very old beta firmware version, you should just update to the current RRF2 release.
Just upload this zip file as is to the /sys folder via DWC.
https://github.com/Duet3D/RepRapFirmware/releases/download/2.05.1/Duet2Firmware-2.05.1.zip
-
Hi, yes I have updated to the latest firmware. I was just posting what the current firmware was when I received the error for clarity...
Couple of updates:
The pin outs on the Maestro and the Wifi are in fact reversed. I had to flip all the connections to get the motors going the right directions. Not a big deal and that is now sorted...
I'm now getting a heater error. You have to use the screw terminals on the Duet WiFi and on the Maestro it is using the 2 pin molex connector. I popped out the molex pins on the connector, snipped the tips so have a good lead and wired it up.
According to the wiring diagrams the VIN power is on the left and the GND is on the right. Correct? This is listed on BOTH diagrams. HOWEVER on the Maestro board it says the Molex connectors are 2 amp and the screw terminal are 5 amp. I have to use the screw terminals on the WIFI board. Do I need to make change somewhere with a jumper etc?
-
@Stephenbright said in Switching from Duet Maestro to Duet WIFI:
The pin outs on the Maestro and the Wifi are in fact reversed. I had to flip all the connections to get the motors going the right directions. Not a big deal and that is now sorted...
An alternative would have been to edit your M569 commands in config.g, changing S0 to S1 or vice versa.
According to the wiring diagrams the VIN power is on the left and the GND is on the right. Correct? This is listed on BOTH diagrams.
If you are viewing the board with the E0/E1 heater connections at the top edge, that is correct.
HOWEVER on the Maestro board it says the Molex connectors are 2 amp and the screw terminal are 5 amp. I have to use the screw terminals on the WIFI board. Do I need to make change somewhere with a jumper etc?
No. We added the Molex connectors on the Maestro so that OEMs using 24V power could use them instead of the screw terminals. OEMs don't generally like screw terminals because they take too long to connect. The Molex connectors are connected in parallel with the screw terminals.
-
This post is deleted! -
I have everything sorted except for the extruder motors are NOW clicking / grinding? Could the voltage me wrong? It looks to be set at E400? Is the 400 mA? Should I go down to 300 mA? I know the Wifi board steps in 100 mA intervals vs the Maestro 50 mA...
Thank you !
; machine_steppercurrent.g
; October 1, 2018; This document sets the stepper motor currents.
; This is an advanced feature and should only be changed if you REALLY know what you're doing!
; Increasing stepper motor currents beyond their limit can result in damage to them!M906 X680 Y680 Z600 E400 I60; Set motor currents (mA) and idle current percentage
-
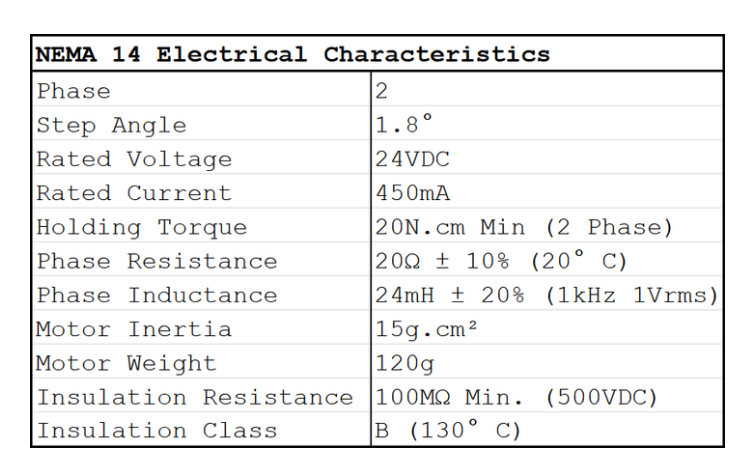
400mA seems low for an extruder. What current were you using when you had the Maestro installed? What is the rated current of the motor? What printer is it?
-
It looks to be rated at 450mA however the stock setting using the Maestro was set like this which is think is 400 mA :
M906 X680 Y680 Z600 E400 I60; Set motor currents (mA) and idle current percentage
It seemed to work fine with the Maestro even if it was low. I can set it to whatever you think would be appropriate.
-
If it worked at 400mA on the Maestro, it should work at 400mA on the Duet 2. Maybe only one of the phases is working. Can you tell whether the extruder is rotating normally when it doesn't have to push filament?
-
@dc42 said in Switching from Duet Maestro to Duet WIFI:
If it worked at 400mA on the Maestro, it should work at 400mA on the Duet 2. Maybe only one of the phases is working. Can you tell whether the extruder is rotating normally when it doesn't have to push filament?
No it is not rotating normally.

When I put the filament in, it is moving but in a clicking / stepping motion, like you can feel the filament vibrating and it's not really loading the filament. This is a pict of the connection.
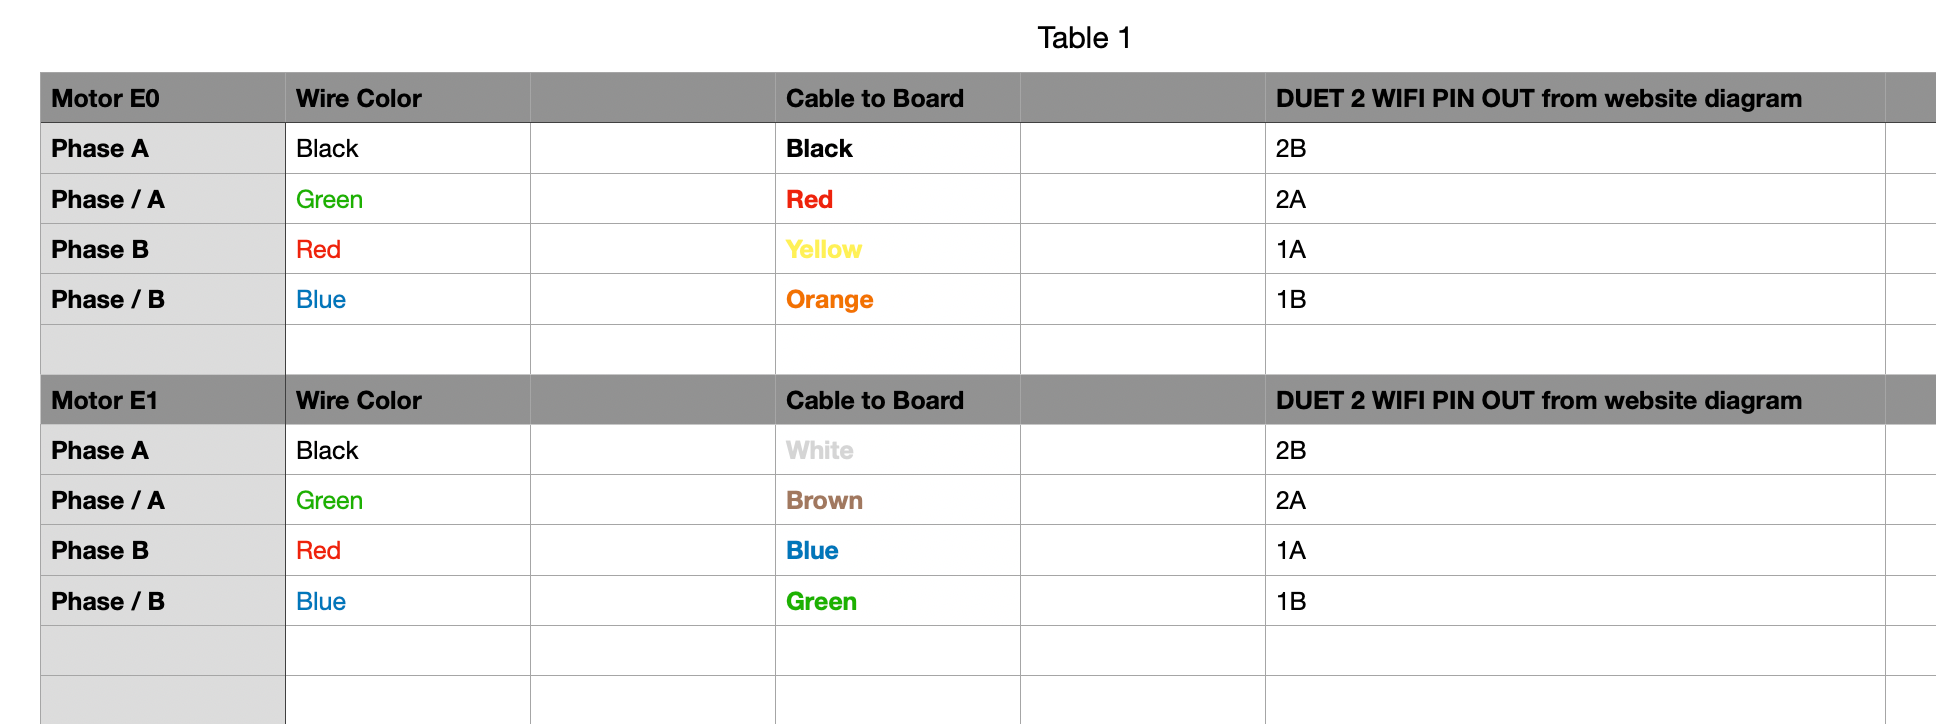
I mapped out this chart if it helps for the cable colors to the board.
-
It really does sound like one of your motor phases is not connected properly. Bad crimp or broken wire. If you have the means, try re-crimping the ends, or replace the wires entirely.
Are you getting any error messages in the console saying a motor phase may be disconnected? It would be strange to get the behaviour but not the error message, so maybe it's something else.
Have you tested the motor on a different driver?
