DWC + PanelDue Interfacing
-
I am tuning and creating macros/tool assignments. The printer I am setting up will be controlled via the PanelDue/DWC (at times), however, when I was setting up the PanelDue it seems to populate the UI on its own and does not seem modifiable unless you do some config.g magic which I am learning through trial and error. There isn't much indication/labeling as to what buttons are mapped to what heater.
My issue up front was that when using the PanelDue I was trying to heat my chamber up to 50C and when I would set the temperature and tap the button on the screen it would reset back to a 0C setting and not even turn on. Playing around with the other temperature control buttons (which there are 4: 2*hot ends, hot bed and chamber) on the PanelDue UI I stumbled upon an error stating that it was trying to set temperature of an undefined tool2 and at the time I did not have one defined or even an intent to have one. Now that I added T2 using H1, my chamber heater, it created redundancy on my interface which is confusing and annoying.
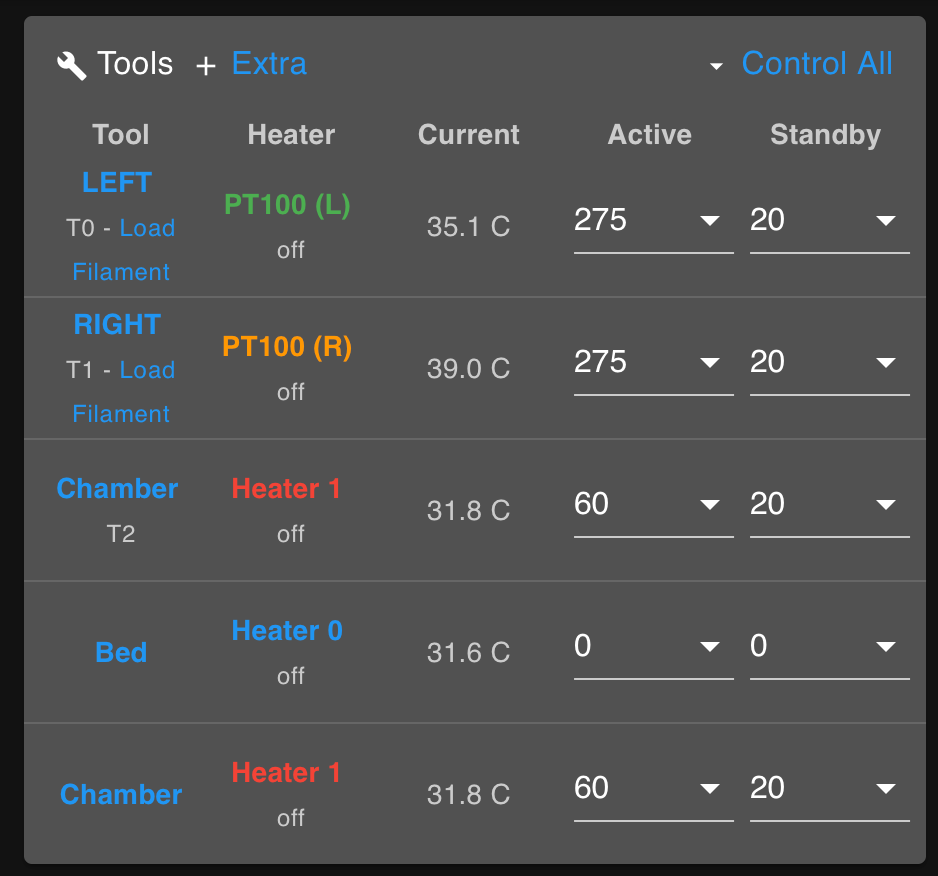

After creating T2 and mapping my chamber to it, its added a 3rd hotend icon which is not desired. (It won't be clear to others using this printer as to what icon 1,2,3 controls which heater) Do I have any control of how the PanelDue lays out its UI? Any tips on how I can get my DWC and my PanelDue interfaces to be tidy, and understandable to anyone using them?
-
The PanelDue firmware has some limitations on chamber heater function that is being improved in the recent beta paneldue firmware releases.
https://forum.duet3d.com/topic/18952/panelduefirmware-3-2-rc3-released
https://duet3d.dozuki.com/Wiki/Connecting_and_configuring_a_chamber_heater
For now, you should define the heaters in the order the paneldue is expecting them, bed heater, extruders, and finally the chamber.
Please post your config.g to show how you have your heaters defined.
-
Heres my config.g
; Axis Definitions====>>>>> ; X = Left (on X-axis) Extruder U = Right (on X-axis) Extruder /// Y = Y-Axis /// Z = Z-Axis ; ======={ Drives }======================================== ; 0.x corresponds to main board /// 20.x corresponds to tooloard-1 /// 21.x corresponds to toolboard-2 ; X M569 P20.0 S0 ; physical drive 0.0 goes forwards M569 P21.0 S0 ; physical drive 0.1 goes forwards ; Y M569 P0.2 S1 ; physical drive 0.2 goes forwards M569 P0.3 S0 ; physical drive 0.3 goes backwards ; Z M569 P0.4 S0 ; physical drive 0.4 goes backwards M569 P0.5 S0 ; physical drive 0.5 goes backwards ; ======={ Extruders }===================================== M569 P0.0 S1 ; physical drive 1.0 goes forwards M569 P0.1 S1 ; physical drive 2.0 goes forwards M584 X20.0 Y0.2:0.3 Z0.4:0.5 U21.0 E0.0:0.1 ; set drive mapping ; ======={ Movement }====================================== M350 X16 Y16 Z16 U16 E16:16 ; configure microstepping with interpolation M92 X81.387 Y81.275 Z1606.43 U81.387 E70.00:70.00 ; set steps per mm M566 X900.00 Y900.00 Z24.00 U900.00 E240.00:240.00 ; set maximum instantaneous speed changes (mm/min) M203 X6000.00 Y6000.00 Z360.00 U6000.00 E1200:00:1200.00 ; set maximum speeds (mm/min) M201 X500.00 Y500.00 Z20.00 U500.00 Y500.00 Z20.00 U500.00 ; set accelerations (mm/s^2) M906 X700 Y700 Z700 E700:700 U700 I30 ; set motor currents (mA) and motor idle factor in percent M84 S20 ; Set idle timeout ; ======={ Axis Limits }=================================== M208 X0 Y17 Z0 U64 S1 ; set axis minima M208 X523 Y454 Z640 U587 S0 ; set axis maxima ; ======={ Endstops }====================================== M574 X1 S1 P"!20.io0.in" ;X-Min Homes Left carriage as Endstop index 0 M574 Y2 S1 P"!io5.in" ;Y-Max Homes Y as endstop index 1 M574 Z1 S1 P"!io3.in+!io4.in" ;Z-Min Homes Z (bed) as endstop index 2 M574 U2 S1 P"!21.io0.in" ;U-Max Homes Right carriage as Endstop index 3 ; ======={ Z-Probe }======================================= M558 P0 H5 F120 T6000 ; disable Z probe but set dive height, probe speed and travel speed M557 X15:439 Y15:439 S20 ; define mesh grid ;M558 P2 H5 F120 T6000 ; enable modulated IR Z probe sensor, dive height, probe speed and travel speed ; ======={ Heaters }======================================= ; Bed>>> M308 S0 P"temp0" Y"thermistor" T100000 B4138 A"Bed" ; configure sensor 0 as thermocouple temp0 pin M950 H0 C"out1" T0 ; create bed heater output on out1 and map it to sensor 0 M307 H0 A340.0 C140.0 D80 B0 ; enable bang-bang mode for the bed heater and set PWM limit M140 H0 ; map heated bed to heater 0 M143 H0 S150 ; set temperature limit for heater 0 to 150C ; Chamber>>> M308 S1 P"temp1" Y"thermistor" T100000 B4138 A"Chamber" ; configure sensor 1 as thermocouple via temp1 pin M950 H1 C"out2" T1 ; create chamber heater output on out2 and map it to sensor 1 M307 H1 A340.0 C140.0 D80 B0 ; enable bang-bang mode for the chamber heater and set PWM limit M141 H1 ; map chamber to heater 1 ;!!!!!!UNCOMMENT FOR TUNING IF NEEDED!!!!!!!! ;M308 S1 P"temp1" Y"thermistor" T100000 B4138 ;M950 H1 C"out2" T1 ;M307 H1 P1.0 B1 ;M141 H1 ; Left nozzle>>> M308 S2 P"spi.cs0" Y"rtdmax31865" A"PT100 (L)" ; configure sensor 2 as thermocouple via CS pin spi.cs0 M950 H2 C"out0" T2 ; create nozzle heater output on 1.out0 and map it to sensor 2 M307 H2 A180.0 C140.0 D5.5 B0 ; disable bang-bang mode for heater and set PWM limit H143 H2 S510 ; set temperature limit for heater 2 to 510C ; Right nozzle>>> M308 S3 P"spi.cs1" Y"rtdmax31865" A"PT100 (R)" ; configure sensor 3 as thermocouple via CS pin spi.cs1 M950 H3 C"out3" T3 ; create nozzle heater output on 2.out0 and map it to sensor 3 M307 H3 A180.0 C140.0 D5.5 B0 ; disable bang-bang mode for heater and set PWM limit H143 H3 S510 ; set temperature limit for heater 3 to 510C ; ======={ Fans }========================================== M950 F0 C"out4" Q500 ; create fan 0 on pin out4 and set its frequency M106 P0 S1 H-1 ; set fan 0 value. Thermostatic control is turned off ;M950 F1 C"out5" Q500 ; create fan 1 on pin out5 and set its frequency ;M106 P1 S1 H-1 ; set fan 1 value. Thermostatic control is turned off ; ======={ Tools}========================================== M563 P0 S"LEFT" D0 H2 ; define tool 0 G10 P0 X0 Y0 Z0 ; set tool 0 axis offsets G10 P0 R20 S275 ; set initial tool 0 active and standby temperatures to 0C M563 P1 S"RIGHT" D1 H3 ; define tool 1 G10 P1 X587 Y0 Z0 ; set tool 1 axis offsets G10 P1 R20 S275 ; set initial tool 1 active and standby temperatures to 0C ; ========{ Filament Monitoring }========================== ;M591 D0.0 P5 C"io1.in" R40:120 E3.0 S1 ;Driver 1.0, laser sensor, pinname, Tol. 40-120%, 3.0mm detection, disabled M591 D0.1 P5 C"io2.in" R40:120 E3.0 S0 ;Driver 2.0, laser sensor, pinname, Tol. 40-120%, 3.0mm detection, disabled ; ========={ Miscellaneous }=============================== M575 P1 S1 B57600 ; enable support for PanelDue -
As I said, you have bed, chamber, tool0, tool1. This is confusing the paneldue.
You'll need to redefine the chamber heater as the last heater. bed=H0, tool0=H1, tool1=H2, chamber=H3
Example:
; Heaters M308 S0 P"temp0" Y"thermistor" T100000 B4138 ; configure sensor 0 as thermistor on pin temp0 M950 H0 C"!out0" T0 ; create bed heater output on !out0 and map it to sensor 0 M307 H0 B0 S1.00 ; disable bang-bang mode for the bed heater and set PWM limit M140 H0 ; map heated bed to heater 0 M143 H0 S120 ; set temperature limit for heater 0 to 120C M308 S1 P"1.temp0" Y"thermistor" T100000 B4138 ; configure sensor 1 as thermistor on pin 1.temp0 M950 H1 C"1.out0" T1 ; create nozzle heater output on 1.out0 and map it to sensor 1 M307 H1 B0 S1.00 ; disable bang-bang mode for heater and set PWM limit M308 S2 P"2.temp0" Y"thermistor" T100000 B4138 ; configure sensor 2 as thermistor on pin 2.temp0 M950 H2 C"2.out0" T2 ; create nozzle heater output on 2.out0 and map it to sensor 2 M307 H2 B0 S1.00 ; disable bang-bang mode for heater and set PWM limit M308 S3 P"temp1" Y"thermistor" T100000 B4138 ; configure sensor 3 as thermistor on pin temp1 M950 H3 C"out1" T3 ; create chamber heater output on out1 and map it to sensor 3 M307 H3 B0 S1.00 ; disable bang-bang mode for the chamber heater and set PWM limit M141 H3 ; map chamber to heater 3 -
@Phaedrux said in DWC + PanelDue Interfacing:
As I said, you have bed, chamber, tool0, tool1. This is confusing the paneldue.
You'll need to redefine the chamber heater as the last heater. bed=H0, tool0=H1, tool1=H2, chamber=H3
Right on, this worked and tidied the PanelDue up nicely, however, I am now missing PanelDue control of the chamber temperature. I am assuming I will have to define the chamber as a tool for the UI to have buttons for it?
-
I think the easiest way to control chamber temps on the paneldue right now would be to create a macro for it in the root of the macro folder so that it shows up on the macro shortcut list on the paneldue.
As I alluded to, there is work currently proceeding to improve the paneldue firmware. 3.2 is currently in testing, so once you're confident that the printer is configured and working well with 3.1.1 you can try testing the 3.2 bundle, or wait for final release.
-
@Phaedrux Right on man, thank you! Even if we can't accomplish what we're after, its nice to know I won't waste time trying lol. Macro will certainly suffice.
@Phaedrux said in DWC + PanelDue interfacing:
you can try testing the 3.2 bundle, or wait for final release.
Most likely will upgrade when the time comes for release!