Capacitive Sensor
-
Hi,
I tried one on my printer because of problems with an inductive sensor interacting with my magnetic build surface.
The problem with the capacitive one was it's slow response time. It has a 50 Hz switching frequency.
The inductive ones I tried ranged from 800 Hz to 3000 Hz.
Let us know how it works.
Frederick
-
Yes.
=== Diagnostics ===
RepRapFirmware for Duet 2 WiFi/Ethernet version 3.1.1 running on Duet WiFi 1.02 or later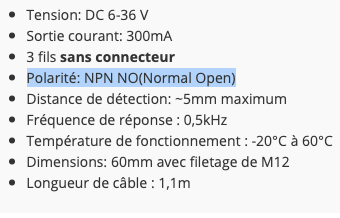
-
@Rudy2A said in Capacitive Sensor:
RepRapFirmware for Duet 2 WiFi/Ethernet version 3.1.1 r
not the firmware but the hardware revision.
see https://duet3d.dozuki.com/Wiki/Connecting_a_Z_probe
Duet 3, Duet 2 Maestro, or revision 1.04 or later of Duet 2 WiFi or Duet 2 Ethernet: you can connect the output of the sensor directly to the Z-probe IN pin.
on 1.04 you dont need the diode
-
@theruttmeister said in Capacitive Sensor:
I'm running the same type of device, just the inductive sensor version.
What result do you get? Are you satisfied?
-
So for me, I need one ... I'm Duet WiFi 1.02 if I understand correctly?
-
@Rudy2A said in Capacitive Sensor:
So for me, I need one ... I'm Duet WiFi 1.02 if I understand correctly?
no you look up the writing on the board.
the firmware can not tell the difference between 1.02, 1.03 and 1.04 -
@Veti said in Capacitive Sensor:
@Rudy2A said in Capacitive Sensor:
So for me, I need one ... I'm Duet WiFi 1.02 if I understand correctly?
no you look up the writing on the board.
the firmware can not tell the difference between 1.02, 1.03 and 1.04ok, on my packaging box is written . V1.04b
-
@Rudy2A said in Capacitive Sensor:
ok, on my packaging box is written . V1.04b
just to be sure check under the 2 thermistors plugs
see https://www.duet3d.com/image/cache/catalog/v104/Wifi_v1.04_above_wb_small-800x800.png
where it says duet2 V1.04 -
@Veti said in Capacitive Sensor:
@Rudy2A said in Capacitive Sensor:
ok, on my packaging box is written . V1.04b
just to be sure check under the 2 thermistors plugs
see https://www.duet3d.com/image/cache/catalog/v104/Wifi_v1.04_above_wb_small-800x800.png
where it says duet2 V1.04Thank you, that's it ... duet2 v1.04
-
@Rudy2A said in Capacitive Sensor:
@theruttmeister said in Capacitive Sensor:
I'm running the same type of device, just the inductive sensor version.
What result do you get? Are you satisfied?
Yes.
But I'm using a relatively expensive sensor (from IFM), and with printers that have either steel beds or steel flex-plate type surfaces.
There was a bunch of testing done a few years ago, we looked at most types of proximity sensors... we found that while inductive are not the most accurate, they are much more consistent than the other options. We found that capacitive sensors vary a lot with ambient temperature, for example. Optical could vary wildly if you use glue on your build surface.
They are not perfect, but good enough that I don't worry about finding something better.
-
there is a video from tom about it
-
Return to the installation.
The wiring is very simple and the adjustment of the probe in Config.g too.Where it goes wrong is with the mesh of the bed ... impossible to have a complete mesh. The nozzle only probes the 2 ends of the front of the deck and stops ... yet normally it should probe all 4 corners as configured.
Tired of searching, I will put back my mini IR probe which for me is not exceptional either (I expected to be frank to be more precise).
-
@Rudy2A said in Capacitive Sensor:
Where it goes wrong is with the mesh of the bed ... impossible to have a complete mesh. The nozzle only probes the 2 ends of the front of the deck and stops ... yet normally it should probe all 4 corners as configured.
this is most likely because you did not take the probe offset into consideration.
post your config.g
-
Exactly, I thought about taking the offset of my probe ... the G32 work good.
; Configuration file for Duet WiFi (firmware version 3)
; executed by the firmware on start-up
;
; generated by RepRapFirmware Configuration Tool v3.1.4 on Mon Oct 26 2020 11:25:15 GMT+0100 (CET); General preferences
G90 ; send absolute coordinates...
M83 ; ...but relative extruder moves
M550 P"My Printer+" ; set printer name
M669 K1 ; select CoreXY mode; Network
M552 S1 ; enable network
M586 P0 S1 ; enable HTTP
M586 P1 S0 ; disable FTP
M586 P2 S0 ; disable Telnet; Drives
M569 P0 S0 ; physical drive 0 goes forwards
M569 P1 S0 ; physical drive 1 goes forwards
M569 P2 S0 ; physical drive 2 goes forwards
M569 P3 S0 ; physical drive 3 goes forwards
M569 P4 S0M584 X0 Y1 Z2:4 E3 ; set drive mapping
M671 X-58:317 Y132:132 S10 ; vis à plomb à gauche (connectées à Z) et à droite (connectées à E1) de repère XM350 X16 Y16 Z16 E16 I1 ; configure microstepping with interpolation
M92 X80.00 Y80.00 Z1600.00 E830.00 ; set steps per mm
M566 X600.00 Y600.00 Z60.00 E2400.00 ; set maximum instantaneous speed changes (mm/min)
M203 X11639 Y11639 Z200 E600 ; set maximum speeds (mm/min)
M201 X800.00 Y800.00 Z40.00 E300.00 ; set accelerations (mm/s^2)
M906 X950 Y950 Z950 E1120 I20 ; set motor currents (mA) and motor idle factor in per cent
M84 S30 ; Set idle timeout; Axis Limits
M208 X0 Y0 Z-0.5 S1 ; set axis minima
M208 X270 Y270 Z245 S0 ; set axis maxima; Endstops
M574 X1 S1 P"xstop" ; configure active-high endstop for high end on X via pin xstop
M574 Y1 S1 P"ystop" ; configure active-high endstop for high end on Y via pin ystop
;M574 Z1 S2 P"io2.in" ; Axe Z avec deux moteurs, butées min.; Z-Probe
M558 P5 C"zprobe.in" H5 F120 T6000 ; set Z probe type to unmodulated and the dive height + speeds
G31 P500 X0 Y-43 Z1.30 ; set Z probe trigger value, offset and trigger height
M557 X11:250 Y11:252 S20 ; define mesh grid; Heaters
M308 S0 P"bedtemp" Y"thermistor" T100000 B4725 C7.06e-8 ; configure sensor 0 as thermistor on pin bedtemp
M950 H0 C"bedheat" T0 ; create bed heater output on bedheat and map it to sensor 0
M307 H0 A435.0 C388.3 D7.8 B0 S0.8 V13.4
;M307 H0 B0 S1.00 ; disable bang-bang mode for the bed heater and set PWM limit
M140 H0 ; map heated bed to heater 0
M143 H0 S120 ; set temperature limit for heater 0 to 120C
M308 S1 P"e0temp" Y"thermistor" T100000 B4725 C7.06e-8 ; configure sensor 1 as thermistor on pin e0temp
M950 H1 C"e0heat" T1 ; create nozzle heater output on e0heat and map it to sensor 1
M307 H1 A650.7 C221.3 D4.8 B0 S1 V13.3
;M307 H1 B0 S1.00 ; disable bang-bang mode for heater and set PWM limit; Fans
M950 F0 C"fan0" Q500 ; create fan 0 on pin fan0 and set its frequency
M106 P0 S0 H-1 ; set fan 0 value. Thermostatic control is turned off
M950 F1 C"fan1" Q500 ; create fan 1 on pin fan1 and set its frequency
M106 P1 S1 H1 T45 ; set fan 1 value. Thermostatic control is turned on; Tools
M563 P0 D0 H1 F0 ; define tool 0
G10 P0 X0 Y0 Z0 ; set tool 0 axis offsets
G10 P0 R0 S0 ; set initial tool 0 active and standby temperatures to 0C; Custom settings are not defined
-
@Rudy2A said in Capacitive Sensor:
. impossible to have a complete mesh.
G32 does not create a mesh. G29 does
G32 does true bed leveling.post your bed.g
-
I have known this for a little while and thanks to this forum that there is a difference between G32 and G29. It was just a tip in case ...
")
; bed.g
G28 ; Home all Axes
M561 ; Efface la correction de plan
M290 R0 S0 ; Efface Baby-stepping; Bed levelling (G32)
G30 P0 X0.0 Y132 Z-99999; sonde près d'une vis sans fin, à mi-chemin le long de l'axe Y
G30 P1 X260 Y132 Z-99999 S2; sonde près d'une vis et calibrez 2 moteurs -
@Rudy2A
that only has 2 probe point. why do you think it should probe 4 points? -
This configuration works perfectly with the IR probe.
S2 probes the 4 corners (2X2).
If you put S4, it will probe 4 points on the first line multiplied by 4, so 16 points on the bed.
This is valid for S3, S6 ...
-
so you are talking about G29 and not G32.
M208 X270 Y270 Z245 S0 ; set axis maxima
G31 P500 X0 Y-43 Z1.30 ; set Z probe trigger value, offset and trigger height
M557 X11:250 Y11:252 S20 ; define mesh gridThis does not match.
Also there will be an error message in the console telling you whats wrong.Y252 can not be reached with an offset of -43
change this to
M557 X11:250 Y11:220 S20 ; define mesh grid -
@Veti said in Capacitive Sensor:
Y252 ne peut pas être atteint avec un décalage de -43
changez ceci en
M557 X11: 250 Y11: 220 S20; définir la grille de maillagethank you,
Indeed, with that it works ...
On the other hand, depending on the tests carried out, the capacitive or IR probe is similar. I would tell you that my finding to come.