Independent Z motor levelling issue
-
Hi, files below, but this current question is really about the adjust z screw macro. Thanks for your help.
config (1).g homeall.g homeall_main.g homez_main.g homez.g bed.g Adjust Z Screw.g
-
Hi,
Please get in the habit of posting files using the </> tag - it saves us the trouble of downloading each file.
config.g
; General preferences
M111 S0 ; Debugging off
M555 P2 ; Set firmware compatibility to look like Marlin
M84 S120 ; Set idle timeout

;Movement
;M669 K5 ; switch to CoreXY mode
M669 K1 X1:1:0:0 Y1:-1:0:1 Z0:0:1:0 U0:0:0:1
M569 P0 S1 ; X Drive 1 goes backwards
M569 P1 S1 ; Y Drive 1 goes forwards
M569 P5 S0 ; U Drive 1 goes backwards
M569 P6 S0 ; V Drive 1 goes forwards
M569 P3 S0 ; E0 Drive 3 goes forwards
M569 P8 S0 ; Z Left Drive 8 goes forwards
M569 P9 S0 ; Z Right Drive 9 goes forwards
M584 X0 Y1 U5 V6 Z8:9 E3:4 P4; assign drives to axis
M671 X-134:444 Y160:160 S2 ; define Z axis leadscrew positions
M574 X1 S1
M574 Y2 S1
M574 U2 S1
M574 V1 S0
M574 Z2 S1

M906 X1000 Y1000 U1000 V1000 Z1000 E1000:1000; Set motor currents (mA) and motor idle factor in per cent

M201 X1000 Y1000 U1000 V1000 Z250 E250,250 I30; Set accelerations (mm/s^2)

M203 X10000 Y10000 U10000 V10000 Z500 E1200:1200 ; Set maximum speeds (mm/min) bumped up extruder settings
; the above settings are set by using the EMF Calculator  on RepRapFirware.org essentially limiting max speed to 80mm/s

M566 X1200 Y1200 U1200 V1200 Z250 E420:420 ; Set maximum instantaneous speed changes (mm/min) bumped up extruder settings

; The above settings are set to 25% of desired maximum printing speed of 70mm/s = 1050

M208 X309 Y304 U405 Z250 S0 ; Set axis maxima
M208 X-94 Y0 U0 Z0 S1 ; Set axis minima

M92 X160 Y160 U160 V160 Z400 E837:837 ; Set steps per mm
M350 X16 Y16 U16 V16 Z16 E16:16 I1 ; Configure microstepping with interpolation

G21 ; Work in millimetres
G90 ; Send absolute coordinates...
M83 ; ...but relative extruder moves

; Z Probe
M558 P1 H3 F120 T6000 A2; Set Z probe type to unmodulated, the axes for which it is used and the probe + travel speeds
G31 P500 X25.5 Y37.5 Z0.5; was 2.18 with an elephant foot compensation of 0.1

; Heaters
M143 S260 ; Set maximum heater temperature to 260C
M305 P0 T100000 B4725 C7.060000e-8 R4700 ; Set Bed thermistor + ADC parameters
M305 P1 T100000 B4725 C7.060000e-8 R4700 ; Set Heater 1 thermistor + ADC parameters
M305 P2 T100000 B4725 C7.060000e-8 R4700 ; Set Heater 2 thermistor + ADC parameters

; Tools
M563 P0 D0 H1 F1; Define tool 0
G10 P0 X0 Y0 Z0 S0 R0 ; Set tool 0 axis offsets

M563 P1 D1 H2 X3 F2; Define tool 1
G10 P1 Y0 U0 Z0 S0 R0 ; Set tool 1 axis offsets

; Network
M550 P"K8200Duet" ; Set machine name
;M552 S1 ; Enable network and acquire dynamic address via DHCP
M552 S2 ; Enable access point mode

; Fans
M106 P0 S1 I0 F500 H1 T45 ; Set fan 0 value, Extruder 1 Fan. PWM signal inversion and frequency. Thermostatic control is turned on
M106 P1 S1 I0 F500 H2 T45 ; Set fan 1 value, Extruder 2 Fan. PWM signal inversion and frequency. Thermostatic control is turned on
M106 P2 S0 I0 F500 H-1 ; Set fan 1 value, Extruder 1 Part Fan. PWM signal inversion and frequency. Thermostatic control is turned off
M106 P3 S0 I0 F500 H-1 ; Set fan 2 value, Extruder 2 Part Fan.PWM signal inversion and frequency. Thermostatic control is turned off

; Custom settings are not configured


; Miscellaneous
;M106 P8 S1	    ; Turn on light
;M140 S30	    ; Preheat Bed
M501                ; Run config-override.g
;G29 S1 		    ; Load the heightmap
T0                  ; Select the first head
homeall.g
G91              		; relative positioning
G1 H2 Z5 F1800   		; lift Z relative to current position
M98 P"homeall_main.g"
M98 P"homez_main.g"
G1 X-700 Y700 F10000		; move X and Y back to stop positions
homeall_main.g
G1 H1 X-700 Y700 U700 F2500 	; move quickly towards endstops
G1 H1 X-700 F2500  		; coarse home X
G1 H1 U700 F2500  		; coarse home U
G1 H1 Y700 F2500  		; coarse home Y
G1 X5 Y-5 U-5 F2500  		; go back a few mm
G1 H1 X-700 F360  		; move slowly to X axis endstop once more (second pass)
G1 H1 U700 F360  		; move slowly to U axis endstop once more (second pass)
G1 H1 Y700 F360  		; move slowly to Y axis endstop once more (second pass)
homez_main.g
G90				; absolute postioning
G1 X129.5 Y122.5 F10000 	; move to bed center for probing
G29 S2
G30				; probe the bed and set Z height
G29 S1
homez.g
G91              		; relative positioning
G1 H2 Z5 F1800   		; lift Z relative to current position
M98 P"homez_main.g"
bed.g
G28
G90                         	; Set to Absolute Positioning
G29 S2			    	; Clear the height map
M561				; Clear any Bed Transforms
T0                          	; Ensure Tool 0 is selected
G28				; Home All
M557 X36:274 Y37.5:282.5 P10:10	;Mesh bed levelling
G29                         	; Probe the bed
G1 X-700 Y700 F10000
adjust_z_screw.g
G28
G29 S2 				; Disable mesh grid heightmap
M561
G1 F10000
;Adjust LeadScrew
G30 P0 X10 Y160 Z-99999     	; probe point near first lead screw
G30 P1 X300 Y160 Z-99999 S2 	; probe point near second lead screw
G29 S1			;Load and enable heightmap
I think I got the files labeled correctly.
Frederick
-
Yes, those are the right files.
Sorry, didn't know what you meant about /
-
@pcsentinel said in Independent Z motor levelling issue:
Yes, those are the right files.
Sorry, didn't know what you meant about /
No problem - if you don't know what I mean just ask.
Frederick
-
OK I've done a quick look at the files - and I am confused.
According to the config file you have a Z end stop but I don't see where you use it.
You are using bed.g for creating the height map when it is intended to be used for manual or auto bed leveling.
How are you invoking bed.g and adjust_z_screw.g?
Thanks.
Frederick
Printers: a E3D MS/TC setup and a RatRig Hybrid. Using Duet 3 hardware running 3.4.6
-
I would suggest removing the G29 S1 from the homing files entirely and moving it either to start.g which gets run before a print starts, or better yet into the slicer start gcode after the homing as been done.
As you have it now, your beg.g is going to the trouble of canceling the mesh, only to home all and reload the mesh before creating a new mesh.
When are you running the adjust_z_screw.g file? I would suggest you add a G30 at the center of the bed before and after the tilt correction and before the mesh is reloaded.
Also, after all these changes you should recreate a new mesh after doing a G30 at the center of the bed.
Also make sure that your homing uses the same point in the center of the bed to set Z0.
-
@fcwilt
Z Endstop is sensor type
bed.g is from web interface and adjust a screw is a macro -
I Understand you points, I changed the adjust Z screw macro along the lines you have mentioned to:
G28
G29 S2
M561
G1 X129.5 Y122.5 F10000 ; move to bed center for probing
G30
G30 P0 X10 Y160 Z-99999 ; probe point near first lead screw
G30 P1 X300 Y160 Z-99999 S2 ; probe point near second lead screw
G1 X129.5 Y122.5 F10000 ; move to bed center for probing
G30
G29 S1When I swapped the G28 at the start with M98 P"homeall_main.g" the U drive started doing squiffy things without being instructed too, i.e. it started moving towards 0.
But having changed to the above then the issue still remains, i.e. I still have the same deviation everytime I run the macro.
-
It may be that I am interpreting the usage incorrectly. AS I understood the help sections, using the method
G30 P0 X10 Y160 Z-99999 ; probe point near first lead screw
G30 P1 X300 Y160 Z-99999 S2 ; probe point near second lead screw
should adjust the lead screws in case they have got out of line. as an example, say the left side of the table was 2mm lower than the right side, I am assuming that running those 2 would spin up just the left side so that they were the same and then set those as equal. but if all it is doing is compensating as the head moves across the bed as per bed compensation then that would result in the issues I am seeing. as as soon as I use G29 S2 and M561 compensation is removed.If that is the case, how get a macro to adjust the Z screws "permanently" so that the tilt is mechanically adjusted before running a proper mesh bed?
-
do you mean the content of the macro?
G28
G32
;G32 run a second time if you want
G28 Z
G29 -
@pcsentinel said in Independent Z motor levelling issue:
If that is the case, how get a macro to adjust the Z screws "permanently" so that the tilt is mechanically adjusted before running a proper mesh bed?
Well how about we organize your files a bit.
The file bed.g is meant to be invoked by G32 which is use for auto bed leveling.
So how about renaming bed.g to create_height_map.g or whatever suits you.
Then rename adjust_z_screws.g to bed.g. Now a G32 will invoke the bed leveling process as intended.
Mesh compensation is intended to compensate for bed irregularities during printing.
Some folks use G29 to create the height map at the start of every print.
Others folks, like me, have a macro that I run when I want to create the height map.
In such a macro you want have at least:
G30 to set the Z=0 datum
G29 to create the height mapSince mesh compensation is meant to be used during printing you can load the height map with G29 S1 in the code you execute at the start of a print. You can then use G29 S2 to unload the height map in the code you execute at the end of a print.
I have a file called print_begin.g which has all the code that I want to execute when starting a print. I invoke that file with M98 P"print_begin.g" entered into the slicer in the place the slicer provides for that type of code.
I have another file called print_end.g which has all the code that I want to execute when finishing a print. I invoke that file with M98 P"print_end.g" entered into the slicer in the place the slicer provides for that type of code.
Among the things that I have in print_begin.g are:
G30 to set the Z=0 datum
G29 S1 to load the existing height mapAmong the things that I have in print_end.g are:
G29 S2 to unload the height map
Hope this gives you some ideas.
Frederick
-
Thanks for your pointers, very useful. Just to update, I have done a number of further experiments and research in the Duet guides. I have decided to come down to the following which seems to exclude unneeded moves
Adjust Z screw
; The adjustment is run 3 times as experiments show slight deviation until 3
G29 S2 ; clear heightmap
M561 ; cancel any bed-plane fitting
G91 ; relative moves
M98 P"homeall_main.g" ; home XYU
M98 P"homez_main.g" ; home Z
G1 H2 Z5 F1800 ; lower Z relative to current position
G30 P0 X10 Y160 Z-99999 ; probe point near first lead screw
G30 P1 X300 Y160 Z-99999 S2 ; probe point near second lead screw
G30 P0 X10 Y160 Z-99999 ; probe point near first lead screw
G30 P1 X300 Y160 Z-99999 S2 ; probe point near second lead screw
G30 P0 X10 Y160 Z-99999 ; probe point near first lead screw
G30 P1 X300 Y160 Z-99999 S2 ; probe point near second lead screw
G90 ; absolute moves
M291 P"Heightmap must be regenerated"This is just used as a macro and not compensation as the adjustment works as required.
I understand you only enable heightmap during your prints, but I note from https://duet3d.dozuki.com/Wiki/Using_mesh_bed_compensation:
"If you home Z using G30 commands in homez.g and homeall.g, you can use G29 S1 in those files, after the G30 command."
So I will for the moment maintain the adjustment at all times as I have always done previously. But once I am out of the testing phase for this printer I may swap over to your methodology.
I have bed.g as
G29 S2 ; clear heightmap
M561 ; cancel any bed-plane fitting
G91 ; relative moves
G1 H2 Z5 F1800 ; lower Z relative to current position
M98 P"homeall_main.g" ; home XYU
M98 P"homez_main.g" ; home Z
G90 ; absolute moves
M557 X10:300 Y37.5:282.5 P10 ; set matrix
G29 ; Probe the bed and create heightmap
G1 X-700 Y700 F10000 ; Move head to home positionThis means I can call it from the the button on the web interface.
Thanks again.
-
@pcsentinel said in Independent Z motor levelling issue:
Hi,
First let me say as long as it works and you are happy with it that is all that really matters.
This means I can call it from the the button on the web interface.
Is below what you are talking about? If so notice that the item that mentions G32 (which invokes bed.g) is labeled True Bed Leveling.
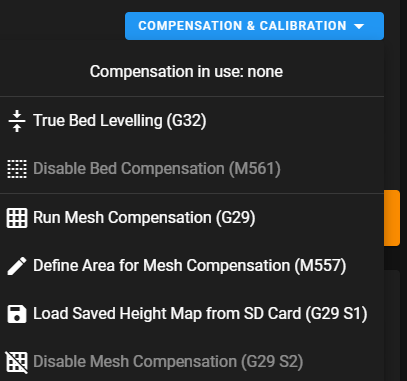
So you have co-opted that menu item for doing Mesh Bed Compensation - which is fine as long as you remember that you've done it.
The file that I have which creates the height map is invoked using a DWC Macro which gives me easy access while having the correct action as the macro button label.
Glad you got things working.
Frederick
-
@pcsentinel said in Independent Z motor levelling issue:
I understand you only enable heightmap during your prints, but I note from https://duet3d.dozuki.com/Wiki/Using_mesh_bed_compensation:
"If you home Z using G30 commands in homez.g and homeall.g, you can use G29 S1 in those files, after the G30 command."I do this as well because I have a slight warp in one of the corners of the bed, so if mesh isn't active, there is a chance I could run the nozzle into the raised area if I'm moving the head around very close to the bed surface.