Duet3D Logo Duet3D
    • Tags
    • Documentation
    • Order
    • Register
    • Login

    HELP! Duet 2 WiFi Configuration and DWC Upload???

    Scheduled Pinned Locked Moved
    Duet Web Control
    5
    203
    13.3k
    Loading More Posts
    • Oldest to Newest
    • Newest to Oldest
    • Most Votes
    Reply
    • Reply as topic
    Log in to reply
    This topic has been deleted. Only users with topic management privileges can see it.
    • PCNoobNeedsMajorHelpundefined
      PCNoobNeedsMajorHelp @Phaedrux
      last edited by

      @phaedrux

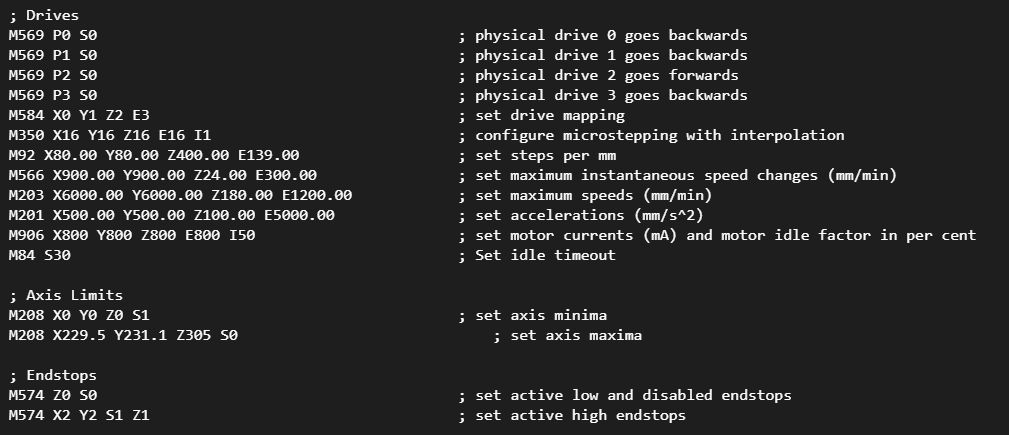
      Do I just change my M574 X2 Y2 to -X2 -Y2? or would that not work at all?

      Or I can just start the whole setting up endstop process over again from scratch

      1 Reply Last reply Reply Quote 0
      • PCNoobNeedsMajorHelpundefined
        PCNoobNeedsMajorHelp @Phaedrux
        last edited by

        @phaedrux

        Or is it my drivers that I need to swap

        or is it this.png

        1 Reply Last reply Reply Quote 0
        • Phaedruxundefined
          Phaedrux Moderator @PCNoobNeedsMajorHelp
          last edited by

          @pcnoobneedsmajorhelp said in HELP! Duet 2 WiFi Configuration and DWC Upload???:

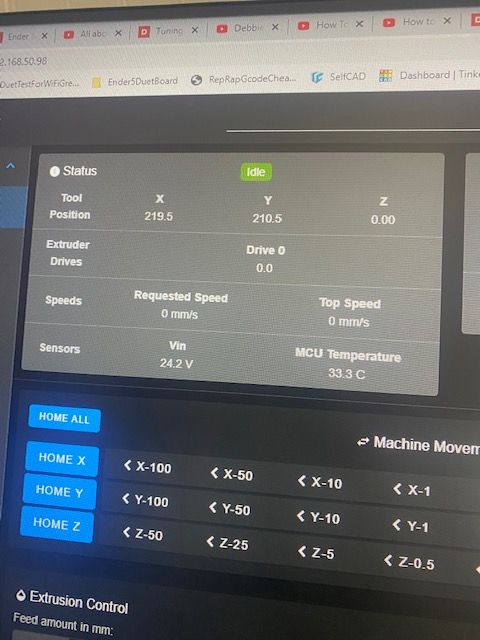
          1: After its done with a print it crashes into the front/left (that's the biggest reason)

          Well the behaviour after the print is over should be controlled by the slicer end gcode. Please post a sliced gcode file so we can see what it's actually being commanded to do.

          Have you updated the cura with the bed size we measured before and put in M208?

          @pcnoobneedsmajorhelp said in HELP! Duet 2 WiFi Configuration and DWC Upload???:

          My home endstops are right there in the back/right corner

          Endstop location can be at the high end or the low end. It doesn't really matter.

          @pcnoobneedsmajorhelp said in HELP! Duet 2 WiFi Configuration and DWC Upload???:

          It's just a lot of wasted time and makes more sense to have it start the print at the corner that it's home at.

          Prints are typically placed in the center, so the distance from one corner or the other should be the same. Do you mean it has to do a prime line first that's positioned at the opposite side? We can change the location of the prime line in the slicer start gcode.

          But if you're really desperate to change it.

          M574 X1 Y1 Z1 S1 ; change endstop from high end to low end

          Change the homing move directions

          ; homeall.g
          ; called to home all axes
          ;
          ; generated by RepRapFirmware Configuration Tool v3.2.3 on Sat May 01 2021 17:31:12 GMT-0700 (Pacific Daylight Time)
          G91                     ; relative positioning
          G1 H2 Z5 F6000          ; lift Z relative to current position
          G1 H1 X-240 Y-240 F3000 ; move quickly to X and Y axis endstops and stop there (first pass)
          G1 H2 X5 Y5 F6000       ; go back a few mm
          G1 H1 X-240 Y-240 F240  ; move slowly to X and Y axis endstops once more (second pass)
          G1 H1 Z-315 F240        ; move Z down stopping at the endstop
          G90                     ; absolute positioning
          
          ; homex.g
          ; called to home the X axis
          ;
          ; generated by RepRapFirmware Configuration Tool v3.2.3 on Sat May 01 2021 17:31:12 GMT-0700 (Pacific Daylight Time)
          G91               ; relative positioning
          G1 H2 Z5 F6000    ; lift Z relative to current position
          G1 H1 X-240 F3000 ; move quickly to X axis endstop and stop there (first pass)
          G1 H2 X5 F6000    ; go back a few mm
          G1 H1 X-240 F240  ; move slowly to X axis endstop once more (second pass)
          G1 H2 Z-5 F6000   ; lower Z again
          G90               ; absolute positioning
          
          ; homey.g
          ; called to home the Y axis
          ;
          ; generated by RepRapFirmware Configuration Tool v3.2.3 on Sat May 01 2021 17:31:12 GMT-0700 (Pacific Daylight Time)
          G91               ; relative positioning
          G1 H2 Z5 F6000    ; lift Z relative to current position
          G1 H1 Y-240 F3000 ; move quickly to Y axis endstop and stop there (first pass)
          G1 H2 Y5 F6000    ; go back a few mm
          G1 H1 Y-240 F240  ; move slowly to Y axis endstop once more (second pass)
          G1 H2 Z-5 F6000   ; lower Z again
          G90  
          

          If you notice that after changing the directions that the axis is moving AWAY from the endstop instead of towards it, then change the rotation direction for the motor.
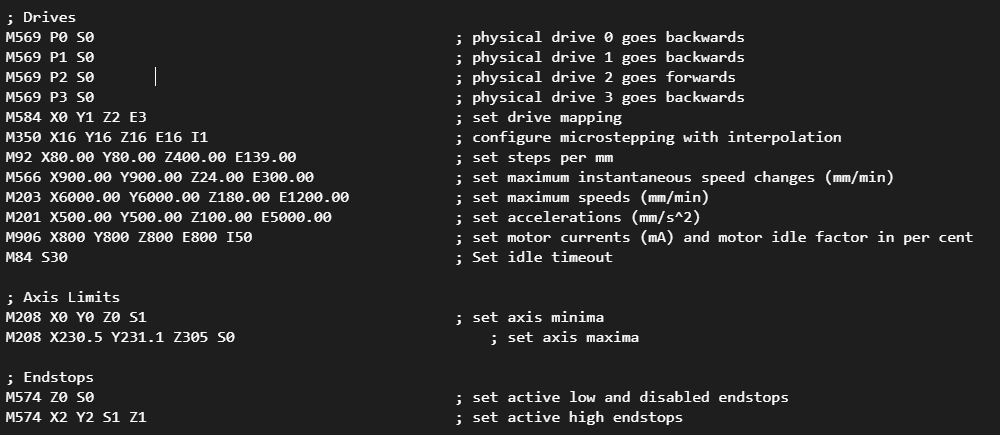
          M569 P0 S1
          M569 P1 S1

          Z-Bot CoreXY Build | Thingiverse Profile

          PCNoobNeedsMajorHelpundefined 1 Reply Last reply Reply Quote 0
          • PCNoobNeedsMajorHelpundefined
            PCNoobNeedsMajorHelp @Phaedrux
            last edited by

            @phaedrux

            Ok. So.

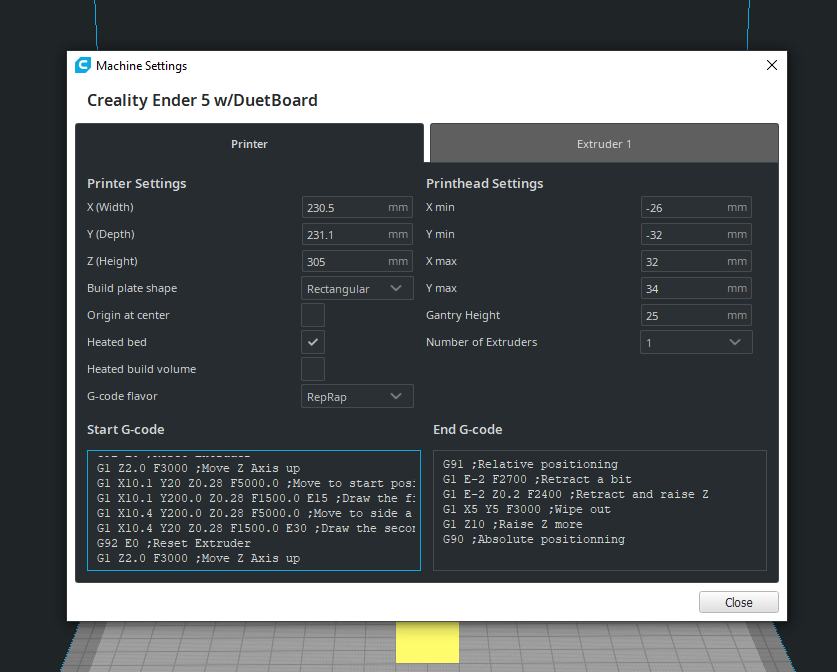
            -Yes, the axis limits are set up in Cura (Ok, cool, we'll change the end gcode)
            -Prints are typically placed in the center, so the distance from one corner or the other should be the same. Do you mean it has to do a prime line first that's positioned at the opposite side? We can change the location of the prime line in the slicer start gcode.

            1. Yes it's starting the prime line at the opposite side and then at the end, homes to the opposite side
            2. So if that's the problem then yeah, I guess it would be in Cura. What lines would I have to change?
            3. I think it homes fine but if the Cura changes don't fix it, I'll change those homing move directions and endstops in the firmware.

            Slicer Gcode from print start and end.png

            Thanks,

            -Carson

            1 Reply Last reply Reply Quote 0
            • Phaedruxundefined
              Phaedrux Moderator
              last edited by

              For the prime line, where do you want it to start and end? Physically jog the nozzle to where you want it to start and end, and make note to the XY coordinates, then we can place those in the prime line.

              For the end gcode, I don't see anything that would be moving it a large amount at the end of the print. It looks like it should be doing a retraction and then a small 5mm diagonal move to wipe the nozzle and then raise it. Can you maybe make a video showing what it's doing at the end of the print?

              Z-Bot CoreXY Build | Thingiverse Profile

              PCNoobNeedsMajorHelpundefined 2 Replies Last reply Reply Quote 0
              • PCNoobNeedsMajorHelpundefined
                PCNoobNeedsMajorHelp @Phaedrux
                last edited by

                @phaedrux
                Videos for start and end of prints as they are currently
                https://www.dropbox.com/sh/urqhwgr6phs2uty/AAC8QKXjih9UCh5PN5P1vy8ia?dl=0
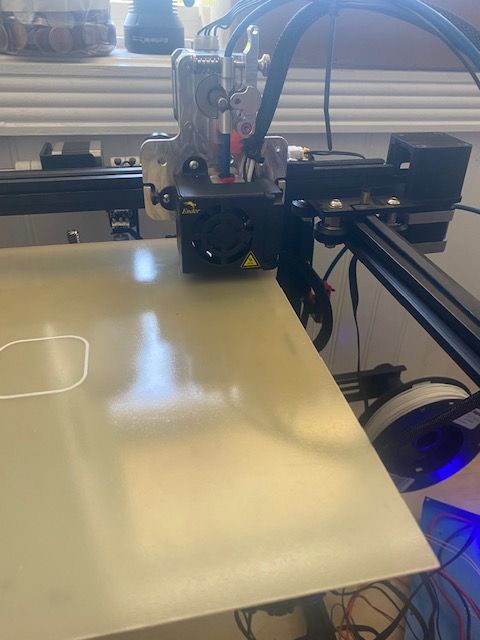
                Picture of new coordinates for the start of the prime line
                Prime line location to be set.jpg
                Picture of printer head position for new coordinates to be entered^
                Pic. of new prime line location.jpg

                1 Reply Last reply Reply Quote 0
                • PCNoobNeedsMajorHelpundefined
                  PCNoobNeedsMajorHelp @Phaedrux
                  last edited by

                  @phaedrux

                  Here's what I plugged in (what I think it might be).

                  -I won't run anything until I get the okay from you. Just wanted to try and be proactive.
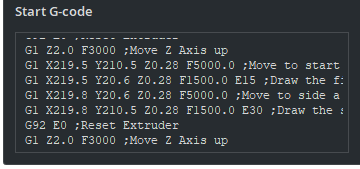
                  New Start G-code
                  NEWSTARTGCODE.png
                  New End G-code 1 of 2
                  NEWENDGCODE1.png
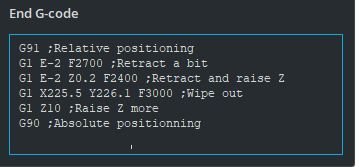
                  New End G-code 2 of 2
                  NEWENDGCODE2.png

                  1 Reply Last reply Reply Quote 0
                  • Phaedruxundefined
                    Phaedrux Moderator
                    last edited by

                    The prime line location looks good.

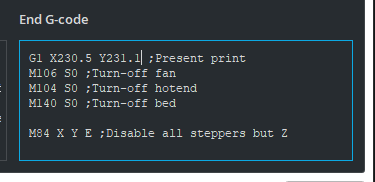
                    The end gcode has a problem though. You've changed the small wipe move of 5mm to a massive 230mm move. That's not what you want to happen.

                    The "present print" bit could be removed entirely. Is that below the first part? I hadn't see that before. That might have been what was causing the crashing. That move would make more sense for a cartesian i3 style printer with a bed that moves back and forth. The idea being that it will slide the bed forwards for you to get at the print. In this case you really just want the print head to move out of the way. The safest way to do that would be to replace G1 230 Y230 ; present print with G28 X Y which will just home the X and Y axis to get the print head out of the way.

                    Z-Bot CoreXY Build | Thingiverse Profile

                    PCNoobNeedsMajorHelpundefined 1 Reply Last reply Reply Quote 0
                    • PCNoobNeedsMajorHelpundefined
                      PCNoobNeedsMajorHelp @Phaedrux
                      last edited by

                      @phaedrux

                      Yes, the second End G-code picture is below it when you scroll down

                      Ok. I've fixed a few things. Let's see how this is.

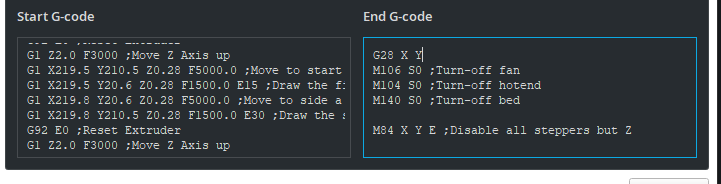
                      Start and End (Top Half)
                      StartandEndGcode1 of 2.png

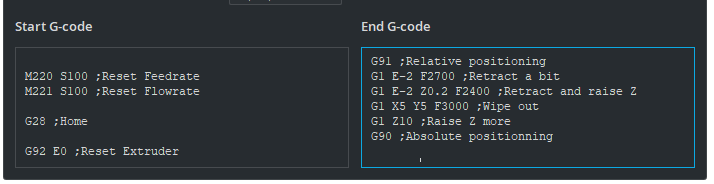
                      Start and End (Bottom Half)
                      StartandEndGcode 2 of 2.png

                      If all this looks good, I'll run another test print

                      Thanks,

                      -Carson

                      1 Reply Last reply Reply Quote 0
                      • Phaedruxundefined
                        Phaedrux Moderator
                        last edited by

                        Yes that looks better.

                        Z-Bot CoreXY Build | Thingiverse Profile

                        PCNoobNeedsMajorHelpundefined 2 Replies Last reply Reply Quote 0
                        • PCNoobNeedsMajorHelpundefined
                          PCNoobNeedsMajorHelp @Phaedrux
                          last edited by

                          @phaedrux

                          Everything looks good. After I get home from work tomorrow, I'll do a few different tests, other than the cube and just check everything out to be sure.

                          Thanks again for all your help! I couldn't have done it without you!

                          -A very Grateful Printer, Carson

                          1 Reply Last reply Reply Quote 1
                          • PCNoobNeedsMajorHelpundefined
                            PCNoobNeedsMajorHelp
                            last edited by

                            @phaedrux

                            So I'm back.

                            3 questions.

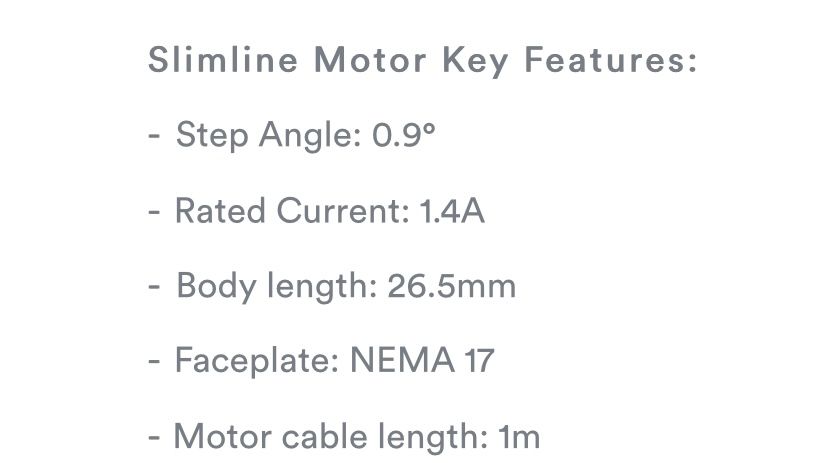
                            1. I swapped my extruder stepper motor with a .9° pancake. What settings do I need to change in my config file?
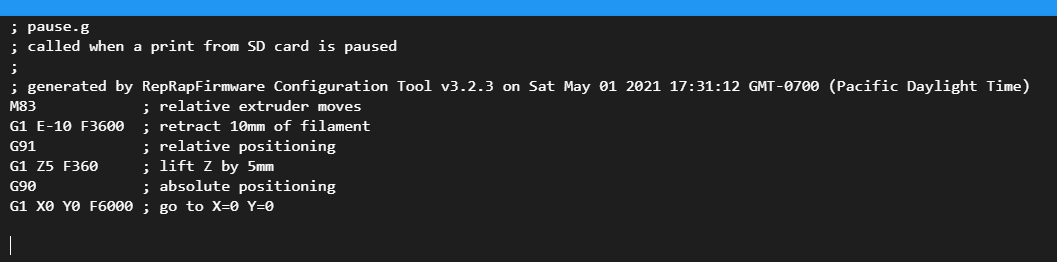
                            2. When I pause a print it crashes into the front left corner. What do I need to change? the G90 command?
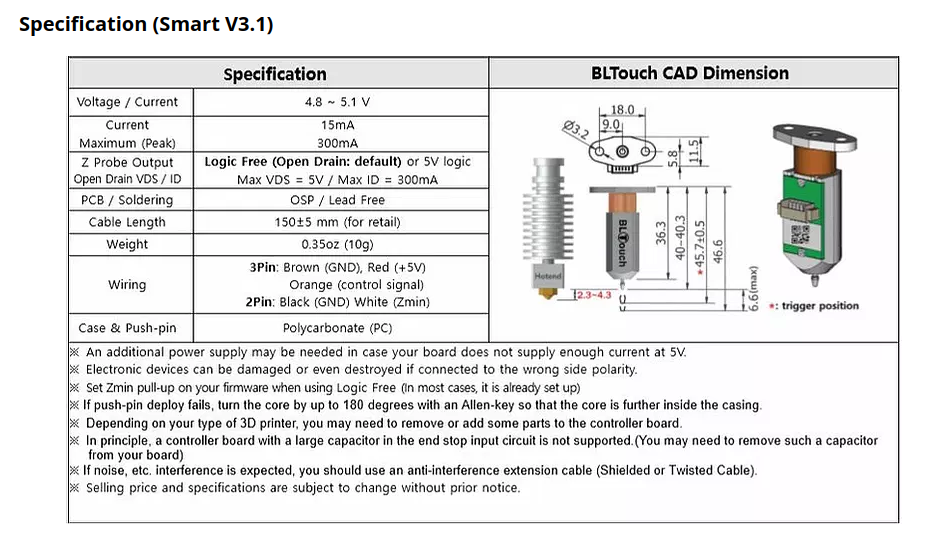
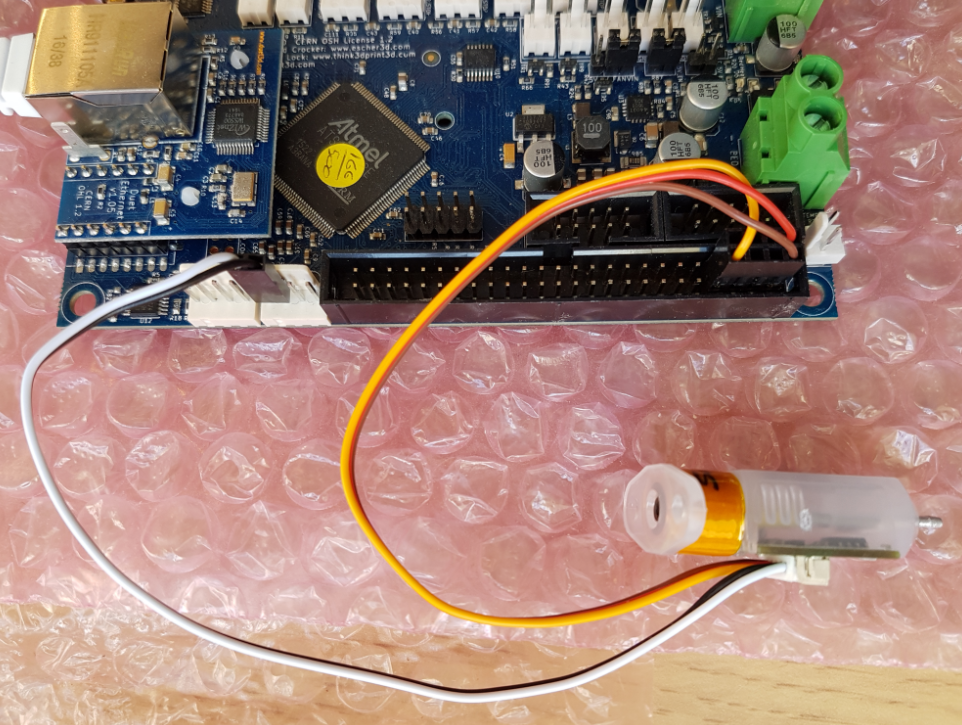
                            3. I am ready to set up the BL Touch. How do I set it up in the config file? It's physically installed on the fan shroud, but I don't know what or if I need to set the offset. I also don't know where to plug it in on the duet. I have the Black and White wired to the Z Endstop. Where do I plug the yellow red and blue connector into?

                            ERROR
                            Something went wrong while parsing server response

                            ^ I keep getting this when I try and upload screenshots of my files. Until I get it fixed let me know what you need and I can relay the info.

                            Thanks,

                            -Carson

                            1 Reply Last reply Reply Quote 0
                            • PCNoobNeedsMajorHelpundefined
                              PCNoobNeedsMajorHelp @Phaedrux
                              last edited by

                              @phaedrux
                              Fixed it. Here are screenshots of my files as they are currently set
                              Config File for stepper.png
                              Pause Crashing.png
                              Config File for BLTouch.png

                              1 Reply Last reply Reply Quote 0
                              • Phaedruxundefined
                                Phaedrux Moderator
                                last edited by

                                For the extruder changing to 0.9 degree from 1.8 degree means that you would double your steps per mm. If you were already using a 0.9 motor you wouldn't change anything.

                                For your pause.g if it's hitting the edge you can slightly adjust the G1 X0 Y0 to be G1 X10 Y10 to give it some space. But if it can't safely reach x0 y0 then your M208 maxima might be a bit off.

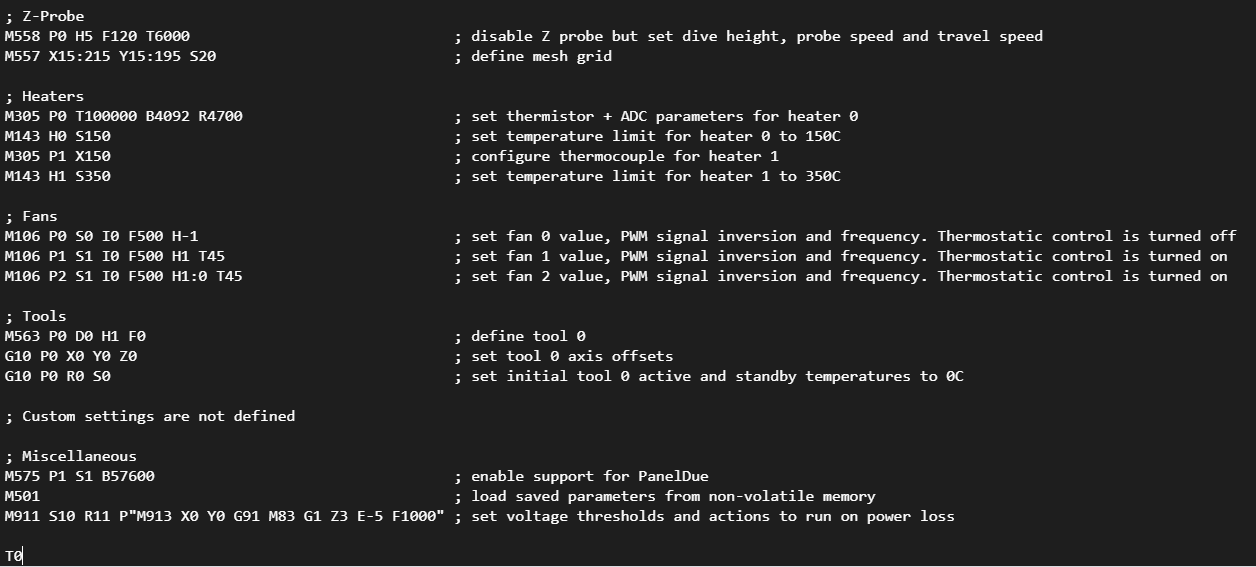
                                For the BLTouch you need this in config.g

                                ; Z-Probe
                                M307 H3 A-1 C-1 D-1                     ; disable heater on PWM channel for BLTouch
                                M558 P9 H5 F120 T6000                   ; set Z probe type to bltouch and the dive height + speeds
                                G31 P500 X0 Y0 Z2.5                     ; set Z probe trigger value, offset and trigger height
                                M557 X15:215 Y15:195 S20                ; define mesh grid
                                

                                You'll need to check config-override.g to any M307 H3 lines and delete them if they exist.

                                And you'll need to create two macro files in the /sys folder for deploy and retract commands to control the pin.

                                ; deployprobe.g
                                ; called to deploy a physical Z probe
                                ;
                                ; generated by RepRapFirmware Configuration Tool v3.2.3 on Sat May 22 2021 10:19:48 GMT-0600 (Central Standard Time)
                                M280 P3 S10 I1 ; deploy BLTouch
                                
                                ; retractprobe.g
                                ; called to retract a physical Z probe
                                ;
                                ; generated by RepRapFirmware Configuration Tool v3.2.3 on Sat May 22 2021 10:20:08 GMT-0600 (Central Standard Time)
                                M280 P3 S90 I1 ; retract BLTouch
                                

                                For wiring it up you should follow this:
                                837e8f8e-eb8f-46d5-83f9-67682b3a4795-image.png

                                https://duet3d.dozuki.com/Wiki/Connecting_a_Z_probe#Section_Duet_2_WiFi_Ethernet_without_a_Duex_2_or_Duex_5_expansion_board

                                Z-Bot CoreXY Build | Thingiverse Profile

                                PCNoobNeedsMajorHelpundefined 1 Reply Last reply Reply Quote 0
                                • PCNoobNeedsMajorHelpundefined
                                  PCNoobNeedsMajorHelp @Phaedrux
                                  last edited by

                                  @phaedrux

                                  When I was checking the new e-steps I noticed it was skipping so I tried to loosen/tighten the tension, and then I took out the filament and the same thing happened. Does this mean this particular motor doesn't have enough torque to support the extruder?

                                  https://www.dropbox.com/s/dw34eyf572cj4vj/Skipping Motor.MOV?dl=0

                                  1 Reply Last reply Reply Quote 0
                                  • Phaedruxundefined
                                    Phaedrux Moderator
                                    last edited by

                                    Do you have to have the specs of the motor? It may need more current than the previous motor. The rule of thumb is to use ~60-80% of the rated motor current.

                                    So if the motor is rated as 1amp (aka 1000ma) then you would use 600 to 800 ma in the M906 command to set the current.

                                    Z-Bot CoreXY Build | Thingiverse Profile

                                    PCNoobNeedsMajorHelpundefined 3 Replies Last reply Reply Quote 0
                                    • PCNoobNeedsMajorHelpundefined
                                      PCNoobNeedsMajorHelp @Phaedrux
                                      last edited by

                                      @phaedrux

                                      Motor Specs.jpg

                                      1 Reply Last reply Reply Quote 0
                                      • PCNoobNeedsMajorHelpundefined
                                        PCNoobNeedsMajorHelp @Phaedrux
                                        last edited by

                                        @phaedrux

                                        Oh also should the tip of the BLTouch probe be at the same height as the tip of my nozzle in relation to the bed?

                                        PaulHewundefined 1 Reply Last reply Reply Quote 0
                                        • PaulHewundefined
                                          PaulHew @PCNoobNeedsMajorHelp
                                          last edited by

                                          @pcnoobneedsmajorhelp No, or you risk crashing the BLT
                                          IIRC the bottom of the main body of the BLT, not the probe should be 4-5mm higher than the nozzle

                                          RailCore II - Duet Mini + 1LC, Voron V0.1 - Duet Mini
                                          Voron 2.4 disassembled..... Waiting for the RailCore Mini....

                                          PaulHewundefined 1 Reply Last reply Reply Quote 0
                                          • PaulHewundefined
                                            PaulHew @PaulHew
                                            last edited by

                                            @paulhew 1b603458-a7a5-420e-a24d-7baed0ae0602-image.png

                                            RailCore II - Duet Mini + 1LC, Voron V0.1 - Duet Mini
                                            Voron 2.4 disassembled..... Waiting for the RailCore Mini....

                                            PaulHewundefined 1 Reply Last reply Reply Quote 0
                                            • First post
                                              Last post
                                            Unless otherwise noted, all forum content is licensed under CC-BY-SA