Been fighting with print adhesion and mesh bed compensation.
-
My printer prints really good, but I can’t get a print to stay on to save my life.
Many of you that have been around a while will remember the Vulcanus 40 COREXY, 440mm x 440mm x 400mm, this is what I built in the beginning. I got frustrated, pushed it to the side and left it for 3 years. Then when the Hemera came out a couple years ago I decided I was going to completely revamp it. I changed the electronics to a Duet 2 Wi-Fi, E3d Hemera, and BlTouch. I replaced all of the linear rods, with linear rails, and no I am not having any issues with the 4 vertical linear rails. If I take the 2 Z motor threaded rods out I can slide it up and down with no resistance. I put a WhamBam flex plate on my 8mm cast aluminum bed.
What I have noticed recently is that when it lays down the second layer I can hear it dragging across that first layer in certain places which leads me to think that it is not loading my Mesh compensation correctly. Also I have never enclosed it, but intend to do so soon.
I use Duet Web Control, Reprapfirmware, and PrusaSlicer
I have other printers, but I really want to get this large format printer that I have sunk a crap load of money into with 3 different sets of electronics, and 3 different extruders to work. Thanks for any assistance.
Prussa slicer Startup Gcode
M104 S[first_layer_temperature] ; set extruder temp
M140 S[first_layer_bed_temperature] ; set bed temp
M190 S[first_layer_bed_temperature] ; wait for bed temp
M109 S[first_layer_temperature] ; wait for extruder temp
G28 XY ;Home XY
M561 ; Clear any bed transform that might be in place
G1 X203 Y208 ; Move Probe to middle of bed
G30 ; Do a single probe
M375 P"WhamBam.csv" ; Load my custom heightmap. Otherwise use G29 S1
G1 Z20.0 F6000 ; Move Z to 10
G1 X5 Y5 ; Move head to front left
G92 E0.0 ; reset extruder position
G1 Z0.2
G1 X60.0 E9.0 F1000.0 ; intro line
G1 X100.0 E12.5 F1000.0 ; intro line
G92 E0.0 ; reset extruder positionConfig.g
; Configuration file for Duet WiFi (firmware version 3)
; executed by the firmware on start-up
;
; generated by RepRapFirmware Configuration Tool v3.1.3 on Sun Jun 14 2020 23:31:14 GMT-0500 (Central Daylight Time); General preferences
G90 ; send absolute coordinates...
M83 ; ...but relative extruder moves
M550 P"The Plastic Beast" ; set printer name
M669 K1 ; select CoreXY mode; Network
M552 S1 ; enable network
M586 P0 S1 ; enable HTTP
M586 P1 S0 ; disable FTP
M586 P2 S0 ; disable Telnet; Drives
M569 P0 S0 ; physical drive 0 goes forwards
M569 P1 S0 ; physical drive 1 goes forwards
M569 P2 S0 ; physical drive 2 goes backwards
M569 P3 S1 ; physical drive 3 goes forwards
M584 X0 Y1 Z2 E3 ; set drive mapping
M350 X16 Y16 Z16 E16 I1 ; configure microstepping with interpolation
M92 X80.00 Y80.00 Z810.00 E420.00 ; set steps per mm
M566 X1000.00 Y1000.00 Z100.00 E120.00 ; set maximum instantaneous speed changes (mm/min)
M203 X24000.00 Y24000.00 Z300.00 E1200.00 ; set maximum speeds (mm/min)
M201 X3000.00 Y3000.00 Z100.00 E250.00 ; set accelerations (mm/s^2)
M906 X1400 Y1400 Z1400 E950 I30 ; set motor currents (mA) and motor idle factor in per cent
M84 S30 ; Set idle timeout; Axis Limits
M208 X0 Y0 Z0 S1 ; set axis minima
M208 X399 Y410 Z400 S0 ; set axis maxima; Endstops
M574 X1 S1 P"xstop" ; configure active-high endstop for low end on X via pin xstop
M574 Y1 S1 P"ystop" ; configure active-high endstop for low end on Y via pin ystop
M574 Z1 S2 ; configure Z-probe endstop for low end on Z; Z-Probe
M950 S0 C"exp.heater3" ; create servo pin 0 for BLTouch
M558 P9 C"^zprobe.in" H5 F100 T4000 ; set Z probe type to bltouch and the dive height + speeds
G31 P500 X-26 Y1.7 Z0.96 ; set Z probe trigger value, offset and trigger height
M557 X5:365 Y30:390 S20 ; define mesh grid; Heaters
M308 S0 P"bedtemp" Y"thermistor" T100000 B3950 ; configure sensor 0 as thermistor on pin bedtemp
M950 H0 C"bedheat" T0 ; create bed heater output on bedheat and map it to sensor 0
M307 H0 B1 S1.00 ; enable bang-bang mode for the bed heater and set PWM limit
M140 H0 ; map heated bed to heater 0
M143 H0 S120 ; set temperature limit for heater 0 to 120C
M308 S1 P"e0temp" Y"thermistor" T100000 B4725 C7.06e-8 ; configure sensor 1 as thermistor on pin e0temp
M950 H1 C"e0heat" T1 ; create nozzle heater output on e0heat and map it to sensor 1
M307 H1 B0 S1.00 ; disable bang-bang mode for heater and set PWM limit
M143 H1 S285 ; set temperature limit for heater 1 to 285C; Fans
M950 F0 C"fan0" Q500 ; create fan 0 on pin fan0 and set its frequency
M106 P0 S0 H1 T45 ; set fan 0 value. Thermostatic control is turned on
M950 F1 C"fan1" Q500 ; create fan 1 on pin fan1 and set its frequency
M106 P1 S1 H1 T45 ; set fan 1 value. Thermostatic control is turned on; Tools
M563 P0 D0 H1 F0 ; define tool 0
G10 P0 X0 Y0 Z0 ; set tool 0 axis offsets
G10 P0 R0 S0 ; set initial tool 0 active and standby temperatures to 0C; Custom settings are not defined
; Miscellaneous
M575 P1 S1 B57600 ; enable support for PanelDue
M911 S10 R11 P"M913 X0 Y0 G91 M83 G1 Z3 E-5 F1000" ; set voltage thresholds and actions to run on power loss
M912 P0 S1 ; set cpu temp offset
M501; config-override.g file generated in response to M500 at 2023-02-09 21:29
; This is a system-generated file - do not edit
; Heater model parameters
M307 H0 R0.223 K0.166:0.000 D3.49 E1.35 S1.00 B0
M307 H1 R1.942 K0.534:0.000 D5.82 E1.00 S1.00 B0 V12.1
; Workplace coordinates
G10 L2 P1 X0.00 Y0.00 Z0.00
G10 L2 P2 X0.00 Y0.00 Z0.00
G10 L2 P3 X0.00 Y0.00 Z0.00
G10 L2 P4 X0.00 Y0.00 Z0.00
G10 L2 P5 X0.00 Y0.00 Z0.00
G10 L2 P6 X0.00 Y0.00 Z0.00
G10 L2 P7 X0.00 Y0.00 Z0.00
G10 L2 P8 X0.00 Y0.00 Z0.00
G10 L2 P9 X0.00 Y0.00 Z0.00; homeall.g
; called to home all axes
;
; generated by RepRapFirmware Configuration Tool v3.1.3 on Sun Jun 14 2020 23:31:14 GMT-0500 (Central Daylight Time)
G91 ; relative positioning
G1 H2 Z5 F6000 ; lift Z relative to current position
G1 H1 X-405 Y-405 F1800 ; move quickly to X or Y endstop and stop there (first pass)
G1 H1 X-405 ; home X axis
G1 H1 Y-405 ; home Y axis
G1 X5 Y5 F6000 ; go back a few mm
G1 H1 X-405 F360 ; move slowly to X axis endstop once more (second pass)
G1 H1 Y-405 ; then move slowly to Y axis endstop
G90 ; absolute positioning
G1 X31 Y5 F6000 ; go to first bed probe point and home Z
G30 ; home Z by probing the bed; Uncomment the following lines to lift Z after probing
;G91 ; relative positioning
;G1 Z5 F100 ; lift Z relative to current position
;G90 ; absolute positioning; homez.g
; called to home the Z axis
;
; generated by RepRapFirmware Configuration Tool v3.1.3 on Sun Jun 14 2020 23:31:14 GMT-0500 (Central Daylight Time)
G91 ; relative positioning
G1 H2 Z5 F6000 ; lift Z relative to current position
G90 ; absolute positioning
G1 X41 Y15 F6000 ; go to first probe point
G30 ; home Z by probing the bed; Uncomment the following lines to lift Z after probing
;G91 ; relative positioning
;G1 Z5 F100 ; lift Z relative to current position
;G90 ; absolute positioning -
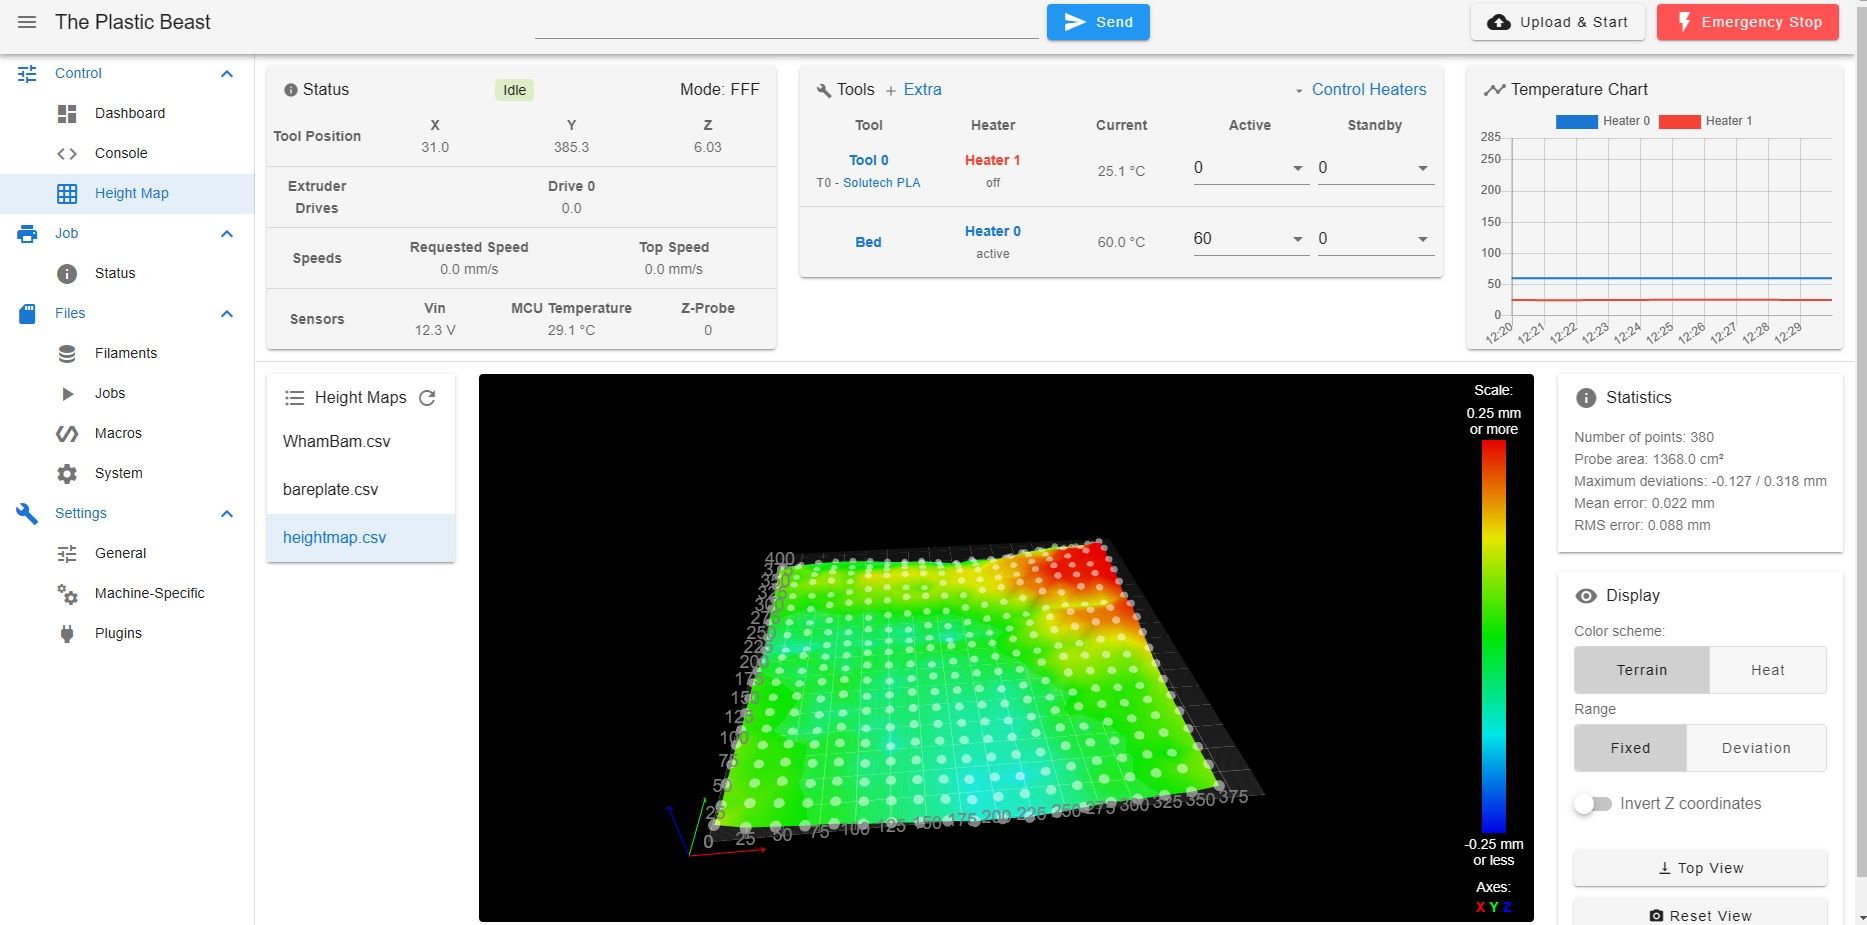
@cdsmith12 can you show us what the heightmap looks like using the heighmap plugin in DWC?
also you can confirm its being loaded in the DWC Dashboard but looking at the "compensation in use:" field under "Compensation and Calibration"
-
Under the "Compensation in use" it says "none", so I guess I need to figure out where my code is wrong. I'm also going to adjust the one corner just a hair to try to get it all green, and rerun mesh compensation.
-
@cdsmith12 I think the reason you see "None" for "Compensation in use" in DWC is because the only place you have the height map loaded is in your print start code
M375 P"WhamBam.csv" ; Load my custom heightmap. Otherwise use G29 S1it should load once you start a print.
Also, if youre interested in expediting your probing by only probing print areas, I would suggest you take a look at this thread:
https://forum.duet3d.com/topic/30796/only-probe-where-the-part-will-be-printed?_=1676405937900
-
@wwak84 So I figured out that it was loading, but not in time to edit before you posted. Here is the top and bottom of a print I started. I think I got my z offset better, but something is causing this ripple effect and the higher it gets the more it drags, then ultimately knocks the print off. These were today with the height map posted above.

 This is the print before I made this post and it is 390mm long, if you look closely it knocked it loose at about 3mm thick and then continued to print, but it has this weird wavy look, but the side view of the layers looks pretty good.

-
@cdsmith12 Sorry for the jumbled words, the preview didn't look like that.
-
@cdsmith12 I think the nozzle may be a bit too close still.
Its hard to troubleshoot without knowing what else you've tried and other details, but I will make a few other guesses that hopefully are helpful. These are some of the issues that I ran into with rough first layers
Calibrate extruder steps. If you've been using your printer fine and this is a recently developed issue then calibration doesn't seem like a probable cause but never hurts to double check.
Is your nozzle well used? It may have worn to a larger diameter and now adjacent lines overlap too much.
Does different filament cause the same issue? I had similar problems with some random amazon brand PLA and it turned out the filament had inconsistent diameter.
Old filament that has absorbed moisture? The excess moisture could be contributing to roughness
Hopefully I havent stated the obvious here