Synchronised Bed & Hotend, Homing not required after print.
-
2 situations for time saving
1: I would like to know how to set up the duet so i can time the heated bed and hot end so they are both ready at the same time.
2: I would like to know how to bypass all homing for printing after i have homed at least once without the motors turning off (Kept on reduced power to hold position)
Kind Regards
Scott -
- Pre heating commands are typically part of start gcode inserted into the job file by the slicer. If you use different filaments and/or bed surfaces you probably have a bunch of combinations of bed and hotend temperatures so to do this accurately you would need to know the time it takes to heat to those temperatures. In addition this is also complicated by sometimes you are heating from cold, and sometimes after the machines has not cooled down completely from the previous job. If you had a set of times then it would be possible to have a macro that started (say) the bed heater and then waited a set amount of time before starting the hotend heater. then waited for them both to reach temperature (using M116) before ending and returning control to the job file. An alternative that may get you most of the way there but is much simpler to implement is to use M116 to wait until the bed heater is within a set amount of the target (say 20C):
M140 S120 ; set the bed to 120C but don't wait.
M116 H0 S20 ; wait for heater 0 (assumed bed) to get within 20C of the target
M568 P0 S250 ; set tool 0 to 250C active (you may also need to select the tool if you have not already)
M116 ; wait for all temperatures to be within the default range of their setpoints (default 2C)
Tweak the first M116 so the point where it stops waiting and starts heating the hotend is roughly right for the range of temperatures you use on you system.
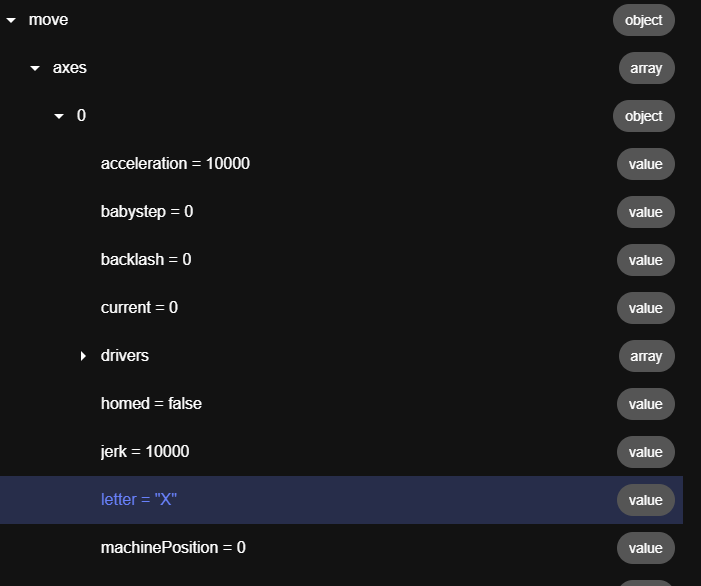
- You can check if an axis is homed using the object model key:
move.axes[n].homedwherenis the axis number, X=0, Y=1, Z=2 typically.
So a if statement like this should work:
if !(move.axes[0].homed) | !(move.axes[1].homed) | !(move.axes[2].homed)
    G28
That will run G28 to home the machine only if one of the axes is unhomed.
You can get fancier and extend the logic to only home an axis if its unhomed if you need to.You will need to be sure that your idle hold current is sufficient to prevent unintended motion when doing things like removing prints from the bed.
-
@T3P3Tony Sweet Cheers for that.
With the object model key, how can i confirm the axis number, For instance i use a Voron where i have 4x Z axis motors, and in my config file i have:M584 X0.5 Y0.4 Z0.0 E121.0 ; set drive mapping
Also where can i find info & references on other object model keys & Conditional g code?
-
Gcode meta commands are documented here:
https://docs.duet3d.com/en/User_manual/Reference/Gcode_meta_commandsThe object model gets added to each release so the documentation is autogenerated and its here:
https://github.com/Duet3D/RepRapFirmware/wiki/Object-Model-DocumentationTo see what elements are actually present on your machine the easiest way is to use the object model browser plugin which will also show live updates.
@Perspective said in Synchronised Bed & Hotend, Homing not required after print.:
With the object model key, how can I confirm the axis number
it can be seen in the OM browser:
also check programmatically if you need to using the key:
move.axes[n].letter@Perspective said in Synchronised Bed & Hotend, Homing not required after print.:
For instance i use a Voron where i have 4x Z axis motors, and in my config file i have:
M584 X0.5 Y0.4 Z0.0 E121.0 ; set drive mapping
You have only assigned one driver to Z (0.0) If you were using 4 motors on driver 0,1,2,3 i would expect:
M584 X0.5 Y0.4 Z0.0:0.1:0.2:0.3 E121.0If you have that then you would see 4 drivers in the move.axes.drivers key:
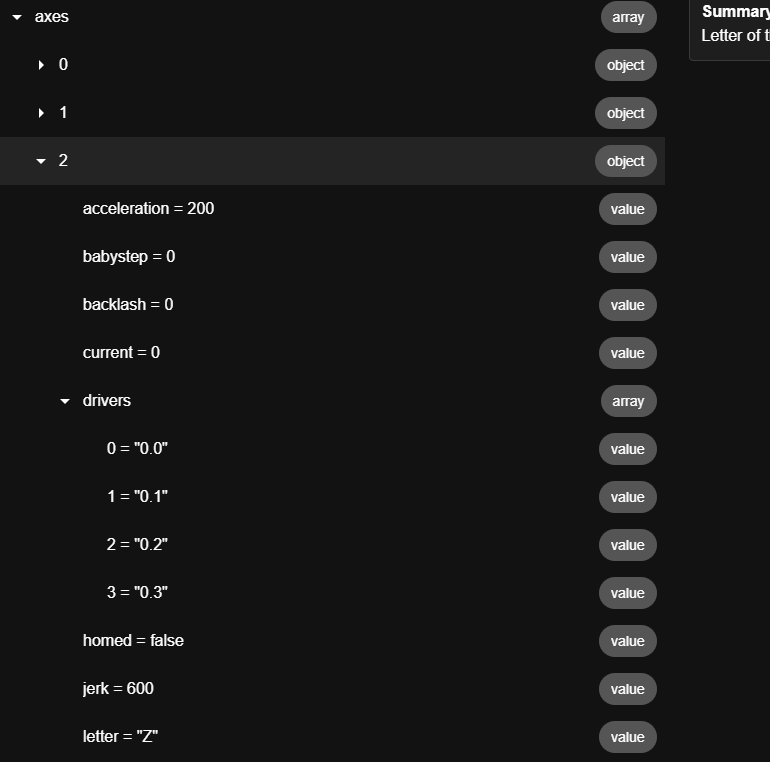
but either way which drivers are assigned to which axes are in the object model.
-
@Perspective said in Synchronised Bed & Hotend, Homing not required after print.:
1: I would like to know how to set up the duet so i can time the heated bed and hot end so they are both ready at the same time.
I feel you're over thinking it quite a bit.
The traditional and simplest way is to simply turn both heaters on in the start gcode and then put M116 in there so it waits until both are up to the set temp before printing commences.
To try to synchronise the end times while still being able to carry out other tasks wold require you to use daemon.g to monitor the current temps and other variables and you would need to know what the heating rate is for each heater.As an exercise I tried to do this in a single macro. (I'm an early riser and have only my own company for a couple f hours)
This would NOT work in a print because it would be blocking, so nothing else can happen at the same time.
I suppose you could start it homing etc in the same macro
However there are myriad complications such as one or both heaters may be turned off during probing.In the object model we can find
heat.heaters[0].model.heatingRate
Which is said to be the heating rate for the heater in Kelvins per second
I tried to use that to calculate how long to get from one temperature to another in seconds, but found it didn't give me anything like the real times I experienced. I suspect there is a lot more going on in the background when that value is used.I then decided to just do a rudimentary measurement of how many degrees per second temp increase I was getting on the heater with a macro like this
M80
M291 R"Bed" P"Enter bed target temp" S5 L{floor(heat.heaters[0].current)} H{floor(heat.heaters[0].max)} F{max(60,floor(heat.heaters[0].current))}
var bedTarget = input
M140 S{var.bedTarget}
var lastheat = heat.heaters[0].current
while (heat.heaters[0].current < var.bedTarget - 1)  && (heat.heaters[0].state = "active")
	G4 S1
	echo "Rate is  " ^ heat.heaters[0].current - var.lastheat
	set var.lastheat = heat.heaters[0].current
M140 S-275
When you run it, you will notice that the heat increase varies during the process because the PID algorithm is making sure you don't over shoot dramatically. Plus it takes more energy to get a cold block/bed to start to increase.
And again, if homing or bed mesh was going on then the heater may be turned off during probe moves.But if you settle on a value, this macro would calculate the delay needed.
It assumes the bed is heater 0 and the tool is heater 1M80 M291 R"Bed" P"Enter bed target temp" S5 L{floor(heat.heaters[0].current)} H{floor(heat.heaters[0].max)} F{max(60,floor(heat.heaters[0].current))} var bedTarget = input M291 R"Tool" P"Enter tool target temp" S5 L{floor(heat.heaters[1].current)} H{floor(heat.heaters[1].max)} F{max(200,floor(heat.heaters[1].current))}} var toolTarget = input var startTime = state.upTime var bedRate = 0.5 ; how many degrees per second heat increase you measured on average var toolRate = 1.6 ; how many degrees per second heat increase you measured on average var bedNow = heat.heaters[0].current var toolNow = heat.heaters[1].current var bedDiff = var.bedTarget - var.bedNow var toolDiff = var.toolTarget - var.toolNow var bedTime = floor(var.bedDiff / var.bedRate) var toolTime = floor(var.toolDiff / var.toolRate) echo "Time to heat bed from " ^ var.bedNow ^ " to " ^ var.bedTarget ^ " is aprox " ^ var.bedTime ^ " seconds" echo "Time to heat tool from " ^ var.toolNow ^ " to " ^ var.toolTarget ^ " is aprox " ^ var.toolTime ^ " seconds" var delayStart = var.startTime + abs(var.bedTime - var.toolTime) if var.bedTime >= var.toolTime M140 S{var.bedTarget} echo "Bed heater started" else M568 P0 S{var.toolTarget} A2 echo "Tool heater started" while state.upTime < var.delayStart echo "Start other heater in " ^ var.delayStart - state.upTime ^ " secs" G4 S1 echo "Delay time exceeded - both heaters on" M140 S{var.bedTarget} M568 P0 S{var.toolTarget} A2 while (heat.heaters[0].current < var.bedTarget-2) && (heat.heaters[1].current < var.toolTarget-2) echo "Both heaters below target" G4 S1 while (heat.heaters[0].current < var.bedTarget) || (heat.heaters[1].current < var.toolTarget) if (heat.heaters[0].current < var.bedTarget) echo "Still waiting for bed. Should finish in " ^ var.startTime + var.bedTime - state.upTime if (heat.heaters[1].current < var.toolTarget) echo "Still waiting for tool. Should finish in " ^ var.startTime + var.toolTime - state.upTime G4 S1 echo "Both heaters have reached target" M140 S-275 M568 P0 A0In a perfect world, both should reach the designated temp at the same time.
If you see negative time left you would decrease the heat rate and vise versa
But it's going to also be affected by whether you're starting from ambient temp or not.A lot of typing to replace M116

-
@T3P3Tony This is the error message i get before a print when i know the printer is already homed as the motors are still powered, this is after i have previously homed then printed:
Warning: the height map was loaded when the current Z=0 datum was not determined by probing. This may result in a height offset.
Cancelled printing file 0:/gcodes/Radius gauge 820 840.gcode, print time was 0h 1m
Error: in GCode file line 46: G1: insufficient axes homedConfig.g:
; General preferences
M575 P1 S1 B57600 ; enable support for PanelDue
G90 ; send absolute coordinates...
M83 ; ...but relative extruder moves
M550 P"Voron-2.4R2-350" ; set printer name
M669 K1 ; select CoreXY mode; Wait a moment for the CAN expansion boards to start
G4 S2; Network
M552 P0.0.0.0 S1 ; enable network and acquire dynamic address via DHCP
M586 P0 S1 ; enable HTTP
M586 P1 S0 ; disable FTP
M586 P2 S1 ; enable Telnet; Drives
M569 P0.4 S1 ; physical drive 0.4 goes forwards
M569 P0.5 S1 ; physical drive 0.5 goes forwards
M569 P0.0 S0 ; physical drive 0.0 goes forwards
M569 P0.1 S0 ; physical drive 0.0 goes forwards
M569 P0.2 S0 ; physical drive 0.0 goes forwards
M569 P0.3 S1 ; physical drive 0.0 goes forwardsM569 P121.0 S0 ; physical drive 121.0 goes forwards
M584 X0.5 Y0.4 Z0.0 E121.0 ; set drive mapping
M350 X64 Y64 Z16 E16 I1 ; configure microstepping with interpolation
M92 X320.00 Y320.00 Z400.00 E694.00 ; set steps per mm
M566 X1200.00 Y1200.00 Z200.00 E1200.00 ; set maximum instantaneous speed changes (mm/min)
M203 X60000.00 Y60000.00 Z24000.00 E2400.00 ; set maximum speeds (mm/min)
M201 X20000.00 Y20000.00 Z6000.00 E10000.00 ; set accelerations (mm/s^2)
M906 X2550 Y2550 Z2300 E600 I30 ; set motor currents (mA) and motor idle factor in per cent M906 X2600 Y2600 Z2400 E600 I30; Endstops
M574 X2 S1 P"^121io1in"
M574 Y2 S1 P"^io1in"
;M574 Z1 S2 P"^121io2in" ; configure Z-probe endstop for low end on Z; Z-Probe
M558 P8 C"^121io2in" H26 F1200 T6000 ; set Z probe type to switch and the dive height + speeds
G31 P500 X0 Y0 Z-0.47 ; set Z probe trigger value, offset and trigger height Z-0.38
M557 X10:340 Y10:340 S11 ; define mesh grid; Heaters
M308 S0 P"temp0" Y"thermistor" T88000 B3950 ; configure sensor 0 as thermistor on pin temp0 T128740
M950 H0 C"out1" T0 ; create bed heater output on out1 and map it to sensor 0
M307 H0 R0.138 K0.085:0.000 D22.26 E1.35 S1.00 B0 ; disable bang-bang mode for the bed heater and set PWM limit
M140 H0 ; map heated bed to heater 0
M143 H0 S120 ; set temperature limit for heater 0 to 120C
M308 S1 P"121.temp0" Y"thermistor" T1886597 B8668 C1.990918e-7 ; configure sensor 1 as thermistor on pin 121.temp0
M950 H1 C"121.out0" T1 ; create nozzle heater output on 121.out0 and map it to sensor 1
M307 H1 M307 H1 R1.579 K0.387:0.000 D12.89 E1.35 S1.00 B0 V23.9 ; disable bang-bang mode for heater and set PWM limit
M143 H1 S500 ; set temperature limit for heater 1 to 500C; Fans
M950 F0 C"121.out1" Q500 ; create fan 0 on pin 121.out1 and set its frequency
M106 P0 S0 H-1 F30000 ; set fan 0 value. Thermostatic control is turned off
M950 F1 C"121.out2" Q500 ; create fan 1 on pin 121.out2 and set its frequency
M106 P1 S1 H1 T60 F30000 ; set fan 1 value. Thermostatic control is turned on
M950 F2 C"out4" Q500 ; create fan 2 on pin out4 and set its frequency
M106 P2 S1 H0 T60 F30000 ; set fan 2 value. Thermostatic control is turned on
M950 F3 C"out5" Q500 ; create fan 3 on pin out5 and set its frequency
M106 P3 S1 H0 T60 F100 ; set fan 3 value. Thermostatic control is turned on
M950 F4 C"out6" Q500 ; create fan 4 on pin out6 and set its frequency
M106 P4 S1 H0 T60 F100 ; set fan 4 value. Thermostatic control is turned on
M950 F5 C"out7" Q500 ; create fan 5 on pin out7 and set its frequency
M106 P5 S1 H0 T60 F100 ; set fan 5 value. Thermostatic control is turned on
M950 F6 C"out8" Q500 ; create fan 6 on pin out8 and set its frequency
M106 P6 S1 H0 T60 F100 ; set fan 6 value. Thermostatic control is turned on
M950 F7 C"out9" Q500 ; create fan 7 on pin out9 and set its frequency
M106 P7 S1 H0 T60 F100 ; set fan 7 value. Thermostatic control is turned on; Tools
M563 P0 S"Dyze Pro 0.4" D0 H1 F0 ; define tool 0
G10 P0 X0 Y0 Z0 ; set tool 0 axis offsets
G10 P0 R0 S0 ; set initial tool 0 active and standby temperatures to 0C; Custom settings
M584 Z0.0:0.1:0.2:0.3
M671 X-70.0:-70.0:419.45:419.45 Y4.5:426.3:4.5:426.3 S10 ; Z pivot points Order: Front Left, Back Left, Front Right, Back Right
M593 P"ei3" S0.01 F36
M572 D0 S0.04
; MiscellaneousM911 S18 R20 P"M913 X0 Y0 G91 M83 G1 Z3 E-5 F1000" ; set voltage thresholds and actions to run on power loss
T0 ; select first tool; Axis Limits
M208 X0 Y0 Z0 S1 ; set axis minima
M208 X350 Y358 Z300 S0 ; set axis maximaM591 D0 P1 C"io2in" S1 ; filament monitor connected to io2
M501
-
@OwenD It is definitely more code to to have it auto calculate heating rates and timing depending on set temps however my current solution is not that complicated as per what tony said but requires knowledge of manually finding out the times:
M140 S[first_layer_bed_temperature]; set bed temp
M116 H0 S10 ; wait for heater 0 (assumed bed) to get within 10C of the target
M104 S[first_layer_temperature]; set extruder temp
M116 S3 ;wait for all temperatures to be within the default range of their setpoints (default 2C) set at 3C
G29 S1my situation is i have a 350mm bed 10mm thick that takes ages to heat up say 4 min & that's with mains heating but my hotend heats up rapidly around 30 secs. i have worked out that the hotend will need equivalent of about 10 degc remaining on the bed to reach synchronised timing however i have it so the bed just heats up first as the hotend always overshoots 10 deg c at the start and i have to wait for it to cool down before it prints, just cant get the pid perfect on it with the auto calibrate system.
So if i used just m116 i am either cooking the filament which degrades it and can cause problems such as blockages as it sits there at full temp for 3.5 mins or i heat the bed then wait an extra 30 secs for the hotend which is time consuming if you already waiting for a whole heap of small proto type prints. better to spend that time setting up synchronised timing then waiting every time is how i see it.
but in saying that i like what you have done although adding the auto fill temps from the slicer would add the cherry on top e.g. S[first_layer_bed_temperature] & S[first_layer_temperature];
-
@Perspective said in Synchronised Bed & Hotend, Homing not required after print.:
but in saying that i like what you have done although adding the auto fill temps from the slicer would add the cherry on top e.g. S[first_layer_bed_temperature] & S[first_layer_temperature];
You can easily achieve that by either moving the whole shebang to your slicer start gcode, or what I would probably do is set temps in your slicer start gcode but put the heaters on standby (or off).
Then in the macro, instead of using the target values derived from M291, you just useheat.heaters[n].active