Since I can't do any printing at the moment (printer is broken), I have put together a bit of a tutorial on "best practice" when creating conditional G code.
There will be many far more qualified people than I on the forum to do this, and I'm sure that there is better and more concise documentation coming, but some may find it useful.
It is far from a complete or even comprehensive treatise on the subject, nor is it meant to be.
Feel free to correct, disagree or ignore as you see fit.
Especially since the code therein is untested (printer broken remember) ")
Conditional G Code best practice.pdf
Best posts made by OwenD
-
Conditional G Code introduction "tutorial" (PDF)posted in Gcode meta commands
-
RE: Baby Stepping.. can it, or can it not be permanent?posted in General Discussion
just run a macro. (assuming you're running RRF3)
You could either do it manually or put it in the stop gcode of your slicer;save_babystep.g ; Add babystep to Z offset and make "persistant" if move.axes[2].babystep !=0 echo {"Z trigger height altered by " ^ move.axes[2].babystep ^ "mm"} echo {"OLD: " ^ sensors.probes[0].triggerHeight ^ " new: " ^ sensors.probes[0].triggerHeight - move.axes[2].babystep} G31 Z{sensors.probes[0].triggerHeight - move.axes[2].babystep} M500 P10:31 ; save settings to config-overide.g - Must have M501 in config.g else echo "No babystepping set. Nothing to save"EDIT: Original post incorrectly added baby steps to trigger height. It should subtract.
-
Pressure Advance Tuning file generatorposted in Tuning and tweaking
Hi All,
In my quest to tune my various settings I decided I needed to be able to automatically generate a test file that would change the pressure advance at set intervals.
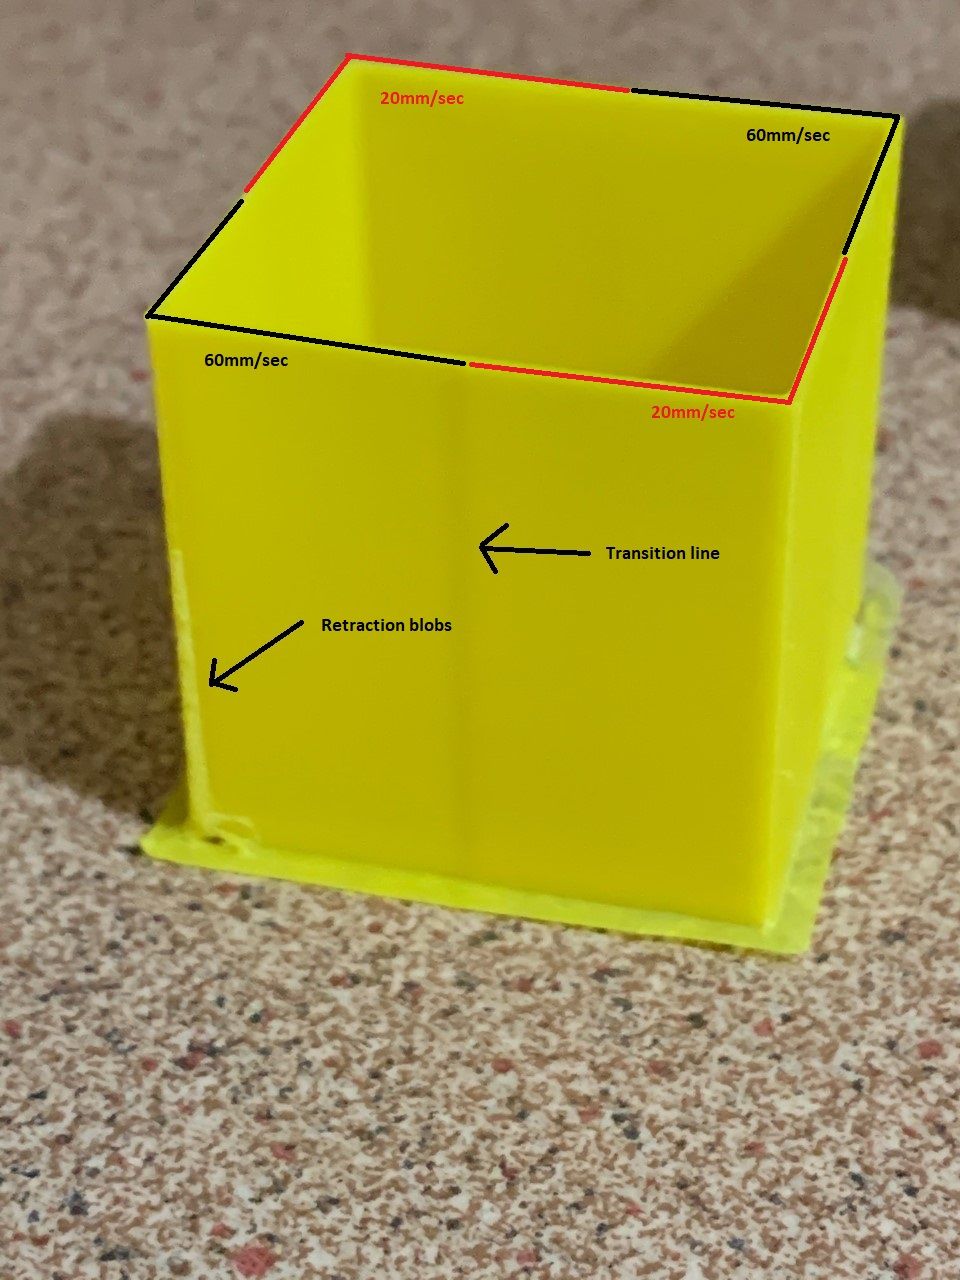
The only programming language I know is Delphi/Lazarus, so I created a windows application to carry out the task.Essentially that application creates a square box with two wall perimeters.
The inner wall prints at a constant speed and acts merely for support.
The outer wall alternates between a high and low speed with the transition point being mid way along the wall.
At the end of each layer a retraction is added.This allows you to see how the PA adjustments are affecting corners at the two speeds and how it is affecting the retraction settings.
A start and end G code section takes care of temps etc.
Here are some pics of tests starting a PA of zero and increasing by 0.05 every 5mm in height.
My printer runs about a 350mm bowden tube.Pic 1: PA range 0-0.35
Note the distinct thickness variations at the speed change point and the blobbing at the retraction/layer change point.
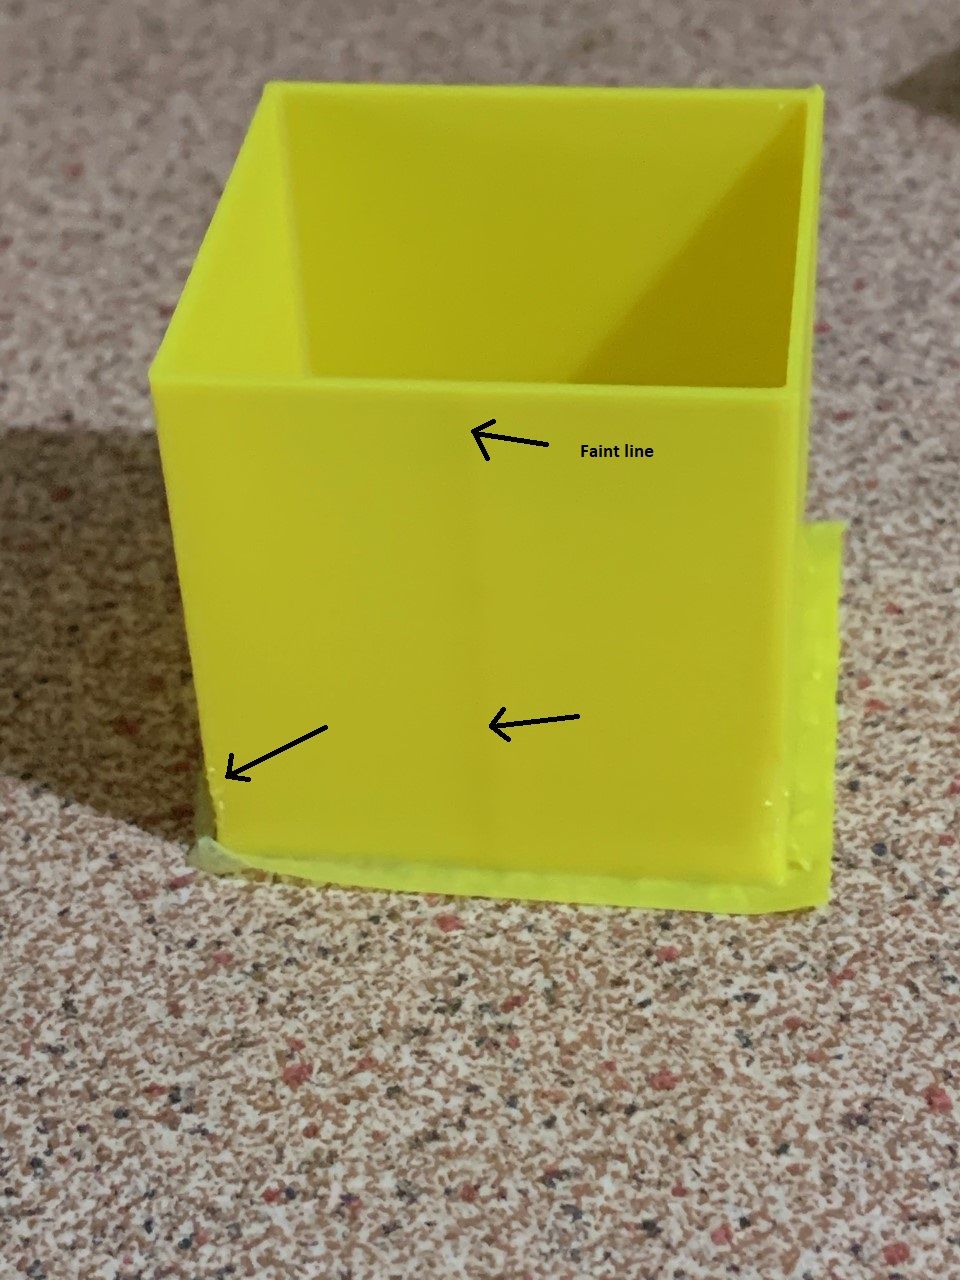
Pic2: PA Range 0.4-0.75
Transition line still faintly visible and some issues around retraction area
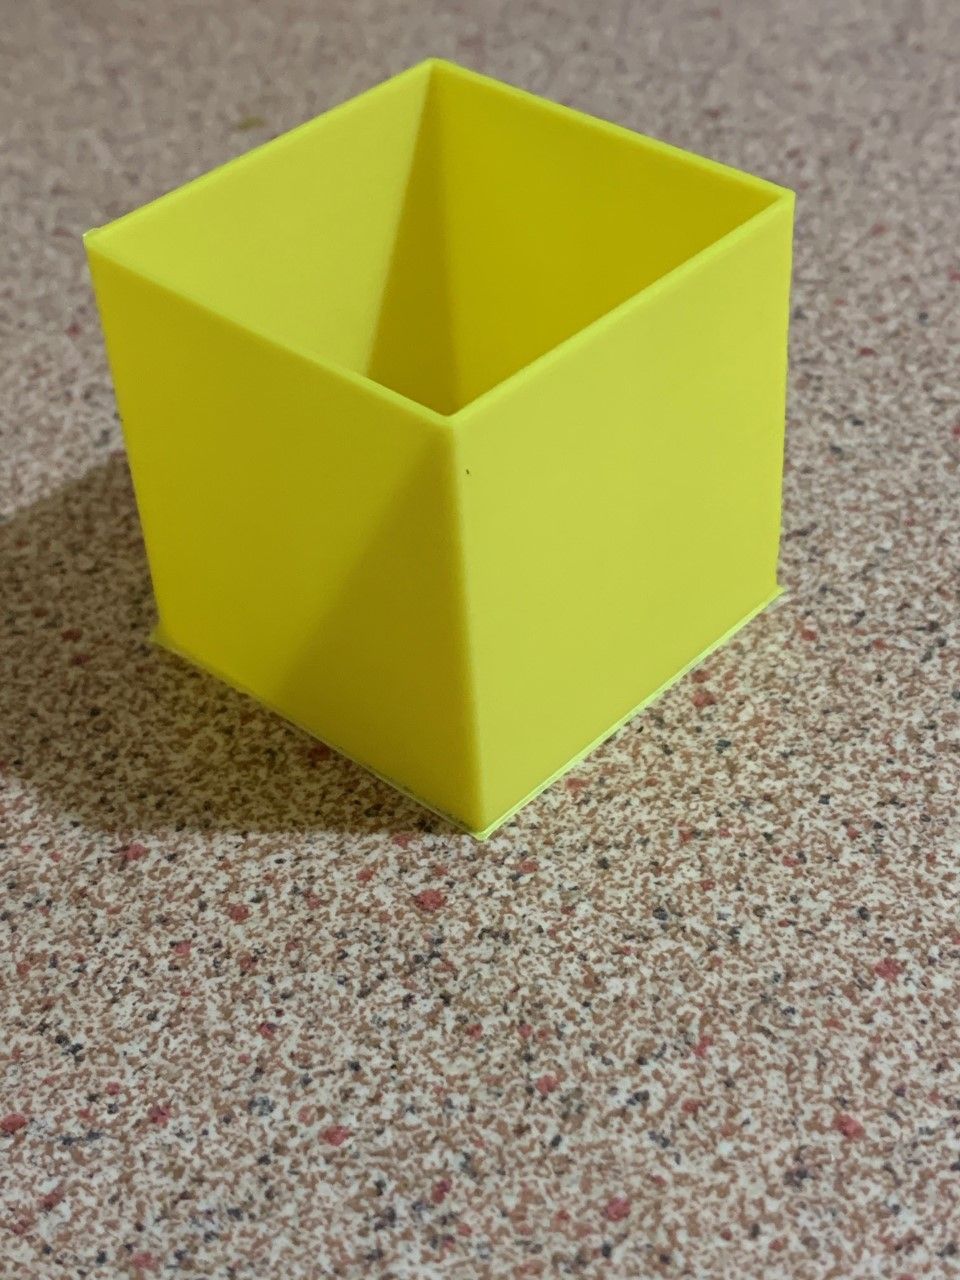
Pic3: PA range 0.8-1.15
Looks pretty good at about mid way
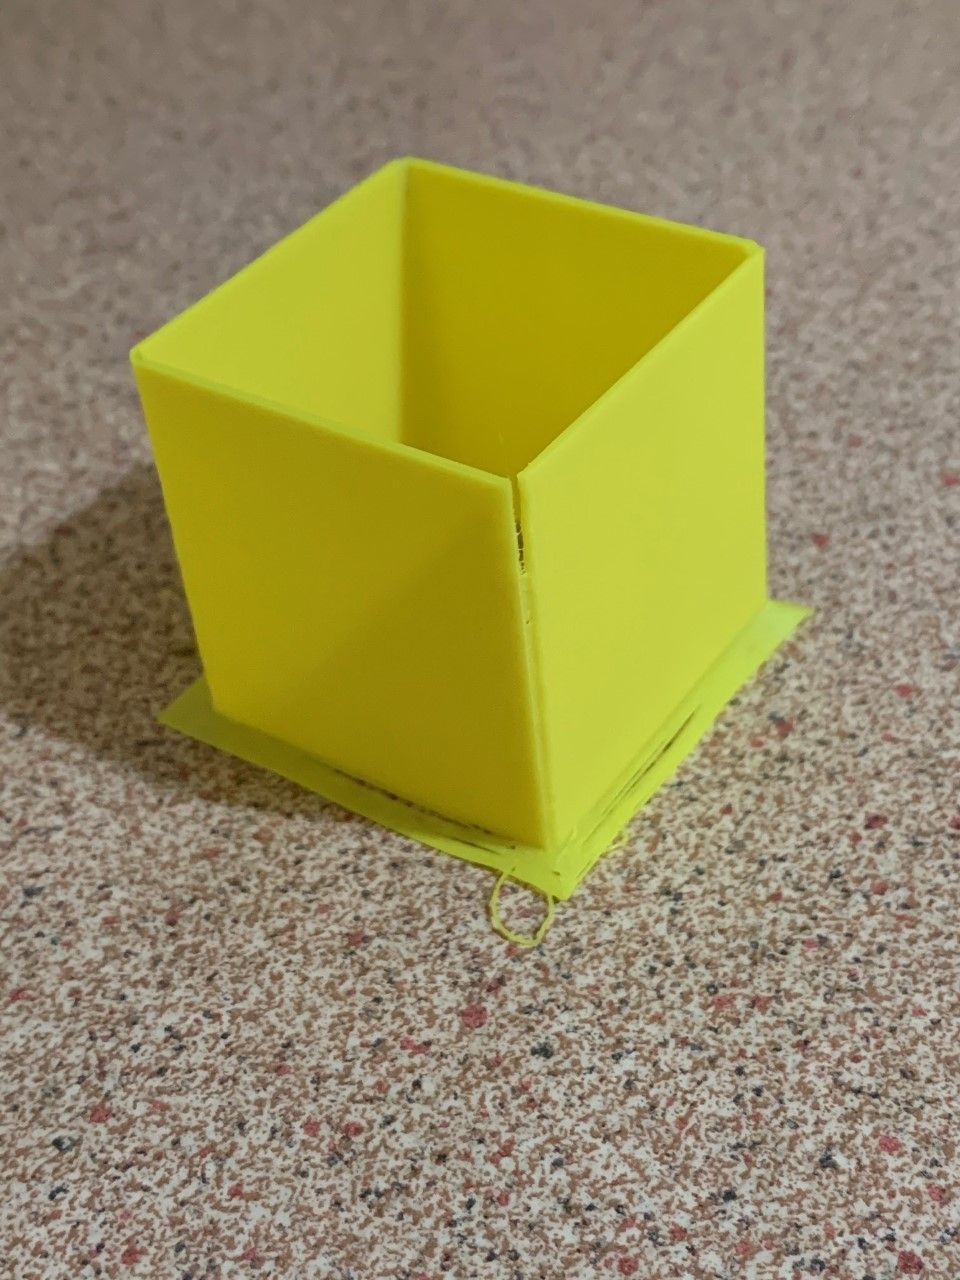
Pic4: PA range 1.2-1.55
Here we can see that pressure advance is starting to cause too much retraction.
I'd either have to reduce PA or try again with less retraction.
If anyone would like to try the application and provide feedback , I have put a link to my dropbox.
Download link:
https://www.dropbox.com/s/nolo5aca26e7fni/PaAdvanceTestInstall_v1-0.zip?dl=0BE WARNED!!
This should be considered very much beta software.
Use at your own risk.
I've only tested on Windows 10.I'm not sure my extrusion volume calculations are 100% accurate.
They seem close, but not identical to Cura's values.
At any rate it seems good enough for the test purposes. -
Macro for "automatic" calibration of BL Touchposted in Gcode meta commands
This macro uses variables so needs RRF3.3b2 or later.
EDIT: Object model values for M558 are now stored in mm/min so no conversion necessary. - please used amended macro below which includes improvements and corrects some errors pointed out in this thread by other users.
It prompts you to jog the nozzle to the bed and then runs 10 probe offset tests (this number is configurable as a variable)
At the end, it discards the highest and lowest reading and averages the rest.
You can then choose to save the result in config-overide.g;Calibrate BL Touch ; Reprap firmware version 3.3b2 or later required! ; if two speed probing is configured in M558,we probably want to reduce the speed for this test var ProbeSpeedHigh = sensors.probes[0].speeds[0]*60 ; Speeds are saved in mm/sec in the object model but M558 uses mm/min var ProbeSpeedLow = sensors.probes[0].speeds[1]*60 M558 F60 ; reduce probe speed to 60mm/min for accuracy - adjust F parameter as required ;define some variables to store readings var NumTests=10 ; modify this value to define number of tests ; Do not change below this line var RunningTotal=0 var Average=0 var Lowest=0 var Highest=0 ; If the printer hasn't been homed, home it if !move.axes[0].homed || !move.axes[1].homed || !move.axes[2].homed G28 else G1 Z{sensors.probes[0].diveHeight} F360 ; if axes homed move to dive height M561 ; clear any bed transform M290 R0 S0 ; clear babystepping ; move nozzle to centre of bed G1 X{(move.axes[0].min + move.axes[0].max)/2} Y{(move.axes[1].min + move.axes[1].max)/2} M564 S0 H0 ; Allow movement beyond limits ;ensure you have room for the probe if move.axes[2].machinePosition < sensors.probes[0].diveHeight G1 Z{sensors.probes[0].diveHeight} M280 P0 S160 I1 ; reset BL Touch G4 S0.5 M98 P"0:/sys/retractprobe.g" ; Ensure probe is retracted & reset G4 S0.5 M561 ; clear any bed transform ; Jog head to position M291 P"Jog nozzle to touch bed" R"Set nozzle to zero" S3 Z1 G92 Z0 ; set Z position to zero M291 P"Press OK to begin" R"Ready?" S3; ; Move probe over top of same point that nozzle was when zero was set G1 Z{sensors.probes[0].diveHeight}; lift head G1 X{move.axes[0].machinePosition - sensors.probes[0].offsets[0]} Y{move.axes[1].machinePosition - sensors.probes[0].offsets[1]} F1800 echo "Current probe offset = " ^ sensors.probes[0].triggerHeight ^ "mm" ; carry out 10 probes (or what is set in NumTests variable) while iterations < var.NumTests G1 Z{sensors.probes[0].diveHeight} ; move to dive height if sensors.probes[0].value[0]=1000 ; if probe is in error state echo "Probe in error state- resetting" M280 P0 S160 I1 ; reset BL Touch G4 S0.5 M98 P"0:/sys/retractprobe.g" ; Ensure probe is retracted & reset G4 S0.5 G30 S-1 M118 P2 S{"Test # " ^ (iterations+1) ^ " Triggered @ " ^ move.axes[2].machinePosition ^ "mm"} ; send trigger height to Paneldue console M118 P3 S{"Test # " ^ (iterations+1) ^ " Triggered @ " ^ move.axes[2].machinePosition ^ "mm"} ; send trigger height to DWC console if iterations == 0 set var.Lowest={move.axes[2].machinePosition} ; set the new lowest reading to first probe height set var.Highest={move.axes[2].machinePosition} ; set the new highest reading to first probe height if move.axes[2].machinePosition < var.Lowest set var.Lowest={move.axes[2].machinePosition} ; set the new lowest reading ;M118 P3 S{"new low reading = " ^ move.axes[2].machinePosition} ; send trigger height to DWC console G4 S0.3 if move.axes[2].machinePosition > var.Highest set var.Highest={move.axes[2].machinePosition} ; set the new highest reading ;M118 P3 S{"new high reading = " ^ move.axes[2].machinePosition} ; send trigger height to DWC console G4 S0.3 set var.RunningTotal={var.RunningTotal + move.axes[2].machinePosition} ; set new running total ;M118 P3 S{"running total = " ^ var.RunningTotal} ; send running total to DWC console G4 S0.5 set var.Average = {(var.RunningTotal - var.Highest - var.Lowest) / (var.NumTests - 2)} ; calculate the average after discarding th ehigh & low reading ;M118 P3 S{"running total = " ^ var.RunningTotal} ; send running total to DWC console ;M118 P3 S{"low reading = " ^ var.Lowest} ; send low reading to DWC console ;M118 P3 S{"high reading = " ^ var.Highest} ; send high reading to DWC console M118 P2 S{"Average excluding high and low reading = " ^ var.Average} ; send average to PanelDue console M118 P3 S{"Average excluding high and low reading = " ^ var.Average} ; send average to DWC console G31 P500 Z{var.Average} ; set Z probe offset to the average reading M564 S0 H1 ; Reset limits M558 F{var.ProbeSpeedHigh}:{var.ProbeSpeedLow} ; reset probe speed to original G1 Z{sensors.probes[0].diveHeight} F360 ; move head back to dive height M291 P{"Trigger height set to : " ^ sensors.probes[0].triggerHeight ^ " OK to save to config-overide.g, cancel to use until next restart"} R"Finished" S3 M500 P31 ; optionally save result to config-overide.g -
RE: oibject model "status" dcos.posted in Documentation
@Tinchus
Political correctness has spread even to RRF.
In the spirit of inclusiveness , you must now use "processing" in deference to those machines that do not identify as "printers" -
Setting up video streaming using raspberry piposted in Third-party software
Recently I had to set up a Raspberry Pi is camera to use as a monitoring device for my printer.
I found that pretty much all the online information was outdated and had no end trouble getting it to work on the current version of Pi OS (BullseyeBookworm).
The entire camera and video handling system has changed over the years.
So I decided to document what worked for me.
In the end it was relatively easy (once you knew the correct steps0I must first point out I know bugger all about Linux.
All this work is taken from bits and pieces I found on various sites and cobbled together, so my apologies for not crediting the original author(s)NOTE: These instructions were done using a Raspberry Pi 4 running
BullseyeBookworm 64 bit and an official Pi camera
Also if you're running RRF in SBC mode, you don't need to do this as I believe it has a built in camera setup.The first step is to install the OS using the Pi Imager
https://www.raspberrypi.com/software/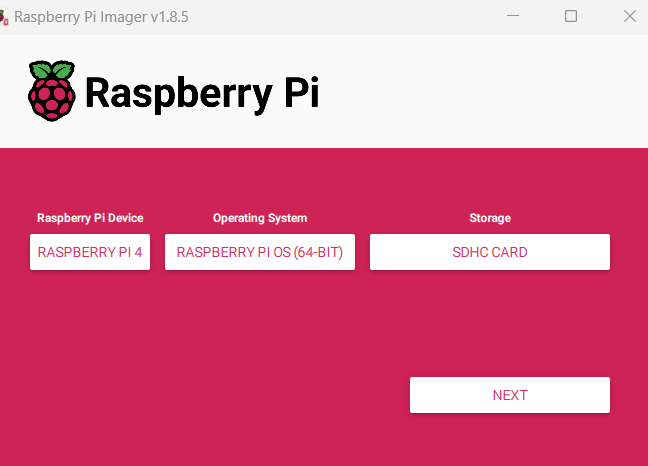
When prompted, choose your user name, password and Wifi details.
NOTE: The current version no longer uses the default user pi and password raspberrywhen you get to this point, click on "edit settings"
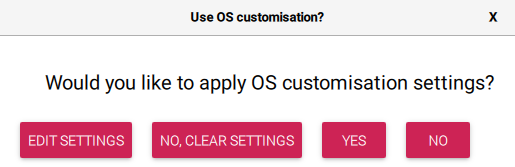
Enable SSH so that you can connect to the Pi via PUTTY rather than always needing a monitor and keyboard.
If you installed a Pi OS that has a desktop you can use the inbuilt command line terminal for all the steps listed below.Then click on YES to apply the settings.
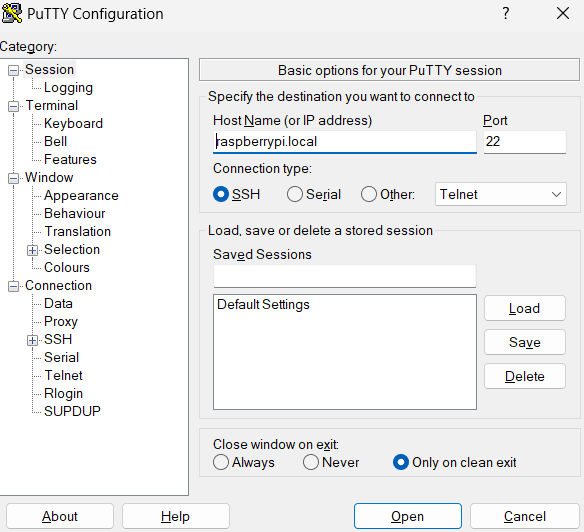
Once the image has been loaded onto the SD card, insert the card in your Pi and start it up.
Start Putty (or some other terminal) and SSH into the Pi
If you used the default settings, you should be able to go to
raspberrypi.local
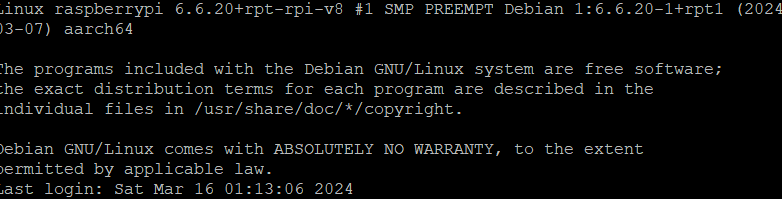
You should see something like this
You may get any updates/upgrade by using these commands
sudo apt updatesudo apt upgradesudo apt installChange directory
cd /usr/local/bin/Open a text edior
sudo nano streamVideo.pyPaste in the following code
#!/usr/bin/python3

# This is the same as mjpeg_server.py, but uses the h/w MJPEG encoder.

import io
import logging
import socketserver
from http import server
from threading import Condition

from picamera2 import Picamera2
from picamera2.encoders import MJPEGEncoder
from picamera2.outputs import FileOutput

PAGE = """\
<html>
<head>
<title>3D Printer Camera</title>
</head>
<body>
<img src="stream.mjpg" width="800" height="600" />
</body>
</html>
"""


class StreamingOutput(io.BufferedIOBase):
    def __init__(self):
        self.frame = None
        self.condition = Condition()

    def write(self, buf):
        with self.condition:
            self.frame = buf
            self.condition.notify_all()


class StreamingHandler(server.BaseHTTPRequestHandler):
    def do_GET(self):
        if self.path == '/':
            self.send_response(301)
            self.send_header('Location', '/index.html')
            self.end_headers()
        elif self.path == '/index.html':
            content = PAGE.encode('utf-8')
            self.send_response(200)
            self.send_header('Content-Type', 'text/html')
            self.send_header('Content-Length', len(content))
            self.end_headers()
            self.wfile.write(content)
        elif self.path == '/stream.mjpg':
            self.send_response(200)
            self.send_header('Age', 0)
            self.send_header('Cache-Control', 'no-cache, private')
            self.send_header('Pragma', 'no-cache')
            self.send_header('Content-Type', 'multipart/x-mixed-replace; boundary=FRAME')
            self.end_headers()
            try:
                while True:
                    with output.condition:
                        output.condition.wait()
                        frame = output.frame
                    self.wfile.write(b'--FRAME\r\n')
                    self.send_header('Content-Type', 'image/jpeg')
                    self.send_header('Content-Length', len(frame))
                    self.end_headers()
                    self.wfile.write(frame)
                    self.wfile.write(b'\r\n')
            except Exception as e:
                logging.warning(
                    'Removed streaming client %s: %s',
                    self.client_address, str(e))
        else:
            self.send_error(404)
            self.end_headers()


class StreamingServer(socketserver.ThreadingMixIn, server.HTTPServer):
    allow_reuse_address = True
    daemon_threads = True


picam2 = Picamera2()
picam2.configure(picam2.create_video_configuration(main={"size": (640, 480)}))
output = StreamingOutput()
picam2.start_recording(MJPEGEncoder(), FileOutput(output))

try:
    address = ('', 8888)
    server = StreamingServer(address, StreamingHandler)
    server.serve_forever()
finally:
    picam2.stop_recording()
Press CTRL + X to exit and choose Y to save file
change directory
cd /etc/systemd/systemOpen the text editor to create a system service file
sudo nano streamVideo.servicePaste in the following code
[Unit]
Description=A script for straming video to http
After=syslog.target network.target

[Service]
WorkingDirectory=/usr/local/bin/
ExecStart=/usr/bin/python3 /usr/local/bin/streamVideo.py

Restart=always
RestartSec=120

[Install]
WantedBy=multi-user.target
PRess CTRL + X
press Y and enter to saveEnter the following to reload the daemon
sudo systemctl daemon-reloadEnable the service
sudo systemctl enable streamVideo.serviceYou should see something like
Created symlink /etc/systemd/system/multi-user.target.wants/streamVideo.service → /etc/systemd/system/streamVideo.service.Restart the Pi
sudo shutdown -r nowAfter the Pi has rebooted, you should be able to access the stream by going to the following URL in your browser
http://raspberrypi.local:8888/index.html
In DWC you need to enter this URL on order to get the stream
http://raspberrypi.local:8888/stream.mjpg
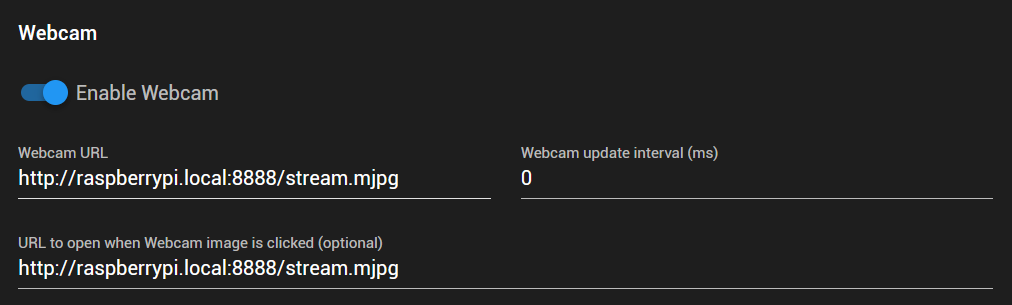
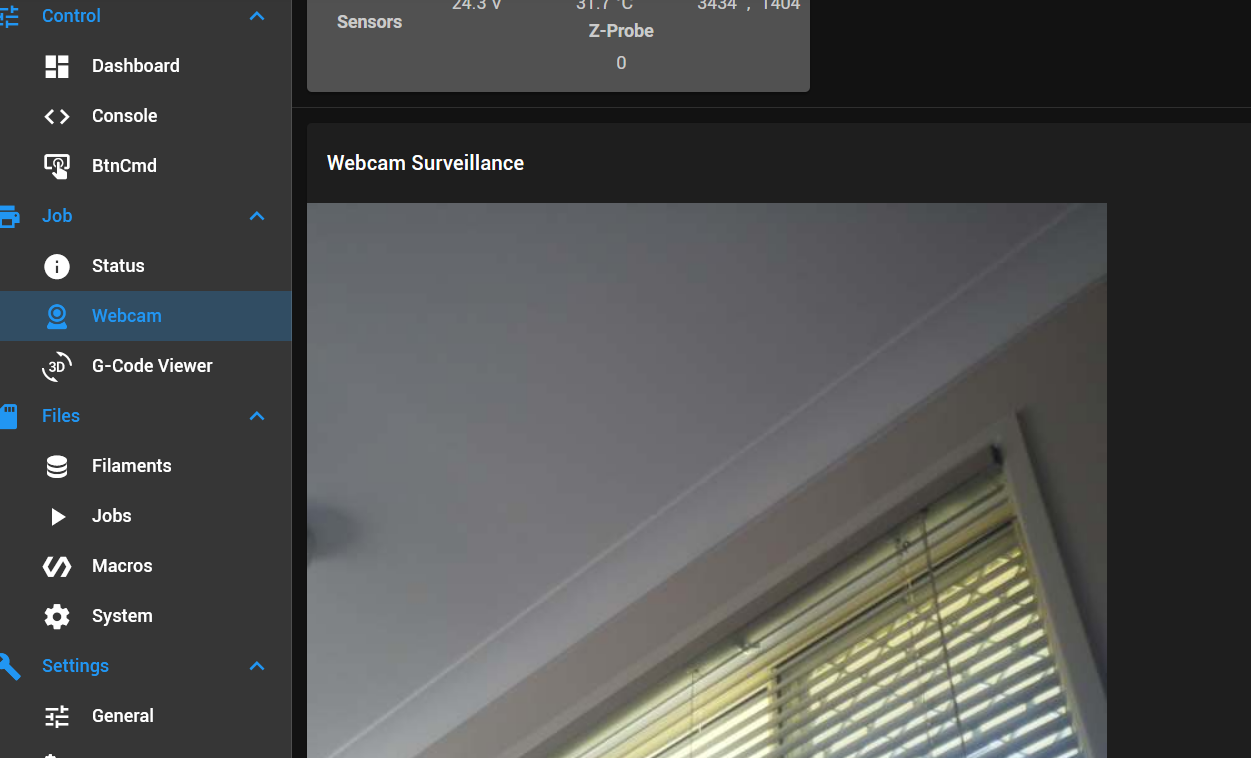
Your video stream should now be visible in the Webcam tab
I hope this saves someone some frustration.
-
RE: Reprap G-Code syntax now part of RJ TextEd text editorposted in General Discussion
I have updated the syntax file for RJ TextEd to include more object model items.
I have also included a suggested colour format file.
You will need to update RJ TextEd to the latest version in order to take advantage of hints etc.Replace the existing files (reprap.syx, reprap.ini) in C:\Users"yourname"\AppData\Roaming\RJ TextEd\Syntax
Copy the file "Reprap Dark.xml" to C:\Users"yourname"\AppData\Roaming\RJ TextEd\Syntax color themes\To install.
1: Go to ENVIRONMENT > THEMES > CUSTOMISE
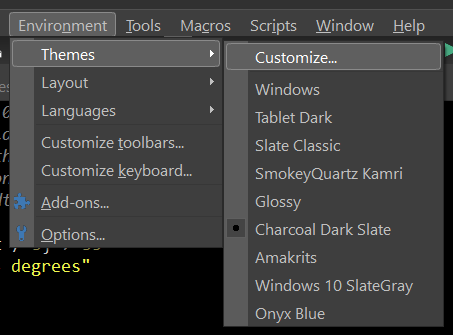
2: Select "Reprap G Code" from the drop down list of highlighters
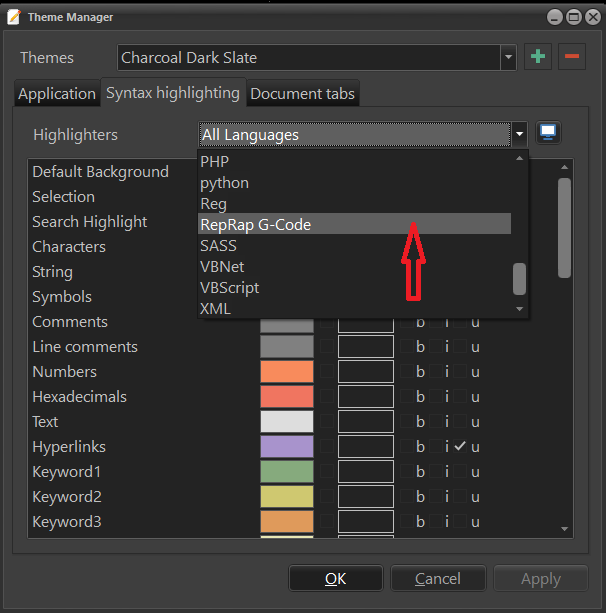
3: Click the button, and select import colors from file
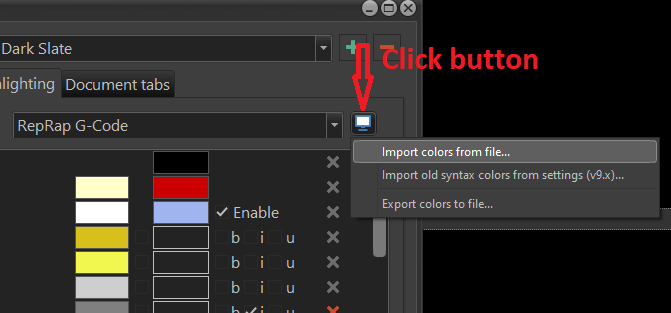
4: Select the "Reprap Dark.xml" file previously copied.
You can customize the colours to suit yourself.
Different G Code parameters such as X, Y, Z , E, F, G etc can be coloured to make individually.
Likewise, comments and other items can be individually coloured.
-
Forum categories for conditional Gcode & macrosposted in Gcode meta commands
Now that 3.1 is released, I think it would be beneficial to have a forum category dedicated to conditional gcode & macros.
This should probably be broken down into various kinematic types.
Furthermore it may be good to have some sort of “duet approved” marker like the “solved” marker, once the macros have been peer reviewed and improved where necessary.
I usually try to make macros “portable” by not hard coding anything, but the very fact that certain parts of the object model are not visible if you don’t run that type of configuration, probably makes putting them in the categories for which they were designed beneficial and will reduce angst and support time.
(Yes, I know we should be checking for null objects and kinematic types as a matter of course in every macro)
Which leads to my final point, which is once we have some documentation on the object model, perhaps someone could do a small tutorial on best practice when writing macros.
My programming background is not in C or its variants so I admit I’m constantly searching for proper syntax etc.
To a non-programmer it is just gobbledygook.
If there’s going to be dozens of people learning to do it, they may as well learn to do it in a way that ensure portability and reduces the chance of unexpected issues.
I’ve always found it usually takes 10 lines of code to do the job, the another 50 lines of code to stop people trying to do it out of order or in a way you never imagined -
RE: Setting up video streaming using raspberry piposted in Third-party software
I found another application that works quite easily and has the benefit of being able to adjust all the settings from the web interface.
It's called picamera2-WebUI-Lite

There's a slight error on the instructions to install and it doesn't tell you how to set it up as a service, so I've listed thesteps.
To install.
SSH into your PI (or open a terminal if using a desktop)
Change directory
cd /usr/local/bin/Clone the repositry
sudo git clone https://github.com/monkeymademe/picamera2-WebUI-Lite.gitChange directory
cd /usr/local/bin/picamera2-WebUI-LiteTest that it's running
python3 app.pyOpen your browser and go to
http://raspberrypi.local:8080/To see just the video feed go to
http://raspberrypi.local:8080/video_feedGo back to the terminal and hot CTRL + C to shut the app down
To set it up as a service
Change directorycd /etc/systemd/systemOpen a text editor to create a system service file
sudo nano webui-lite.servicePaste in the following
[Unit]
Description=Start script for WebUi-Lite as a service
After=syslog.target network.target
[Service]
WorkingDirectory=/usr/local/bin/picamera2-WebUI-Lite/
ExecStart=/usr/bin/python3 /usr/local/bin//picamera2-WebUI-Lite/app.py
Restart=always
RestartSec=120
[Install]
WantedBy=multi-user.target
Press CTRL + X to exit and Y to save
Reload the daemon
sudo systemctl daemon-reloadEnable the service
sudo systemctl enable webui-lite.serviceNOTE that if you already have the other streamVideo service I listed above using Picamera you will have to disable it as you can't run both.
sudo systemctl disable streamVideo.serviceReboot the system to make sure the service starts
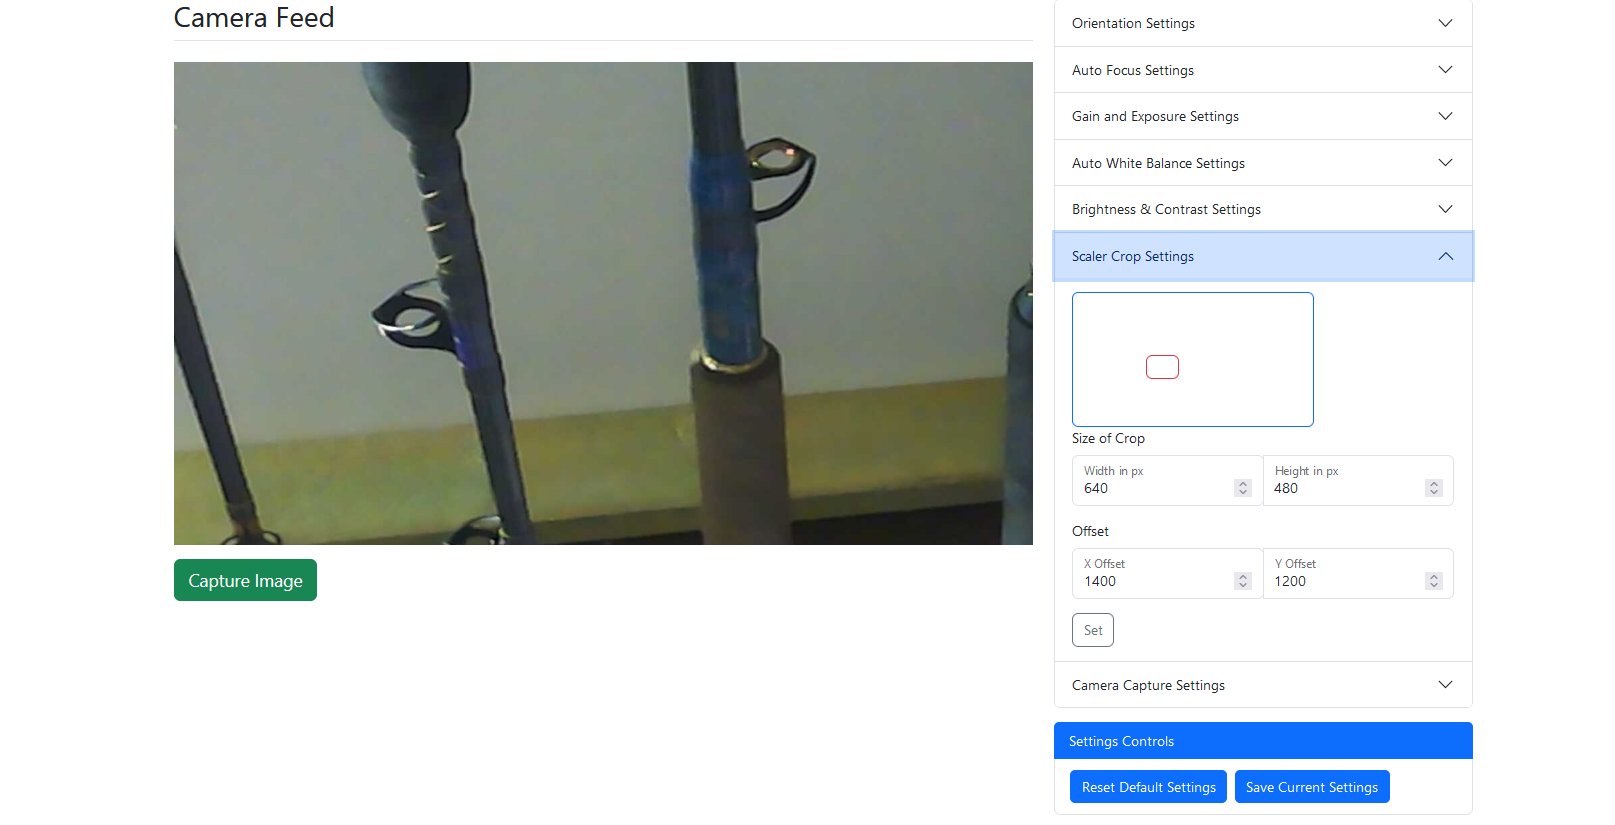
sudo shutdown -r nowAdjust your DWC settings as follows
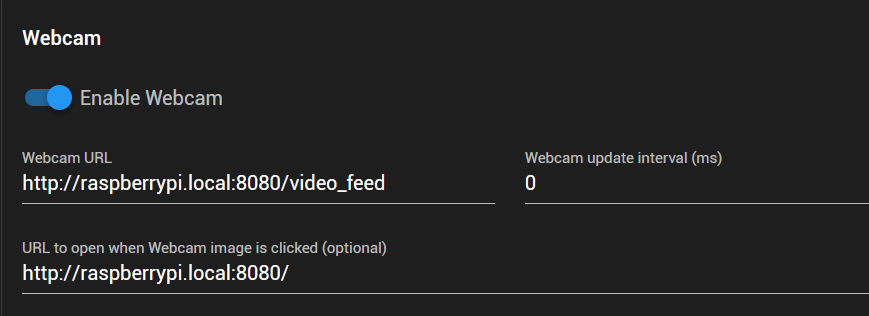
This will allow you to easily get to the settings page by clicking on the webcam image in DWC
From there adjust your resolution and you can also zoom in a particular area using the scaler crop settings.Full view

Cropped view
-
RE: Conditional G Code - RJ TextEd Syntax file.posted in General Discussion
For those using RJ Text Editor, I have posted an updated syntax file that includes the new object model items and G Codes contained in RRF3.5.0 b2
It can be downloaded here
https://www.rj-texted.se/Forum/viewtopic.php?p=18659#p18659It includes mouse over hints for G Code commands and auto-complete
The program comes with the RRF syntax file as standard but you may need to update it as new firmware versions come out.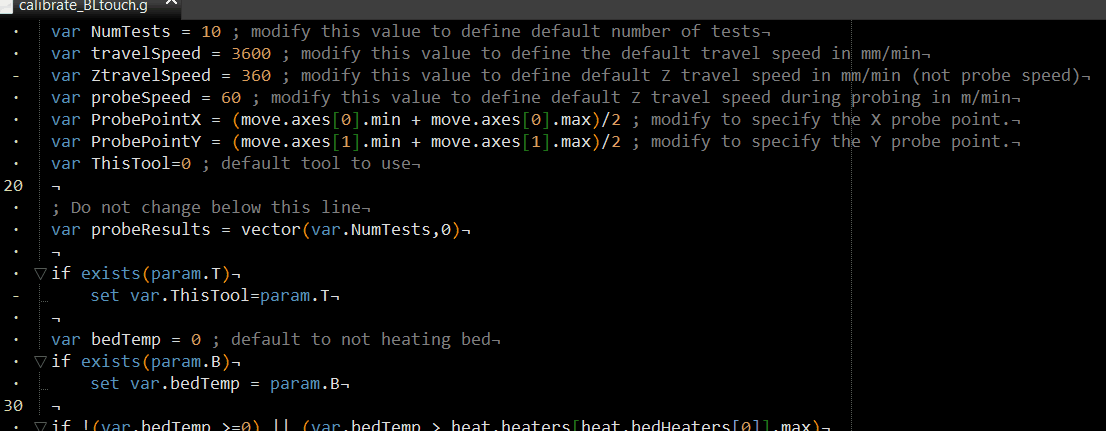
Latest posts made by OwenD
-
RE: Error message I can't get rid ofposted in General Discussion
@handyandy
You've used M190 instead of M109 in Cura
You have a max bed temp of 110c set in config.g and this is trying to set the bed to 175cM190 T0 R175 ; wait for temperatureYou might consider moving on to M568 for the tool settings, M140 for the bed and M116 to wait for temps.
The advantage is being able to specify active & standby temps and modes.EDIT: Too slow
 ^^^^ What he said
 -
RE: Script for Z offsetposted in Gcode meta commands
@ericlmccormick
You have to use SET in cases where the variable has already been created
Also access to any variable or global value is in the format
var.myVarset var.z_height = 1234 echo var.z_height -
RE: Conditional G Code - RJ TextEd Syntax file.posted in General Discussion
I have just uploaded a new version of the syntax files to take include new RRF features and object model items in RRF V3.6.0b4
I have also changed the file so that hints are displayed when viewing auto complete options.The files can be downloaded here
https://github.com/owendare/RJTexted-ReprapFirmware-SyntaxThe syntax files should be placed her
C:\Users\YOUR USER NAME\AppData\Roaming\RJ TextEd\Syntax\User definedThe colour theme file should be laced here
C:\Users\YOUR USER NAME\AppData\Roaming\RJ TextEd\Syntax color themesEDIT:
Upload of new GIF's fails so deleted from post -
RE: Synchronised Bed & Hotend, Homing not required after print.posted in Gcode meta commands
@Perspective said in Synchronised Bed & Hotend, Homing not required after print.:
but in saying that i like what you have done although adding the auto fill temps from the slicer would add the cherry on top e.g. S[first_layer_bed_temperature] & S[first_layer_temperature];
You can easily achieve that by either moving the whole shebang to your slicer start gcode, or what I would probably do is set temps in your slicer start gcode but put the heaters on standby (or off).
Then in the macro, instead of using the target values derived from M291, you just useheat.heaters[n].active -
RE: Synchronised Bed & Hotend, Homing not required after print.posted in Gcode meta commands
@Perspective said in Synchronised Bed & Hotend, Homing not required after print.:
1: I would like to know how to set up the duet so i can time the heated bed and hot end so they are both ready at the same time.
I feel you're over thinking it quite a bit.
The traditional and simplest way is to simply turn both heaters on in the start gcode and then put M116 in there so it waits until both are up to the set temp before printing commences.
To try to synchronise the end times while still being able to carry out other tasks wold require you to use daemon.g to monitor the current temps and other variables and you would need to know what the heating rate is for each heater.As an exercise I tried to do this in a single macro. (I'm an early riser and have only my own company for a couple f hours)
This would NOT work in a print because it would be blocking, so nothing else can happen at the same time.
I suppose you could start it homing etc in the same macro
However there are myriad complications such as one or both heaters may be turned off during probing.In the object model we can find
heat.heaters[0].model.heatingRate
Which is said to be the heating rate for the heater in Kelvins per second
I tried to use that to calculate how long to get from one temperature to another in seconds, but found it didn't give me anything like the real times I experienced. I suspect there is a lot more going on in the background when that value is used.I then decided to just do a rudimentary measurement of how many degrees per second temp increase I was getting on the heater with a macro like this
M80
M291 R"Bed" P"Enter bed target temp" S5 L{floor(heat.heaters[0].current)} H{floor(heat.heaters[0].max)} F{max(60,floor(heat.heaters[0].current))}
var bedTarget = input
M140 S{var.bedTarget}
var lastheat = heat.heaters[0].current
while (heat.heaters[0].current < var.bedTarget - 1)  && (heat.heaters[0].state = "active")
	G4 S1
	echo "Rate is  " ^ heat.heaters[0].current - var.lastheat
	set var.lastheat = heat.heaters[0].current
M140 S-275
When you run it, you will notice that the heat increase varies during the process because the PID algorithm is making sure you don't over shoot dramatically. Plus it takes more energy to get a cold block/bed to start to increase.
And again, if homing or bed mesh was going on then the heater may be turned off during probe moves.But if you settle on a value, this macro would calculate the delay needed.
It assumes the bed is heater 0 and the tool is heater 1M80 M291 R"Bed" P"Enter bed target temp" S5 L{floor(heat.heaters[0].current)} H{floor(heat.heaters[0].max)} F{max(60,floor(heat.heaters[0].current))} var bedTarget = input M291 R"Tool" P"Enter tool target temp" S5 L{floor(heat.heaters[1].current)} H{floor(heat.heaters[1].max)} F{max(200,floor(heat.heaters[1].current))}} var toolTarget = input var startTime = state.upTime var bedRate = 0.5 ; how many degrees per second heat increase you measured on average var toolRate = 1.6 ; how many degrees per second heat increase you measured on average var bedNow = heat.heaters[0].current var toolNow = heat.heaters[1].current var bedDiff = var.bedTarget - var.bedNow var toolDiff = var.toolTarget - var.toolNow var bedTime = floor(var.bedDiff / var.bedRate) var toolTime = floor(var.toolDiff / var.toolRate) echo "Time to heat bed from " ^ var.bedNow ^ " to " ^ var.bedTarget ^ " is aprox " ^ var.bedTime ^ " seconds" echo "Time to heat tool from " ^ var.toolNow ^ " to " ^ var.toolTarget ^ " is aprox " ^ var.toolTime ^ " seconds" var delayStart = var.startTime + abs(var.bedTime - var.toolTime) if var.bedTime >= var.toolTime M140 S{var.bedTarget} echo "Bed heater started" else M568 P0 S{var.toolTarget} A2 echo "Tool heater started" while state.upTime < var.delayStart echo "Start other heater in " ^ var.delayStart - state.upTime ^ " secs" G4 S1 echo "Delay time exceeded - both heaters on" M140 S{var.bedTarget} M568 P0 S{var.toolTarget} A2 while (heat.heaters[0].current < var.bedTarget-2) && (heat.heaters[1].current < var.toolTarget-2) echo "Both heaters below target" G4 S1 while (heat.heaters[0].current < var.bedTarget) || (heat.heaters[1].current < var.toolTarget) if (heat.heaters[0].current < var.bedTarget) echo "Still waiting for bed. Should finish in " ^ var.startTime + var.bedTime - state.upTime if (heat.heaters[1].current < var.toolTarget) echo "Still waiting for tool. Should finish in " ^ var.startTime + var.toolTime - state.upTime G4 S1 echo "Both heaters have reached target" M140 S-275 M568 P0 A0In a perfect world, both should reach the designated temp at the same time.
If you see negative time left you would decrease the heat rate and vise versa
But it's going to also be affected by whether you're starting from ambient temp or not.A lot of typing to replace M116

-
RE: Multiple Heat Bed Conditional (Regional) Start Codeposted in Gcode meta commands
IF statements in RRF must be indented, so none of the statements you have will be working.
https://docs.duet3d.com/User_manual/Reference/Gcode_meta_commands#conditional-construct
It looks to me like to me IF statements are from a slicer START G-Code section.
They may be workable there, but only the M140 commands should end up in your job g-code. -
RE: Seemed like daemon.g was not starting.posted in Gcode meta commands
@machinemark said in Seemed like daemon.g was not starting.:
Thanks for the clarification.
No problem.
There's more documentation specific to daemon.g here and hereYou will also find plenty of instances of it;s use on the forum.
Once you're satisfied it''s working correctly, mark you post as a question and then mark it solved.
-
RE: Seemed like daemon.g was not starting.posted in Gcode meta commands
@machinemark
If you send the same M117 message repeatedly only the first will display a message.
daemon.g probably stared running before your web interface connection was established so you didn't see the first instance.
Using either "echo" or M118 avoids this.
As would using an ever changing string likeM117 "Hello world, it's been " ^ state.upTime ^ " since boot up" -
RE: X axis not at zero when at homeposted in General Discussion
@Chris-S
M574 defines whether you're homing to the low or high end.
It sounds like you're homing to the high end, so the value when the stop triggers should be max travel as set by M208
You'd need to post your config.g so that it can be examined properly. -
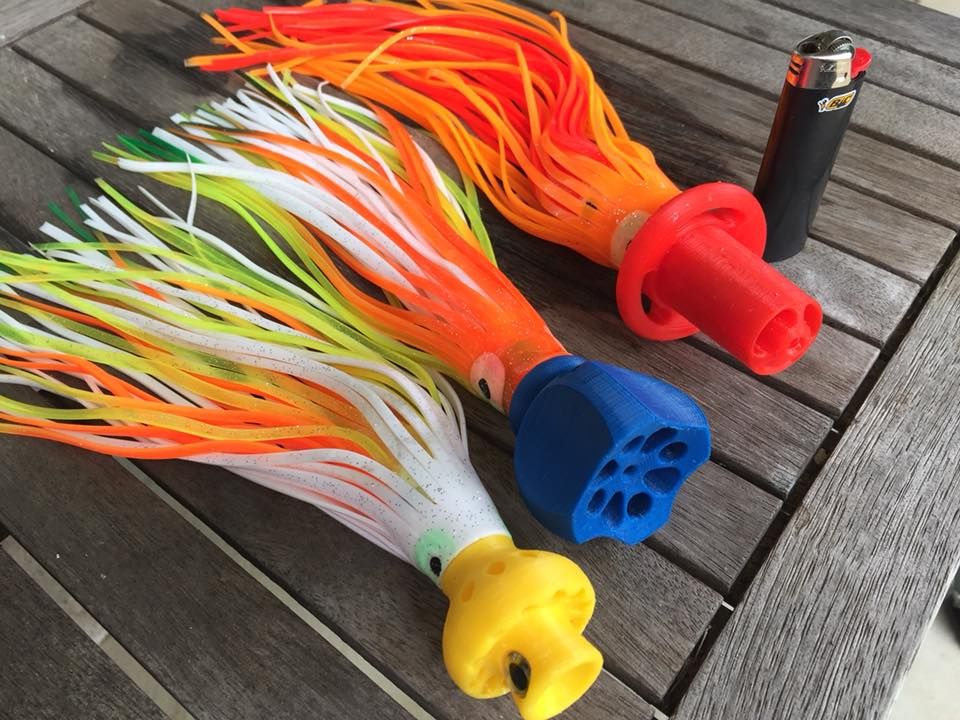
RE: What useful things have you printed on a 3D printer?posted in General Discussion
Apart from sundry brackets, housings etc around the house, most of my efforts are devoted to custome skirted lure designs for marlin fishing.
"Traditional" lures have a head cast from resin. Shaping the face creates a swimming action and having holes through it helps create a bubble trail to help attract the fish.
It's a big ocean out there, so anything out of the ordinary for a predator gets attention and hopefully an "I wonder if I can eat that" moment.I don't try to replicate traditional lures. We all know they work and resin being heavier has different properties.
I try to design things that have never been tried before.
Flexibility of design and fast prototyping allow me to create weird shapes to see what they do to the action as different areas grab the water.
Easy creation of complex air pathways allow differing bubble trails.
I can combine tings like bibs (normally only used on non game fishing lures) and add pivoting sections.Some designs work, others are abject failures , but it's all fun.
Unfortunately I don't own a game boat, so usually only do one trip a year chasing marlin.A few designs
Checking out theaction and bubble trail

A marlin checking out the spread.
Underwater camera towed in the lure spread shows fish come for a look but often don't strike.