Duet 2 v1.02 not responding
-
@droftarts
I thinck I fixed all probblems for homing.Next "problem" is printing haha. Error: Attempting to extrude with no tool selected.
-
@thomasvanderwal You have a tool defined:
; Tools
M563 P0 D0 H1 F0 ; create tool #0
M568 P0 R0 S0 ; set initial tool #0 active and standby temperatures to 0C
Send
T0to activate it, or click on the 'Tool 0' name in DWC.However, I advise you to follow the 'Commissioning' guide: https://docs.duet3d.com/en/How_to_guides/Commissioning particularly as the reported temperatures are likely to be a long way out.
It would be good if you could answer some of my questions, or responded to my advice with changes you have made. It will help me help you.
Ian
Bed-slinger - Mini5+ WiFi/1LC | RRP Fisher v1 - D2 WiFi | Polargraph - D2 WiFi | TronXY X5S - 6HC/Roto | CNC router - 6HC | Tractus3D T1250 - D2 Eth
-
@droftarts I made the corrections you said. Wiring is now good. The badradius is fine now. Homing works.
I made the change M308.
My contact with a person first is getting me nowhere. I made your changes and that worked.Now I have to make adjustments in the tool settings etc.
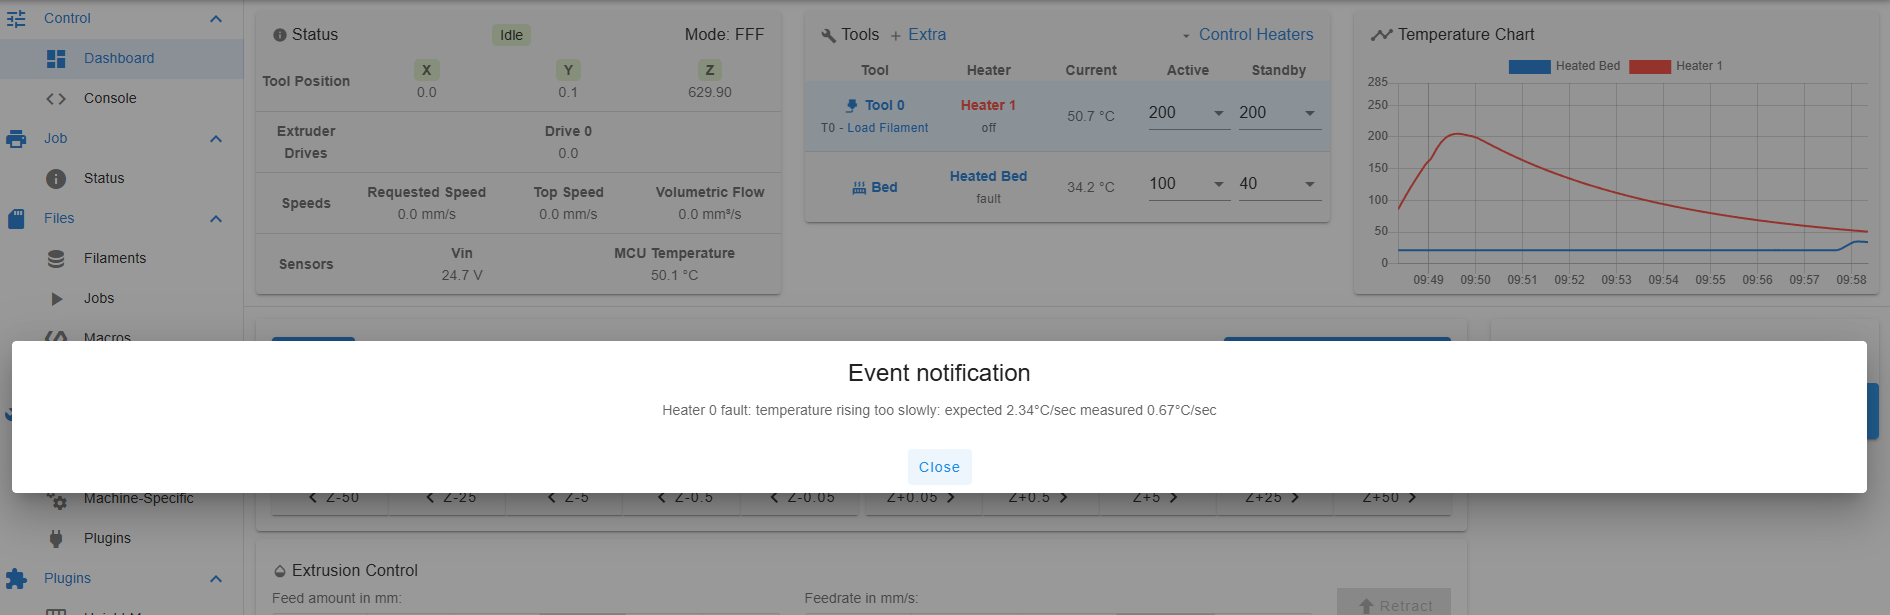
COnsole says ; Error : can't turn heater 1 on while in fault state. -
@droftarts I don't know where the wiring goes to that I had connected to the 5V. It goes underneath the bed.
-
@thomasvanderwal You will need to calibrate the delta (see https://docs.duet3d.com/en/User_manual/Tuning/Delta_calibration) before you even think of printing, and to do that you need to get probing working. Investigate the bed, as I suggested.
For the heater fault, what temperatures does DWC report for the hotend and bed? Like I said, it looks like the hot end uses a PT100 temperature sensor, not a thermistor.
Ian
Bed-slinger - Mini5+ WiFi/1LC | RRP Fisher v1 - D2 WiFi | Polargraph - D2 WiFi | TronXY X5S - 6HC/Roto | CNC router - 6HC | Tractus3D T1250 - D2 Eth
-
@droftarts said in Duet 2 v1.02 not responding:
For the heater fault, what temperatures does DWC report for the hotend and bed?
I will respond asap with your remarks.
-
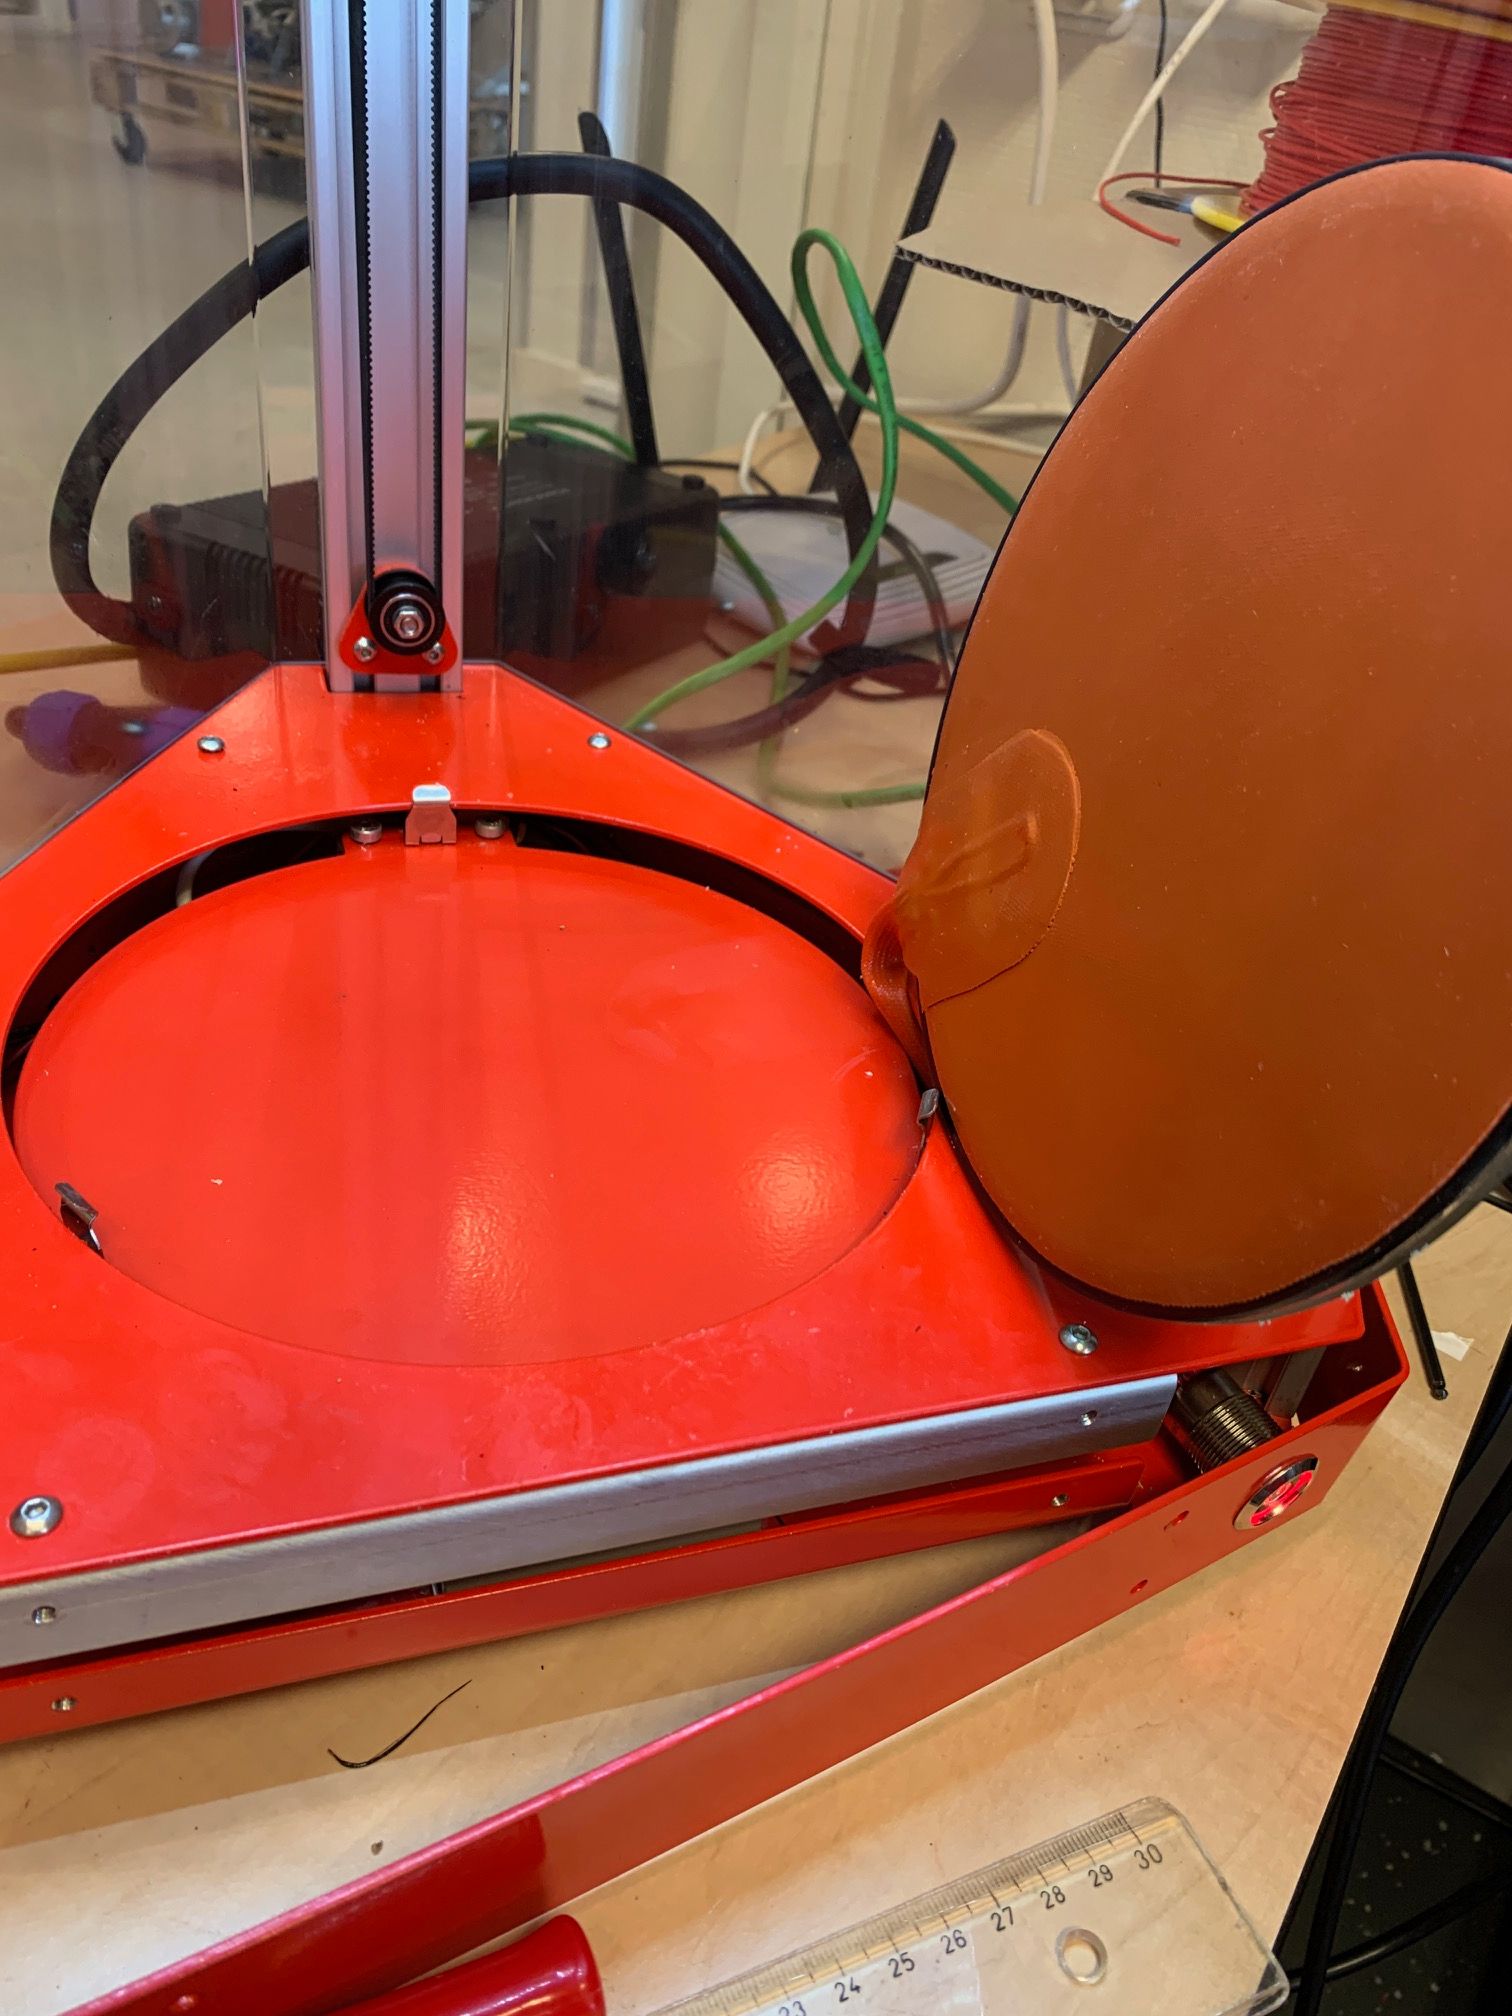
it uses a kinematic bed, and the nozzle pushing on the bed breaks a circuit. I think you can remove the bed and look underneath. If so, do that and post a picture
The manual says it has a automatic bed leveling. The button in the web browser works. I can’t get under the plate otherwise I have to dismantle the complete buttom…..M308 S1 P"spi.cs1" Y"rtd-max31865" ; create sensor number 1 as a PT100 sensor in the first position on the Duet 2 daughterboard connector
The nozzle (heater 1) works correct now. It heats up to 200degrees. Bed heating is not working yet. Is that maybe the wire that was wrong connected? But I can’t see where it has to be plugged. In documentation it won’t say.Once you can home the printer to the endstops (you didn't say if my previous advice helped)
Homing works now (Height is 650mm). Delta Calibration workt also (I think)For the heater fault, what temperatures does DWC report for the hotend and bed?
Bed is maybe heater 0? It gets a fault. -
-
@thomasvanderwal said in Duet 2 v1.02 not responding:
The manual says it has a automatic bed leveling. The button in the web browser works. I can’t get under the plate otherwise I have to dismantle the complete buttom…..
It's not magic, it needs to use something as a probe. What does pressing the button do? It should move the nozzle down and stop when it touches the plate, then probe the bed in multiple places. If it does nothing, it has NOT auto calibrated. You should have a sys/bed.g file on the SD card for this; please post that.
Most likely the wire I pointed out is the probe wire. But the configuration depends on what kind of probe it is. The last configuration you had was:
; Probes
M558 K0 P1 C"zprobe.in" H5 F120 T6000 ; configure analog probe via slot #0
M558 H30 ;*** Remove this line after delta calibration has been done and new delta parameters have been saved
G31 P500 X0 Y0 Z0.7 ; set Z probe trigger value, offset and trigger height
But you don't have anything connected to "zprobe.in" (which is a 4-pin header). The wire from the bed is 3-pin plug, wired in the same colour order as an endstop, so should probably connect to an endstop header ("e0stop" would be a good choice) and the configuration changed to reflect this.
It looks like you should be able to lift out the bed plate. This from the pdf manual:
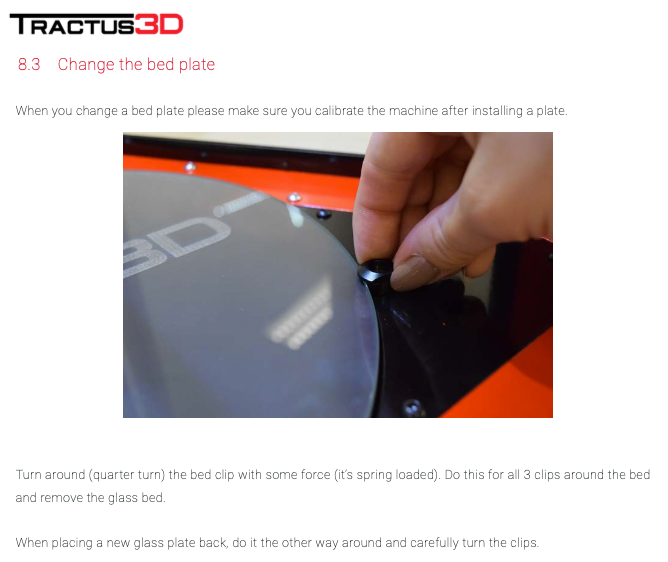
It looks like yours has 3 spring clips rather than quarter turn bed clips. Remove the bed and see what is underneath.
Bed is maybe heater 0? It gets a fault.
You need to tune both the bed and extruder heaters. See https://docs.duet3d.com/en/How_to_guides/Commissioning#h-7-tune-heaters
Please post your current config.g.
Ian
Bed-slinger - Mini5+ WiFi/1LC | RRP Fisher v1 - D2 WiFi | Polargraph - D2 WiFi | TronXY X5S - 6HC/Roto | CNC router - 6HC | Tractus3D T1250 - D2 Eth
-
@droftarts ai, it would be much work to get underneath it.
; bed.g
; called to perform automatic delta calibration
;
; generated by RepRapFirmware Configuration Tool v3.5.10 on Wed Feb 26 2025 13:56:06 GMT+0100 (Midden-Europese standaardtijd)

G28 ; home the towers first
; Probe the bed at 3 peripheral and 3 halfway points, and perform 6-factor auto compensation
; Before running this, you should have set up your Z-probe trigger height to suit your build, in the G31 command in config.g.
G30 P0 X0 Y84.9 H0 Z-99999
G30 P1 X73.53 Y-42.45 H0 Z-99999
G30 P2 X-73.53 Y-42.45 H0 Z-99999
G30 P3 X0 Y42.4 H0 Z-99999
G30 P4 X36.72 Y-21.2 H0 Z-99999
G30 P5 X-36.72 Y-21.2 H0 Z-99999
G30 P6 X0 Y0 H0 Z-99999 S6
; Use S-1 for measurements only, without calculations. Use S4 for endstop heights and Z-height only. Use S6 for full 6 factors
; If your Z probe has significantly different trigger heights depending on XY position, adjust the H parameters in the G30 commands accordingly. The value of each H parameter should be (trigger height at that XY position) - (trigger height at centre of bed)
; Configuration file for RepRapFirmware on Duet 2 Ethernet ; executed by the firmware on start-up ; ; generated by RepRapFirmware Configuration Tool v3.5.10 on Wed Feb 26 2025 13:56:06 GMT+0100 (Midden-Europese standaardtijd) ; General G90 ; absolute coordinates M83 ; relative extruder moves M550 P"Duet 3" ; set hostname ; Accessories M575 P1 S0 B57600 ; configure PanelDue support ; Network M552 P0.0.0.0 S1 ; configure Ethernet adapter M586 P0 S1 ; configure HTTP ; Smart Drivers M569 P0 S1 D2 ; driver 0 goes forwards (X axis) M569 P1 S1 D2 ; driver 1 goes forwards (Y axis) M569 P2 S1 D2 ; driver 2 goes forwards (Z axis) M569 P3 S1 D2 ; driver 3 goes forwards (extruder 0) ; Motor Idle Current Reduction M906 I30 ; set motor current idle factor M84 S30 ; set motor current idle timeout ; Axes M584 X0 Y1 Z2 ; set axis mapping M350 X16 Y16 Z16 I1 ; configure microstepping with interpolation M906 X800 Y800 Z800 ; set axis driver currents M92 X80 Y80 Z80 ; configure steps per mm M566 X1200 Y1200 Z1200 ; set maximum instantaneous speed changes (mm/min) M203 X18000 Y18000 Z18000 ; set maximum speeds (mm/min) M201 X1000 Y1000 Z1000 ; set accelerations (mm/s^2) ; Extruders M584 E3 ; set extruder mapping M350 E16 I1 ; configure microstepping with interpolation M906 E1000 ; set extruder driver currents M92 E663 ; configure steps per mm M566 E1200 ; set maximum instantaneous speed changes (mm/min) M203 E3600 ; set maximum speeds (mm/min) M201 E1000 ; set accelerations (mm/s^2) ; Kinematics M665 L230 R105.6 B200 H650 ; set delta radius, diagonal rod length, printable radius and homed height M208 Z0 S1 ; set minimum Z M666 X0 Y0 Z0 A0 B0 ; endstop adjustments and XY tilt, can be determined using auto calibration as well ; Probes M558 K0 P0 H5 F120 T6000 ; configure manual probe via slot #0 M558 H30 ;*** Remove this line after delta calibration has been done and new delta parameters have been saved G31 P500 X0 Y0 Z0.7 ; set Z probe trigger value, offset and trigger height ; Endstops M574 X2 P"xstop" S1 ; configure X axis endstop M574 Y2 P"ystop" S1 ; configure Y axis endstop M574 Z2 P"zstop" S1 ; configure Z axis endstop M851 Z-2.0 ; Stel de Z-offset in (verlaag of verhoog de waarde afhankelijk van je situatie) M500 ; Sla de instellingen op in de EEPROM ; Sensors M308 S0 P"bedtemp" Y"thermistor" A"Heated Bed" T100000 B4725 C7.06e-8 ; configure sensor #0 ;M308 S1 P"e0temp" Y"thermistor" A"Nozzle" T100000 B4725 C7.06e-8 ; configure sensor #1 M308 S1 P"spi.cs1" Y"rtd-max31865" ; create sensor number 1 as a PT100 sensor in the first position on the Duet 2 daughterboard connector ; Heaters M950 H0 C"bedheat" T0 ; create heater #0 M143 H0 P0 T0 C0 S140 A0 ; configure heater monitor #0 for heater #0 M307 H0 R2.43 D5.5 E1.35 K0.56 B1 ; configure model of heater #0 M950 H1 C"e0heat" T1 ; create heater #1 M143 H1 P0 T1 C0 S285 A0 ; configure heater monitor #0 for heater #1 M307 H1 R2.43 D5.5 E1.35 K0.56 B0 ; configure model of heater #1 ; Heated beds M140 P0 H0 ; configure heated bed #0 ; Fans M950 F0 C"fan0" ; create fan #0 M106 P0 S0 L0 X1 B0.1 ; configure fan #0 M950 F1 C"fan1" ; create fan #1 M106 P1 S0 B0.1 H1 T45 ; configure fan #1 ; Tools M563 P0 D0 H1 F0 ; create tool #0 M568 P0 R0 S0 ; set initial tool #0 active and standby temperatures to 0C T0 ; Selecteer tool #0 M104 S200 ; Stel de extruder in op 200°C M109 S200 ; Wacht tot de extruder op 200°C is -
@droftarts This not to follow for a dutchman.....Can you give me some tips?
-
@thomasvanderwal said in Duet 2 v1.02 not responding:
M665 L230 R105.6 B200 H650 ; set delta radius, diagonal rod length, printable radius and homed height
B parameter should be 100. It's the bed radius, not diameter.
; Probes
M558 K0 P0 H5 F120 T6000 ; configure manual probe via slot #0Change this to:
M558 K0 P5 C"e0stop" H5 F120 T6000 ; configure analog probe via slot #0Connect the 3-wire cable from the bed to the e0 endstop connector. Reset the printer, and in DWC in the Status panel under "Sensors" you should get a "Z-Probe":
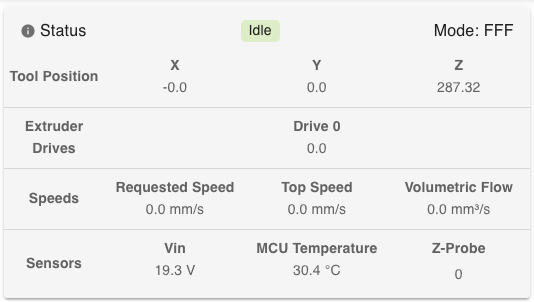

The probe is '0' if it is not triggered, and '1000' and highlighted red if it is triggered.
Press down on the bed and see if it changes. If it goes from 0 to 1000, all is good. If it goes from 1000 to 0, you need to invert the signal by changing M558 C parameter to
C"!e0stop". If it doesn't change, either the wiring is incorrect, or you need to investigate the bed further.M851 Z-2.0 ; Stel de Z-offset in (verlaag of verhoog de waarde afhankelijk van je situatie)
M500 ; Sla de instellingen op in de EEPROMRemove these lines from your endstop configuration. They are not correct.
M104 S200 ; Stel de extruder in op 200°C
M109 S200 ; Wacht tot de extruder op 200°C isRemove these lines from the end of config.g. You should not automatically heat the hot end at power on, it's dangerous.
After these changes, please also send
M98 P"config.g"to the printer in the DWC Console, and post the response (you can cut and paste text from the DWC console)This not to follow for a dutchman.....Can you give me some tips?
If there is something specific you don't understand, please ask a specific question. This is too vague to answer. For 'tips' you should read the documentation. If you mean "What do the Gcodes in the config.g mean?", you can look up what each Gcode means in the Gcode dictionary: https://docs.duet3d.com/en/User_manual/Reference/Gcodes
If we can get the probing working, I think you are nearly there!
Ian
Bed-slinger - Mini5+ WiFi/1LC | RRP Fisher v1 - D2 WiFi | Polargraph - D2 WiFi | TronXY X5S - 6HC/Roto | CNC router - 6HC | Tractus3D T1250 - D2 Eth
-
@droftarts I changed it all. Yes nearly there, but first Ihave to sesolve (or you haha) this:

-
@thomasvanderwal said in Duet 2 v1.02 not responding:
but first Ihave to sesolve (or you haha) this
I said this earlier: You need to tune both the bed and extruder heaters. See https://docs.duet3d.com/en/How_to_guides/Commissioning#h-7-tune-heaters
Ian
Bed-slinger - Mini5+ WiFi/1LC | RRP Fisher v1 - D2 WiFi | Polargraph - D2 WiFi | TronXY X5S - 6HC/Roto | CNC router - 6HC | Tractus3D T1250 - D2 Eth
-
@droftarts commissioning done!
When I wan't to print with a Tractus do I need simlify3d as a slicer or is Cura etc also good enough? -
@thomasvanderwal Any slicer is fine, the devil is in the detail of setting up the slicer correctly. I use the open source Prusaslicer, Orcaslicer and occasionally Cura. I don't use Simplify3D as it is paid-for software, and the open source options are just as good. Try and find a good guide to setting up the slicer profile for your machine.
You may also want to calibrate your steps per mm (ie make sure that when you command a 10mm movement it actually moves 10mm), and at your speeds and accelerations, which are set to the default at the moment.
We have a basic Calibration guide here: https://docs.duet3d.com/en/How_to_guides/Calibration . While our guide is good for basic calibration, you may want to fine tune everything. Teaching Tech has a good set of guides here: https://teachingtechyt.github.io/calibration.html
Ian
Bed-slinger - Mini5+ WiFi/1LC | RRP Fisher v1 - D2 WiFi | Polargraph - D2 WiFi | TronXY X5S - 6HC/Roto | CNC router - 6HC | Tractus3D T1250 - D2 Eth
-
@droftarts It's also new to me to make configuration files for the filaments.
Do I need to make a directory /filaments and create this?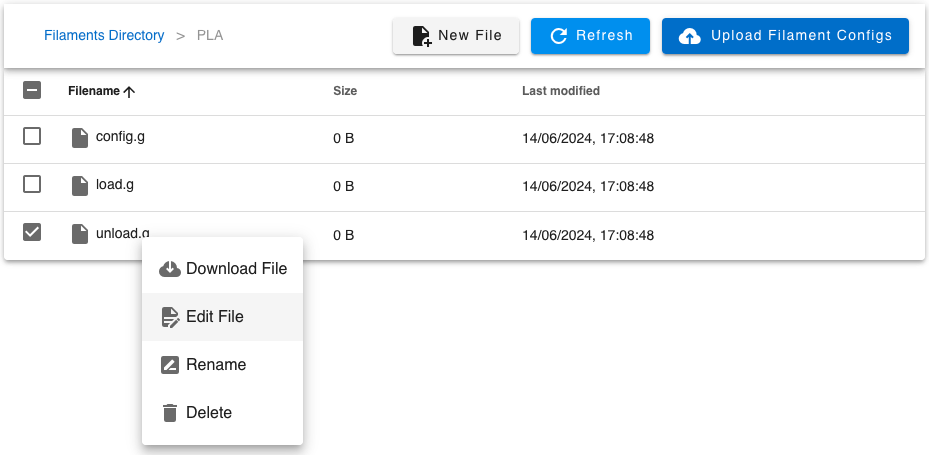
-
@thomasvanderwal You don't need to use the filament functionality of DWC/RRF. I don't! I just put the filament in that I'm going to use, and set up the slicer with the correct filament. It's up to you.
Creating a new filament should create the /filaments folder if there isn't one already. See https://docs.duet3d.com/en/User_manual/Reference/DWC_filaments
Ian
Bed-slinger - Mini5+ WiFi/1LC | RRP Fisher v1 - D2 WiFi | Polargraph - D2 WiFi | TronXY X5S - 6HC/Roto | CNC router - 6HC | Tractus3D T1250 - D2 Eth
-
I changed S1 to S0 in M569. It went the wrong way.
Finally I wanted to print. But it "hit" the bottom. I thought I leveled the delta but. It says:
Error: G30: Probe was not triggered during probing move -
@thomasvanderwal said in Duet 2 v1.02 not responding:
extrude en retract seems to go the wrong way.
Change the M569 S parameter for the extruder. See "Reversing a stepper motor" in https://docs.duet3d.com/en/How_to_guides/Commissioning#h-10-check-stepper-motors
Also my PLA goos neary through the opening
I'm not sure what you mean.
But I don't know if the extrusion or retracting button on my duetPanel works also with this code.
Can you show a picture of what buttons you mean?
Ian
Bed-slinger - Mini5+ WiFi/1LC | RRP Fisher v1 - D2 WiFi | Polargraph - D2 WiFi | TronXY X5S - 6HC/Roto | CNC router - 6HC | Tractus3D T1250 - D2 Eth