New firmware 1.21RC5 available
-
(continued from the rc4 thread, in case relevant here)
Ok, so if I downgrade back to 1.2.0 everything works as expected and I can see the Endstops hit = No for all axes
Then I upgrade to 1.2.1 (rc4 or 5) and all axes show Endstops hit = yes.Two wire switches connected to left two pins on duet board (with wifi component bottom left)
Should this be happening? Have I done something wrong?
The DWC machine properties page shows the raw endstop input state wirth used wirth firmware 1.21RC5. So "Endstop hit" really means the endstop input is high, otherwise it is low. M119 reports the actual endstop status.
The incorrect readout by DWC doesn't affect the behaviour.
Thanks for the tip with M119. I've checked that and its working fine.
I still have the problem though. When I downgrade to 1.2.0 Z homes correctly, when I upgrade to 1.2.1 (rc4 and 5) Z crashes into the bed and ignores the Z switch. Any ideas?
Sorry, a bit new to all this so rather helpless…
-
You posted your config.g file in the RC4 thread, but I haven't seen your homing files yet. Please post them.
-
Here's the homing files. They were on the rc4 thread as well so apologies if I'm double posting
[[language]]
; homex.g
; called to home the X axis
;
; generated by RepRapFirmware Configuration Tool on Wed Mar 07 2018 10:07:16 GMT+0000 (GMT)
G91               ; relative positioning
G1 S2 Z5 F6000    ; lift Z relative to current position
G1 S1 X-205 F6000 ; move quickly to X axis endstop and stop there (first pass)
G1 X5 F6000       ; go back a few mm
G1 S1 X-205 F600  ; move slowly to X axis endstop once more (second pass)
G1 S2 Z-5 F6000   ; lower Z again
G90               ; absolute positioning
[[language]] ; homey.g ; called to home the Y axis ; ; generated by RepRapFirmware Configuration Tool on Wed Mar 07 2018 10:07:16 GMT+0000 (GMT) G91 ; relative positioning G1 S2 Z5 F6000 ; lift Z relative to current position G1 S1 Y-205 F6000 ; move quickly to Y axis endstop and stop there (first pass) G1 Y5 F6000 ; go back a few mm G1 S1 Y-205 F600 ; move slowly to Y axis endstop once more (second pass) G1 S2 Z-5 F6000 ; lower Z again G90 ; absolute positioning[[language]] ; homez.g ; called to home the Z axis ; ; generated by RepRapFirmware Configuration Tool on Wed Mar 07 2018 10:07:16 GMT+0000 (GMT) G91 ; relative positioning G1 Z5 F6000 ; lift Z relative to current position G1 S1 Z-180 F6000 ; move Z down until the switch triggers G92 Z0 ; set Z position to trigger height ; Uncomment the following lines to lift Z after probing ;G91 ; relative positioning ;G1 Z5 F100 ; lift Z relative to current position ;G90 ; absolute positioning[[language]] ; homeall.g ; called to home all axes ; ; generated by RepRapFirmware Configuration Tool on Wed Mar 07 2018 10:07:16 GMT+0000 (GMT) G91 ; relative positioning G1 S2 Z5 F6000 ; lift Z relative to current position G1 S1 X-205 Y-205 F6000 ; move quickly to X and Y axis endstops and stop there (first pass) G1 X5 Y5 F6000 ; go back a few mm G1 S1 X-205 Y-205 F600 ; move slowly to X and Y axis endstops once more (second pass) G1 S2 Z-180 F6000 S1 ; move Z down stopping at the endstop G90 ; absolute positioning G92 Z0 ; set new Z position ;G1 Z5 F100 ; uncomment this line to lift the nozzle after homing -
The only thing I've spotted is that in homez.g, in this line:
G1 Z5 F6000 ; lift Z relative to current position
you need to add parameter S2.
Please run M574 without parameters, to check that the Z endstop configuration is reported correctly.
I suggest you test Z homing by starting with the nozzle a long way above the bed, telling the machine to home Z, then triggering the Z endstop switch manually. If that doesn't stop the Z movement, that will give you time to turn the power off before the nozzle reaches the bed.
-
Thanks for the tip of moving Z up first and triggering manually!
So HomeZ now works fine but HomeAll doesn't. I still get the same problem. Is this line correct (from homaall.g)..
[[language]] G1 S2 Z-180 F6000 S1 ; move Z down stopping at the endstop -
No, it has both S1 and S2 in it. Remove the S2.
-
No, it has both S1 and S2 in it. Remove the S2.
David,
Could you explain what S2 actually does on a Cartesian or CoreXY?
The Wiki is a little vague
We have:
"Snnn Flag to check if an endstop was hit (S1 to check, S0 to ignore, S2+S3 see note, default is S0) 1"
Then referring to that note we have:
"1RepRapFirmware can be set to enable or disable the "sensing" of endstops during a move. Using the S1 or S2 parameter on a delta printer causes the XYZ parameters to refer to the individual tower motor positions instead of the head position, and to enable endstop detection as well if the parameter is S1. If S3 is passed instead, RepRapFirmware will measure the axis length."
So there is an explanation of what S2 and S3 do on a Delta but no explanation of what S2 (or S3) do when used with other kinematics. I guess it just needs a sentence in the Wki to say something like "For other Kinematics S2 does "xyz" "
-
S2 causes a raw motor move, ignoring any mapping from axis movement to motors, and also disables axis limits, bed compensation and axis skew compensation.
So on a Cartesian printer, S2 is just like S1 except that endstop switches are not checked. On a CoreXY printer, G1 S2 Xnn will cause just the X motor to move, resulting in a diagonal movement. Similarly for G1 S2 Ynn. But the Z motor on a CoreXY printer drives just the Z axis, so G1 S2 Znn will cause just a Z movement
-
Thanks David,
Might be an idea to cut and paste that explanation into the Wiki, as and when you get time.
-
-
I did a super quick check of the various CNC Work/Machine coordinate changes, and all looks good. I will do a more thorough check as time permits.
However… CNCjs, in "Marlin" mode, doesn't understand how to decode the status report, and always shows machine coordinates in both the Machine and Work readouts. Not sure what the best answer is here...
-
Regarding the external drivers. I am still getting random layer shifting in both x and y. I have upgraded to 1.21 RC5 and no change. I am using M569 P5 S1 R1 T10:10:7:2 to create the step and direction signals.
I decided to remove the external drives to see if it was the mechanics of the system and not drive related. I installed traditional steppers on the X and Y axis using the built in drivers and re-ran the 3DBenchy. The results were pretty clear.
While I have a couple other minor issues with cooling to resolve, the print came out much better with no layer shifting. This has been the main problem I've been fighting for weeks. The mechanical side of the printer looks good, I just have something with these external drives that I cannot figure out.
They are 2HSS57 closed loop stepper drives and either something with the step generation or internal position/velocity monitoring loop in the drive is giving a problem. Nothing I did ever seemed to effect any change (inverting signals, changing from rising to falling edge, etc). The only thing that had a small impact was increasing the step signals from 1600 p/rev to 3200 on the drive itself and doubled the steps/mm. This resulted in reduced layer shifting, but it was still there.
Short of replacing all the external closed loop motors/drives with steppers and using the built in drives, I'm not sure really where to go from here.
-
I've installed RC5 and printed a couple of things without any issues. Update from RC4 was OK without requiring rename of the file.
Regards
-
I've also had success with installing RC5 over RC4 and doing a test print on a Kossel Mini delta.
-
Regarding the external drivers. I am still getting random layer shifting in both x and y. I have upgraded to 1.21 RC5 and no change. I am using M569 P5 S1 R1 T10:10:7:2 to create the step and direction signals.
I decided to remove the external drives to see if it was the mechanics of the system and not drive related. I installed traditional steppers on the X and Y axis using the built in drivers and re-ran the 3DBenchy. The results were pretty clear.
While I have a couple other minor issues with cooling to resolve, the print came out much better with no layer shifting. This has been the main problem I've been fighting for weeks. The mechanical side of the printer looks good, I just have something with these external drives that I cannot figure out.
They are 2HSS57 closed loop stepper drives and either something with the step generation or internal position/velocity monitoring loop in the drive is giving a problem. Nothing I did ever seemed to effect any change (inverting signals, changing from rising to falling edge, etc). The only thing that had a small impact was increasing the step signals from 1600 p/rev to 3200 on the drive itself and doubled the steps/mm. This resulted in reduced layer shifting, but it was still there.
Short of replacing all the external closed loop motors/drives with steppers and using the built in drives, I'm not sure really where to go from here.
What is the maximum step pulse rate that the drivers ever receive during printing? If the rate exceeds 25kHz then the firmware switches to double stepping. Ordinary stepper drivers don't notice this, but perhaps closed-loop ones might.
-
PS - @DougJones, please can you try the version at https://www.dropbox.com/s/iq9pzfaugyfei7x/Duet2CombinedFirmware-even.bin?dl=0. This is an experimental build that tries to maintain regular step pulse interval at high speeds, so it may play better with servo drivers. The maximum step rate is reduced by about one third.
Any thoughts re: the inconsistent homing mentioned earlier? Using a mini ir-probe with tight tolerances specified, but it's often off quite a bit from the leveling measurements which are always consistent.
-
PS - @DougJones, please can you try the version at https://www.dropbox.com/s/iq9pzfaugyfei7x/Duet2CombinedFirmware-even.bin?dl=0. This is an experimental build that tries to maintain regular step pulse interval at high speeds, so it may play better with servo drivers. The maximum step rate is reduced by about one third.
I have the same layer shifting problem as DougJones. I didn't bring it up since I thought it's caused by my clamp type coupling slipping. It looks like the amplitude of the shifting is reverse proportional to step per mm, my layer shifting is much less noticeable when I increased to 1000 steps/mm. I'll also test the firmware when I get a chance.
-
It's slightly more complicated than normal, because the name of the main firmware binary for the Duet WiFi and Duet Ethernet has changed.
To update a Duet WiFi or Duet Ethernet from RC2 to RC5, rename Duet2CombinedFirmware.bin to either DuetWiFiFirmware.bin or DuetEthernetFirmware.bin according to what your existing firmware and DWC expect. Then upload that file through the Settings->General tab of DWC. …....
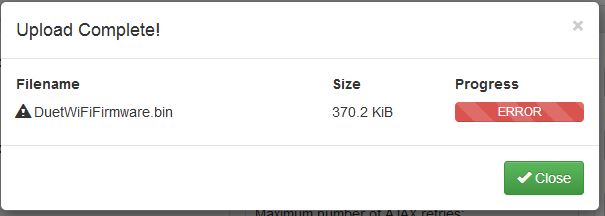
I renamed the file Duet2CombinedFirmware.bin to DuetWiFiFirmware.bin when I try to upload from setting page I get an error