Beginner Needs Help - Anycubic Kossel Plus + Duet WiFi -- HOW?
-
Hello all,
I'll just say it - I have no idea what I'm doing, and I need help. PLEASE NOTE: As much as I'd like to know WHY an issue is happening, I'd love to know HOW TO FIX THE ISSUE more. Also, please forgive me but I am not a hardware engineer at all, so I won't understand a word of what most forum members suggest on the forums (and I've tried).
Here's what I have:
- I bought an Anycubic Kossel Linear Plus and (separately) a Duet Wifi circuit board. The Kossel Plus has the linear rail and heated bed upgrades installed.
- The Duet Wifi board has XXXX firmware installed.
- I can connect to the Duet WiFi board via DHCP over Wifi successfully.
- I am trying to connect the Kossel Plus wiring to the Duet Wifi's connectors and I am not able to finish the setup and calibration. I have unplugged and reconnected everything and I'm still experiencing problems.
- I have never printed anything with this printer, either with the stock TriGorilla board or with the Duet Wifi board. I am stuck somewhere between "Setup" and "Calibrated" - I have disconnected everything so that I can start from scratch again.
- I tried the configuration wizard but didn't know what to enter at each stage. I am using the generated config files from that wizard currently.
Here's what looks wrong when the printer is connected to the Duet Wifi:
Note: I've used this wiki to connect the Duet to my printer: https://duet3d.dozuki.com/Guide/2.)+Wiring+your+Duet/9
When I connect to the Duet's web interface, the following things are happening:
a. The hot-end/"Heater 1" temperature is displaying "2000 C" - If I try to increase the heat on the "Heater 1" hot-end, I get a temperature fault displayed. The "2000 C" value doesn't change.
"Error: Temperature reading fault on heater 1: unknown temperature sensor channel"
b. The bed/"Heater 0" temperature is displaying "2000 C" also, but I did get the bed to heat up successfully before. It throws a fault when I try to increase the temperature. The "2000 C" value doesn't change.
"Error: Temperature reading fault on heater 0: unknown temperature sensor channel"
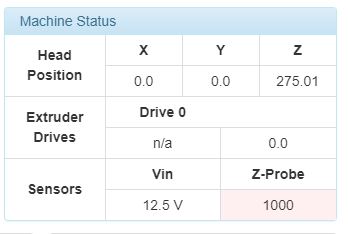
c. I can "Home all" successfully where all three arms/sliders move up to the top endstops and halt. The web interface then indicates that X, Y and Z are now homed.
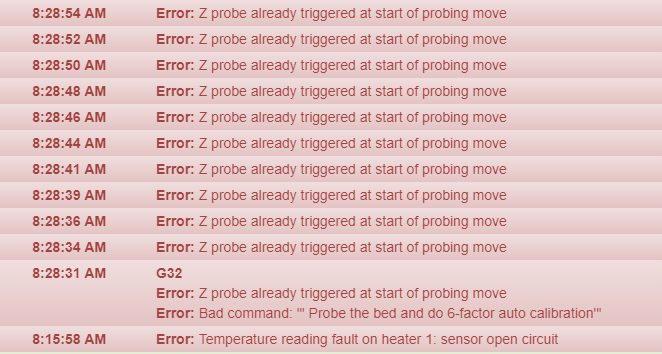
BUT! If I try to auto-calibrate the delta by clicking on that button, it errors out. The arms and hot-end drops to the bed and slowly marks three bed locations. The web interface then halts with an error: "Error: Z probe already triggered at start of probing move."
d. The Z-probe sensor (under Machine Status) has a value of 1000. This never changes.

Here are the printer wires that I don't know where to connect:
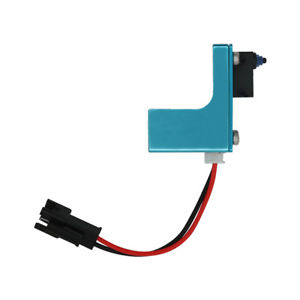
- Where does the "Z-" wire from the Anycubic-provided Z-probe connect to for best results? This is the wire that connects to the blue Z-probe when its attached (by magnet) to the hot-end.
The following printer wires are connected to the Duet board:
-
(Step 3) The PSU's red and black wires are connected to the "Power In" terminal. Black is to GND, and Red wire is to "VIN"
-
(Step 7) The endstop wires (two wires) from each top-mounted endstop are connect to the three connectors as shown in the picture. I used the provided three-pin connectors and connected the RED/positive wire to the "Signal" pin and Black/negative wire to the "GND" pin - no wires are connected to the middle "+3.3v" pin.
-
(Step 8 ) X, Y and Z Endstops are behaving correctly in the web interface when tested.
-
(Step 9) The hot-end heater wires are connected at E0 and screwed in securely.
-
(Step 10) - The correct motor wires are connected to the Motor connectors on the Duet board. Using the "Home All" button on the web interface successfully raises the three sliders to the top endstops.
-
(Step 12) - Fan wires are connected to the PWM fan connectors for "FAN0" and "FAN1." I believe the fans start up if I click the "Home All" button in the web interface.
-
(Step 13 and 14) - The Bed Heater wires are crimped with ferrules/pins and connected to the Duet connector. The Bed Thermistor wiring are also connected to the "BED_TEMP" connector.
Here are my config files:
a. config.g
; generated by RepRapFirmware Configuration Tool on Sun May 13 2018 19:16:40; General preferences
G90 ; Send absolute coordinates...
M83 ; ...but relative extruder moves
M555 P1 ; Set firmware compatibility to look like RepRapFirmare;*** The homed height is deliberately set too high in the following - you will adjust it during calibration.
M665 R150 L280 B100 H280 ; Set delta radius, diagonal rod length, printable radius and homed height
M666 X0 Y0 Z0 ; Put your endstop adjustments here, or let auto calibration find them; Network
M550 Pduettest
M552 S1 ; Enable network
M586 P0 S1 ; Enable HTTP
M586 P1 S0 ; Disable FTP
M586 P2 S0 ; Disable Telnet; Z-Probe
M558 P5 H20 F100 T6000 ; Set Z probe type to switch and the dive height + speeds
G31 P500 X0 Y0 Z2.5 ; Set Z probe trigger value, offset and trigger height
M557 R85 S20 ; Define mesh grid; Drives
M569 P0 S1 ; Drive 0 goes forwards
M569 P1 S1 ; Drive 1 goes forwards
M569 P2 S1 ; Drive 2 goes forwards
M569 P3 S1 ; Drive 3 goes forwards
M350 X16 Y16 Z16 E16 I1 ; Configure microstepping with interpolation
M92 X80 Y80 Z80 E663 ; Set steps per mm
M566 X1200 Y1200 Z1200 E1200 ; Set maximum instantaneous speed changes (mm/min)
M203 X18000 Y18000 Z18000 E1200 ; Set maximum speeds (mm/min)
M201 X1000 Y1000 Z1000 E1000 ; Set accelerations (mm/s^2)
M906 X1000 Y1000 Z1000 E800 I30 ; Set motor currents (mA) and motor idle factor in per cent
M84 S30 ; Set idle timeout; Axis Limits
M208 Z0 S1 ; Set minimum Z; Endstops
M574 X2 Y2 Z2 S1 ; Set active high endstops; Heaters
;M305 P0 T100000 B4138 C0 R4700 ; Set thermistor + ADC parameters for heater 0
;M143 H0 S220 ; Set temperature limit for heater 0 to 120C
;M305 P1 T100000 B4138 C0 R4700 ; Set thermistor + ADC parameters for heater 1
;M143 H1 S120 ; Set temperature limit for heater 1 to 220C; Fans
M106 P0 S0.3 I0 F500 H-1 ; Set fan 0 value, PWM signal inversion and frequency. Thermostatic control is turned off
M106 P1 S1 I0 F500 H1 T45 ; Set fan 1 value, PWM signal inversion and frequency. Thermostatic control is turned on
M106 P2 S1 I0 F500 H1 T45 ; Set fan 2 value, PWM signal inversion and frequency. Thermostatic control is turned on; Tools
M563 P0 D0 H1 ; Define tool 0
G10 P0 X0 Y0 Z0 ; Set tool 0 axis offsets
G10 P0 R0 S0 ; Set initial tool 0 active and standby temperatures to 0C; Automatic saving after power loss is not enabled
; Custom settings are not configuredb. homedelta.g
; generated by RepRapFirmware Configuration Tool on Sun May 13 2018 19:16:40
G91 ; relative positioning
G1 S1 X280 Y280 Z280 F1800 ; move all towers to the high end stopping at the endstops (first pass)
G1 X-5 Y-5 Z-5 F1800 S2 ; go down a few mm
G1 S1 X10 Y10 Z10 F360 ; move all towers up once more (second pass)
G1 Z-5 F6000 ; move down a few mm so that the nozzle can be centred
G90 ; absolute positioning
G1 X0 Y0 F6000 ; move X+Y to the centrec. bed.g
; called to perform automatic delta calibration via G32
;
; generated by RepRapFirmware Configuration Tool on Sun May 13 2018 19:16:40
M561 ; clear any bed transform
G28 ; home the printer; Probe the bed at 3 peripheral and 0 halfway points, and perform 3-factor auto compensation
; Before running this, you should have set up your Z-probe trigger height to suit your build, in the G31 command in config.g.
G30 P0 X0 Y84.9 H0 Z-99999
G30 P1 X73.53 Y-42.45 H0 Z-99999
G30 P2 X-73.53 Y-42.45 H0 Z-99999
G30 P3 X0 Y0 H0 Z-99999 S3
; Use S-1 for measurements only, without calculations. Use S4 for endstop heights and Z-height only. Use S6 for full 6 factors
; If your Z probe has significantly different trigger heights depending on XY position, adjust the H parameters in the G30 commands accordingly. The value of each H parameter should be (trigger height at that XY position) - (trigger height at centre of bed)**
Can anyone help me but understand that I am not experienced at all with 3D printers or terminology.Thanks and best regards.
-
I can't help much because I know next to nothing about Delta printers. However, the heater faults and readings of 2,000 deg C usually indicate that the thermistor channels are open circuit or shorting (can't remember which). Anyway, it's likely to be a wiring problem.
-
@deckingman said in Beginner Needs Help - Anycubic Kossel Plus + Duet WiFi -- HOW?:
I can't help much because I know next to nothing about Delta printers. However, the heater faults and readings of 2,000 deg C usually indicate that the thermistor channels are open circuit or shorting (can't remember which). Anyway, it's likely to be a wiring problem.
Actually I think it may be that the M305's are all commented out that is causing the heater faults!
-
@dougal1957 Yes that would do it too
 I didn't even look at the config file.
 -
I have Anycubic Kossel with TriGorrilla, and I have a couple of printers with Duet. Everything I have is a Delta. So maybe I can help. First specific q/a:
Where does the probe (the one that attaches with a magnet) wire to the Duet board?
Physical WIring: Attach it to the Z- endstop connector. See red circles in diagram. For a microswitch, polarity does not matter.
Configuration: In your config M558 command, specify Mode 4, and in the G31, the offset between the nozzle and the probe. The X/Y/Z offsets in the G31 need to be set to YOUR printer. Eyeball it to start with, and refine later.
Something close to:
G31 X20 Y10 Z5 P25 M558 P4 X0 Y0 Z1 H5 F100 T2000 
-
Thank you for your help with this. I really appreciate it.
I've uncommented the "Heater" section and now the Bed/"Heater 0" tool responds correctly and heats up as expected.
Unfortunately, the "Tool 0"/"Heater 1" line still displays a temperature of 2000C and "fault" - it does not change if I select a different temperature to test. Any suggestions?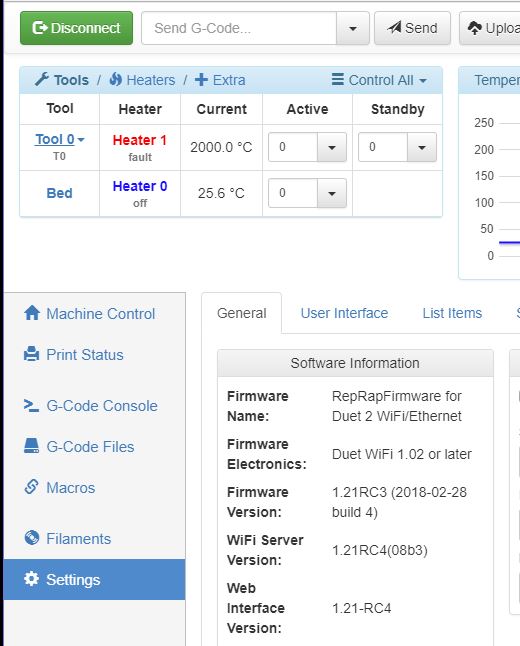
-
Hi Danal - Thank you for the advice. Here's where I am:
a. I've re-crimped the "Z-" wire to the endstop connector and updated my config.g file with the new G-codes. The Z-value now shows a height value. Unfortunately, the "Z-probe" sensor value is still stuck at 1000. Is this ok?
b. When I press the "auto delta calibration" button in the web interface, the hot-end drops down and attempts to do its thing. Several errors pop up and eventually the process just stops.
c.
Question: Where does the "T0" wire from the hot-end connect to? Is this why the "Tool 0"/"Heater 1" temperature is still displaying 2000C and has the following error?"
Error: Temperature reading fault on heater 1: sensor open circuit"
I really appreciate all of the help. How do you like your delta printers with the Duet boards? Do you have any tips or recommendations? Thanks again.
-
Update - I reterminated the Hot-End/"Heater 1" power cables and moved the "T0"/Hot-End thermistor to the matching E0 dual pin connector. Both of the Heaters (Hot-End and Bed) are now responding to the temperature settings successfully.
Thank you for your help with this. The only thing remaining is to troubleshoot what these Z-probe errors are - and getting to understand what calibration means. The resources here are difficult to say the least.
But thanks again for getting my two Heater sources working. Cheers!
-
On your M558 command, add "I1". (That is an "eye one").
This inverts the probe. At the moment, the duet thinks the switch has already hit the bed, thus the "...already triggered...".
Once it is inverted, it should eliminate those error messages.
-
@mindbender9 said in Beginner Needs Help - Anycubic Kossel Plus + Duet WiFi -- HOW?:
I really appreciate all of the help. How do you like your delta printers with the Duet boards? Do you have any tips or recommendations? Thanks again.
Personally, I love them, and REALLY like the Duet with the Smart Effector. That effector uses the nozzle itself as a probe, so you can have a G32 in your "print start gcode".
Hints:
-
Once you get G32 working, be sure you "save" the results with an M500... and be sure that the printer "loads" the results every time it boots by having an M501 somewhere near the end of your "config.g".
-
Be sure the M665 L value is correct. This is the length of the diagonal rods, "joint center to joint center". Your Anycubic documentation should have this. This is the one parameter that G32 does NOT set... and is foundational to G32 getting the things it does set, getting those correct.
-
You should only have to probe/calibrate the printer when something changes. Removing and replacing the bed, changing nozzles, etc.
My sequence when calibrating the printer is something like:
Part 1:
Attach your probe.
Optionally, Heat the bed and the extruder. This increases the accuracy of the calibration, but is not absolutely required.
Machine Control > Auto Delta Calibration
Go to the G-Code Console and check the "deviation". Perhaps run it again and see if it gets better. Learn what is typical to YOUR printer. Here's a sequence from my "Big Fast Delta":
7:18:36 AMG32 Calibrated 6 factors using 7 points, deviation before 0.134 after 0.009 7:16:54 AMG32 Calibrated 6 factors using 7 points, deviation before 0.165 after 0.058 When the deviation is acceptable to you, issue an M500 to "save" the results.
Part 2:
Machine Control > hit the DROPDOWN next to "Auto Delta Calibration" and select "Run Mesh Grid Compensation"
This will probe a bunch of points and then pop up a grid map. Pay attention to the overall deviation numbers at the bottom. The "spread" should be small, less than 1/2 to 1MM.

-
-
Hi @Danal
Ok. So here's what I've done so far for calibrating my Kossel Plus:
- I've set my the following lines in config.g to:
M558 P4 X0 Y0 Z1 H5 F1000 T5000 I1
M665 R134 L271 B85 H300-
Followed Part 1 above:
a. Attached Probe to the Hot-End
b. I heated both the Hot-End to 180C and Bed to 60C
c. Clicked on "Home All" on the main page -
After clicking the "Auto-Delta Calibration" button on the main page, the Hot-End (and probe) did the following:
a. The Hot-End and probe smashes into center of the bed. Hard.
b. The Hot-End scrapes along the bed towards the Z motor, rises up to about 3cm and clicked several times
c. The Hot-End remained about 3cm above the bed and moved towards the Y motor and clicked several times
d. The Hot-End remained 3cm above the bed and moved towards the X motor and clicked several times again
e. The Hot-End then centered itself, rose to 18cm and then froze. -
Here's the error messages that occured during the Auto-Delta Calibration:

-
I don't know how you were able to check the "deviation" - What code did you use? AMG32 generated an error indicating that it was an unknown command.
I didn't understand what I'm supposed to do here, so I didn't proceed on to Part 2. -
Here's my bed.g file:
; generated by RepRapFirmware Configuration Tool on Sun May 13 2018 19:16:40
M561 ; clear any bed transform
G28 ; home the printerM401 ; deploy the Z probe
; Probe the bed at 3 peripheral and 0 halfway points, and perform 3-factor auto compensation
; Before running this, you should have set up your Z-probe trigger height to suit your build, in the G31 command in config.g.
G30 P0 X0 Y84.9 H0 Z-99999
G30 P1 X73.53 Y-42.45 H0 Z-99999
G30 P2 X-73.53 Y-42.45 H0 Z-99999
G30 P3 X0 Y0 H0 Z-99999 S3M402 ; retract the Z probe
G1 X0 Y0 Z150 F15000 ; get the head out of the way of the bed
So to be honest, I'm not understanding what's going on and what's supposed to happen. Any suggestions on what to do now?
Thanks,
-
It sounds that your delta calibration is initially a long way out. Temporarily increase the H parameter in the M558 command to 30 and see if that allows you to calibrate without the "Z probe was not triggered" messages.
-
@dc42 said in Beginner Needs Help - Anycubic Kossel Plus + Duet WiFi -- HOW?:
It sounds that your delta calibration is initially a long way out. Temporarily increase the H parameter in the M558 command to 30 and see if that allows you to calibrate without the "Z probe was not triggered" messages.
i had similar issue. here is a resolution that worked for me
- delete config-override.g (or rename it)
- home your delta
- with a ruler measure nozzle height
- put this measure into M665 Hxxxx
- run auto-calibration
- M500 to store results
-
I following your instructions and the Z-probe did the same exact steps as before. The same "Error: Z probe was not triggered during probing move" errors appeared (one for each point).
I should note that this is the stock Z-probe that I'm using (it came with the Anycubic Kossel Linear Plus):
I did not run M500 to store the results since the probe was clicking while airborne (3cm above the bed). I don't know why this is happening - do you need to see any of my config files?It's not the stock Z-probe that's clicking, because it's dead. The loud clicking is actually coming from either the diagonal arms which are fighting the movement, or the hot-end hardware as it's being moved toward the outer edge of the platform.
Either way, this isn't good. Something is wrong with either the configurations or the hardware. Way to go, Anycubic3d...
I'm stumped.
-
@mindbender9 said in Beginner Needs Help - Anycubic Kossel Plus + Duet WiFi -- HOW?:
I following your instructions and the Z-probe did the same exact steps as before. The same "Error: Z probe was not triggered during probing move" errors appeared (one for each point).
I should note that this is the stock Z-probe that I'm using (it came with the Anycubic Kossel Linear Plus):
I did not run M500 to store the results since the probe was clicking while airborne (3cm above the bed). I don't know why this is happening - do you need to see any of my config files?
I'm stumped.
What do you mean by "the probe was clicking while airborne" ? Have you tested the z probe and its configuration? See https://duet3d.dozuki.com/Wiki/Test_and_calibrate_the_Z_probe.
-
It looks like the Z-probe doesn’t respond or stop if I attempt a Dynamic Test from the link above. The repeated contact with the bed at high speeds must’ve damaged it. I’m also looking at the damage to the surface of the bed, and I have to ask: Is this all typical for new Duet board owners?
Moving ahead - Is there a way to calibrate this printer without the use of a Z-probe? And if so, how?
I’m trying to make the most of this, but This is all very discouraging.
-
Hads the probe ever worked with the Duet? If not then it's probably a wiring or configuration issue.
You can do manual configuration as long as you are running fairly recent firmware. Set Z probe type 0 (that's P0 in the M558 command in config.g) to tell the firmware that you have no Z probe. Then run G31 as usual. The web interface will prompt you.
-
You can also make a probe for a couple of dollars/pounds, if you have access to a printer that works. (Check local libraries and maker organizations).
https://www.thingiverse.com/thing:1976680
And a microswitch, which are available from MANY channels. Here's what I did on an Anycubic that was old enough to have not shipped with a probe (non Duet board... but the switch holder and stuff is still good knowledge).
http://danalspub.com/2017/11/upgrading-an-anycubic-kossel-to-marlin-1-6-6/
-
Hi DC. I'm not sure if the stock probe has ever worked from the beginning with either board, so I've ordered your DC42 IR sensor to continue this setup with. Your video on the IR sensor convinced me to purchase it, but I'm hopeful that its install will be easier.
In the meantime, I'll attempt the manual configuration with Z probe type 0 and see what happens (when I get home).
Question: If I run G31 (after setting the Z probe type to 0), will I have to save any settings or alter the config,g file with any values? If so, where are those values found?
Thank you for your continued help.
-
I've decided to upgrade to an IR sensor, but I appreciate your help.
Best regards and many thanks!
P.S. Your BFD delta is something else. Do the mag arms make a difference performance-wise?


