Duet3D Logo Duet3D
    • Tags
    • Documentation
    • Order
    • Register
    • Login
    1. Home
    2. deckingman
    • Profile
    • Following 1
    • Followers 25
    • Topics 245
    • Posts 8,383
    • Best 1,397
    • Controversial 11
    • Groups 0

    deckingman

    @deckingman

    Just an old guy who likes to play around with stuff.

    1.9k
    Reputation
    889
    Profile views
    8.4k
    Posts
    25
    Followers
    1
    Following
    Joined Last Online
    Website somei3deas.wordpress.com/ Location Denton, Norhampton, UK

    deckingman Unfollow Follow

    Best posts made by deckingman

    • My CoreXYUVAB as of today

      Just published a YouTube video of my machine's current state of evolution if anyone is interested. https://www.youtube.com/watch?v=IG3AGKDzdH4.

      I've attempted to explain the machine without using words - hope it works. It's best viewed on something a bit bigger than a 'phone and better still with reasonable speakers. It'll take 10 minutes of your time to watch it.

      posted in My Duet controlled machine
      deckingmanundefined
      deckingman
    • What happens to the temperature inside your nozzle?

      I've attempted to answer the question in the title by putting a thermocouple inside a nozzle (as opposed to just measuring the hot end temperature). Then running various tests to evaluate the further effects of deflected (as opposed to direct) part cooling air on nozzle temperature with both brass and hardened steel nozzles. The results might surprise you (or at least give food to thought) - especially if you use (or are considering using) hardened steel nozzles.

      https://somei3deas.wordpress.com/2020/05/21/the-effect-of-deflected-part-cooling-air-on-brass-and-steel-nozzle-temperatures/

      posted in 3D Printing General Chat
      deckingmanundefined
      deckingman
    • My 6 input (5+1) mixing hot end

      I've made a bit of progress on this if anyone is interested - details on my blog here

      https://somei3deas.wordpress.com/2020/02/24/my-6-input-51-mixing-hot-end-version-2/

      posted in My Duet controlled machine
      deckingmanundefined
      deckingman
    • RE: Poor print quality with RRF3 - especially 3.2.2.

      A quick update for anyone who is/was following this thread. The repairs to the printer after the crash (RRF 3.3.beta1+1) were all completed within a couples of days. We don't really know the cause but @dc42 thinks it may have been due to something called a "race condition". Anyway, long story short but I've done lots of test prints and I'm now running 3.3.beta2. With that, I got three good repeats of the part I was printing before - not perfect prints (mostly due to a lack of retraction) but they were consistent so I finally had a baseline to work with. The problems I had with pressure advance seem to have gone away so I've re-enabled that. I've moved on to printing other things (because I really don't want to make any more of that same part) and have just completed 3 collet holders which take a tad under 7 hours each. They are quite respectable prints with no significant variations in print quality between all 3.
      So confidence has gone up a couple of notches..........

      posted in Tuning and tweaking
      deckingmanundefined
      deckingman
    • The worlds first 6 input, single nozzle, multi material hot end?

      This is a follow on from my earlier multi-input mixing hot end designs. I believe it might be the worlds first hot end capable of printing multiple materials at up to 350 deg C whilst maintaining the temperature of other loaded filaments at less than 200 deg C. That is to say with this single hot end, I could potentially print a 6 part object with each part made from a different material ranging from say PLA at around 200 deg C up to PC at around 320 deg C or higher and the PLA would not get "cooked". It also has the capability to combine filaments with similar thermal characteristics and because it has 6 melt chambers, it could also be used with very large nozzle diameters requiring very high flow rates.

      Link here if anyone is interested (and there is a bit of an appeal at the end). https://youtu.be/1j0UH6ctTDI

      posted in 3D Printing General Chat
      deckingmanundefined
      deckingman
    • My multi input, multi material, mixing hot end

      I've taken a few more tentative steps along what I'm sure will be a bumpy road and which may even end up in a cul-de-sac. But anyway, I've started to document the journey on my blog if anyone is interested https://somei3deas.wordpress.com/2019/06/06/my-modular-multi-input-multi-material-mixing-hot-end-part-1/

      posted in My Duet controlled machine
      deckingmanundefined
      deckingman
    • RE: Poor print quality with RRF3 - especially 3.2.2.

      For anyone watching this thread, and for those who have contributed, I just want to say that the Duet team and I have opened up the communication medium that we used at the very start (when Gen 3 was still at the pre-production stage), in order to work together to resolve these issues. That's nothing personal - just that these forums are maybe not the best way to post messages rapidly back and forth between us.

      I thought it important to state that fact, in case anyone got the impression that I had been abandoned by the Duet team - that isn't the case and we are working together to try and get to the bottom of wtf is happening.

      posted in Tuning and tweaking
      deckingmanundefined
      deckingman
    • Duet Gen 3 Teaser

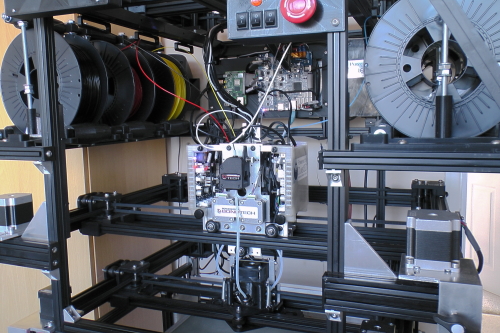
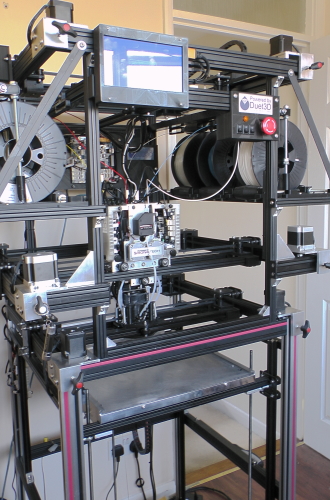
      I thought that I would post a couple of pics of my printer as it stands right now - although I can't get back far enough to get the full 1.7 metre height in the pics.

      0_1567758524484_pic1.jpg

      0_1567758540770_pic 2.jpg

      So this is a CoreXYUVAB with 6 extruders. XY is the lowest gantry and currently carries a Diamond 5 colour hot end. UV is the next gantry which moves in sync with the XY apart from when homing. It carries 6 Bondtech BMGs and two Duet gen 3 (prototype) expansion boards. This is the heaviest gantry and is driven by 2.8 Amp Nema 23s. AB is a uppermost gantry and does the opposite moves to the lower two gantries. It carries nothing more that lumps of lead to cancel the forces of the lower two gantries. XY and Z are connected to the 3rd expansion board (not visible in those pics). UVAB are connected to the main board mounted at the back of the printer along with the RPi. Eventually these will have covers.

      The total moving mass, excluding the load balancing gantry and now that I have upgraded from 5 extruders to 6 as well as fitted the expansion boards to the extruder carriage, is a tad over 5 Kgs (up from about 3.5 kgs). I used to run non-print moves at 350mm/sec with acceleration set to 1000 mm/sec^2 and see no reason why I won't be able to continue to use those settings with the larger Nema23s driving the now heavier UV gantry (but we'll see)....

      posted in My Duet controlled machine
      deckingmanundefined
      deckingman
    • "Universal" Tool Change Files (on steroids).

      I'm posting this here in the "Gcode meta commands" section because these files contain many of these type of commands which might serve as practical examples. But the files might also be useful for anyone setting up a tool changer.

      I'm slowly getting to grips with meta commands and the object model but I've had a lot of help along the way from others on these forums and from DC42, so a big thank you to all who have helped me out.

      I don't have a tool changer as such. That is to say, I do have multiple tools and print multiple filament types but with a 6 input, dual heat zone, single nozzle hot end. So switching between filaments means moving the print head over a "chute" and purging, wiping etc as well as changing temperatures and filament specific parameters for things like pressure advance, retraction settings, speed multipliers etc. There are a lot of other things going on such as when changing from a high temperature filament to a low temperature one, I need to purge out the high temperature filament with low temperature filament but before I change the temperature. Otherwise, the nozzle will still be full of high temperature filament which won't extrude at the new, lower, temperature setting. Then I need to do a second purge with the new filament at the correct temperature.

      Anyway, here is what I have for tfree0 but you'll see that with the use of conditional statements and meta commands, it's a "universal" file. So I could wrap all the commands into a single macro called something like "toolfree" and use a one line M98 in every tfree file. Likewise tpre and tpost. The files are all annotated so shouldn't need any further explanation.

      echo "Running tfree",state.currentTool,tools[state.currentTool].name
      ; in this case will print "Running tfree 0 PLA" 
      
      G10 ; retract
      

      All this file does is to retract the filament but note the "universal" echo statement which uses the current tool number and current tool name.

      Here is tpre

      
      echo "Running tpre",state.currentTool,tools[state.currentTool].name
      
      ; check if axes homed and if so, move to purge position, if not, abort
      
      if !move.axes[0].homed || !move.axes[1].homed || !move.axes[2].homed || !move.axes[3].homed || !move.axes[4].homed 
      	abort "One or more axes not homed - aborting"
      	
      G1 X{global.left} U{global.left} Y{global.rear} V{global.rear} F18000; move to "bucket"
      

      In tpre, I need to move both the print head (XY) and the extruder gantry (UV) to a position over the purge bucket (chute) which is defined by the global variables. So it's important that the printer has been homed before attempting the G1 moves. Hence the check which will either do the move or abort. Again I use a "universal" echo statement which will tell me which tpre file is being run as well as the tool name.

      Here is tpost which has a bit more going on like additional purge but only if going from high temperature filament to low temperature, force cooling but only if going from a high temperature to a low temperature, waiting for temperatures to settle, wiping the nozzle etc.

      
      echo "Running tpost",state.currentTool,tools[state.currentTool].name
      
      ;state.currentTool is the current tool number, so in this case will print "Running tpost 0 PLA"
       
      ; When switching from a high temperature filament to a low temperature filament
      ; it is necessary to purge out the old filament with the new filament
      ; at the high temperature. No tool is active at the start of tpre 
      ; so I need to do the purge here in tpost. 
      
      ; By doing it first, the hot end won't have had time to cool
      ; heat.heaters[1] is the nozzle heater
      ; tools[n] is the tool number
      ; active[0] is the nozzle active temperature
      if heat.heaters[1].current >= tools[state.currentTool].active[0]-5; 5 degree tolerance - no point purging if both temps close to each other
      	echo "Purging out high temperature filament" 
      	M98 P"0:/macros/SinglePurge.g" ; purge nozzle
      ;the following will force cool the nozzle to within 4 deg of the active temp if it's too hot
      while (heat.heaters[1].current > heat.heaters[1].active+4)
      	echo "Force cooling nozzle now at ", sensors.analog[1].lastReading ; show current hot end temperature
      	M106 P2 S255; turn on force cooling fan 
      	G4 S1 ; wait a sec
      M106 P2 S0 ;turn fan off
      
      ; the following will wait for the nozzle only to heat to within 3 degrees of it's active temp if it's too cold
      ; it won't wait for the combining block temperature to change
       
      while (heat.heaters[1].current < heat.heaters[1].active-3)
      	echo "Waiting for Tool",state.currentTool,"to reach temperature" ; will print "Waiting for Tool 0 the reach temperature"
      	echo "Now at",sensors.analog[1].lastReading  
      	G4 S1
      	
      ; load filament specific parameters from macros/Filaments
      echo "Loading ",tools[state.currentTool].name," specific parameters" ; will print for example "Loading PLA specific parameter"
      M98 P{"0:/macros/Filaments/"^tools[state.currentTool].name^".g"} ; will load the macro with the exact same name as the tool	- so be careful!!
      															; in this case, it will load 0:/macros/filaments/PLA.g		
      echo "Purging Tool", state.currentTool,tools[state.currentTool].name ; will print "Purging Tool 0 PLA" in this case
      M98 P"0:/macros/SinglePurge.g" ; purge nozzle
      echo "Wiping nozzle" 
      M98 P"0:/macros/Nozzle wipe" ; wipe nozzle
      M400 ; wait for moves to complete
      G1 R2 X0 Y0 U0 V0 Z0 F18000 ; return gantries to whence they came prior to tool change
      G11; unretract 
      

      The comments within the file should explain what's happening but if not, I'll happily answer any questions.

      So hopefully you'll see that by using meta commands and conditional gcode, I've ended up with "universal" files that can be used with any tool. As stated earlier, the entire thing could be wrapped in another macro so each and every tpost file would simply have the same single M98 to call that macro. Without those meta commands, I would have specifically reference say the active temperature for the specific tool, so every tpost file would be slightly different. I have 9 tools defined so that's 27 separate tool change files which would otherwise need to have slight differences between them.

      There is just one thing I still need to address which is this....

      M98 P{"0:/macros/Filaments/"^tools[state.currentTool].name^".g"}

      This will extract the current tool name and add it to the path for the macro. So for example with tool named "PLA" the macro must also be named "PLA.g". I need to add error checking to catch cases where the macro is incorrectly named or missing.

      This was great help https://docs.duet3d.com/en/User_manual/Tuning/Tool_changing. Especially the section on tool change sequence. There is one thing I found slightly quirky which is that the old tool gets deselected after tfree, but the new tool isn't active until after tpre. So no tool is selected during tpre which means that if you want to do anything with extruders, you'd have to do something like pick up and save the active temperature of the previous or next tool in a variable, set the temperature to the correct value for the old tool, do what you need to do, then restore the correct active temperature.

      Anyway, I hope the above may be of use or at least give you some ideas.
      posted in Gcode meta commands
      deckingmanundefined
      deckingman
    • 1st multi material print with my 6 input hot end

      It's been a long and bumpy road but I've finally developed my 6 input hot end to the point where I can now print and switch between, almost any filament type from Carbon fibre Nylon, to flexible filaments such as TPU, whilst retaining the ability to combine similar filament types for multi colour printing.

      Link to YouTube video here if anyone is interested - it'll take 23 minutes of your life to watch it fully. https://youtu.be/5VG_r_b00sY

      posted in My Duet controlled machine
      deckingmanundefined
      deckingman

    Latest posts made by deckingman

    • RE: [RRF 3.5.2] Extruder motor fails to do a long extrusion

      @leone On the video you posted, it looks to me like the extruder is trying to run very much faster than 100mm/minute. My best guess is that either you miss typed the feedrate or you have the steps per wildly out. Posting your config.g as well some information about the extruder and motor would be helpful.

      posted in General Discussion
      deckingmanundefined
      deckingman
    • Where are people buying filament here in the UK

      Sadly I learn that 3DFilaprint have ceased trading.
      For me, it's the end of a long standing relationship. They used to offer an excellent fast and efficient service, and stocked just about every filament type from every manufacturer. So I need to find another UK based supplier but search results show a myriad of options. Therefore I'd like to know if anyone on these forums has any recommendations (good or bad).

      posted in General Discussion
      deckingmanundefined
      deckingman
    • RE: Issue with Heater 1 Predicted Maximum Temperature Warning

      @R006 If you get a warning that a heater could potentially reach a dangerous temperature, then the safest way to address this is to use a less powerful heater. Then if say a MOSFET failed, the heater would get hot, but not dangerously so.

      posted in General Discussion
      deckingmanundefined
      deckingman
    • RE: Centering a print

      @Derek-F You'll need to redo all your homing files. The origin is now set as the centre of the bed so if you want to probe the bed in the centre, you'll need move the print head to X=0 Y =0. i.e this line "G1 X200 Y200 F6000 ; go to first probe point" needs to be changed to "G1 X0 Y0 F6000 ; go to first probe point

      Note that the position of the end stops can stay the same. Note also that any files you previously sliced with the origin set to one corner of the bed will need to be re-sliced because they will contain moves in the range zero to circa 400 whereas with the origin in the slicer set to the centre, the moves need to be in te range minus circa 200 to plus circa 200.

      Edit posted while DC was typing. also, it appears my PC has the wrong time set.

      posted in Tuning and tweaking
      deckingmanundefined
      deckingman
    • RE: Centering a print

      @Derek-F

      1. M500 stores parameters and should never appear in config.g. M501 reads parameters. If you use config-override.g then it needs to be present at the end of config.g. If you don't use config-override.g then don't use M501.
      2. Only config.g and config-override.g if it's present.
      3. Something isn't right. The config.g you posted shows M208 for X to be zero and plus circa 400. If you had followed my instructions, these should be circa minus 200, and circa plus 200.
      posted in Tuning and tweaking
      deckingmanundefined
      deckingman
    • RE: Centering a print

      @Derek-F said in Centering a print:

      ................... I then sent M500 to save the setting.

      Ahhh - that could be what's screwing things up for you. When you save settings this way, it writes the values to another file called "config-override.g" which does exactly what the name suggests. That is to say, it overwrites any G or M codes that may be in config.g. When power is applied, the contents of config.g are read and applied, then if your config.g contains an M501 command (which it does) it will read and act upon any commands which are contained in config-override.g. So if you have anything in config-override.g which relates to axis dimensions, offsets, or position, these commands will supersede (overwrite) the previous values which were read from config.g. Which effectively means that editing values in config.g will have no effect (because they are being overridden by commands in config.override.g).

      This is why personally, I never use M500, M501 and have no config-override.g file and instead only use config.g. In my opinion, having configuration values stored in two different locations simply leads to confusion and mayhem. You can either do as I do and stop using config-override.g and only use config.g, or make sure that if you make any changes, make then in config-override.g instead of config.g (but sooner or later, you'll forget and it will come back and bite you in the arse).

      posted in Tuning and tweaking
      deckingmanundefined
      deckingman
    • RE: Centering a print

      @Derek-F The bit that's missing is that you haven't said what you set the Xmin and Xmax in M208 to. Also, when you make changes to config g you need to load those changes, either by sending M98 P" config.g" or by cycling the power to the board. Another thing you could try is, cycle the power to the printer but do nothing else. At this point the printer won't be "homed" and the motors will be free to move with no holding current. Then physically move the print head by hand SLOWLY to the left hand edge of the bed and note this X position. This will get around any limits set by M208. Then move the print head SLOWLY to the right hand edge of the bed. Note this position. Take the first reading away from the second, divide the answer by two and set your min and max values using M208. Do this by editing config g. Now cycle the power again to apply those changes. Then home the printer. As a further check, move the print head to X=0 and physically measure the distance from the nozzle to the left and right edges to make sure they are equal.

      posted in Tuning and tweaking
      deckingmanundefined
      deckingman
    • RE: Centering a print

      @Derek-F You're welcome. I probably should have emphasised that you must set the bed dimensions in your slicer to match the axis travel. That is to say, in the example I gave, the X width would be 402 mm.

      posted in Tuning and tweaking
      deckingmanundefined
      deckingman
    • RE: Centering a print

      @Derek-F I don't think you've grasped what @dc42 was trying to tell you. Start by jogging the print head in the X minus direction until it either reaches the edge of the build plate or the minimum gantry travel if the cannot reach the edge. Then send G92 X0. This will "tell" the firmware that this is X=0. Then move the gantry as far as possible in the X plus direction, either until it reaches the edge of the build plate or maximum gantry travel if it cannot reach the edge. Note the displayed X position. This is your allowable axis travel. Now divide that number by two. E.g. if it was 402 mm, you'd have 201. Then ln M208 set X min to be minus 201 and X max to be plus 201. Repeat for the Y axis. You've now set the origin to be the exact centre of the bed. Set your slicer to also have the origin as the centre. Now anything you print will always be exactly centred on the bed.

      posted in Tuning and tweaking
      deckingmanundefined
      deckingman
    • RE: Create a virtual temp. sensor based on average of multiple?

      Expanding on what @stuartofmt has said, it's unlikely that there would be a significant difference in temperatures if your bed conducts heat well (which it should). But in the unlikely event that there are significant differences, then cold spots would likely cause problems with first layer adhesion whereas hot spots are unlikely to cause any significant issues. Therefore, it would make more sense to use a single temperature sensor located at a known cold spot.

      posted in Gcode meta commands
      deckingmanundefined
      deckingman