effector tilting into bed on print
-
4:52:21 PMG32
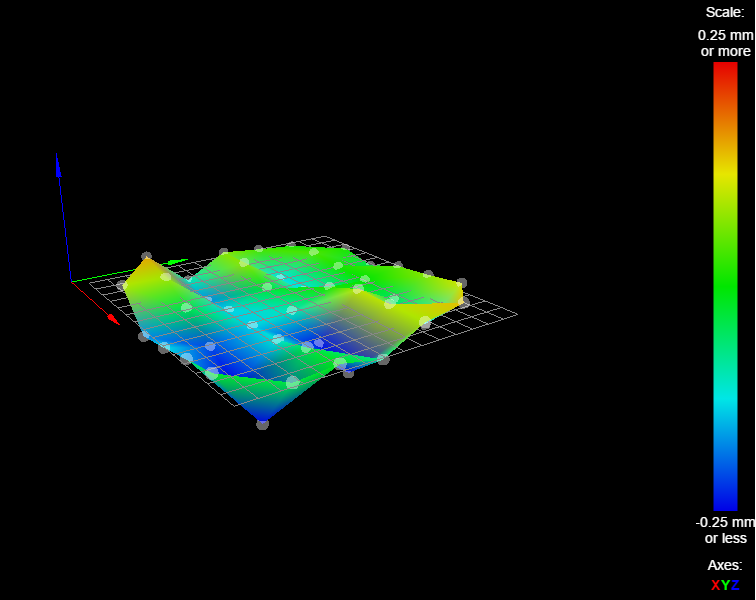
Calibrated 6 factors using 10 points, deviation before 0.126 after 0.121
4:51:50 PMG32
Calibrated 6 factors using 10 points, deviation before 0.137 after 0.121After measuring and adjust the home switch mounts to be physically equal
-
-
Hi Tim,
Your height map shows the classic crinkle-crisp effect along the X axis - with ridges at one end turning into valleys at the other end. This explains your unusually high calibration deviation. It is caused by backlash in the mechanics. To resolve it:
- Lubricate the magnetic joints. I used a thin smear of silicone grease on the magballs. White lithium grease should be suitable too.
- Check that the belts are taut and the idlers free to rotate.
- Check that the carriages slide up and down the towers with no significant friction, and lubricate parts as necessary. If using wheeled carriages, check that the wheels are free to rotate and not gripping the towers too tightly. With no belts or rods fitted, the carriages should drop under their own weight.
- Check that you are using sufficient motor current. 60% to 85% of the rated motor current is good.
HTH David
-
Hi dc42
Thanks for you input.I have applied some light grease. Check this out!
G32
Calibrated 6 factors using 10 points, deviation before 0.119 after 0.119
10:24:46 AMG32
Calibrated 6 factors using 10 points, deviation before 0.121 after 0.120
10:24:11 AMG32
Calibrated 6 factors using 10 points, deviation before 0.120 after 0.119Do I need to delete the previous height map, or is the .csv file overwritten?
There is no real difference in the graphed data.
I certainly do not detect any drag in the carriages. Perhaps I should invest in sliding bearings?
-
@timvukman said in effector tilting into bed on print:
Do I need to delete the previous height map, or is the .csv file overwritten?
The .csv file is only overwritten when you run G29 again, so you can delete oit to make sure you don't use it.
There is no real difference in the graphed data.
I certainly do not detect any drag in the carriages. Perhaps I should invest in sliding bearings?
I found that linear rails and bearings worked better than my previous wheeled carriages, however my wheeled carriages weren't the best. I suggest you check whether the carriages drop under their own weight if you remove the rods and belts, and if they don't then reduce the pressure of the wheels on the towers.
-
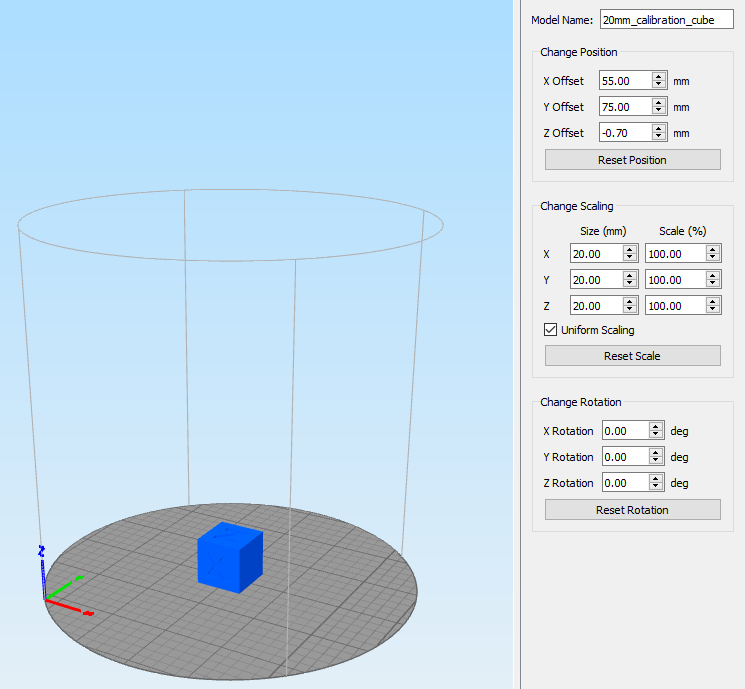
I would appreciate some input on what is driving my print issue. It's not as obvious in yesterday's photos as it will be in the one I post later today. When printing the calibration cube, the rim is being rounded at the right rear corner, as is the cube.
The obvious deduction would be that the printing is at or near or overlapping with the outer radius of the print area defined on the print bed.That brings me to the point I made earlier that my print is not starting in the area of the center of the bed.
I will include a photo of S3D where you can see that there are offsets in the settings in the top right boxes. I have tried removing them and resetting and recentering and repositioning everything I can find that pertains to those settings, but I can't get rid of them.
Also, while the web interface indicates that the Z height is rising layer by layer, the physical print has the nozzle plowing around in the filament that has been laid down. The nozzle is not going up, or is going at way too slowly.


-
@dc42
I will look into the linear rails. I unfortunately have metal wheeled carriages on order. Maybe they will work out better. I do not have any pressure being applied on the carriage wheels. There are three wheels which I feel is not sturdy as the carriages can be rotated in place to some degree without a huge effort.
My carriages that came with the kit are injection molded as was everything else other than the vertical pillars and the horizontal frame pieces. I also want to change the nuts to the type that turn in the channel so they can actually be tightened. The kit came with square nuts which I do not feel have the required grip. -
-
Try sending G1 X0 Y0 Z5 F3000. Does that place the nozzle 5mm above bed centre?
-
It looks to me that you are using S3D and you have the parameters wrong, because it isn't printing the cube at the centre of the bed:
- Change the X and Y offsets to zero in the screen you illustrated above
- On The G-Code tab, in "Build volume" set X and Y to the bed printable diameter, and in "Origin offset" set X and Y to half that value. It's crazy having to set an offset, but that's how S3D seems to work.
-
-
@dc42 said in effector tilting into bed on print:
Try sending G1 X0 Y0 Z5 F3000. Does that place the nozzle 5mm above bed centre?
No, that command sent the nozzle into the bed at the center. Why has my 0 for Z gone out of whack? I didn't change anything that I am aware of. I will redo the Z0. That might be why my cube turned out the way it did.
It looks to me that you are using S3D and you have the parameters wrong, because it isn't printing the cube at the centre of the bed:
Yes, your observation is my exact question. If I tell S3d to reset position, all my numbers say o, but the cube is off the bed out front and left.
If I tell S3D to center the model, it puts it in the middle of the picture of the bed. I am looking for the process to match up what S3D says to what it does. Unless X0,Y0 is off the bed in S3DChange the X and Y offsets to zero in the screen you illustrated above
On The G-Code tab, in "Build volume" set X and Y to the bed printable diameter, and in "Origin offset" set X and Y to half that value. It's crazy having to set an offset, but that's how S3D seems to work.
The net result is that the key that shows the X,Y,Z axes is in the center of the bed. I told the software to center the object, and the position displayed in the top left of the screen is now X=0, Y=30. The cube was placed half way through the bed, so in edit I told it to drop the model on to the table. It now shows a Z offset of 10 which makes sense to me.
I reset my Z0 because it was out by 8.93. My g30 S-1 is returning 0.659
I have reset Z=0. Ny total Z when homed is now 148.0. At Z0, I can move a piece of paper with some drag on it.
UPDATE
The changes within S3d and the build volume parameters seems to have solved the problem of my print not starting around the center of the actual print bed. It is printer there now. It is printing with the X at the bottom of the cube, and the outline of the X is perfect!Well, it started well. The Z axis does not appear to be raising in accordance with the numbers displayed in the browser. The nozzle is pushing filament around as it prints. It is not putting layer on layer. It is creating trenches in the model
-
Yes, the XYZ axes should be in the middle of the bed drawn by S3D because they indicate where the point (0,0,0) is. Under "Tools/Options/Models" in S3D there is a checkbox "Automatically center and arrange imported models". I have that checked.
Regarding the nozzle not rising the correct amount between layers:
- If you use the Z jog buttons in Duet Web Control, does the nozzle height change by the correct amount?
- What are your M201, M203, M208 and M92 settings in config.g?
-
Hi dc42
No, the jog controls for Z are not moving the correct amount. Move Z-100 moves -80mm
M92 X80 Y80 Z80 E157.5 ; Set steps per mm
M566 X1200 Y1200 Z1200 E1200 ; Set maximum instantaneous speed changes (mm/min)
M203 X18000 Y18000 Z18000 E1200 ; Set maximum speeds (mm/min)
M201 X1000 Y1000 Z1000 E1000 ; Set accelerations (mm/s^2)
Edited to add minus sign in front of 80 -
Currently you have the steps/mm set to 80 in the M92 command. That would be correct if you are using 1.8deg motors and 20 tooth GT2 pulleys. Are you using 16 tooth pulleys instead? If so then you need to set 100 steps/mm in M92, which would account for getting 80mm of movement when you command 100.
Caution: after correcting the steps/mm you must correct the homed height (M665 H parameter), then set the M558 dive height parameter (also H) to a higher value e.g. 30, re-run auto calibration a few times, and copy the new M665/M666 values to config.g.
Also, I suggest you reduce the maximum XYZ speeds in the M203 command to 9000 until you know that everything is working well. After that you can test higher speeds.
-
Thanks!
I figured that was the case, and I had tried changing the Z step. I had left X and Y because they were correct in size on the configuration cube that I was trying to print.
I can see why they all have to change. I'm getting pretty good with M665/M666 changes. I have been setting my Z=0 by changing the H in M665 in config.g
The changes don't carry over to config-override.g M665. I'm pretty sure I did an M500. I have been editing the M665 in config-override.g even though the file says not to edit it.
I will implement the required changes and reset the parameters.
-
The machine went nuts when I tried to run the auto config after making the changes.
It seems that one should delete the M665/M66 lines before running it after changes like those are made.
I had radius information that was almost the diameter of the bed. Pulled the magnets right off the carriage (Z)
I deleted M655/M66, reran auto config, saved that. Then I power cycled the machine and rehomed and then reran autoconfig. That put the correct values into config-override.g and I was ok from there.
10:12:37 AMG32
Calibrated 6 factors using 10 points, deviation before 0.045 after 0.035Now, to try a configuration cube
")
-
@timvukman said in effector tilting into bed on print:
The machine went nuts when I tried to run the auto config after making the changes.
It seems that one should delete the M665/M66 lines before running it after changes like those are made.
I had radius information that was almost the diameter of the bed. Pulled the magnets right off the carriage (Z)I'm sorry, I thought that setting the M665 H parameter to the measured value and increasing the dive height to 30 would be sufficient for auto calibration to work correctly.
Calibrated 6 factors using 10 points, deviation before 0.045 after 0.035
That's more like it!
-
At the moment, my delta is laying down a beautiful cube.
I'm not sure I could have fixed this is there was one thing wrong, but certainly, there was at least 4 or 5 things wrong. With the interdependence of all of the elements, I was chasing problems that were changing each time I made changes.
Thank you all for giving me a starting point, and a logical way to deal with each issue at the point in time it needed to be dealt with so that the other issues could be dealt with in the proper order.
Setting up my Cartesian with the DuetWifi was so simple in comparison, but each issue could be addressed without really causing new ones.
I love the silent smooth printing that this board provides, and I am extremely impressed with the smart effector.
I have plans to build a Thor Arm printer next. I have a few Nema17 motors left after upgrading my cartesian to 24V and Nema23 motors.
So, I will be ordering another DuetWifi
-
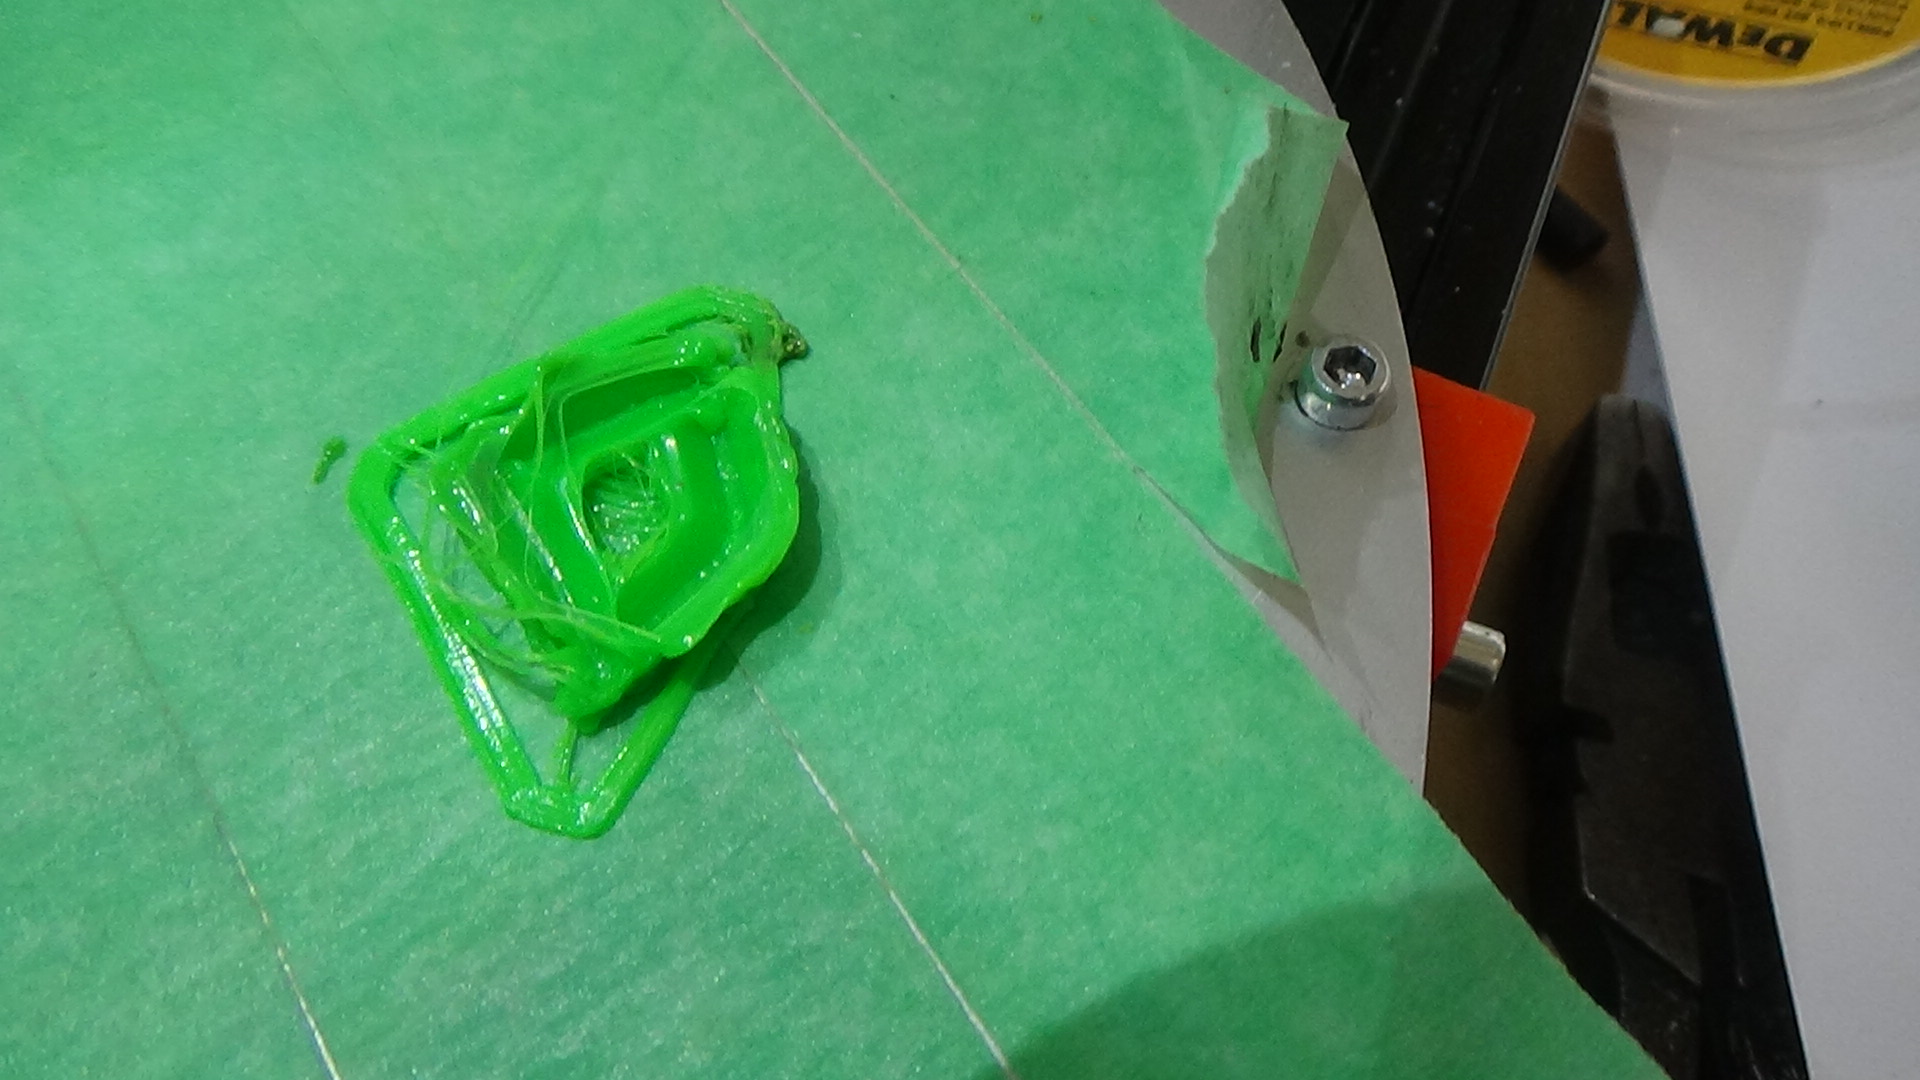
24% in. It looks like the nozzle is trenching the model. Over extrusion?
At 25% printed, height on the browser screen says it is at 5mm. Rough measurement says it might be 1mm higher for the actual model. The model is starting to rock back and forth on the tape it's printing on.
When I changed the XYZ steps /mm to 100, I did not recalibrate the filament extruder. Should I do that?
-
The extruder calibration is not affected by the XYZ steps/mm, however if you haven't already calibrated the extruder then I recommend that you do.
What infill percentage did you use when you sliced the model?
-
I did calibrate the extruder for 100mm and it was dead on. Print quality is set for medium.
Interior Fill Percentage = 90%
Outline Overlap = 15%
Infill Extrusion Width 100%
Minimum Infill Length 5.0 mm
Combine Infill Every = 1 layers -
Turn the interior fill percentage down a lot. 15 to 30% is commonly used. If necessary, turn down the extrusion factor.