Moving bed carriage: 3 or 4 bearings?
-
I am in the process of replacing my Igus glide bearings on hardened steel smooth rods with Igus glide rails. Up until this point my bed carriage uses 3 glide bearings. I have it like this since I got my aluminium bed carriage that is a slightly modified version of this carriage. I have not yet encountered any real issues with this setup unless I overtighten the bed leveling screws - but I know that and I know the reason for this issue.
Reading in the update note of the linked design the designer says he has explicitly removed the option to mount it only on three bearings and mentions that P3Steel also "evolved" into this decision. That made me rethink my decision on how many bearings to mount the carriage on.
I would be very glad hearing different opinions on why the one or the other method would be better.
-
There is less chance of bearing alignment issues with 3 bearings over 4, that said I use 4 on my P3 Steel with no issues and the bed seems more stable on 4 then 3,
Just be more careful while doing the installation. -
4 bearings on 2 rails makes about as much sense as 4 leveling screws.
I notice that the bearing holes in the plate are close to each other in the Y direction. That is done so that shorter Y axis guide rails, and so a shorter printer frame, can be used as a cost shaving tactic. Unfortunately, that leaves the bed plate supported by leveling screws and long expanses of thin, flexible aluminum that are far from the bearings. If you're rebuilding the Y axis, consider using full-length Y axis rails, then move the bearings apart in the Y direction. Use 3 bearings, not 4, and put 3 leveling screws, not 4, as close to the bearings as possible to give the bed more solid support.
When you tighten the leveling screws down and have "problems" with the Y axis it's because the support plate is bending and causing misalignment of the bearings. 3 leveling screws will not cause the support plate to bend no matter how much you tighten them. If they are arranged in a pitch and roll configuration, leveling the bed will be fast and easy.
-
@mrehorstdmd said in Moving bed carriage: 3 or 4 bearings?:
4 bearings on 2 rails makes about as much sense as 4 leveling screws.
I notice that the bearing holes in the plate are close to each other in the Y direction. That is done so that shorter Y axis guide rails, and so a shorter printer frame, can be used as a cost shaving tactic. Unfortunately, that leaves the bed plate supported by leveling screws and long expanses of thin, flexible aluminum that are far from the bearings. If you're rebuilding the Y axis, consider using full-length Y axis rails, then move the bearings apart in the Y direction. Use 3 bearings, not 4, and put 3 leveling screws, not 4, as close to the bearings as possible to give the bed more solid support.
I am already using 3-point-leveling. Did that from the moment I had the printer (a bit clumsy with the original carriage but correctly since I have this one). Though I am only rebuilding the motion part of the Y axis. Using full-length rails would probably not work without changing the frame also. Or they would stick out to the front. Though I have to measure that since I did not consider yet to move the bearings apart. I will check how far I can push this without replacing the frame's Y extrusions.
When you tighten the leveling screws down and have "problems" with the Y axis it's because the support plate is bending and causing misalignment of the bearings. 3 leveling screws will not cause the support plate to bend no matter how much you tighten them.
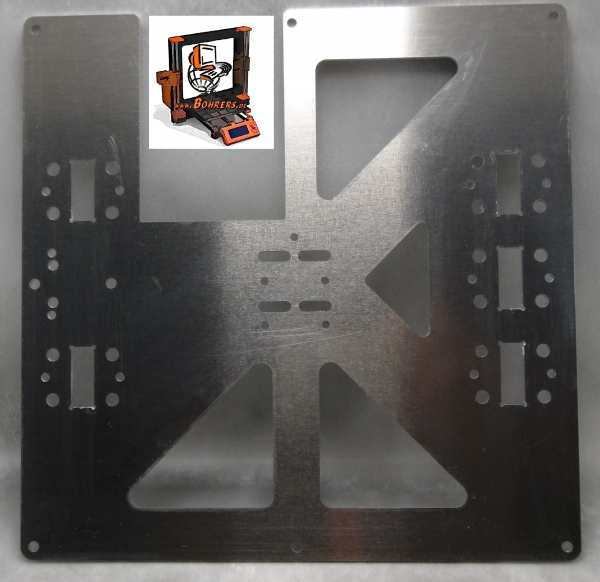
They will! Because that is what they do on my machine but mainly because of a rather unusual combination of things. I do have two bearings on the left side and one on the right - but the leveling screws are the opposite. So the side where there is only one bearing in the (Y) center I have two leveling screws, one at the front, one at the back. I don't like this setup but I am limited with the existing screw holes. The image below shows the actual carriage. Top is back, bottom is front.
It is supposed to have two leveling screws at the back and one at the front which would at least lower the impact of this still not-perfect-setup. But then the leveling screw collides with the belt idler.
Anyway, considering to move to mounting holes for the bearings is a good idea. I will check how far I can move them. Thanks!
-
I checked the clearances on the current setup to possibly move the bearings further apart and just by the looks of it I can move them nearly to front and back edges. At least as much that they are flush with the front/back-facing edges of the triangles.
Thanks @mrehorstdmd for pointing me in this direction. I will have to think about a hard stop at Y max then (there is one at Y min because the carriage would slam into the motor mount) and rearrange the Y endstop but that is a simple issue to solve.
Only thing that makes me still wonder of 3 or 4 bearings is that the Igus linear guides configurator always assumes two bearings per side and you can not even change this.

-
Has anyone used 2020 and linear rails on a Y-movement Cartesian?
-
Re Linear Rails
Yes, I have modified my Prusa to linear rails mounted on 3030 extrusion. It has made the printer bed far more stable. Improvement to print quality is minimal but there is a big improvement to repeat-ability. The only calibration I really need to do now on a regular basis, is to level the Z axis.
The original 8mm diameter rails and bearing arrangement is easy to build and probably just about adequate and cost effective for the loads involved but not good engineering practice IMO.
The linear rails do need precise alignment and setting up, but once done, the bed runs smoothly and stays in alignment.