[SOLVED] Nozzle too low by 1mm after Z homing - any ideas?
-
UPDATE: Problem is SOLVED. Y Axis crossbar was out of joint.
I have a new Duet Wifi installed as an Ultimaker 2+ upgrade.
M115 reports: RepRapFirmware for Duet 2 WiFi/Ethernet FIRMWARE_VERSION: 2.02(RTOS) ELECTRONICS: Duet WiFi 1.02 or later FIRMWARE_DATE: 2018-12-24b1.
Authentic BLTouch classic is handling the Z axis homing & bed compensation, seems to work fine, got a few tree frogs here to prove it.
...Except that when a print starts, it starts with the nozzle desiring to go 1mm below(!) the bed surface.
I have a workaround right now in that Simplify3D lets me raise that initial Z by 1mm in the gcode and I have a perfect first layer every time, but this is a Band-Aid. Would like to find out why this is happening and correct it. Any ideas?
Here's the obligatory config.g:
; Configuration file for Duet WiFi (firmware version 1.21)
; executed by the firmware on start-up
;
; generated by RepRapFirmware Configuration Tool on Fri Mar 15 2019 21:53:32 GMT-0700 (Pacific Daylight Time); General preferences
G90 ; Send absolute coordinates...
M83 ; ...but relative extruder moves
M555 P1 ; Set firmware compatibility to look like RepRapFirmare; Network
M550 PCharlie_Brown ; Set machine name
M551 P[redacted] ; Set password
M552 S1 ; Enable network
M552 P192.168.1.125 ;
M586 P0 S1 ; Enable HTTP
M586 P1 S0 ; Disable FTP
M586 P2 S0 ; Disable Telnet; Drives
M569 P0 S0 ; Drive 0 (X) goes backwards
M569 P1 S1 ; Drive 1 (Y) goes forwards
M569 P2 S0 ; Drive 2 (Z) goes backwards
M569 P3 S1 ; Drive 3 (E0) goes forwards
M350 X16 Y16 Z16 I1 ; Configure microstepping with interpolation
M350 E16 I1 ; Configure microstepping with interpolation
M92 X80 Y80 Z400 E537 ; Set steps per mm
M566 X900 Y900 Z12 E120 ; Set maximum instantaneous speed changes (mm/min)
M203 X18000 Y18000 Z980 E1200 ; Set maximum speeds (mm/min)
M201 X500 Y500 Z500 E1000 ; Set accelerations (mm/s^2)
M906 X1250 Y1250 Z1250 E1000 I30 ; Set motor currents (mA) and motor idle factor in per cent
M84 S15 ; Set idle timeout; Axis Limits
M208 X0 Y0 Z0 S1 ; Set axis minima
M208 X223 Y223 Z205 S0 ; Set axis maxima; Endstops
M574 X1 Y2 S1 ; Set active high endstops; Z-Probe
M307 H3 A-1 C-1 D-1 ; release heater 3 for use by probe
M558 P9 H5 F1200 T8000 ; https://duet3d.dozuki.com/Wiki/Connecting_a_Z_probe#Section_BLTouch
; explanation of M558 parameters: https://reprap.org/wiki/G-code#M558:_Set_Z_probe_type
G31 X22 Y-21 Z1.582 P25 ; https://duet3d.dozuki.com/Wiki/Connecting_a_Z_probe#Section_BLTouchM574 Z1 S2 ; Set endstops controlled by probe
M557 X15:208 Y15:208 S20 ; Define mesh grid; Heaters
M307 H0 B0 S1.00 ; Disable bang-bang mode for the bed heater and set PWM limit
M305 P0 X201 ; Configure thermocouple for heater 0 (Bed)
M143 H0 S120 ; Set temperature limit for heater 0 to 120C
M305 P1 X200 ; Configure thermocouple for heater 1 (Hotend)
M143 H1 S280 ; Set temperature limit for heater 1 to 280C; Fans
M106 P0 S0 I0 F500 H-1 ; Set fan 0 value, PWM signal inversion and frequency. Thermostatic control is turned off
M106 P1 S1 I0 F500 H1 T45 ; Set fan 1 value, PWM signal inversion and frequency. Thermostatic control is turned on
M106 P2 S1 I0 F500 H-1 ; Set Case LEDS PWM signal inversion and frequency. Thermostatic control is turned off; Tools
M563 P0 D0 H1 ; Define tool 0
G10 P0 X0 Y0 Z0 ; Set tool 0 axis offsets
G10 P0 R0 S0 ; Set initial tool 0 active and standby temperatures to 0CM501 ; https://forum.duet3d.com/topic/3055/having-trouble-setting-the-z-offset/6
; Automatic saving after power loss is not enabled
; Custom settings are not configured
-
What do your homing files look like?
-
Here's the homing macros:
; homeall.g
; called to home all axes
;
; generated by RepRapFirmware Configuration Tool on Fri Mar 15 2019 21:53:29 GMT-0700 (Pacific Daylight Time)
G91 ; relative positioning
G1 Z5 F6000 S2 ; lift Z relative to current position
G1 S1 X-228 Y228 F4800 ; move quickly to X and Y axis endstops and stop there (first pass) (was F1800)
G1 X5 Y-5 F6000 ; go back a few mm
G1 S1 X-228 Y228 F360 ; move slowly to X and Y axis endstops once more (second pass)
G90 ; absolute positioning
G1 X110 Y110 F7200 ; go to first probe point (approx center of bed)G30 ; home Z by probing the bed
; Uncomment the following lines to lift Z after probing
G91 ; relative positioning
G1 S2 Z5 F100 ; lift Z relative to current position
G90 ; absolute positioning; homex.g
; called to home the X axis
;
; generated by RepRapFirmware Configuration Tool on Fri Mar 15 2019 21:53:32 GMT-0700 (Pacific Daylight Time)
G91 ; relative positioning
G1 Z5 F6000 S2 ; lift Z relative to current position
G1 S1 X-228 F7200 ; move quickly to X axis endstop and stop there (first pass)
G1 X5 F6000 ; go back a few mm
G1 S1 X-228 F360 ; move slowly to X axis endstop once more (second pass)
G1 Z-5 F6000 S2 ; lower Z again
G90 ; absolute positioning; homey.g
; called to home the Y axis
;
; generated by RepRapFirmware Configuration Tool on Fri Mar 15 2019 21:53:29 GMT-0700 (Pacific Daylight Time)
G91 ; relative positioning
G1 Z5 F6000 S2 ; lift Z relative to current position
G1 S1 Y228 F7200 ; move quickly to Y axis endstop and stop there (first pass)
G1 Y-5 F6000 ; go back a few mm
G1 S1 Y228 F360 ; move slowly to Y axis endstop once more (second pass)
G1 Z-5 F6000 S2 ; lower Z again
G90 ; absolute positioning; homez.g
; called to home the Z axis
;
; generated by RepRapFirmware Configuration Tool on Fri Mar 15 2019 21:53:32 GMT-0700 (Pacific Daylight Time)
G91 ; relative positioning
G1 Z5 F6000 S2 ; lift Z relative to current position
G90 ; absolute positioning
G1 X110 Y110 F7200 ; go to first probe point (approx center of bed)G30 ; home Z by probing the bed
; Uncomment the following lines to lift Z after probing
G91 ; relative positioning
G1 S2 Z5 F100 ; lift Z relative to current position
G90 ; absolute positioning -
Are you using any mesh grid compensation? Or automatic leveling?
-
Yes, I have done the G29 to establish a height map file and load the resulting heightmap.csv from a startup script in Simplify3D:
M907 E1000 ; BONDTECH Extruder Only
G28 XY ;Home XY
M561 ; Clear any bed transform that might be in place
G1 X104.5 Y130 ; Move Probe to middle of bed
G30 ; Do a single probe
G29 S1; load heightmap
G1 Z20.0 F6000 ; Move Z to 20G1 X20 Y10 F3000 ; bring extruder to front
G92 E0 ; zero the extruded length
G1 Z10 ; lower
G1 E19 F200 ; purge nozzle quickly
G1 E26 F60 ; purge nozzle slowly
G92 E0 ; zero the extruded length again
G1 E-5.5 F400 ; retract
G1 X190 Z0 F9000 ; pull away filament
G1 X210 F9000 ; wipe
G1 Y20 F9000 ; wipe
G1 E0 ; feed filament back -
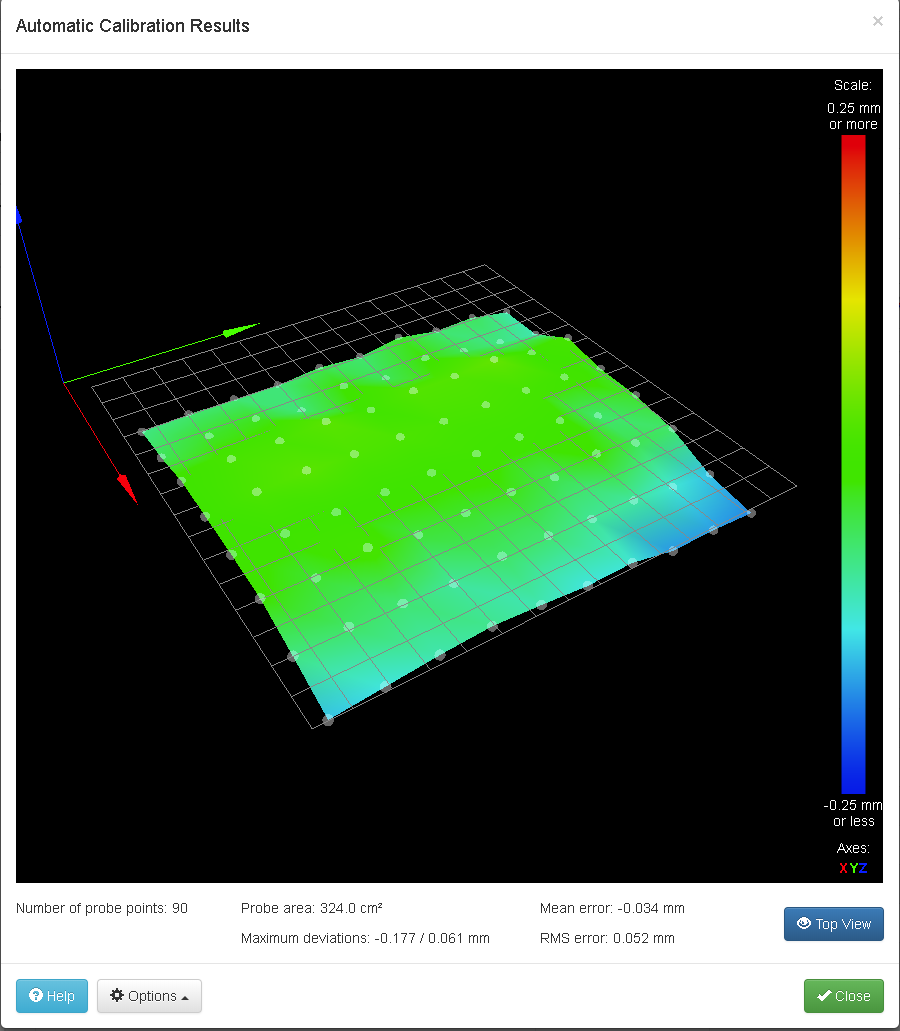
Can you post an image of the height map?
Does the Displayed z height say 1mm or does it indicate the set first layer height?
-
I should also report that I have run this procedure (https://duet3d.dozuki.com/Wiki/Test_and_calibrate_the_Z_probe#Section_Calibrate_the_Z_probe_trigger_height) about twenty times, consistently coming up with very similar results around 1.6mm, and averaged these runs to come up with the value in the G31 command for Z offset.
Here's the screenshot of the heightmap:
.png](/assets/uploads/files/1552869130305-screenshot-54-resized.png)
Just started a print after having the machine turned off for a few hours. Z on first layer showed 1.08. It was printing about a millimeter too high. Removed the +1mm Z offset "band-aid" from the GCODE, and have got a perfect first layer. No idea why it is working now.
I appreciate the help. Will post up again if the problem recurs.
-
@lowracer said in Nozzle too low by 1mm after Z homing - any ideas?:
G31 X22 Y-21 Z1.582 P25
change the z offset to increase by 1mm
G31 X22 Y-21 Z2.582 P25 -
@veti said in Nozzle too low by 1mm after Z homing - any ideas?:
@lowracer said in Nozzle too low by 1mm after Z homing - any ideas?:
G31 X22 Y-21 Z1.582 P25
change the z offset to increase by 1mm
G31 X22 Y-21 Z2.582 P25First thing I tried. Didn't have any effect. The problem is solved, have done several prints all perfect first layer without any slicer adjustments.
I think what happened is that the crossbar that holds the Y axis in place had slipped out of joint, throwing the XY gantry out of level. Once I snapped that bar back in, no more problem. Going to mark this one solved. Thanks for the help everyone.