Delta calibration
-
Hello,
I have a delta, and for some reason I cannot get the calibration right:
Known good values, not exact but within a few millimeters:
M665 R149.129 L360.230 B120.0 H244.568Measured values by 17 point delta auto calibration:
M665 L285.051:285.051:285.051 R132.613 H245.860 B120.0 X-0.210 Y-0.846 Z0.000It seems that the L value is very off, also this started around the time when I swapped the tower steppers to 0.9 degree ones, and corrected the steps/mm from 100 to 200 (1/16 microstepping, 16T pulleys, GT2)
The measured tower movement equals the commanded movement from DWCAlso, if I do a delta calibration followed by a heightmap, then the heightmap shows significant elevation near each tower.
Config:
Smart effector with magnetic joins of 360mm length (All from Duet store)
1/16 microstepping, 16T pulleys (gt2)
Firmwares tested: 2.02, 2.03+1Anyi ideas please? What am I doing wrong?
-
Please post your "bed.g"
-
You are using either 7 or 9 factor calibration. If you change to 6 or 8 factor, what is the reported deviation after running a few auto calibration cycles?
-
; bed.g ; called to perform automatic delta calibration via G32 ; ; generated by RepRapFirmware Configuration Tool on Mon Apr 23 2018 21:09:51 GMT+0200 (CEST) M561 ; clear any bed transform G28 ; home all towers M106 P1 S0 ;Stop radiator cooling fan to reduce interference M106 P0 S0 ;Stop part cooling fan to reduce interference ;M144 ;Set bed heating to standby M558 B1 does this ; Probe the bed at 10 peripheral and 6 halfway points, and perform 7-factor auto compensation ; Before running this, you should have set up your Z-probe trigger height to suit your build, in the G31 command in config.g. G30 P0 X0 Y94.9 H0 Z-99999 G30 P1 X55.78 Y76.78 H0 Z-99999 G30 P2 X90.26 Y29.33 H0 Z-99999 G30 P3 X90.26 Y-29.33 H0 Z-99999 G30 P4 X55.78 Y-76.78 H0 Z-99999 G30 P5 X0 Y-94.9 H0 Z-99999 G30 P6 X-55.78 Y-76.78 H0 Z-99999 G30 P7 X-90.26 Y-29.33 H0 Z-99999 G30 P8 X-90.26 Y29.33 H0 Z-99999 G30 P9 X-55.78 Y76.78 H0 Z-99999 G30 P10 X0 Y47.4 H0 Z-99999 G30 P11 X41.05 Y23.7 H0 Z-99999 G30 P12 X41.05 Y-23.7 H0 Z-99999 G30 P13 X0 Y-47.4 H0 Z-99999 G30 P14 X-41.05 Y-23.7 H0 Z-99999 G30 P15 X-41.05 Y23.7 H0 Z-99999 G30 P16 X0 Y0 H0 Z-99999 S7 ; Use S-1 for measurements only, without calculations. Use S4 for endstop heights and Z-height only. Use S6 for full 6 factors ; If your Z probe has significantly different trigger heights depending on XY position, adjust the H parameters in the G30 commands accordingly. The value of each H parameter should be (trigger height at that XY position) - (trigger height at centre of bed) M106 P1 S255 ;Set radiator cooling fan to 100% ;M144 S1 ;Resume bed heating M558 B1 does this @dc42
Yes, sorry, confused the probe count with the factors (the code is the same as above but changed the last G30 S7 to S8 is that correct?)
I ran it four times like that, this is the result from the last run:
Calibrated 8 factors using 17 points, deviation before 0.113 after 0.113 -
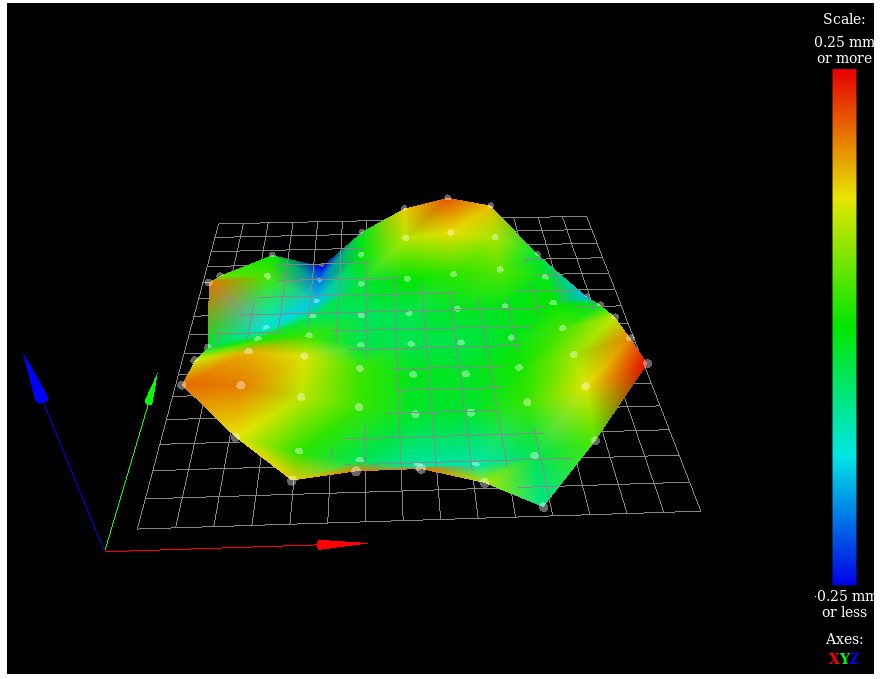
@denke, it looks like you have stable calibration now although the deviation is a little high. If you run G29 mesh bed probing and post a screen shot or two of the height map here, it may give us some clues about why that is.
-
@dc42
 G29
G2969 points probed, min error -0.254, max error 0.246, mean 0.029, deviation 0.099
Height map saved to file heightmap.csv -
@dc42 A bit of additional information, I tried setting the correct rod length length in config, removing the heightmap, removing the config override, rebooting, and checking movements, and in this case a pure Y movement caused the head height to change also (Y-100 caused the head to get closer to the bed).
-
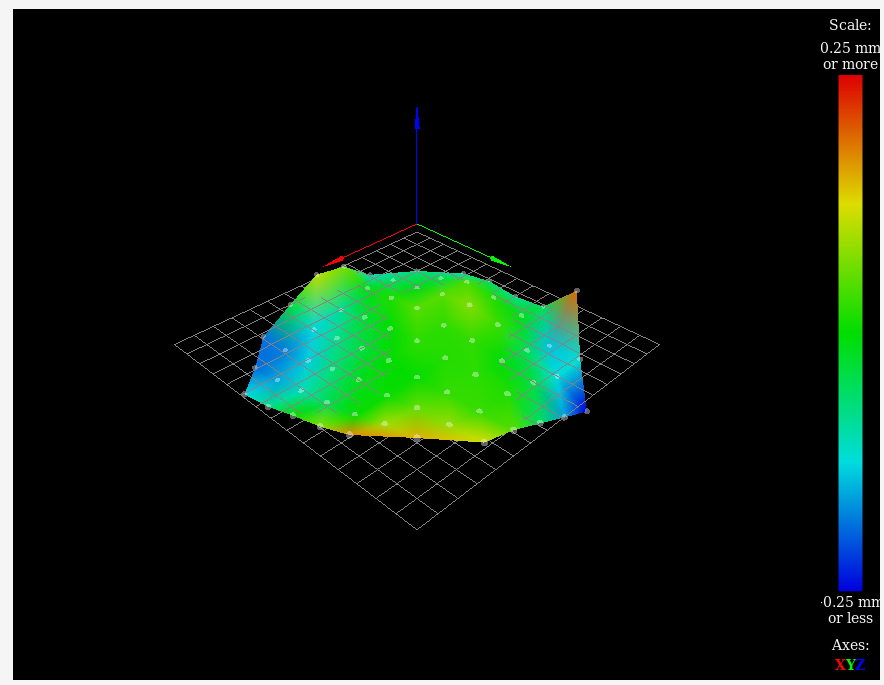
I also tried setting the steps/mm back to 100, and setting the microstepping from 16 to 8 on all three towers. The following delta calibration result is:
; config-override.g file generated in response to M500 ; This is a system-generated file - do not edit ; Delta parameters M665 L360.230:360.230:360.230 R150.336 H246.133 B120.0 X1.515 Y0.616 Z0.000 M666 X3.830 Y-6.058 Z2.228 A-4.27 B0.81 
Which seems to be about correct
-
@denke said in Delta calibration:
I also tried setting the steps/mm back to 100, and setting the microstepping from 16 to 8 on all three towers.
Please post your complete config.g file. The effect of those changes will depend on whether your M350 commands comes before or after your M92 command.
Are you absolutely certain that the motors are 0.9deg? Do they have a part number label on them?
-
; Configuration file for Duet WiFi (firmware version 1.20 or newer) ; executed by the firmware on start-up ; ; generated by RepRapFirmware Configuration Tool on Mon Apr 23 2018 21:09:51 GMT+0200 (CEST) ; General preferences G90 ; Send absolute coordinates... M83 ; ...but relative extruder moves M555 P1 ; Set firmware compatibility to look like RepRapFirmare ;*** The homed height is deliberately set too high in the following - you will adjust it during calibration. M665 R149.129 L360.230 B120.0 H244.568 ; Set delta radius, diagonal rod length, printable radius and homed height M666 X0 Y0 Z0 ; Put your endstop adjustments here, or let auto calibration find them ; Network M550 Pprinter ; Set machine name M552 S1 ; Enable network ;*** Access point is configured manually via M587 M586 P0 S1 ; Enable HTTP M586 P1 S1 ; Enable FTP M586 P2 S1 ; Enable Telnet ; Drives M569 P0 S0 ; Drive 0 goes forward TODO reorient pulley to fix this M569 P1 S1 ; Drive 1 goes backwards M569 P2 S1 ; Drive 2 goes backwards M569 P3 S1 ; Drive 3 goes backwards M350 X8 Y8 Z8 E16 I1 ; Configure microstepping with interpolation M92 X100 Y100 Z100 E140 ; Set steps per mm M566 X1200 Y1200 Z1200 E700 ; Set maximum instantaneous speed changes (mm/min) M203 X22000 Y22000 Z22000 E30000 ; Set maximum speeds (mm/min) M201 X2000 Y2000 Z2000 E3000 ; Set accelerations (mm/s^2) M906 X1000 Y1000 Z1000 E1500 I3 ; Set motor currents (mA) and motor idle factor in per cent M84 S3 ; Set idle timeout ; Axis Limits M208 Z0 S1 ; Set minimum Z ; Endstops M574 X2 Y2 Z2 S1 ; Set active high endstops ; Z-Probe M558 P5 R0.4 H3 A8 B1 F1020 T15000 ; Set Z probe type to effector and the dive height + speeds G31 P100 X0 Y0 Z-0.15 ; Set Z probe trigger value, offset and trigger height M557 R100 S20 ; Define mesh grid ; Heaters M301 H0 S0.80 P10 I0.1 D200 T0.4 W180 B30 ; Use PID on bed heater (may require further tuning) M305 P0 T100000 B4388 C7.060000e-8 R4700 ; Set thermistor + ADC parameters for heater 0 M143 H0 S120 ; Set temperature limit for heater 0 to 120C M305 P1 T100000 B4388 C0 R4700 ; Set thermistor + ADC parameters for heater 1 M143 H1 S320 ; Set temperature limit for heater 1 to 320C ; Fans ;TODO M106 -> M950 M106 P0 S0 I0 F500 H-1 ; Set fan 0 value, PWM signal inversion and frequency. Thermostatic control is turned off M106 P1 S1 I0 F500 H-1 ; Set fan 1 value, PWM signal inversion and frequency. Thermostatic control is turned off M106 P2 S0 I0 F500 H-1 ; Set fan 2 value, PWM signal inversion and frequency. Thermostatic control is turned off ; Tools M563 P0 D0 H1 ; Define tool 0 G10 P0 X0 Y0 Z0 ; Set tool 0 axis offsets G10 P0 R0 S0 ; Set initial tool 0 active and standby temperatures to 0C ; Automatic saving after power loss is not enabled ; Custom settings M915 X Y Z S17 F0 R2 H120 ;Configure stall detection for all axis, sensitivity 10 no filter pause on fail min speed 100 step/sec M207 S4 R0 F14400 T14400 Z0.3 ;Retraction - 4mm - 0mm added unretract - speed - speed - z-hop ; Miscellaneous M501 ; Load saved parameters from non-volatile memory T0 ; Select first tool The steppers are Sanyo - Denki 103-594-05XD04 (the original gears were pressed off and replaced with 16T pulleys)
They are 0.9 deg steppers for sure, this is boh on the label and they have a very different feel too.Another interesting thing, is when I decreased the microstepping from 16 to 8 the motors went from completely silent to quite loud (interpolation was and is turned on)
-
Out of curiosity, what is your bed surface and height sensor type? I've also struggled with getting that heightmap as good on my delta as on cartesian.
-
I use a 32cm dia 12/24V heated bed which is quite thick, about 4mm, a lockbuild sticker surface, and smart effector set to quite sensitive (I cannot remember the actual number) and the magnetic ball joint arms. I usually get green across the entire heatmap
-
@denke said in Delta calibration:
M350 X8 Y8 Z8 E16 I1 ; Configure microstepping with interpolation
M92 X100 Y100 Z100 E140 ; Set steps per mmYou should get exactly the same calibration results with:
M350 X16 Y16 Z16 E16 I1 ; Configure microstepping with interpolation
M92 X200 Y200 Z200 E140 ; Set steps per mm@denke said in Delta calibration:
Another interesting thing, is when I decreased the microstepping from 16 to 8 the motors went from completely silent to quite loud (interpolation was and is turned on)
On the TMC2660 drivers used on the Duet WiFi/Ethernet, interpolation only works at x16 microstepping.
-
@dc42
I get the strangest things ...

I'll condinue to debug tomorrow or the day after that, and thanks for the help!
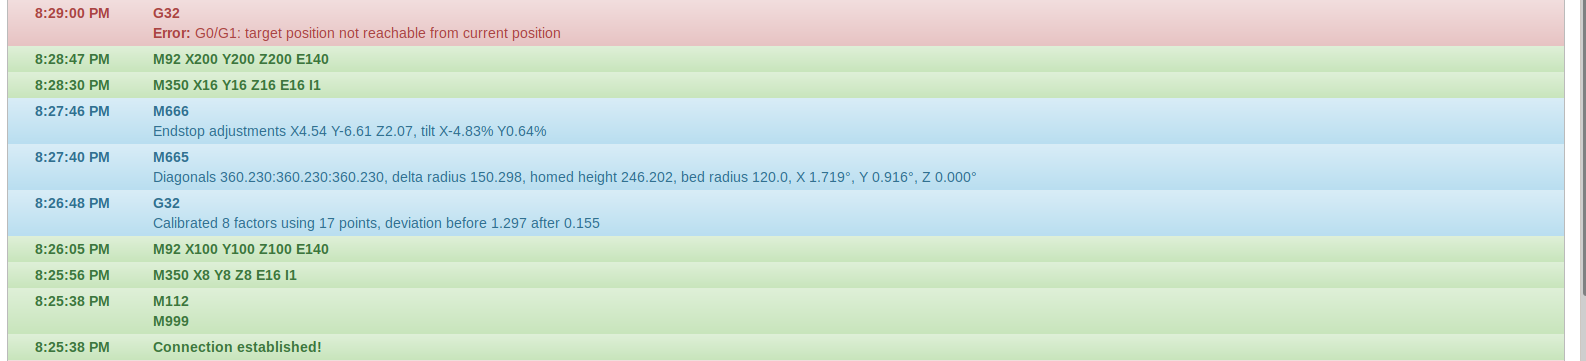
-
The "Target position not reachable" message on a delta usually means the effector is at/near the top of its travel (e.g. because you have just homed the printer) and you have tried to move it horizontally to a position that can't be reached at that height.
-
@dc42
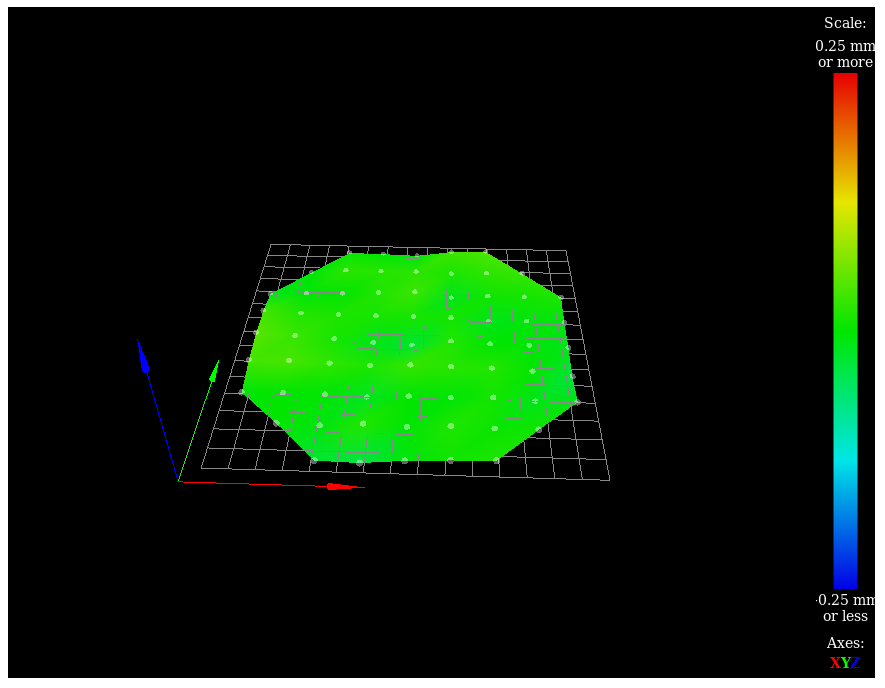
Yep, you are right, I increased the relative movement backing down from the endstops after homing, and it solved the issue.Also, I found the issue with the original bad movement/calibration problem: The pulley on the X axis collided with the upper joint of the magball rod, causing it to be slightly displaced from the metal studs on far from center Y positions.
Fixed it, the result is the following:

Thank you for the lot of help you provided!!