Bed Mesh Compensation off on reboot
-
Tonxy X5SA Pro
Duet 2 WifiFirmware Name: RepRapFirmware for Duet 2 WiFi/Ethernet
Firmware Electronics: Duet WiFi 1.02 or later
Firmware Version: 2.05 (2019-12-13b1)
WiFi Server Version: 1.23
Web Interface Version: 1.22.6Been printing for about a month. Decided to switch over to glass. Went with a 330mm x 330mm x 3mm Borosilicate Glass Plate. Using the Tronxy XY-08N Inductive sensor, which quickly became obvious I would have a problem, so I bought a sheet of 22 gauge steel to put underneath. I seemed to consistently get readings so I began to level.
M564 S0 to disable Axis limit
Got it to touch the bed in the middle with heat set at printing heat for bed and hot end.
G92 Z0 to zero the head
bunch of jogging to run G30 S-1 to read trigger height.
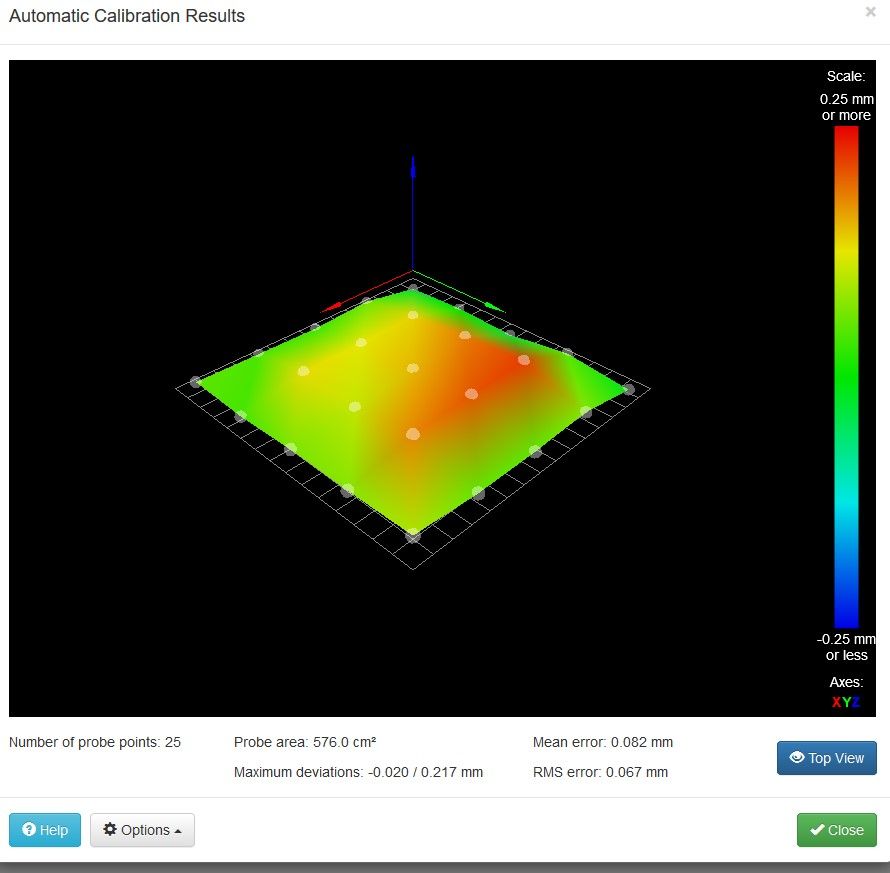
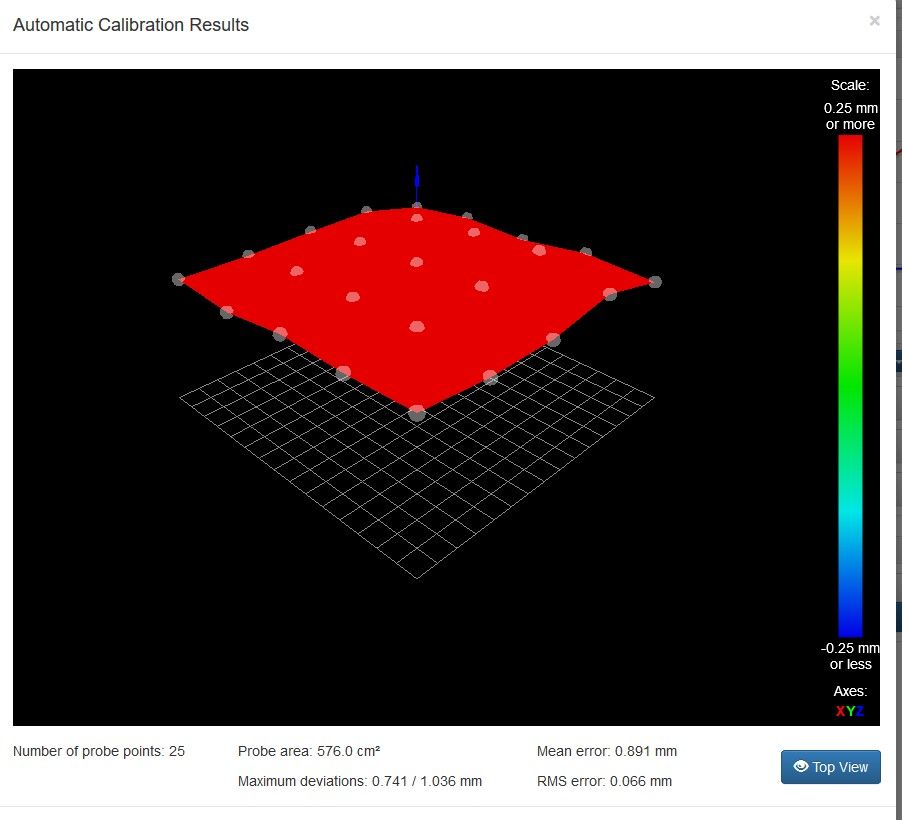
Set trigger height in config.g but did not reset yet so that I could test and show why I feel like I'm going crazy as I kept getting an almost 1mm extra height on the bed mesh map after reboot.Before reset:

After reset:

I have no overrides
Config config.g
homezhomez.gWill the steel and glass not work? Am I missing something stupid? It's funny how just as I think I understand what I'm doing, something else comes up that makes me question it all.
I hope that's enough info and appreciate any help I can get on my first post.
Rob
-
Hi Rob,
well, I think the probing works repeatably, as the STDdev is the same on both, and the shape looks similar where one can see it. It seems that it 's just shifted up by 0.8xy mm...
After aG28 Z,G1 Z0, is the nozzle on the glass? Did you have to correct your Z offset for the probe and did you do this in the config.g? (this was my error after I mounted my probe the second time ).
).Regards, Edi
-
The z offset before was 1.2mm. The z offset with the glass and metal is 2.898mm. G28 Z followed by G1 Z0 does put it on the glass, but .8mm too tight.
I agree the probe seems to be working exactly as it should. It's almost like the offset is wrong.
My understanding of the process is, you are setting the Z 0 by using command G92 Z0. Then after you raise the head, or in my case, lower the bed, and run G30 S-1, it's measuring the distance between the now set 0 and when the probe is triggered. After a few tests of that you take that number you found and put it in the config so that the next time it reboots and you home the Z it knows that true Z is (in my case) 2.898mm below that trigger point.
I went back to the old plate and went through the whole process again and that worked. I just read that there was a difference between Auto Bed Compensation and Run Mesh Bed Compensation, so I took the old bed back off, put the glass and metal back on. Disabled the mesh bed compensation. Se the Z to 0. Ran G30 S-1 again, found my 2.898, changed config, rebooted and ran mesh bed compensation. 0.8mm high everywhere still. The only thing I can take away from that is my process is repeatable and I am repeatably doing the same wrong thing.
So confused. lol
Rob
-
Is there a G31 in your config-override.g? If so delete it and save file.
-
Don't have a config-override.g file at all. That I know of.

-
Just put a G29 S1 at the end of your config.g
This will load the last mesh and activate mesh compensation.. -
@tobias_munich said in Bed Mesh Compensation off on reboot:
Just put a G29 S1 at the end of your config.g
its better to put the G29 S1 in the start of your file that you are printing.
also the G29 S1 should come after the G28 where Z=0 is determined. -
The G29 S1 in the config.g did not work. I believe it's because you can't home everything until after the system has booted up anyways. However, @tobias_munich is on the right path as @Veti said. I reset the glass back up, set my Z offset, rebooted, compensated, rebooted again, ran G1 Z0, too tight. Pulled it away from the bed, ran G29 S1 manually, ran G1 Z0 again and this was just right. I added G29 S1 after the G28 command in my starting g-Code of the file and am currently printing on glass correctly for the first time.
Thank you all for your help!! However, this feels like a band aid. I get what we have accomplished and it makes sense, but I still wonder what the root cause of the problem is. It's almost like the firmware wasn't taking my trigger height by some percentage.
I'm going to try printing for awhile as it sits right now just to get some hours out of the machine and make sure I can get consistent prints. Thanks again and let me know if anyone else has any ideas for the root cause.
Rob