Active does not turn Hot End (Tool 0) on
-
This is relatively small bug I am trying to work out. When I change the Active setting for the heat bed to any temp I specified in my drop down, it turns the heat bed on immediately. However when I do the same for the Hot End (Tool 0/ Heater 1) it does nothing, I have to go over and click on the tool to get it to turn active or put it in standby. This use to work, but after I upgraded the firmware on this Duet Wifi board it seemed to stop working. Anyone care to share what I am missing in the config file?
; Configuration file for Duet WiFi (firmware version 1.19.2)
; executed by the firmware on start-up
;
; generated by RepRapFirmware Configuration Tool on Sun Aug 05 2018 14:15:49 GMT-0500 (Central Standard Time); General preferences
M111 S0 ; Debugging off
G21 ; Work in millimetres
G90 ; Send absolute coordinates...
M83 ; ...but relative extruder moves
M555 P2 ; Set firmware compatibility to look like Marlin
M564 H0M667 S1 ; Select CoreXY mode
M208 X0 Y0 Z0 S1 ; Set axis minima
M208 X300 Y200 Z300 S0 ; Set axis maxima; Endstops
M574 X1 Y2 Z1 S0 ; Define active low and unused microswitches; Drives
M569 P0 S0 ; Drive 0 goes forwards
M569 P1 S0 ; Drive 1 goes forwards
M569 P2 S0 ; Drive 2 goes forwards
M569 P3 S1 ; Drive 3 goes backwards
M350 X16 Y16 Z16 E16 I1 ; Configure microstepping with interpolation
M92 X100 Y100 Z400 E408 ; Set steps per mm
M566 X600 Y600 Z24 E300 ; Set maximum instantaneous speed changes (mm/min)
M203 X30000 Y30000 Z300 E1500 ; Set maximum speeds (mm/min)
M201 X2000 Y2000 Z100 E4000 ; Set accelerations (mm/s^2)
M906 X800 Y800 Z1200 E1000 I30 ; Set motor currents (mA) and motor idle factor in per cent
M84 S30 ; Set idle timeout; Heaters
M143 H0 S250 ; Set maximum heater temperature
M305 P0 T100000 B4725 C7.060000e-8 R4700 ; Set thermistor + ADC parameters for heater 0
M305 P1 T100000 B4725 C7.060000e-8 R4700 ; Set thermistor + ADC parameters for heater 1; Tools
M563 P0 D0 H1 F2 ; Define tool 0
G10 P0 X0 Y0 Z0 ; Set tool 0 axis offsets
G10 P0 R0 S0 ; Set initial tool 0 active and standby temperatures to 0C; Network
M552 S1 ; Turn network on
M550 PDuet ; Set machine name
M552 P192.168.1.36
M586 P0 S1 ; Enable HTTP
M586 P1 S0 ; Disable FTP
M586 P2 S1 ; Enable Telnet; Fans
; Fan 0 is used as the part cooling fan for tool 0 (see M563 in the Tools section above)
M106 P1 S1 I0 F500 H1 T45 ; Set fan 2 (hotend) value, PWM signal inversion and frequency. Thermostatic control is turned on.
; Fan 1 not connected
; Fan 2 not connected; Custom settings are not configured
-
Add a T0 to the end of your config.g to make the heater active at startup. You've already for a G10 command to set the temps to 0, so it will be active and off at power on, then when you select a temp from the drop down it will heat up as expected.
-
Forgive me if I am missing the obvious but I am missing something I added a T0 at the end of the config.g file all it did was turn the Tool 1 to active a start up. I might not have been specific enough. I use to be able to select a temp for the hot end from the Active drop down box and it would turn the hot end on automatically, or I could type in 210, hit enter and it would do the same. There must be a command I am missing and where exactly to insert it. Any ideas?
-
Have you changed your DWC version recently?
-
No, what happened sometime back was I had a corrupted or failed SD Card and had to replace it, unfortunately I did not have a backup of the current config, so I had to re-write it, but I must have forgotten what the command was. I believe the initial firmware was on either 1.14 or 1.17, this is the most current version I have been using. I just never got around to figuring it out and I thought I would see if someone on the forums could point me in the right direction. I appreciate you help.
Firmware Name: RepRapFirmware for Duet 2 WiFi/Ethernet
Firmware Electronics: Duet WiFi 1.0 or 1.01
Firmware Version: 2.01(RTOS) (2018-07-26b2)
WiFi Server Version: 1.21
Web Interface Version: 1.21.2-dc42 -
Well you're definitely a bit out of date, but 2.01 isn't too bad. The web interface is really out of date though.
I suggest you do some updating.
https://duet3d.dozuki.com/Wiki/Installing_and_Updating_Firmware
-
@Phaedrux !![alt text]!
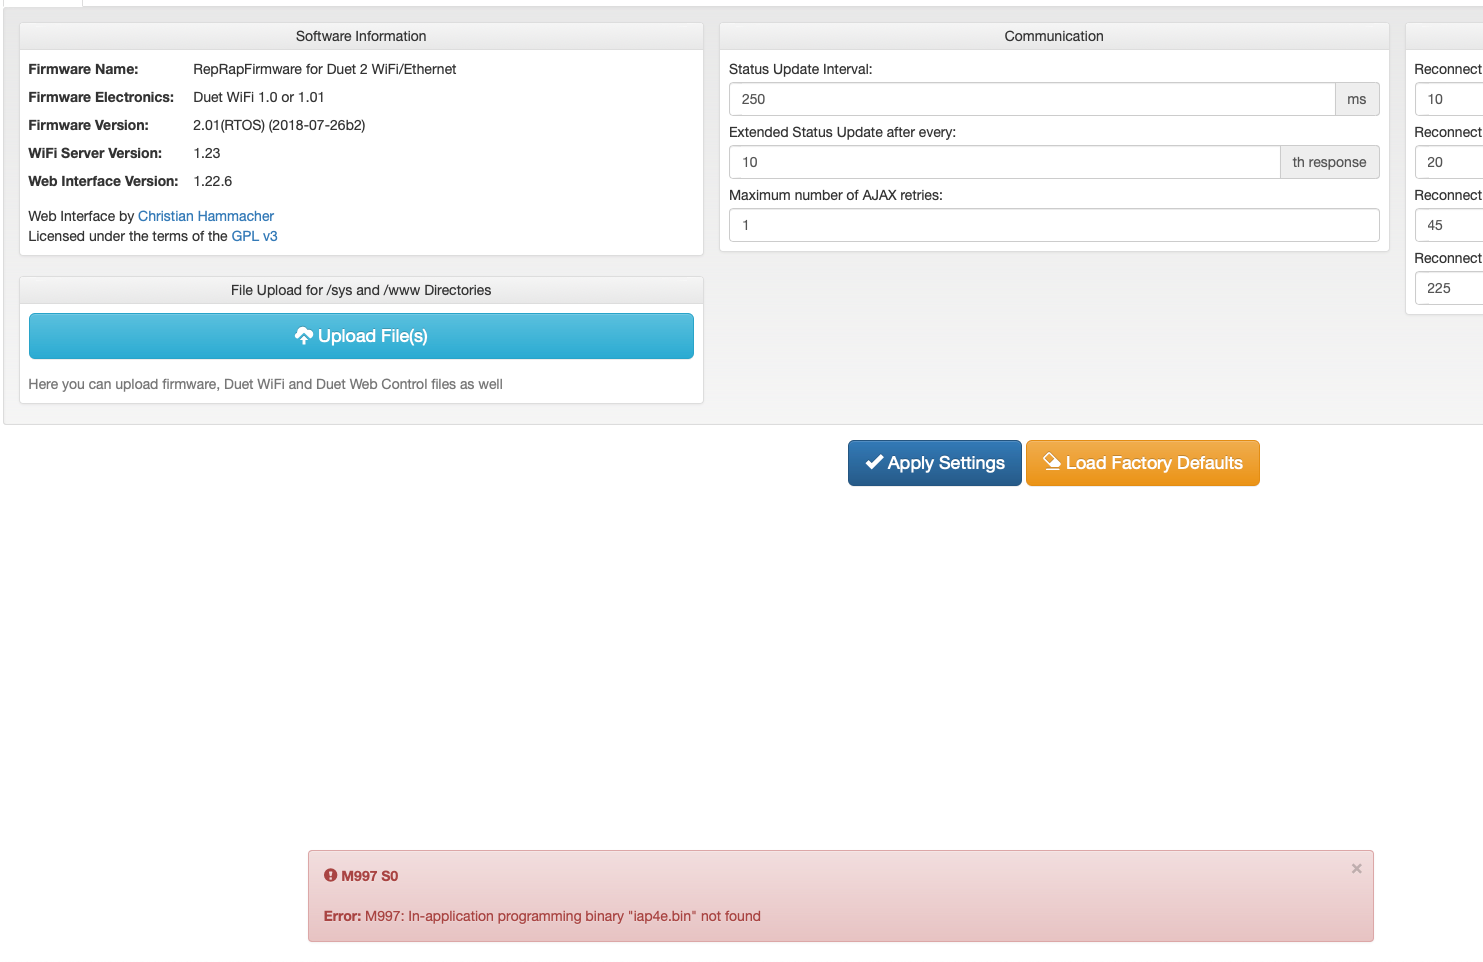
Ok, so I reviewed the information you sent me and yes indeed I am way of date. I backed up all of my config files and downloaded the combo update as well as the individual files. I tried to install the combo update. I get an error message of M997 S0 iap4e.bin not found. I went back and reviewed the fail safe methods. I removed the SD Card, installed the new web interface (bit different than before) and was able to update the wifi server. I can't seem to get the firmware to move off of the 2.01 to the 2.05, I can still connect through Web GUI and I can sent a M997 S1, it says it is updating the firmware and completes. The revision still says 2.01(RTOS), so I am a bit perplexed. Can you tell me what I am missing? Thanks again.
-
However this still doesn't solve what I was originally trying to accomplish, unless that is an issue the newer firmware is going to correct. I am missing something in the config.g file that turns the selection from he Active drop down into an Active state for Heater 1/ Tool0. When I select something in the Active drop down for the Bed/ Heater 0 it turns the bed from off to active setting and begins to heat the bed; alternatively I can can click on Heater 0 and cycle through active, standby, and off. I can do that with he Heater 1 as well. I just miss being able to use the drop down as a means of convenience. I assume at this point since I have updated all of the other features/ functions of the interface, I need to get the firmware current to at least 2.05, then address the other issue/ feature. I have moved the T0 command around in several spots on the config.g file. Sometimes it will move the state to standby but never active.
-
@titanhusker said in Active does not turn Hot End (Tool 0) on:
iap4e.bin
You need to download this file and place it in the sys folder
https://github.com/dc42/RepRapFirmware/releases/download/1.21/iap4e.bin
Then you should be able to simply upload this zip file (don't unzip it) and it should update all the needed files.
https://github.com/dc42/RepRapFirmware/releases/download/2.05/Duet2Firmware-2.05.zip
-
First let me say Happy Easter,
That fixed the firmware upgrade issue, on a side note, I found that I can't use Safari during the upgrade, it doesn't seem to download the file as a zip. After using Google Chrome it downloaded the file as zip and worked like it was intended. I generally drag my feet on upgrading firmware for the specific reason that things don't seem to work like they should afterwards. That is the case now. After completing all of the updates, I did notice there is trouble with the motor direction. I ran into this issue before and @dc42 and another user got me straightened out, I made sure to back up that configuration.Did something change with motor direction from 1.19 to 2.05?It seems like my X & Y have swapped positions somehow maybe it is in the configuration? Nothing was physically changed on the board. Here is a copy of my config file.
; General preferences
M111 S0 ; debugging off
G21 ; work in millimeters
G90 ; send absolute coordinates...
M83 ; ...but relative extruder moves
M555 P2 ; set firmware compatibility to look like Marlin
M564 H0; Axis Limits
M667 S1 ; select CoreXY mode
M208 X0 Y0 Z0 S1 ; set axis minima
M208 X295 Y190 Z300 S0 ; set axis maxima; Endstops
M574 X1 Y1 Z1 S0 ; define active low and unused microswitches; Drives
M569 P0 S0 ; Drive 0 goes forwards
M569 P1 S1 ; Drive 1 goes backwards
M569 P2 S0 ; Drive 2 goes forwards
M569 P3 S1 ; Drive 3 goes backwards
M350 X16 Y16 Z16 E16 I1 ; Configure microstepping with interpolation
M92 X100 Y100 Z400 E148 ; Set steps per mm
M566 X600 Y600 Z24 E300 ; Set maximum instantaneous speed changes (mm/min)
M203 X30000 Y30000 Z300 E1500 ; Set maximum speeds (mm/min)
M201 X2000 Y2000 Z100 E4000 ; Set accelerations (mm/s^2)
M906 X800 Y800 Z1200 E1000 I30 ; Set motor currents (mA) and motor idle factor in per cent
M84 S30 ; Set idle timeout; Heaters
M305 P0 T100000 B4725 C7.060000e-8 R4700 ; Set thermistor + ADC parameters for heater 0
M143 H0 S120 ; set temperature limit for heater 0 to 120C
M305 P1 T100000 B4725 C7.060000e-8 R4700 ; Set thermistor + ADC parameters for heater 1
M143 H1 S280 ; set temperature limit for heater 1 to 280C; Tools
M563 P0 D0 H1 F0 ; define tool 0
G10 P0 X0 Y0 Z0 ; set tool 0 axis offsets
G10 P0 R0 S0 ; set initial tool 0 active and standby temperatures to 0C; Network
M550 P"Dbot CoreXY" ; set printer name
M552 S1 ; enable network
M586 P0 S1 ; enable HTTP
M586 P1 S0 ; disable FTP
M586 P2 S1 ; enable Telnet; Fans
M106 P0 S0 I0 F500 H-1 ; set fan 0 value, PWM signal inversion and frequency. Thermostatic control is turned off
M106 P1 S1 I0 F500 H1 T45 ; set fan 1 value, PWM signal inversion and frequency. Thermostatic control is turned onMy printer should be moving in this order.
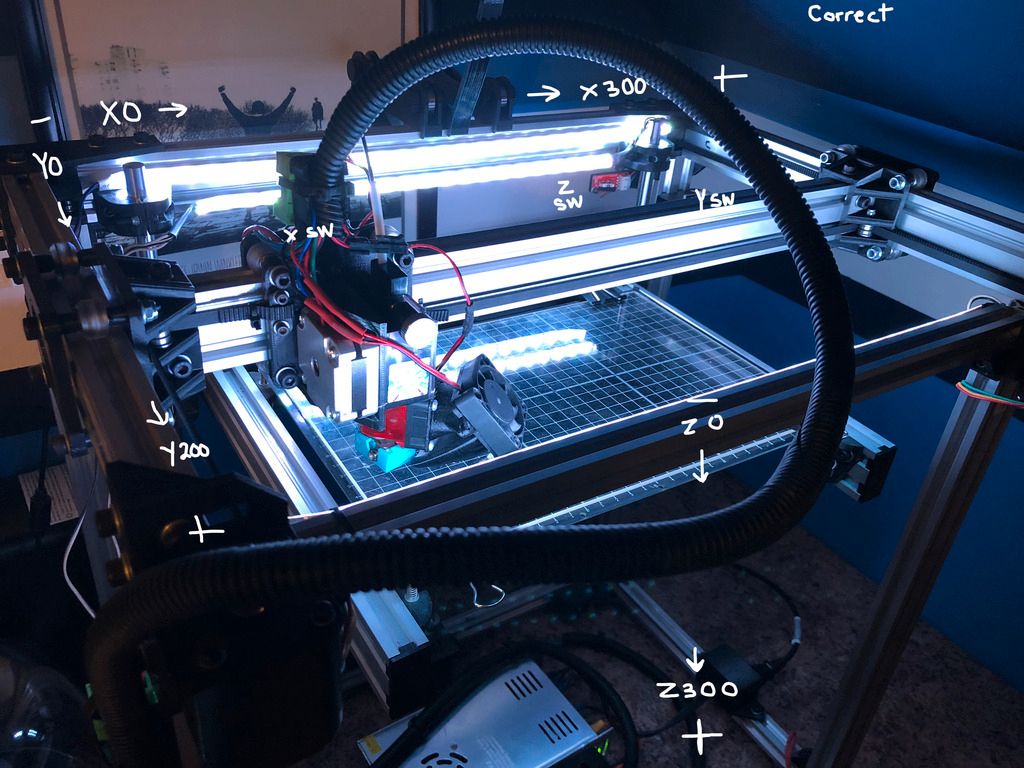
As shown the
X should go left (0) to right (300);
Y should go back (0) to front (200);
Z should go top (0) to bottom (300);X & Y have somehow swapped positions, meaning on the dashboard in machine movement - the X is moving for the Y and in the wrong direction. Y has swapped for the X, but is running in the correct direction. Here is a YouTube clip of what I am talking about.
According to the Duet WiFi Wiring Schemative Drive 0 = X; Drive 1 = Y; Drive 2 = Z; Drive 3 = E
M569 P0 S0 ; Drive 0 goes forwards
M569 P1 S1 ; Drive 1 goes backwards
M569 P2 S0 ; Drive 2 goes forwards
M569 P3 S1 ; Drive 3 goes backwardsSo I tried to make a minor tweak on drive 1 and flipped it from S1 to S0, it made the X become the Y, so I changed it back. I don't want to alter to many things without some guidance, so I will pause here until I get back on the right track.
-
@titanhusker said in Active does not turn Hot End (Tool 0) on:
Did something change with motor direction from 1.19 to 2.05?
Yes.
https://duet3d.dozuki.com/Wiki/ConfiguringRepRapFirmwareCoreXYPrinter#Section_Testing_motor_movement
Go through those movement tests, the results will dictate what you must change.
-
I notice in your photo that you have Y0 at the back of the printer. Typically the 0,0 point would be at the front left of the printer so that you have a right hand coordinate system to match the slicer coordinate system. The 0,0 point could also be in the middle, it doesn't really matter. The important thing is that when looking directly at it from the front the X+ goes to the right, Y+ goes to the back.
Do you notice that any prints are mirrored or rotated such that they don't match the slicer preview?
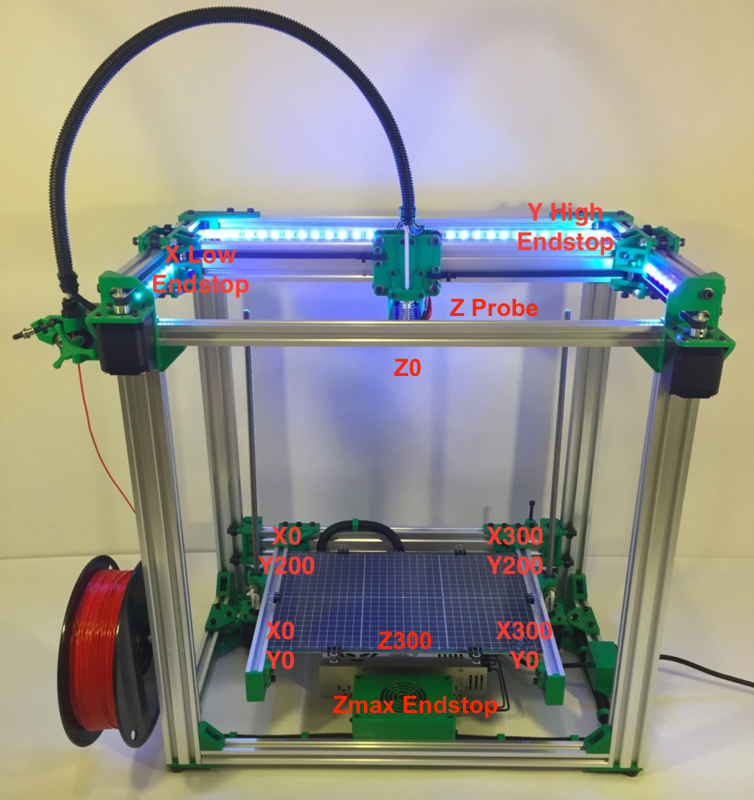
So the way you have things is a little non-standard, but I also notice you have a dbot and I think the dbot as built stock was a little non-standard.
If you want to make the changes to return to a standard right hand system you would need to change the following:
The Y endstop would become Ymax rather than Ymin. (M574 Y2)
The homing move directions would have to change accordingly.
And then your motor directions would have to be tested according to that previous link to ensure that the corexy movements were correct.
You can also take a look at these posts which go through the same thing for corexy setup
https://forum.duet3d.com/topic/14971/vcore-pro-core-xy-the-x-and-y-axis-home-issue/4
https://forum.duet3d.com/topic/12676/mirrored-x-axis/9You can also see my own config for my dbot for comparison: homeall.g config.g