Duet 2 wifi not homing and other issues
-
Ok well the BLTouch part is simple enough.
How do you have it wired up? We need to know what pin you're using for servo control. You're missing an M950 command to create that pin. The index number of that pin is needed for the M280 servo commands in your deploy and retract macros.
Also, remove +zprobe.mod from the M558 command.
-
I have it on heater 3 and its wired how the bltouch guide in the forums said to do it. Right now i have it working but for some odd reason im printing about 5mm in the air. I did the zero adjustments but for some odd reason its not working i think it might be cura but im not sure.
-
Please post your current config.g, homeall.g and homez.g, and your slicer start gcode.
Are you now able to deploy and retract the pin with M401 and M402?
-
yep i can deploy and retract the pin now. and im able to get a mesh map and i have zeroed the bed as best as i can. And here ya go. the cura start gcode is just a start on my end. I figured those would be good to have and was thinking id need to either add more or take away some.
; Configuration file for Duet WiFi (firmware version 2.03)
; executed by the firmware on start-up
;
; generated by RepRapFirmware Configuration Tool v3.1.1 on Wed Jun 03 2020 20:30:38 GMT-0700 (Pacific Daylight Time); General preferences
G90 ; send absolute coordinates...
M83 ; ...but relative extruder moves
M550 P"Tronxy X5sa Pro" ; set printer name
M669 K1 ; select CoreXY mode; Network
M552 S1 ; enable network
M586 P0 S1 ; enable HTTP
M586 P1 S0 ; disable FTP
M586 P2 S0 ; disable Telnet; Drives
M569 P0 S1 ; physical drive 0 goes forwards
M569 P1 S1 ; physical drive 1 goes forwards
M569 P2 S0 ; physical drive 2 goes backwards
M569 P3 S1 ; physical drive 3 goes forwards
M584 X0 Y1 Z2 E3 ; set drive mapping
M350 X16 Y16 Z16 E16 I0 ; configure microstepping without interpolation
M92 X80.00 Y80.00 Z400.00 E95.00 ; set steps per mm
M566 X600.00 Y600.00 Z12.00 E120.00 ; set maximum instantaneous speed changes (mm/min)
M203 X18000.00 Y18000.00 Z180.00 E1500.00 ; set maximum speeds (mm/min)
M201 X3000.00 Y3000.00 Z100.00 E10000.00 ; set accelerations (mm/s^2)
M906 X950 Y950 Z950 E1260 I10 ; set motor currents (mA) and motor idle factor in per cent
M84 S5 ; Set idle timeout; Axis Limits
M208 X0 Y0 Z0 S1 ; set axis minima
M208 X330 Y330 Z375 S0 ; set axis maxima; Endstops
M574 X1 Y1 S0 ; set active low and disabled endstops
M574 Z1 S2 ; set endstops controlled by probe; Z-Probe
M307 H3 A-1 C-1 D-1 ; disable heater on PWM channel for BLTouch
M558 P9 H5 F120 T6000 ; set Z probe type to bltouch and the dive height + speeds
G31 P500 X-32.8 Y0 Z-2.42 ; set Z probe trigger value, offset and trigger height
M556 S50 X0 Y0 Z0 ; set orthogonal axis compensation parameters
M557 X25:275 Y25:275 S50 ; define mesh grid
M307 H3 A-1 C-1 D-1M558 P9 H5 F100 T2000
G31 X0 Y0 Z0 P25
; Heaters
M307 H0 B0 S1.00 ; disable bang-bang mode for the bed heater and set PWM limit
M305 P0 T100000 B4138 R4700 ; set thermistor + ADC parameters for heater 0
M143 H0 S80 ; set temperature limit for heater 0 to 80C
M305 P1 T100000 B4092 R4700 ; set thermistor + ADC parameters for heater 1
M143 H1 S280 ; set temperature limit for heater 1 to 280C; Fans
M106 P0 S0 I0 F500 H-1 ; set fan 0 value, PWM signal inversion and frequency. Thermostatic control is turned off
M106 P1 S1 I0 F500 H1 T45 ; set fan 1 value, PWM signal inversion and frequency. Thermostatic control is turned on; Tools
M563 P0 D0 H1 F0 ; define tool 0
G10 P0 X0 Y0 Z0 ; set tool 0 axis offsets
G10 P0 R0 S0 ; set initial tool 0 active and standby temperatures to 0C; Custom settings are not defined
; Miscellaneous
M307 H3 A-1 C-1 D-1
M558 P9 H5 F100 T2000
G31 X0 Y0 Z0
M501 ; load saved parameters from non-volatile memory
M911 S10 R11 P"M913 X0 Y0 G91 M83 G1 Z3 E-5 F1000" ; set voltage thresholds and actions to run on power loss; homeall.g
; called to home all axes
;
; generated by RepRapFirmware Configuration Tool v3.1.1 on Wed Jun 03 2020 20:30:38 GMT-0700 (Pacific Daylight Time)
G91 ; relative positioning
G1 H2 Z5 F6000 ; lift Z relative to current position
G1 H1 X-335 Y-335 F1800 ; move quickly to X or Y endstop and stop there (first pass)
G1 H1 X-335 ; home X axis
G1 H1 Y-335 ; home Y axis
G1 X5 Y5 F6000 ; go back a few mm
G1 H1 X-335 F360 ; move slowly to X axis endstop once more (second pass)
G1 H1 Y-335 ; then move slowly to Y axis endstop
G90 ; absolute positioning
G1 X63 Y35 F6000 ; go to first bed probe point and home Z
G30 ; home Z by probing the bed; Uncomment the following lines to lift Z after probing
;G91 ; relative positioning
;G1 Z5 F100 ; lift Z relative to current position
;G90 ; absolute positioning; homez.g
; called to home the Z axis
;
; generated by RepRapFirmware Configuration Tool v3.1.1 on Wed Jun 03 2020 20:30:38 GMT-0700 (Pacific Daylight Time)
G91 ; relative positioning
G1 H2 Z5 F6000 ; lift Z relative to current position
G90 ; absolute positioning
G1 X63 Y35 F6000 ; go to first probe point
G30 ; home Z by probing the bed; Uncomment the following lines to lift Z after probing
;G91 ; relative positioning
;G1 Z5 F100 ; lift Z relative to current position
;G90 ; absolute positioningcura start code
G28 ;Homes the printer
G29 ;Meshbed level and bed compinsation
G29 S1 ;load mesh
M83 ;relative extrusion -
@Birdman19 said in Duet 2 wifi not homing and other issues:
; Z-Probe
M307 H3 A-1 C-1 D-1 ; disable heater on PWM channel for BLTouch
M558 P9 H5 F120 T6000 ; set Z probe type to bltouch and the dive height + speedsG31 P500 X-32.8 Y0 Z-2.42 ; set Z probe trigger value, offset and trigger height
M556 S50 X0 Y0 Z0 ; set orthogonal axis compensation parameters
M557 X25:275 Y25:275 S50 ; define mesh grid
M307 H3 A-1 C-1 D-1
M558 P9 H5 F100 T2000
G31 X0 Y0 Z0 P25
; Miscellaneous
M307 H3 A-1 C-1 D-1
M558 P9 H5 F100 T2000
G31 X0 Y0 Z0You have no less than 3 M558/G31 entries in your config.g. The last of which takes precedence. Delete the duplicates. Keep the one with the Offsets. Also, note that the Z offset is positive, not negative. Getting this corrected should make your probing far more predictable.
-
Thank you. Ill do that right away and try a print out and let ya know if im still too far off the bed or not.
-
well its printing kinda part of the center it will print on now but just right next to it it cant get the petg to stick for some odd reason. i think i might have to do more bed mesh maps and try and perfect the bed for it to print properly.
-
Once you fix the multiple G31 in your config and have the offsets properly present you'll need to redo your mesh for those offsets to be applied to the mesh. Then you should see better performance.
-
yeah i took out the g31's and the m558's you told me to. and i redid my mesh a few times. i found out that the clips i was using was also part of a bed level problem which sucks. i think ill have to redo the calibration of the zprobe to get a good first layer since it seems to be trying to lift up when it needs to get closer or stay the same height.
-
@Phaedrux ok another issue popped up. I followed the zprobe offset instructions in dozuki and set my zprobe in the config.g and went to print and well i think it put out the wrong numbers. cause i had to do z babbystepping to 1.25mm to get a proper layer height/squish other wise it wouldnt put down a layer of filament. Could you tell me what the heck is going on with that? i wish you could be in my living room right now to see whats going on.
-
Describe how you measured the trigger height.
Post your config.g and homing files. -
Well i did these steps that are in the dozuki for duet3d about 4 times the readings where only off by .003 so i figured lets choose the middle one and go with it. And with the babystepping set to how i said 1.25 i was able to get a print off for my bltouch mount. Which you would think id be excited since i dont have to worry about a ziptie holding the bltouch on. Guess again lol once i switched to the new mount some how its changed the entire bed. i truly dont understand it.
Jog the nozzle down until it is just touching the bed or just gripping a sheet of paper. If the firmware doesn't let you jog it down far enough, send M564 S0 to disable axis limits.
Once you have the nozzle touching the bed, send command G92 Z0 to tell the firmware that the head is at Z=0
Jog the head up by 5 to 10mm
Send command G30 S-1. The nozzle will descend or the bed rise until the probe triggers and the Z height at which the probe stopped will be reported. If you are using a nozzle-contact Z probe, the trigger height will be slightly negative. For any other type of Z probe where the probe triggers before the nozzle contacts the bed, it will be positive.
Repeat from step 5 two or three times to make sure that the trigger height is consistent.; Configuration file for Duet WiFi (firmware version 2.03)
; executed by the firmware on start-up
;
; generated by RepRapFirmware Configuration Tool v3.1.1 on Wed Jun 03 2020 20:30:38 GMT-0700 (Pacific Daylight Time); General preferences
G90 ; send absolute coordinates...
M83 ; ...but relative extruder moves
M550 P"Tronxy X5sa Pro" ; set printer name
M669 K1 ; select CoreXY mode; Network
M552 S1 ; enable network
M586 P0 S1 ; enable HTTP
M586 P1 S0 ; disable FTP
M586 P2 S0 ; disable Telnet; Drives
M569 P0 S1 ; physical drive 0 goes forwards
M569 P1 S1 ; physical drive 1 goes forwards
M569 P2 S0 ; physical drive 2 goes backwards
M569 P3 S1 ; physical drive 3 goes forwards
M584 X0 Y1 Z2 E3 ; set drive mapping
M350 X16 Y16 Z16 E16 I0 ; configure microstepping without interpolation
M92 X80.00 Y80.00 Z400.00 E436.5 ; set steps per mm
M566 X600.00 Y600.00 Z12.00 E120.00 ; set maximum instantaneous speed changes (mm/min)
M203 X18000.00 Y18000.00 Z180.00 E1500.00 ; set maximum speeds (mm/min)
M201 X3000.00 Y3000.00 Z100.00 E10000.00 ; set accelerations (mm/s^2)
M906 X950 Y950 Z950 E1260 I10 ; set motor currents (mA) and motor idle factor in per cent
M84 S5 ; Set idle timeout; Axis Limits
M208 X0 Y0 Z0 S1 ; set axis minima
M208 X330 Y330 Z375 S0 ; set axis maxima; Endstops
M574 X1 Y1 S0 ; set active low and disabled endstops
M574 Z1 S2 ; set endstops controlled by probe; Z-Probe
M307 H3 A-1 C-1 D-1 ; disable heater on PWM channel for BLTouch
M558 P9 H5 F120 T6000 ; set Z probe type to bltouch and the dive height + speeds
G31 P500 X-32.8 Y0 Z1.722 ; set Z probe trigger value, offset and trigger height
M557 X25:275 Y25:275 S50 ; define mesh grid
M307 H3 A-1 C-1 D-1; Heaters
M307 H0 B0 S1.00 ; disable bang-bang mode for the bed heater and set PWM limit
M305 P0 T100000 B4138 R4700 ; set thermistor + ADC parameters for heater 0
M143 H0 S80 ; set temperature limit for heater 0 to 80C
M305 P1 T100000 B4092 R4700 ; set thermistor + ADC parameters for heater 1
M143 H1 S280 ; set temperature limit for heater 1 to 280C; Fans
M106 P0 S0 I0 F500 H-1 ; set fan 0 value, PWM signal inversion and frequency. Thermostatic control is turned off
M106 P1 S1 I0 F500 H1 T45 ; set fan 1 value, PWM signal inversion and frequency. Thermostatic control is turned on; Tools
M563 P0 D0 H1 F0 ; define tool 0
G10 P0 X0 Y0 Z0 ; set tool 0 axis offsets
G10 P0 R0 S0 ; set initial tool 0 active and standby temperatures to 0C; Custom settings are not defined
; Miscellaneous
M501 ; load saved parameters from non-volatile memory
M911 S10 R11 P"M913 X0 Y0 G91 M83 G1 Z3 E-5 F1000" ; set voltage thresholds and actions to run on power loss; homeall.g
; called to home all axes
;
; generated by RepRapFirmware Configuration Tool v3.1.1 on Wed Jun 03 2020 20:30:38 GMT-0700 (Pacific Daylight Time)
G91 ; relative positioning
G1 H2 Z5 F6000 ; lift Z relative to current position
G1 H1 X-335 Y-335 F1800 ; move quickly to X or Y endstop and stop there (first pass)
G1 H1 X-335 ; home X axis
G1 H1 Y-335 ; home Y axis
G1 X5 Y5 F6000 ; go back a few mm
G1 H1 X-335 F360 ; move slowly to X axis endstop once more (second pass)
G1 H1 Y-335 ; then move slowly to Y axis endstop
G90 ; absolute positioning
G1 X63 Y35 F6000 ; go to first bed probe point and home Z
G30 ; home Z by probing the bed; Uncomment the following lines to lift Z after probing
;G91 ; relative positioning
;G1 Z5 F100 ; lift Z relative to current position
;G90 ; absolute positioning; homex.g
; called to home the X axis
;
; generated by RepRapFirmware Configuration Tool v3.1.1 on Wed Jun 03 2020 20:30:38 GMT-0700 (Pacific Daylight Time)
G91 ; relative positioning
G1 H2 Z5 F6000 ; lift Z relative to current position
G1 H1 X-335 F1800 ; move quickly to X axis endstop and stop there (first pass)
G1 X5 F6000 ; go back a few mm
G1 H1 X-335 F360 ; move slowly to X axis endstop once more (second pass)
G1 H2 Z-5 F6000 ; lower Z again
G90 ; absolute positioning; homey.g
; called to home the Y axis
;
; generated by RepRapFirmware Configuration Tool v3.1.1 on Wed Jun 03 2020 20:30:38 GMT-0700 (Pacific Daylight Time)
G91 ; relative positioning
G1 H2 Z5 F6000 ; lift Z relative to current position
G1 H1 Y-335 F1800 ; move quickly to Y axis endstop and stop there (first pass)
G1 Y5 F6000 ; go back a few mm
G1 H1 Y-335 F360 ; move slowly to Y axis endstop once more (second pass)
G1 H2 Z-5 F6000 ; lower Z again
G90 ; absolute positioning; homez.g
; called to home the Z axis
;
; generated by RepRapFirmware Configuration Tool v3.1.1 on Wed Jun 03 2020 20:30:38 GMT-0700 (Pacific Daylight Time)
G91 ; relative positioning
G1 H2 Z5 F6000 ; lift Z relative to current position
G90 ; absolute positioning
G1 X63 Y35 F6000 ; go to first probe point
G30 ; home Z by probing the bed; Uncomment the following lines to lift Z after probing
;G91 ; relative positioning
;G1 Z5 F100 ; lift Z relative to current position
;G90 ; absolute positioning -
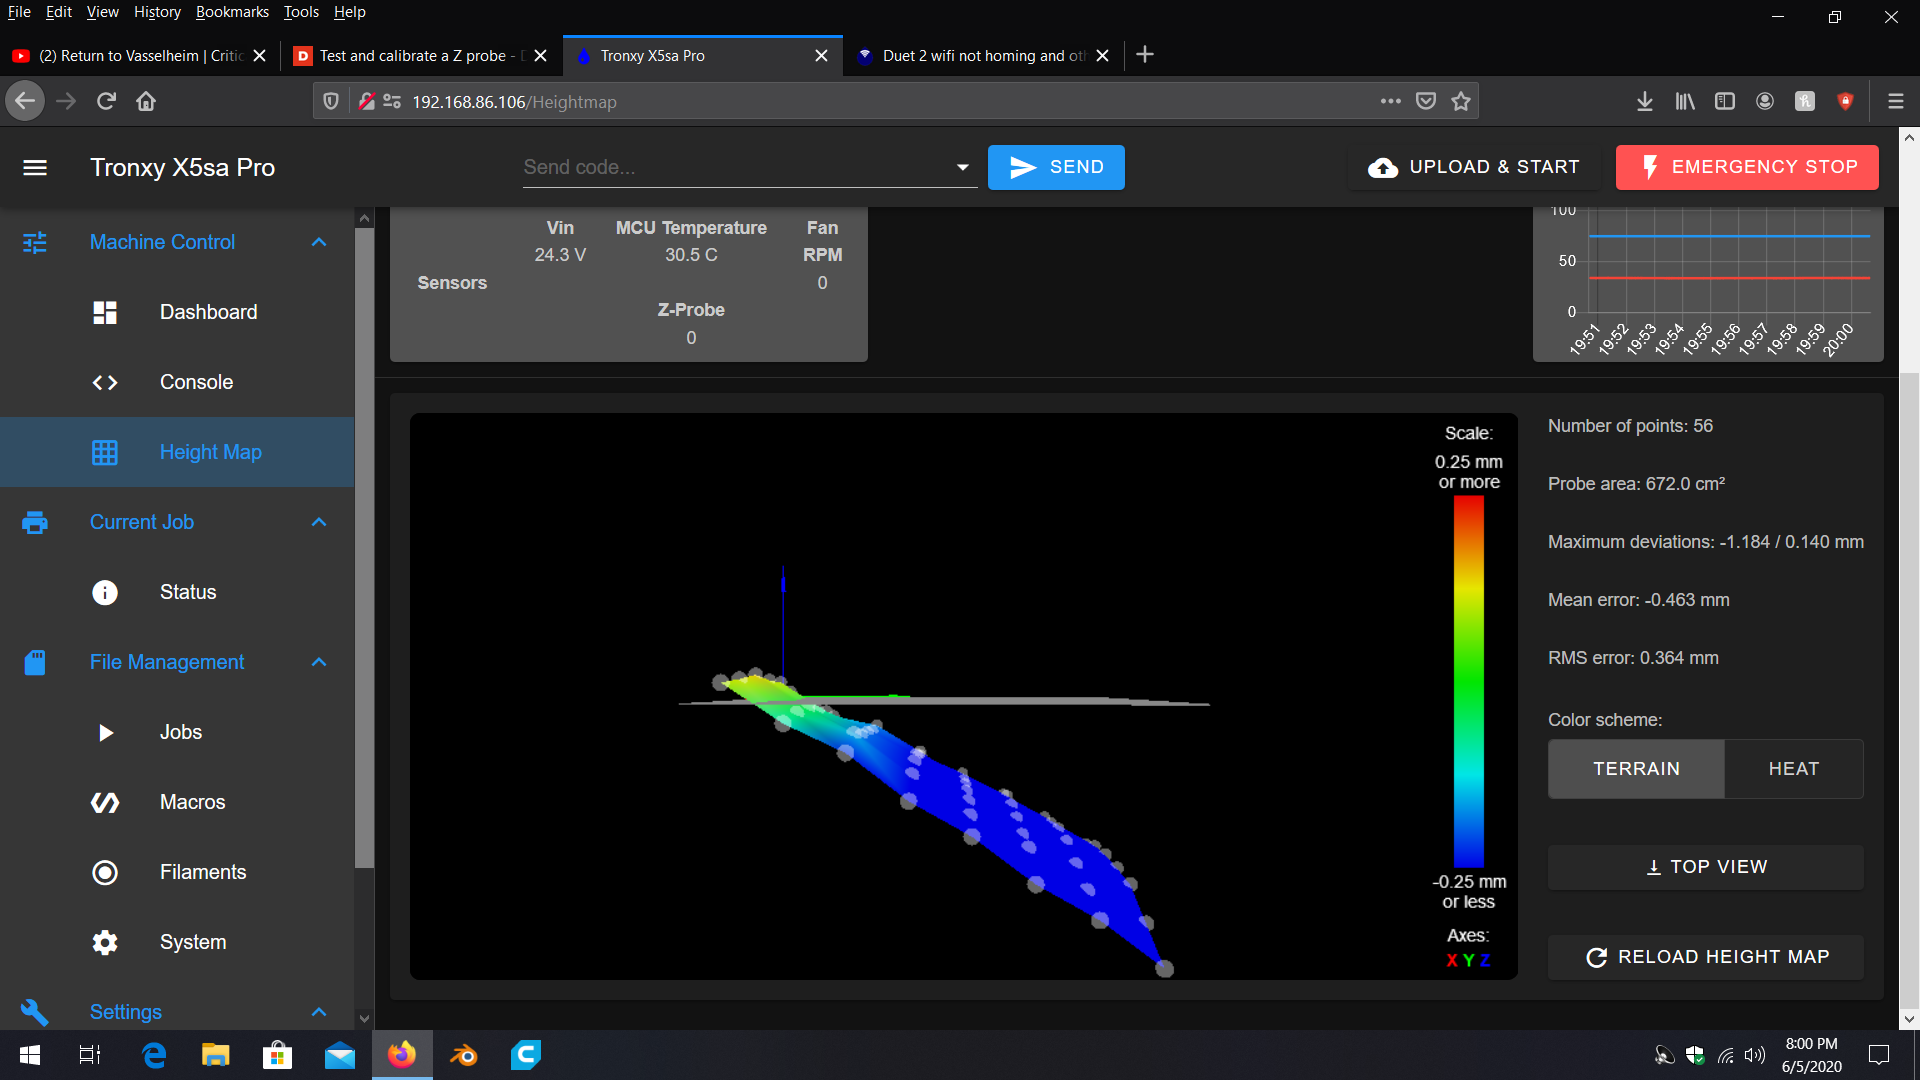 That is my bed after the mount was attached with all of the screws turned up to about 2 threads each screw. to be honest im getting one heck of a laugh but its also frustrating.
 -
Keep in mind the visualization is exaggerated. The actual tilt is only 1.2mmish.
I'll have to take a closer look a little later. -
ok let me know if you want any more files.
-
Ok i can say this for real. The mesh compensation doesnt work worth a darn. If it did the tip would be the perfect distance from the bed to get the perfect first layer not jam the nozzle. And cause the filament to not flow.
-
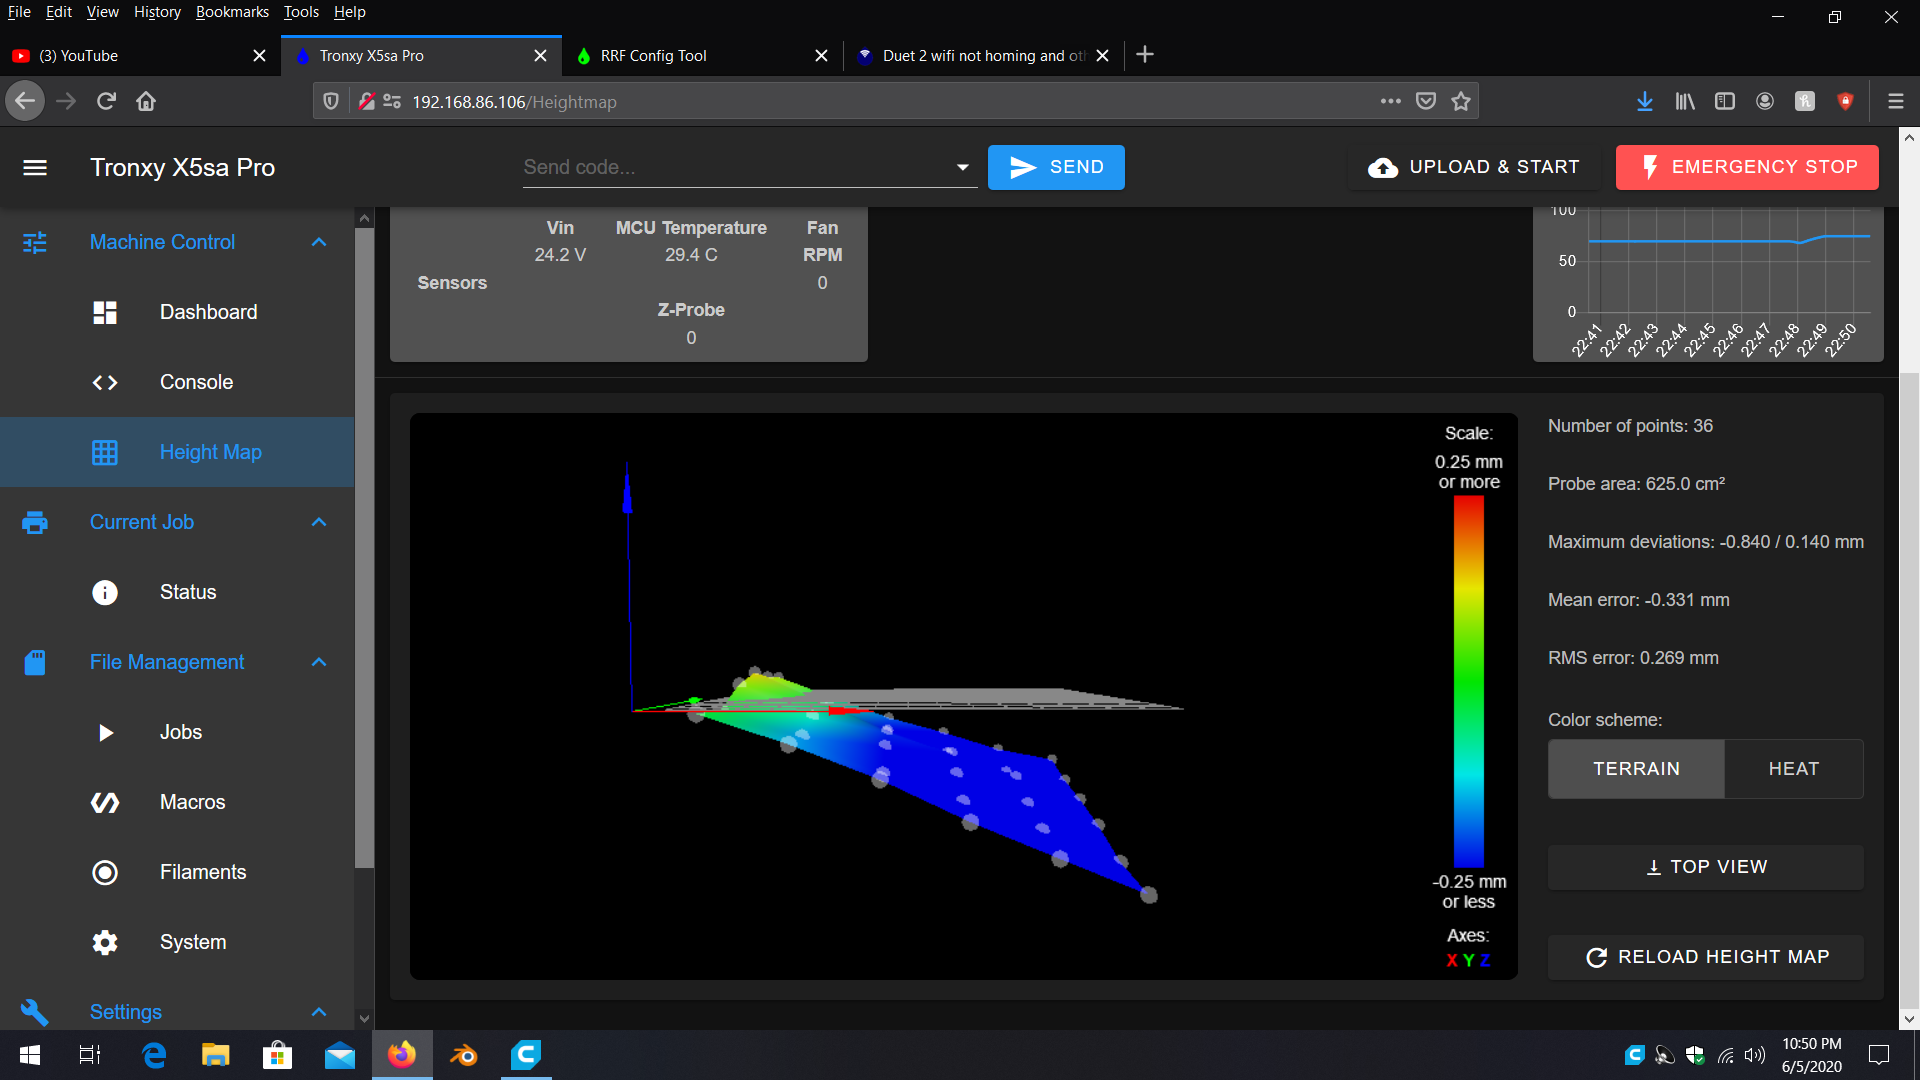
Ok how the heck does the bed switch from front being high to the side being high? in just one restart at that.
-
What does your mount look like?
Did you remeasure the XY offset after changing the mount?G1 X63 Y35 F6000 ; go to first bed probe point and home Z
G30 ; home Z by probing the bedChange the X Y position to move the probe to the center of the bed.
Have you manually leveled the bed to confirm the bed is touching the nozzle at all the leveling screw points?
-
its a tronxy x5sa pro its got a flat bar with the lead screw and two smooth rods running through it on each side and square stock running to each flat bar on both sides of the hotbed. Yes i have leveled the bed and made sure its touching at all points. So far i have gotten it to print its on layer 10 with your help 99% of the way lol the last 1% is from a random youtube post that talked about m500 to save everything which none of the documents talk about. thankfully when i found the m500 i setup everything saved with it and then reset the board and checked and m500 again just to make sure and it worked like a charm.
-
i think im gonna have to do a pully setup at the motors to fix any bed floppyness. But so far the semi fix is to not save power and to just let the motors have full power all the time.