unusual/unnerving noises + error codes
-
So it seems to be working ok now which is good. but when going for a test print i reserve this
Error: Fan number 2 not found
Error: Invalid tool number
Warning: Tool 0 was not driven because its heater temperatures were not high enough or it has a heater faultthe Fan i think can probably wait til a little later but the tool i feel is an issue
-
I think you should try a different slicer. Something is not right in your simplify3d setup.
Are you using the config.g from the set I provided? Can you post what you have now? Copy and paste from the config.g edit window or upload the file here.
All of your hardware works when you control it from the web interface, but when you try to print a file sliced in simplify 3d it doesn't work. I think your printer profile in S3D is setup for a different printer. I don't use S3D so I'm not much help there.
-
@Phaedrux said in unusual/unnerving noises + error codes:
simplify 3d
yeah using the your one.
; Configuration file for Duet WiFi (firmware version 3)
; executed by the firmware on start-up
;
; generated by RepRapFirmware Configuration Tool v3.1.4 on Wed Sep 16 2020 13:09:04 GMT-0600 (Central Standard Time); General preferences
G90 ; send absolute coordinates...
M83 ; ...but relative extruder moves
M550 P"Duet2Wifi" ; set printer name; Network
M552 S1 ; enable network
M586 P0 S1 ; enable HTTP
M586 P1 S0 ; disable FTP
M586 P2 S0 ; disable Telnet; Drives
M569 P0 S0 ; physical drive 0 goes backwards
M569 P1 S1 ; physical drive 1 goes backwards
M569 P2 S0 ; physical drive 2 goes forwards
M569 P3 S0 ; physical drive 3 goes forwards
M584 X0 Y1 Z2 E3 ; set drive mapping
M350 X16 Y16 Z16 E16 I1 ;a configure microstepping with interpolation
M92 X80.00 Y80.00 Z400.00 E93.00 ; set steps per mm
M566 X900.00 Y900.00 Z12.00 E1200.00 ; set maximum instantaneous speed changes (mm/min)
M203 X6000.00 Y6000.00 Z180.00 E1200.00 ; set maximum speeds (mm/min)
M201 X500.00 Y500.00 Z20.00 E250.00 ; set accelerations (mm/s^2)
M906 X600 Y600 Z600 E600 I30 ; set motor currents (mA) and motor idle factor in per cent
M84 S30 ; Set idle timeout; Axis Limits
M208 X-5.5 Y-10 Z0 S1 ; set axis minima
M208 X220 Y220 Z250 S0 ; set axis maxima; Endstops
M574 X1 S1 P"xstop" ; configure active-high endstop for low end on X via pin xstop
M574 Y1 S1 P"ystop" ; configure active-high endstop for low end on Y via pin ystop
M574 Z1 S2 ; configure Z-probe endstop for low end on Z; Z-Probe
M950 S0 C"exp.heater3" ; create servo pin 0 for BLTouch
M558 P9 C"^zprobe.in" H5 F120 T6000 ; set Z probe type to bltouch and the dive height + speeds
G31 P500 X-31 Y0 Z0.6 ; set Z probe trigger value, offset and trigger height
M557 X9.5:220 Y5:195 S20 ; define mesh grid; Heaters
M308 S0 P"bedtemp" Y"thermistor" T98801 B4185 ; configure sensor 0 as thermistor on pin bedtemp
M950 H0 C"bedheat" T0 ; create bed heater output on bedheat and map it to sensor 0
M307 H0 B0 S1.00 ; disable bang-bang mode for the bed heater and set PWM limit
M140 H0 ; map heated bed to heater 0
M143 H0 S120 ; set temperature limit for heater 0 to 120C
M308 S1 P"e0temp" Y"thermistor" T98801 B4185 ; configure sensor 1 as thermistor on pin e0temp
M950 H1 C"e0heat" T1 ; create nozzle heater output on e0heat and map it to sensor 1
M307 H1 B0 S1.00 ; disable bang-bang mode for heater and set PWM limit; Fans
M950 F0 C"fan0" Q500 ; create fan 0 on pin fan0 and set its frequency
M106 P0 C"Heatsink" S0 H-1 ; set fan 0 name and value. Thermostatic control is turned off
M950 F1 C"fan1" Q500 ; create fan 1 on pin fan1 and set its frequency
M106 P1 C"PartCooling" S1 H1 T45 ; set fan 1 name and value. Thermostatic control is turned on
M950 F1 C"fan2" Q500 ; create fan 2 on pin fan2 and set its frequency
M106 P1 C"ExtruderCooling" S1 H1 T45 ; set fan 2 name and value. Thermostatic control is turned on; Tools
M563 P0 S"Extruder 01" D0 H1 F0 ; define tool 0
G10 P0 X0 Y0 Z0 ; set tool 0 axis offsets
G10 P0 R0 S0 ; set initial tool 0 active and standby temperatures to 0C; Custom settings are not defined
; Miscellaneous
M575 P1 S1 B57600 ; enable support for PanelDue
M501 ; load saved parameters from non-volatile memory
M911 S10 R11 P"M913 X0 Y0 G91 M83 G1 Z3 E-5 F1000" ; set voltage thresholds and actions to run on power loss
T0 ; select first toolSo i didnt use a slicer there was a gcode on the interface for the benchy so i thought id try that. Im just downloading cura now so will try again and see what happens
-
@PR1OR said in unusual/unnerving noises + error codes:
; Fans
M950 F0 C"fan0" Q500 ; create fan 0 on pin fan0 and set its frequency
M106 P0 C"Heatsink" S0 H-1 ; set fan 0 name and value. Thermostatic control is turned off
M950 F1 C"fan1" Q500 ; create fan 1 on pin fan1 and set its frequency
M106 P1 C"PartCooling" S1 H1 T45 ; set fan 1 name and value. Thermostatic control is turned on
M950 F1 C"fan2" Q500 ; create fan 2 on pin fan2 and set its frequency
M106 P1 C"ExtruderCooling" S1 H1 T45 ; set fan 2 name and value. Thermostatic control is turned on
; Tools
M563 P0 S"Extruder 01" D0 H1 F0 ; define tool 0This defined the fans and tool.
The tool uses fan 0 for part cooling, extruder 0 for the motor, and heater 1 for the hotend.
The hotend heatsink fan is fan1.
Fan 2 is being used as maybe a duet board cooling, but maybe you don't have anything connected to fan2?
You won't be able to print old gcode, you'll need to slice a new file.
You'll have to setup Cura with a new printer profile. Make sure to tell it you are using reprap gcode flavor.
-
@Phaedrux perfect i think i have this right.
I think i only have two things left wooohooo
-
I have two fan bars on the DWC but they only seem to move together and not individually. How would i make them independant?
-
When doing the true bed leveling i keep getting this response. But i can see where to amend either G32 or G29
Warning: Skipping grid point (190.0, 60.0) because Z probe cannot reach it
Warning: Skipping grid point (210.0, 60.0) because Z probe cannot reach it
Warning: Skipping grid point (210.0, 80.0) because Z probe cannot reach it
Warning: Skipping grid point (190.0, 80.0) because Z probe cannot reach it
19/09/2020, 11:36:03 G29
Warning: Skipping grid point (190.0, 20.0) because Z probe cannot reach it
Warning: Skipping grid point (210.0, 20.0) because Z probe cannot reach it
Warning: Skipping grid point (210.0, 40.0) because Z probe cannot reach it
Warning: Skipping grid point (190.0, 40.0) because Z probe cannot reach it
-
-
@PR1OR said in unusual/unnerving noises + error codes:
I have two fan bars on the DWC but they only seem to move together and not individually. How would i make them independant?
Those two sliders are for the same thing. The tool fan slider is for the fan of the currently selected tool, which is fan0, and the fan0 slider is for fan0. If you had two tools with different fans, the tool slider would always control the fan of the currently selected tool and you'd have 2 sliders for each fan as well. There is a little button link near the fan sliders "change visibility" that will let you hide one of you like since you only have 1 tool.
To get rid of those errors we need to change the M557 grid spacing to take your probe offset into account because it can't reach some of the areas you're asking it to.
Try
M557 X5:185 Y5:205 P6 -
@Phaedrux Ahh ok fine thats ok then ill just hide one of them
in regard to the M557 X5:185 Y5:205 P6 i have updated this.
and am now getting this
G32Warning: Skipping grid point (5.0, 5.0) because Z probe cannot reach it
Warning: Skipping grid point (41.0, 5.0) because Z probe cannot reach it
Warning: Skipping grid point (77.0, 5.0) because Z probe cannot reach it
Warning: Skipping grid point (113.0, 5.0) because Z probe cannot reach it
Warning: Skipping grid point (149.0, 5.0) because Z probe cannot reach it
Warning: Skipping grid point (185.0, 5.0) because Z probe cannot reach it -
also are you able to break down that code so i can start understanding the structure and meaning? I think it will help for the future (rofl)
I would on SAP and code regularly so i think if i started understanding what everything means i maybe able to start fault finding alittle better
-
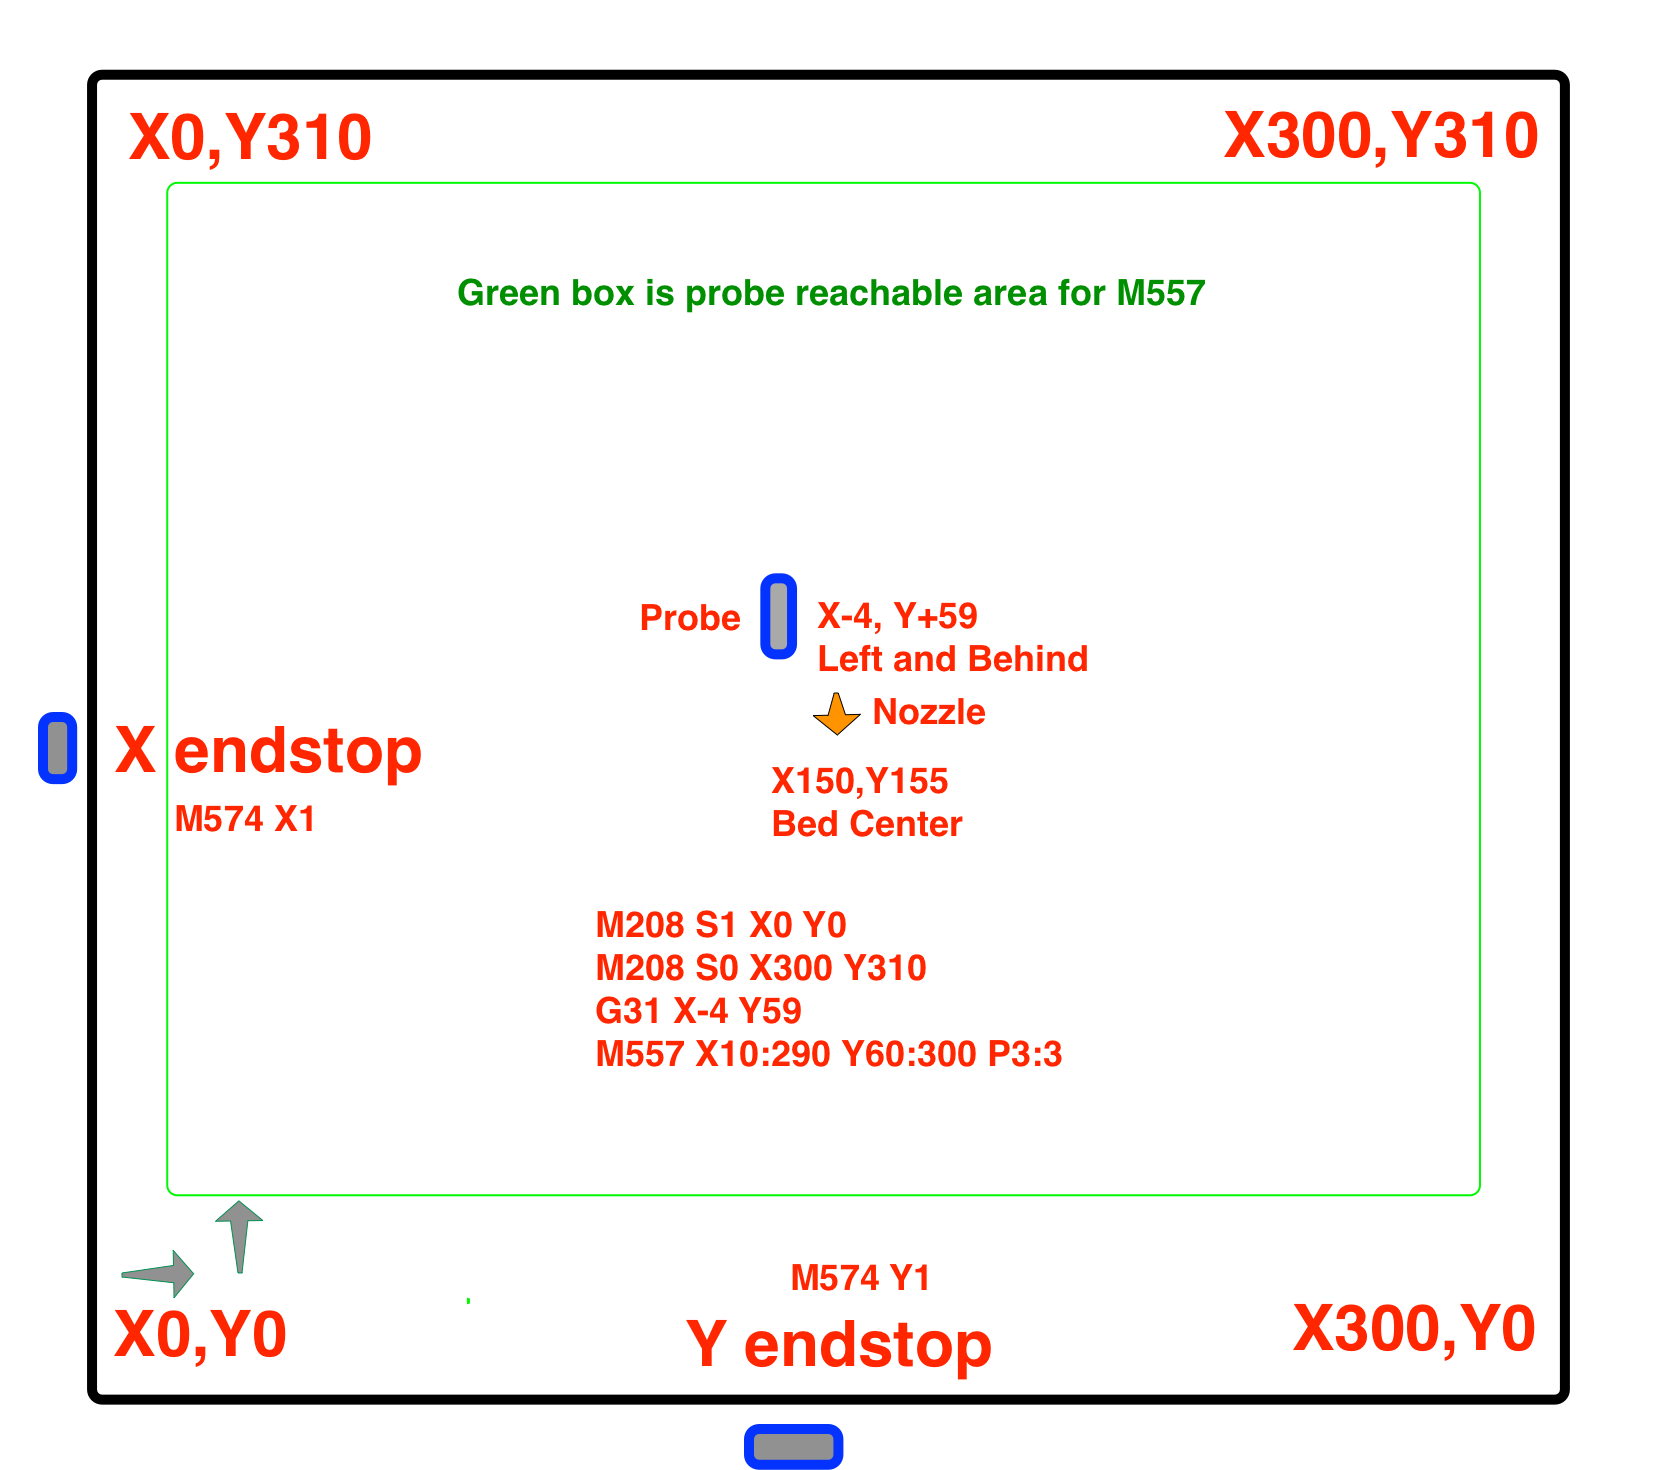
Well to define a good M557 you'd take your M208 axis limits and your G31 X Y offsets and choose points such that the probe is able to reach them.
A good way to do this is to draw a diagram of your bed showing the size and probe offsets and then you can see where the probe is able to reach.
It's skipping the Y5 area now, but I thought it should be able to reach it because the probe is inline with the nozzle (y0 offset) and the Y axis goes from -10 to 220.
-
@Phaedrux said in unusual/unnerving noises + error codes:
220
Thank you for this!! i now am not getting that message. I have sorted the parameters and i think i have as bigger printing area as i can get.
However i am now getting this
Warning: the height map has a substantial Z offset. Suggest use Z-probe to establish Z=0 datum, then re-probe the mesh.
36 points probed, min error -1.793, max error -0.002, mean -0.966, deviation 0.483I have tried to recalibrate the BL touch using this
https://duet3d.dozuki.com/Wiki/Test_and_calibrate_the_Z_probe
As i read that, that maybe the issue, but it keeps coming up now
Any ideas? also as a side point (pardon my ignorance) should the BL touch auto adjust the Z axis depending on the height or do i still have to manually have to adjust using the height map?
-
@PR1OR said in unusual/unnerving noises + error codes:
Warning: the height map has a substantial Z offset. Suggest use Z-probe to establish Z=0 datum, then re-probe the mesh.
this mean you are loading the mesh before you have homed the printer.
check your start code
if you have G28 and G29 make sure that G28 comes first. -
@Veti said in unusual/unnerving noises + error codes:
G28 and G29 m
So i dont believe im using a G28 code. Should i be?
-
G28 calls homeall. so at some point you are using it to home the printer otherwise it wouldn't be moving.
Please post your current homeall.g and config.g and your slicer start gcode section.
-
; homeall.g
; called to home all axes
;
; generated by RepRapFirmware Configuration Tool v3.1.4 on Wed Sep 16 2020 13:09:04 GMT-0600 (Central Standard Time)
G91 ; relative positioning
G1 H2 Z5 F6000 ; lift Z relative to current position
G1 H1 X-230.5 Y-235 F1800 ; move quickly to X and Y axis endstops and stop there (first pass)
G1 H2 X5 Y5 F6000 ; go back a few mm
G1 H1 X-230.5 Y-235 F360 ; move slowly to X and Y axis endstops once more (second pass)
G90 ; absolute positioning
G1 X40.5 Y20 F6000 ; go to first bed probe point and home Z
G30 ; home Z by probing the bed; Uncomment the following lines to lift Z after probing
;G91 ; relative positioning
;G1 Z5 F100 ; lift Z relative to current position
;G90 ; absolute positioningConfig.g
; Configuration file for Duet WiFi (firmware version 3)
; executed by the firmware on start-up
;
; generated by RepRapFirmware Configuration Tool v3.1.4 on Wed Sep 16 2020 13:09:04 GMT-0600 (Central Standard Time); General preferences
G90 ; send absolute coordinates...
M83 ; ...but relative extruder moves
M550 P"Jack's Printer" ; set printer name; Network
M552 S1 ; enable network
M586 P0 S1 ; enable HTTP
M586 P1 S0 ; disable FTP
M586 P2 S0 ; disable Telnet; Drives
M569 P0 S0 ; physical drive 0 goes backwards
M569 P1 S1 ; physical drive 1 goes backwards
M569 P2 S0 ; physical drive 2 goes forwards
M569 P3 S0 ; physical drive 3 goes forwards
M584 X0 Y1 Z2 E3 ; set drive mapping
M350 X16 Y16 Z16 E16 I1 ;a configure microstepping with interpolation
M92 X80.00 Y80.00 Z400.00 E93.00 ; set steps per mm
M566 X900.00 Y900.00 Z12.00 E1200.00 ; set maximum instantaneous speed changes (mm/min)
M203 X6000.00 Y6000.00 Z180.00 E1200.00 ; set maximum speeds (mm/min)
M201 X500.00 Y500.00 Z20.00 E250.00 ; set accelerations (mm/s^2)
M906 X600 Y600 Z600 E600 I30 ; set motor currents (mA) and motor idle factor in per cent
M84 S30 ; Set idle timeout; Axis Limits
M208 X0 Y0 S1 ;set axis minima NEW 22.09.2020
M208 X230 Y220 S0 ;set axis maxima NEW 22.09.2020
;M208 X-5.5 Y-10 Z0 S1 ; set axis minima
;M208 X220 Y220 Z250 S0 ; set axis maxima
;M208 X-5.5:220 Y-10:220 Z0:250 ; set axis minima and maxima NEW ADDED 22.09.2020; Endstops
M574 X1 S1 P"X Stop" ; configure active-high endstop for low end on X via pin xstop
M574 Y1 S1 P"Y Stop" ; configure active-high endstop for low end on Y via pin ystop
M574 Z1 S2 ; configure Z-probe endstop for low end on Z; Z-Probe
M950 S0 C"exp.heater3" ; create servo pin 0 for BLTouch
M558 P9 C"^zprobe.in" H5 F120 T6000 ; set Z probe type to bltouch and the dive height + speedsG31 X-10 Y-20 Z0.5 ; set Z probe trigger value, offset and trigger height NEW 22.09.2020
M557 X30:215 Y0:200 P6 ; define mesh grid NEW 22.09.2020;G31 P500 X-31 Y20 Z0.5 ; set Z probe trigger value, offset and trigger height
;M557 X5:185 Y5:205 P6 ; define mesh grid; Heaters
M308 S0 P"bedtemp" Y"thermistor" T98801 B4185 ; configure sensor 0 as thermistor on pin bedtemp
M950 H0 C"bedheat" T0 ; create bed heater output on bedheat and map it to sensor 0
M307 H0 B0 S1.00 ; disable bang-bang mode for the bed heater and set PWM limit
M140 H0 ; map heated bed to heater 0
M143 H0 S120 ; set temperature limit for heater 0 to 120C
M308 S1 P"e0temp" Y"thermistor" T98801 B4185 ; configure sensor 1 as thermistor on pin e0temp
M950 H1 C"e0heat" T1 ; create nozzle heater output on e0heat and map it to sensor 1
M307 H1 B0 S1.00 ; disable bang-bang mode for heater and set PWM limit; Fans
M950 F0 C"fan0" Q500 ; create fan 0 on pin fan0 and set its frequency
M106 P0 C"Heatsink" S0 H-1 ; set fan 0 name and value. Thermostatic control is turned off
M950 F1 C"fan1" Q500 ; create fan 1 on pin fan1 and set its frequency
M106 P1 C"PartCooling" S1 H1 T45 ; set fan 1 name and value. Thermostatic control is turned on
M950 F2 C"fan2" Q500 ; create fan 2 on pin fan2 and set its frequency
M106 P2 C"Board Cooling" S1 ; set fan 2 name and value. Thermostatic control is turned on; Tools
M563 P0 S"Extruder 01" D0 H1 F0 ; define tool 0
G10 P0 X0 Y0 Z0 ; set tool 0 axis offsets
G10 P0 R0 S0 ; set initial tool 0 active and standby temperatures to 0C; Custom settings are not defined
; Miscellaneous
M575 P1 S1 B57600 ; enable support for PanelDue
M501 ; load saved parameters from non-volatile memory
M911 S10 R11 P"M913 X0 Y0 G91 M83 G1 Z3 E-5 F1000" ; set voltage thresholds and actions to run on power loss
T0 ; select first toolWhat do you mean by slicer start gcode section? as in Cura?
-
@PR1OR said in unusual/unnerving noises + error codes:
What do you mean by slicer start gcode section? as in Cura?
Yes. The slicer will insert some gcode commands before the print starts to set temperatures, home the printer, etc. This is where the G29 should go to either load the heightmap or create a new one.
-
@Phaedrux i think this is what you mean.
Start Code
; Ender 3 Custom Start G-code
G92 E0 ; Reset Extruder
G28 ; Home all axes
G1 Z2.0 F3000 ; Move Z Axis up little to prevent scratching of Heat Bed
G1 X0.1 Y20 Z0.3 F5000.0 ; Move to start position
G1 X0.1 Y200.0 Z0.3 F1500.0 E15 ; Draw the first line
G1 X0.4 Y200.0 Z0.3 F5000.0 ; Move to side a little
G1 X0.4 Y20 Z0.3 F1500.0 E30 ; Draw the second line
G92 E0 ; Reset Extruder
G1 Z2.0 F3000 ; Move Z Axis up little to prevent scratching of Heat Bed
G1 X5 Y20 Z0.3 F5000.0 ; Move over to prevent blob squishEnd Code
G91 ;Relative positioning
G1 E-2 F2700 ;Retract a bit
G1 E-2 Z0.2 F2400 ;Retract and raise Z
G1 X5 Y5 F3000 ;Wipe out
G1 Z10 ;Raise Z more
G90 ;Absolute positionningG1 X0 Y{machine_depth} ;Present print
M106 S0 ;Turn-off fan
M104 S0 ;Turn-off hotend
M140 S0 ;Turn-off bedM84 X Y E ;Disable all steppers but Z
-
Yes that would be it. So if you want to enable mesh compensation you would add G29 after the G28 in the start gcode section to probe the bed and create a new heightmap. Or if your bed is pretty stable you can use G29 S1 to load a previously created heightmap.
As long as you're doing G28 before the creation of the heightmap with G29 you shouldn't get that Z=0 datum error.
@PR1OR said in unusual/unnerving noises + error codes:
also as a side point (pardon my ignorance) should the BL touch auto adjust the Z axis depending on the height or do i still have to manually have to adjust using the height map?
I'm not sure what you mean by this. When you have mesh compensation enabled it will automatically adjust the position of the nozzle up or down to account for the heightmap. The displayed Z position won't change however because it's trying to keep the nozzle distance from the bed the same as it moves around in X and Y.
Can you create a new heightmap by running G28 and then G29 and post a photo of the heightmap display?
-
@Phaedrux thanks i will try this on my next print, i have one going fairly well at the min so dont want to stop it haha
and the second point is the answer i was hoping for!! thanks again