Duet2 Beginner with RRF Config Tool
-
Hello folks, I am doing a bunch of work on my printer and have moved to the firmware stages using RRF config tool, however I have questions. Is there a site or post that offers detailed descriptions of the input fields? I would rather be able to research on my own than ask 30 questions on a forum post. I am a complete noob when it comes to gcode etc so I dont want to waste yalls time with my noob questions when I could just go read X post.
For example, under printer geometry, do the min and max values represent the size of the build plate, the printable space allowed by my extruder and printer frame, or the distance my extruder can travel?
ty, Dad
-
Hi,
I don't care for the configuration tool and have never used it.
When I got started with the Duet family my first board came with a sample configuration file.
I studied that and read the firmware documentation to understand what each command in the configuration sample file did.
I seen too many folks use the configuration tool, take the config file it creates, put it in the printer and power it up. When it doesn't work they struggle since they never learned what the commands do and which ones are needed for a given task.
And lately some of the code that users claim the configuration tool has generated is questionable doing things I would never do.
Just my two cents.
As to your question about min/max different folks use them differently.
I set the X and Y values to the printable area with X=0 Y=0 at the exact center of the bed. The Z value is the max safe travel from 0 to whatever.
Other folks set them according to the max travel for each axis.
Frederick
-
@printerdad said in Duet2 Beginner with RRF Config Tool:
I dont want to waste yalls time with my noob questions when I could just go read X post.
Don't let that hold you back. Fire away.
-
Ok here are some questions I have. Sorry if this info is readily available somewhere.
Duet 2 Ethernet - firmware 2.03 to 2.05
-
I am using 2 Z motors on headers ZA and ZB. Do I double the value for amps of the motor when I input the rated z amperage?
-
I have my BLtouch as a z-probe wired like this:
BLTouch-------to------Duet
out (white) --- Zprobe header, input
GND (black) --- Zprobe header, GND
+5V (red) --- Expansion, +5v (pin1.)
Control (yellow) --- Expansion, Heater3 (pin 8.)
GND (brown) --- Expansion, GND (pin 2.)
Is this a typical configuration, and if so, do I set the servo control to E3 Channel? -
For my fans, I have 2 extruders, each with their own heatsink fan. I also have a parts-cooling fan. I set the extruder fans for no thermostatic control, so they would be on all the time, wired to the non-pwm fan headers. I set the parts-cooling fan to no thermostatic control so my slicer can control it, wired to pwm control. Will those configurations operate my fans as intended?
-
How do I add a 3rd always-on fan for the duet board cooling? Possibly wire the two extruder, always-on fans in parallel?
-
I am not sure how to configure my tool. I currently have a single Tool 0, set with extruders E0 and E1, heaters E0 and E1, and fans 1 and 2. Is this a typical configuration?
-
Is there a spot to input the x-offset for the space between my two extruder nozzles?
Thanks for your time and advice, Dad
-
-
@printerdad said in Duet2 Beginner with RRF Config Tool:
I am using 2 Z motors on headers ZA and ZB. Do I double the value for amps of the motor when I input the rated z amperage?
They are wired in series internally, so you just need to set the current to whatever 60-85% of the rated max current of the motors would be and you're good to go. Same as if it's a single motor.
@printerdad said in Duet2 Beginner with RRF Config Tool:
Is this a typical configuration, and if so, do I set the servo control to E3 Channel?
Confusingly it should be E2 Channel in the config tool. That frees up Heater pin 3. It makes a lot more sense in RRF3 because it lets you assign actual pin names.
@printerdad said in Duet2 Beginner with RRF Config Tool:
Duet 2 Ethernet - firmware 2.03 to 2.05
Why not update to RRF3? The config tool gets a bit more logical with RRF3 because of how flexible it is to use pins. If this is a start from scratch kind of situation, this might be a good way to go.
For example, with RRF3 you get to choose your pin mappings like so
 Screen Shot 2021-03-15 at 9.33.58 PM.png
@printerdad said in Duet2 Beginner with RRF Config Tool:
For my fans, I have 2 extruders, each with their own heatsink fan. I also have a parts-cooling fan. I set the extruder fans for no thermostatic control, so they would be on all the time, wired to the non-pwm fan headers. I set the parts-cooling fan to no thermostatic control so my slicer can control it, wired to pwm control. Will those configurations operate my fans as intended?
If you want your heat sink fans to be always on you don't have to specify them at all in the config tool or your config. Just connect them to an always on port in parallel or individually or directly to VIN. Whatever you like.
For the part cooling fan connect to fan0 and fan1 and assign those fans to the tools.
@printerdad said in Duet2 Beginner with RRF Config Tool:
How do I add a 3rd always-on fan for the duet board cooling? Possibly wire the two extruder, always-on fans in parallel?
Yes that's an option if you want to have it always on. Or connect it to Fan2 and set it to thermostatic and have it tied to the bed heater and extruder heaters at 45c so that it comes on during a print.
@printerdad said in Duet2 Beginner with RRF Config Tool:
I am not sure how to configure my tool. I currently have a single Tool 0, set with extruders E0 and E1, heaters E0 and E1, and fans 1 and 2. Is this a typical configuration?
If you have 2 extruders you'll need 2 tools.
@printerdad said in Duet2 Beginner with RRF Config Tool:
Is there a spot to input the x-offset for the space between my two extruder nozzles?
Yes that's on the tools page as well. There's an edit button under the heading of XYZ offsets.
If you do wish to update the firmware to RRF3 and start with a fresh config from the tool here's how.
If you still have access to DWC. Upload these 3 zip files, one at a time in the system tab. Don't extract them. Reboot after each. Use M115 to verify the firmware has been applied.
https://github.com/Duet3D/RepRapFirmware/releases/download/2.05.1/Duet2Firmware-2.05.1.zip
https://github.com/Duet3D/RepRapFirmware/releases/download/3.0/Duet2and3Firmware-3.0.zip
https://github.com/Duet3D/RepRapFirmware/releases/download/3.2.2/Duet2and3Firmware-3.2.2.zip
That will get your firmware and DWC up to date.For your config, might be a good idea to run through the configurator tool and generate a fresh set for RRF3.
https://configtool.reprapfirmware.org/Start -
Here's a config.json file you can load into the config tool to play around with that is set to use RRF3 and has 2 tools and a BLtouch configured.
; Configuration file for Duet WiFi (firmware version 3)
; executed by the firmware on start-up
;
; generated by RepRapFirmware Configuration Tool v3.2.3 on Mon Mar 15 2021 21:59:06 GMT-0600 (Central Standard Time)

; General preferences
G90                                                ; send absolute coordinates...
M83                                                ; ...but relative extruder moves
M550 P"My Printer"                                 ; set printer name

; Network
M552 S1                                            ; enable network
M586 P0 S1                                         ; enable HTTP
M586 P1 S0                                         ; disable FTP
M586 P2 S0                                         ; disable Telnet

; Drives
M569 P0 S1                                         ; physical drive 0 goes forwards
M569 P1 S1                                         ; physical drive 1 goes forwards
M569 P2 S1                                         ; physical drive 2 goes forwards
M569 P3 S1                                         ; physical drive 3 goes forwards
M569 P4 S1                                         ; physical drive 4 goes forwards
M584 X0 Y1 Z2 E3:4                                 ; set drive mapping
M350 X16 Y16 Z16 E16:16 I1                         ; configure microstepping with interpolation
M92 X80.00 Y80.00 Z400.00 E420.00:420.00           ; set steps per mm
M566 X900.00 Y900.00 Z60.00 E120.00:120.00         ; set maximum instantaneous speed changes (mm/min)
M203 X6000.00 Y6000.00 Z180.00 E1200.00:1200.00    ; set maximum speeds (mm/min)
M201 X500.00 Y500.00 Z20.00 E250.00:250.00         ; set accelerations (mm/s^2)
M906 X800 Y800 Z800 E800:800 I30                   ; set motor currents (mA) and motor idle factor in per cent
M84 S30                                            ; Set idle timeout

; Axis Limits
M208 X0 Y0 Z0 S1                                   ; set axis minima
M208 X230 Y210 Z200 S0                             ; set axis maxima

; Endstops
M574 X1 S1 P"xstop"                                ; configure active-high endstop for low end on X via pin xstop
M574 Y1 S1 P"ystop"                                ; configure active-high endstop for low end on Y via pin ystop
M574 Z1 S2                                         ; configure Z-probe endstop for low end on Z

; Z-Probe
M950 S0 C"exp.heater3"                             ; create servo pin 0 for BLTouch
M558 P9 C"^zprobe.in" H5 F120 T6000                ; set Z probe type to bltouch and the dive height + speeds
G31 P500 X0 Y0 Z2.5                                ; set Z probe trigger value, offset and trigger height
M557 X15:215 Y15:195 S20                           ; define mesh grid

; Heaters
M308 S0 P"bedtemp" Y"thermistor" T100000 B3950     ; configure sensor 0 as thermistor on pin bedtemp
M950 H0 C"bedheat" T0                              ; create bed heater output on bedheat and map it to sensor 0
M307 H0 B0 S1.00                                   ; disable bang-bang mode for the bed heater and set PWM limit
M140 H0                                            ; map heated bed to heater 0
M143 H0 S120                                       ; set temperature limit for heater 0 to 120C
M308 S1 P"e0temp" Y"thermistor" T100000 B3950      ; configure sensor 1 as thermistor on pin e0temp
M950 H1 C"e0heat" T1                               ; create nozzle heater output on e0heat and map it to sensor 1
M307 H1 B0 S1.00                                   ; disable bang-bang mode for heater  and set PWM limit
M143 H1 S280                                       ; set temperature limit for heater 1 to 280C
M308 S2 P"e1temp" Y"thermistor" T100000 B3950      ; configure sensor 2 as thermistor on pin e1temp
M950 H2 C"e1heat" T2                               ; create nozzle heater output on e1heat and map it to sensor 2
M307 H2 B0 S1.00                                   ; disable bang-bang mode for heater  and set PWM limit
M143 H2 S280                                       ; set temperature limit for heater 2 to 280C

; Fans
M950 F0 C"fan0" Q500                               ; create fan 0 on pin fan0 and set its frequency
M106 P0 S0 H-1                                     ; set fan 0 value. Thermostatic control is turned off
M950 F1 C"fan1" Q500                               ; create fan 1 on pin fan1 and set its frequency
M106 P1 S1 H-1                                     ; set fan 1 value. Thermostatic control is turned off
M950 F2 C"fan2" Q500                               ; create fan 2 on pin fan2 and set its frequency
M106 P2 S1 H1:2:0 T45                              ; set fan 2 value. Thermostatic control is turned on

; Tools
M563 P0 D0 H1 F0                                   ; define tool 0
G10 P0 X0 Y0 Z0                                    ; set tool 0 axis offsets
G10 P0 R0 S0                                       ; set initial tool 0 active and standby temperatures to 0C
M563 P1 D1 H2 F1                                   ; define tool 1
G10 P1 X0 Y0 Z0                                    ; set tool 1 axis offsets
G10 P1 R0 S0                                       ; set initial tool 1 active and standby temperatures to 0C

; Custom settings are not defined

; Miscellaneous
M575 P1 S1 B57600                                  ; enable support for PanelDue
M501                                               ; load saved parameters from non-volatile memory
M911 S10 R11 P"M913 X0 Y0 G91 M83 G1 Z3 E-5 F1000" ; set voltage thresholds and actions to run on power loss
T0                                                 ; select first tool
I didn't know some details for your printer so I left them default, so you'd need to change the details to suit.
-
This is a ton of great information, thank you. I do want to update to RRF3 however I have a cpl more questions.
If you do wish to update the firmware to RRF3 and start with a fresh config from the tool here's how.
If you still have access to DWC. Upload these 3 zip files, one at a time in the system tab. Don't extract them. Reboot after each. Use M115 to verify the firmware has been applied.
I dont know IF I still have access or not...I have never turned this board on before to be honest. It's straight from the box. I can connect it to my pc via usb but getting the ethernet to work will be a nightmare because my roommate, who is a software engineer for our ISP, has an overly complicated network setup in our house, and I dont want to hear him crying right now.
Can I simply connect the board via usb and have access to DWC? -
@printerdad said in Duet2 Beginner with RRF Config Tool:
Can I simply connect the board via usb and have access to DWC?
You can't access DWC over USB
You could however connect directly over ethernet from your PC/Laptop
https://forum.duet3d.com/topic/22019/connect-ubuntu-pc-directly-to-duet-ethernet-without-a-router/3?_=1615846598333 -
This may help
https://duet3d.dozuki.com/Guide/1.)+Getting+Connected+to+your+Duet/7
The board will use DHCP by default so it shouldn't be too difficult to connect to any network that will serve an IP address.
If not, the direct connect method described by @jay_s_uk can be useful.
-
so much great info, thanks guys. I have a lot of tinkering to do now!
-
@Phaedrux said in Duet2 Beginner with RRF Config Tool:
Here's a config.json file you can load into the config tool to play around with that is set to use RRF3 and has 2 tools and a BLtouch configured.
How do I use this file?
-
nvm i copied and pasted into a new .json
-
Should have been able to download it and then upload it into the config tool. If it was opening as a text file in a browser window file > save as.. probably would do it.
-
New questions, I need help with the config tool again. I am setting up my fans, and i want my extruder fans to turn on only when the extruder is heating.
Do I- Fan0 set to thermostatic control, yes. Monitor E0, threshold 45C?
or - Fan0 set to thermostatic control, no. Under tools page, select fan0 for the E0's fan?
whats the difference? It wont let me assign fan0 to any E in tools, if I have thermostatic control turned on for that fan0.
Also, I assume the extruder XYZ offsets are the distance away from 0,0,0, when the printer is homed to XYZ? Why would there be a Z offset?
thanks, Dad
- Fan0 set to thermostatic control, yes. Monitor E0, threshold 45C?
-
Did the config I provided not have all the fans assigned as well? Should have been fan0 as the part cooling fan for tool0 and fan1 as the part cooling fan for tool1. And fan2 as the heatsink fan tied to the heaters.
@printerdad said in Duet2 Beginner with RRF Config Tool:
Also, I assume the extruder XYZ offsets are the distance away from 0,0,0, when the printer is homed to XYZ? Why would there be a Z offset?
Yes, usually tool0 would be 0,0,0 and tool1 would have an offset in XYZ from there. There is Z because the tools aren't always are the same height.
-
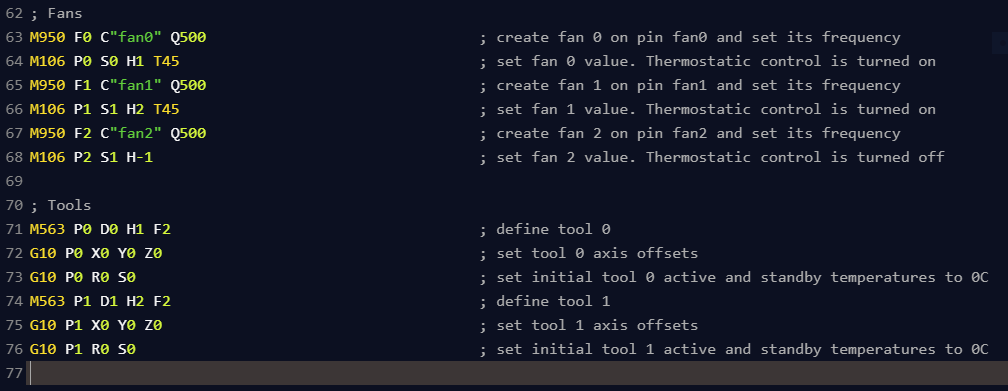
This is my fan setup:
fan0, heatsink E0
fan1, heatsink E1
fan 2, parts cooling fan for both -
In which case your fan and tool section in config.g would look like this
; Fans M950 F0 C"fan0" Q500 ; create fan 0 on pin fan0 and set its frequency M106 P0 S0 H1 T45 ; set fan 0 value. Thermostatic control is turned on M950 F1 C"fan1" Q500 ; create fan 1 on pin fan1 and set its frequency M106 P1 S1 H2 T45 ; set fan 1 value. Thermostatic control is turned on M950 F2 C"fan2" Q500 ; create fan 2 on pin fan2 and set its frequency M106 P2 S1 H-1 ; set fan 2 value. Thermostatic control is turned off ; Tools M563 P0 D0 H1 F2 ; define tool 0 G10 P0 X0 Y0 Z0 ; set tool 0 axis offsets G10 P0 R0 S0 ; set initial tool 0 active and standby temperatures to 0C M563 P1 D1 H2 F2 ; define tool 1 G10 P1 X0 Y0 Z0 ; set tool 1 axis offsets G10 P1 R0 S0 ; set initial tool 1 active and standby temperatures to 0C -
Ok Ive got 3.2.2 installed with the new configuration files, installed using dwc. Here are a couple problems Im having.
ToolFan and Fan2 are both operating the same fan, which should be Fan2.
Fan2 starts at 100% upon power on, which should be 0.
Not sure why ToolFan is even listed as it has thermostatic control. (I have 2 tool fans)

Also, Tool0 starts as active upon power on, but tool1 does not. Seems odd.
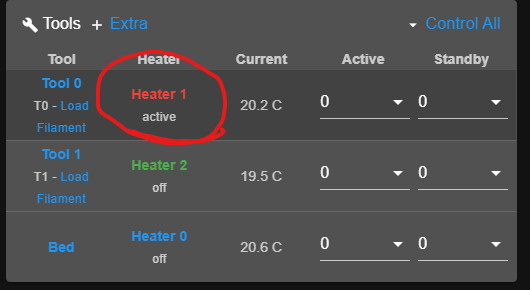
This is a screenshot of my config.
Thanks guys, Dad
-
TOOL FAN and FAN2 are the same thing in your case.
TOOL FAN will control the fan of the currently selected tool. IF you had multiple tools with separate fans, you would see TOOL FAN, FAN1 and FAN2 (as an example). Tool fan would control either fan1 or fan2 depending on which tool was selected at the time.
If you wish you can hide the fans you don't want to see by clicking on the change visibility button.
M950 F2 C"fan2" Q500                               ; create fan 2 on pin fan2 and set its frequency
M106 P2 S1 H-1
To have fan2 start off, change the S value in the M106 command from S1 (on) to S0 (off). Like so:
M106 P2 S1 H-1toM106 P2 S0 H-1Tool0 starts as active at power up because there is likely a T0 at the end of your config.g to select the first tool. You can only use a single tool at a time, the others will be in standby or inactive. It would be up to your slicer to send the tool change commands to switch between them as needed.
-
I do have 2 tool fans though, fan0 and fan1. I have two extruders each with their own heat sink fans. Fan2 is a parts cooling fan, not a tool fan.
The fan slider is operating my parts cooling fan.Also, If S0 or S1 is the command for fan start on/off then why is only one fan starting on, when two of them have S1 in the gcode?