AKC LP - calibration woes
-
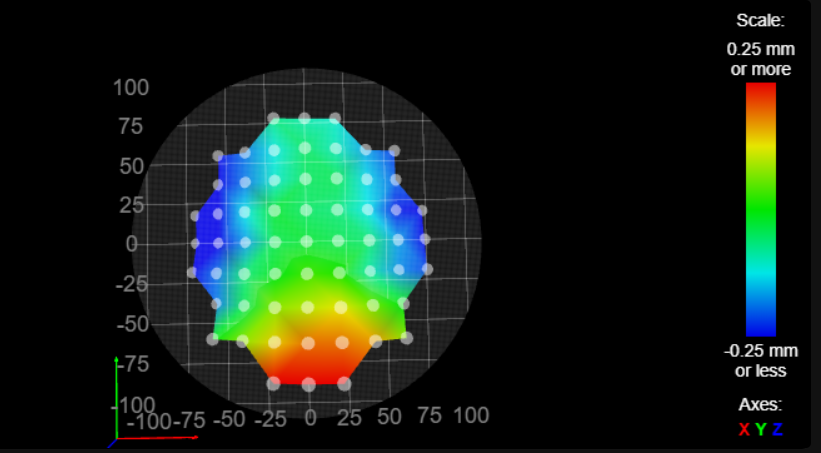
I converted my delta over to duet 2 wifi, smart effector, mag ball arms. I ran delta calibration and followed to documentation. I ran it 6 times and kicks out deviation of -0.000 , 0.017 +/- .05 on the latter. I ran mesh bed leveling to see what it looks like and it is not good. I then went back and set my probe offset to 0 and measured the trigger height of each point in delta calibration and offset those points z in bed.g . and it did not change my mesh much at all but at least it is consistently probing those areas correctly. any help guidance is appreciated! Please see below my mesh's I ran 4 times and they are identical, and my config / bed.g
; Configuration file for Duet WiFi (firmware version 3.3)
; executed by the firmware on start-up
;
; generated by RepRapFirmware Configuration Tool v3.3.10 on Mon Mar 14 2022 17:05:41 GMT-0400 (Eastern Daylight Time); General preferences
G90 ; send absolute coordinates...
M83 ; ...but relative extruder moves
M550 P"AKC Delta" ; set printer name
M665 R140.125 L288.17 B115 H230.46 X 0.986° Y 2.410° ; Set delta radius, diagonal rod length, printable radius and homed height
M666 X0.04 Y-.18 Z.14 ; put your endstop adjustments here, or let auto calibration find them; Network
M552 S1 ; enable network
M586 P0 S1 ; enable HTTP
M586 P1 S0 ; disable FTP
M586 P2 S0 ; disable Telnet; Drives
M569 P0 S0 ; physical drive 0 goes forwards
M569 P1 S0 ; physical drive 1 goes forwards
M569 P2 S0 ; physical drive 2 goes forwards
M569 P4 S0 ; physical drive 3 goes forwards
M584 X0 Y1 Z2 E4 ; set drive mapping
M350 E16 I0 ; Disable interpolation on extruder
M350 X16 Y16 Z16 I1 ; Configure microstepping with interpolation for XYZ
M92 X80.00 Y80.00 Z80.00 E96.00 ; set steps per mm
M566 X300.00 Y300.00 Z300.00 E300.00 ; set maximum instantaneous speed changes (mm/min)
M203 X6000.00 Y6000.00 Z6000.00 E1200.00 ; set maximum speeds (mm/min)
M201 X750.00 Y750.00 Z750.00 E1000.00 ; set accelerations (mm/s^2)
M906 X1200 Y1200 Z1200 E1000 I30 ; set motor currents (mA) and motor idle factor in per cent
M84 S30 ; Set idle timeout; Axis Limits
M208 Z0 S1 ; set minimum Z; Endstops
M574 X2 S1 P"xstop" ; configure switch-type (e.g. microswitch) endstop for low end on X via pin xstop
M574 Y2 S1 P"ystop" ; configure switch-type (e.g. microswitch) endstop for low end on Y via pin ystop
M574 Z2 S1 P"zstop" ; configure switch-type (e.g. microswitch) endstop for low end on Z via pin zstop; Z-Probe
M558 P8 C"zprobe.in+zprobe.mod" H5 F120 r.4 T10000 B1 ; set Z probe type to unmodulated and the dive height + speeds
;M558 H30 ;*** Remove this line after delta calibration has been done and new delta parameters have been saved
G31 P100 X0 Y0 Z-0.21 ; set Z probe trigger value, offset and trigger height
M557 R85 S20 ; define mesh grid; Heaters
M308 S0 P"bedtemp" Y"thermistor" T100000 B4138 ; configure sensor 0 as thermistor on pin bedtemp
M950 H0 C"bedheat" T0 ; create bed heater output on bedheat and map it to sensor 0
;M307 H0 B0 R0.325 C444.4 D5.28 S1.00 V23 ; enable bang-bang mode for the bed heater and set PWM limit
M307 H0 R0.314 C404.133:404.133 D7.24 S1.00 V23.7 B0 I0
M140 H0 ; map heated bed to heater 0
M143 H0 S75 ; set temperature limit for heater 0 to 120C
M308 S1 P"e0temp" Y"thermistor" T100000 B4138 ; configure sensor 1 as thermistor on pin e0temp
M950 H1 C"e0heat" T1 ; create nozzle heater output on e0heat and map it to sensor 1
;M307 H1 B0 R5.298 C198.6:198.6 D10.28 S1.00 V23.6 ; disable bang-bang mode for heater and set PWM limit
;M307 H1 R5.502 C178.573:138.507 D9.45 S1.00 V23.6 B0 I0
;M307 H1 B0 R5.883 C199.7:138.1 D9.56 S1.00 V23.5
M307 H1 R5.502 C178.573:138.507 D9.45 S1.00 V23.6 B0 I0
M143 H1 S265 ; set temperature limit for heater 1 to 265C; Fans
M950 F0 C"fan0" Q500 ; create fan 0 on pin fan0 and set its frequency
M106 P0 S0 H-1 ; set fan 0 value. Thermostatic control is turned off
M950 F1 C"fan1" Q500 ; create fan 1 on pin fan1 and set its frequency
M106 P1 S1 H1 T45 ; set fan 1 value. Thermostatic control is turned on; Tools
M563 P0 D0 H1 F0 ; define tool 0
G10 P0 X0 Y0 Z0 ; set tool 0 axis offsets
G10 P0 R0 S0 ; set initial tool 0 active and standby temperatures to 0C; Custom settings are not defined
; Miscellaneous
M911 S10 R11 P"M913 X0 Y0 G91 M83 G1 Z3 E-5 F1000" ; set voltage thresholds and actions to run on power loss
m501; bed.g
; called to perform automatic delta calibration via G32
;
; generated by RepRapFirmware Configuration Tool v3.3.10 on Mon Mar 14 2022 17:05:40 GMT-0400 (Eastern Daylight Time)
M561 ; clear any bed transform
;G28 ; home all towers
; Probe the bed at 3 peripheral and 3 halfway points, and perform 6-factor auto compensation
; Before running this, you should have set up your Z-probe trigger height to suit your build, in the G31 command in config.g.
G30 P0 X0 Y84.9 H-.04 Z-99999
G30 P1 X73.53 Y-42.45 H-.05 Z-99999
G30 P2 X-73.53 Y-42.45 H-.22 Z-99999
G30 P3 X0 Y42.4 H-.01 Z-99999
G30 P4 X36.72 Y-21.2 H-.02 Z-99999
G30 P5 X-36.72 Y-21.2 H-.06 Z-99999
G30 P6 X0 Y0 H0 Z-99999 S6
; Use S-1 for measurements only, without calculations. Use S4 for endstop heights and Z-height only. Use S6 for full 6 factors
; If your Z probe has significantly different trigger heights depending on XY position, adjust the H parameters in the G30 commands accordingly. The value of each H parameter should be (trigger height at that XY position) - (trigger height at centre of bed) -
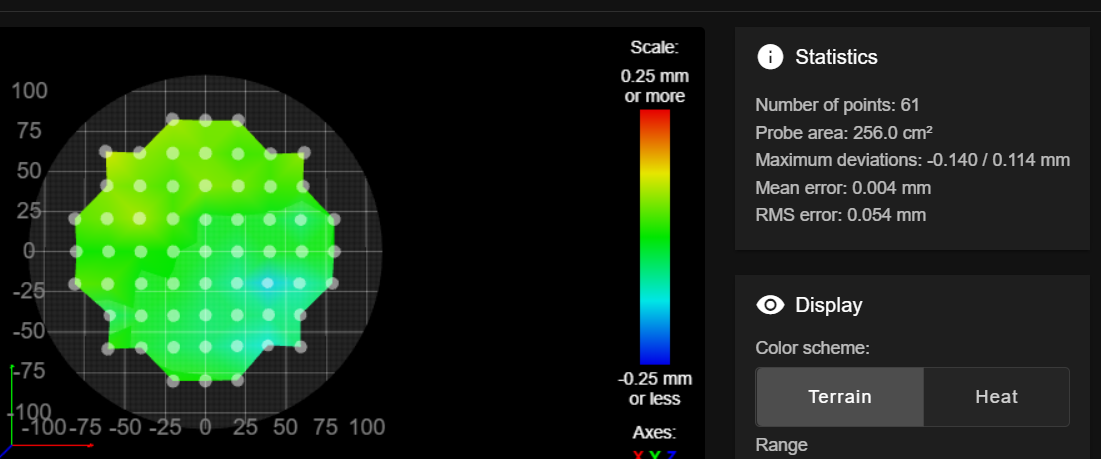
quick update - I made a new bed.g with more points s6 and ran calibration once and then ran a mesh and this was the result.
; bed.g file for RepRapFirmware, generated by Escher3D calculator
; 13 points, 6 factors, probing radius: 112, probe offset (0, 0)
G28
G30 P0 X0.00 Y112.00 Z-99999 H0
G30 P1 X71.99 Y85.80 Z-99999 H0
G30 P2 X110.30 Y19.45 Z-99999 H0
G30 P3 X96.99 Y-56.00 Z-99999 H0
G30 P4 X38.31 Y-105.25 Z-99999 H0
G30 P5 X-38.31 Y-105.25 Z-99999 H0
G30 P6 X-96.99 Y-56.00 Z-99999 H0
G30 P7 X-110.30 Y19.45 Z-99999 H0
G30 P8 X-71.99 Y85.80 Z-99999 H0
G30 P9 X0.00 Y56.00 Z-99999 H0
G30 P10 X48.50 Y-28.00 Z-99999 H0
G30 P11 X-48.50 Y-28.00 Z-99999 H0
G30 P12 X0 Y0 Z-99999 S6 -
okay, I think I solved my own problem. But any feedback or input is welcomed, good or bad. So first I bumped my bed.g probe from 7 to 13 points s6 which took my mesh deviation from .174 to .054 and min/max from -.512/.363 to -.140/.114
NOTE: I am using a boro bed and have put a straight edge across it with a light it is "almost" perfectly flat. I am very happy with the resultsWith that I went all in, adjusting my bed.g probe point amounts / from s6-8
bed.g 13 points @ 112radius 6 factor
g29 - 61 points probed, min error -0.140, max error 0.114, mean 0.004, deviation 0.054
m666 Endstop adjustments X1.59 Y-2.48 Z0.89, tilt X0.00% Y0.00%
m665 Diagonals 288.000:288.000:288.000, delta radius 139.404, homed height 230.635, bed radius 110.0, X 0.321°, Y 0.112°, Z 0.000°bed.g 16 points @110 radius 6 factor
G29 61 points probed, min error -0.078, max error 0.078, mean -0.001, deviation 0.036
m666 Endstop adjustments X1.64 Y-2.37 Z0.73, tilt X0.00% Y0.00%
m665 Diagonals 288.000:288.000:288.000, delta radius 139.543, homed height 230.643, bed radius 110.0, X 0.479°, Y 0.073°, Z 0.000°bed.g 16 points @110 radius 8 factor
G29 61 points probed, min error -0.053, max error 0.064, mean 0.007, deviation 0.023
m666 Endstop adjustments X1.38 Y-1.34 Z-0.03, tilt X0.59% Y-0.70%
m665 Diagonals 288.000:288.000:288.000, delta radius 139.487, homed height 230.644, bed radius 110.0, X -0.051°, Y 0.098°, Z 0.000°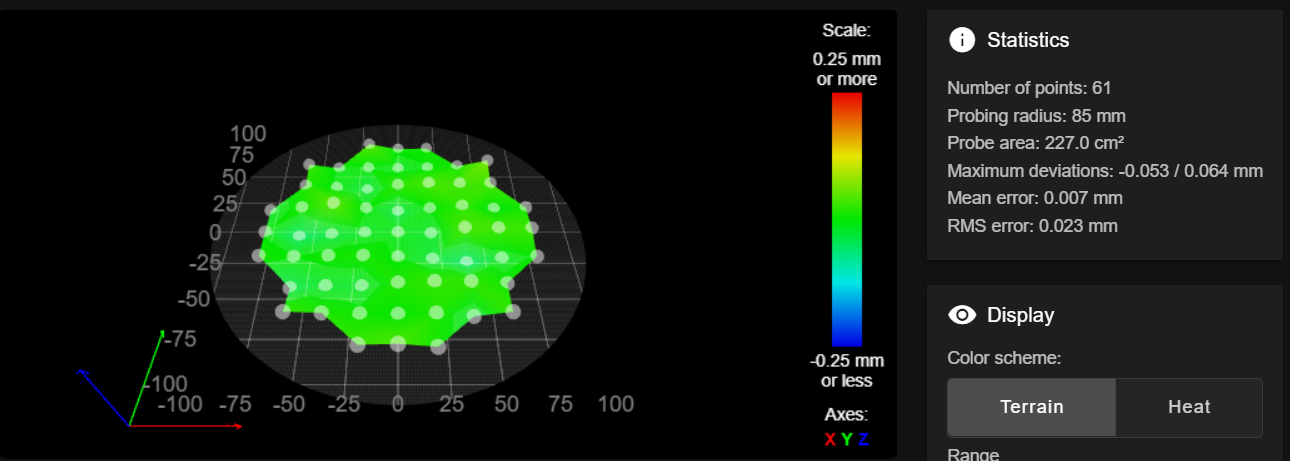
EDIT: Just ran my first test print - the first layer...perfect all the way around the bed.

-
@jbenj00 I'm glad you got it working well! I use 13 probe points and S8 on the final G30 command in bed.g. The reported deviation is around 0.02mm. I don't normally use mesh compensation because the height map is very flat, like yours.
Duet WiFi hardware designer and firmware engineer
Please do not ask me for Duet support via PM or email, use the forum
http://www.escher3d.com, https://miscsolutions.wordpress.com -
@dc42 I am happy too, thank you! I had been bouncing my head off a wall and digging through the forums looking for so guidance before I posted. Then after I said let's give this a shot and dumb luck won the day. I was only using mesh as a tool to see what my delta calibration was effecting.
-
 undefined dc42 marked this topic as a question
-
undefined dc42 has marked this topic as solved