Dimensional Issue - (Hexagon side-to-side length)
-
I have a custom built 3D printer with a Duet 2 Wifi and Smart Effector.
For dimensional calibration, I 3D printed a hexagon of side-to-side length of 75 mm.
Here is the dimension after printing:
Against tower Z: 75.00 mm
Against tower X: 75.60 mm
Against tower Y: 74.50 mm
(Almost upto 1 mm variation)I have tried calibrating using S6, S7 and S8 factor. The value of each length changes but the relative difference in dimension upto 1 mm remains.
I have checked the length of diagonal rods multiple times. They are all equal. I have also printed two cubes of height 20 mm and 120 mm. The steps per mm are correct.
What is that I am missing? How can I rectify this issue ?
I have attached the image of printed hexagon.
Kind Regards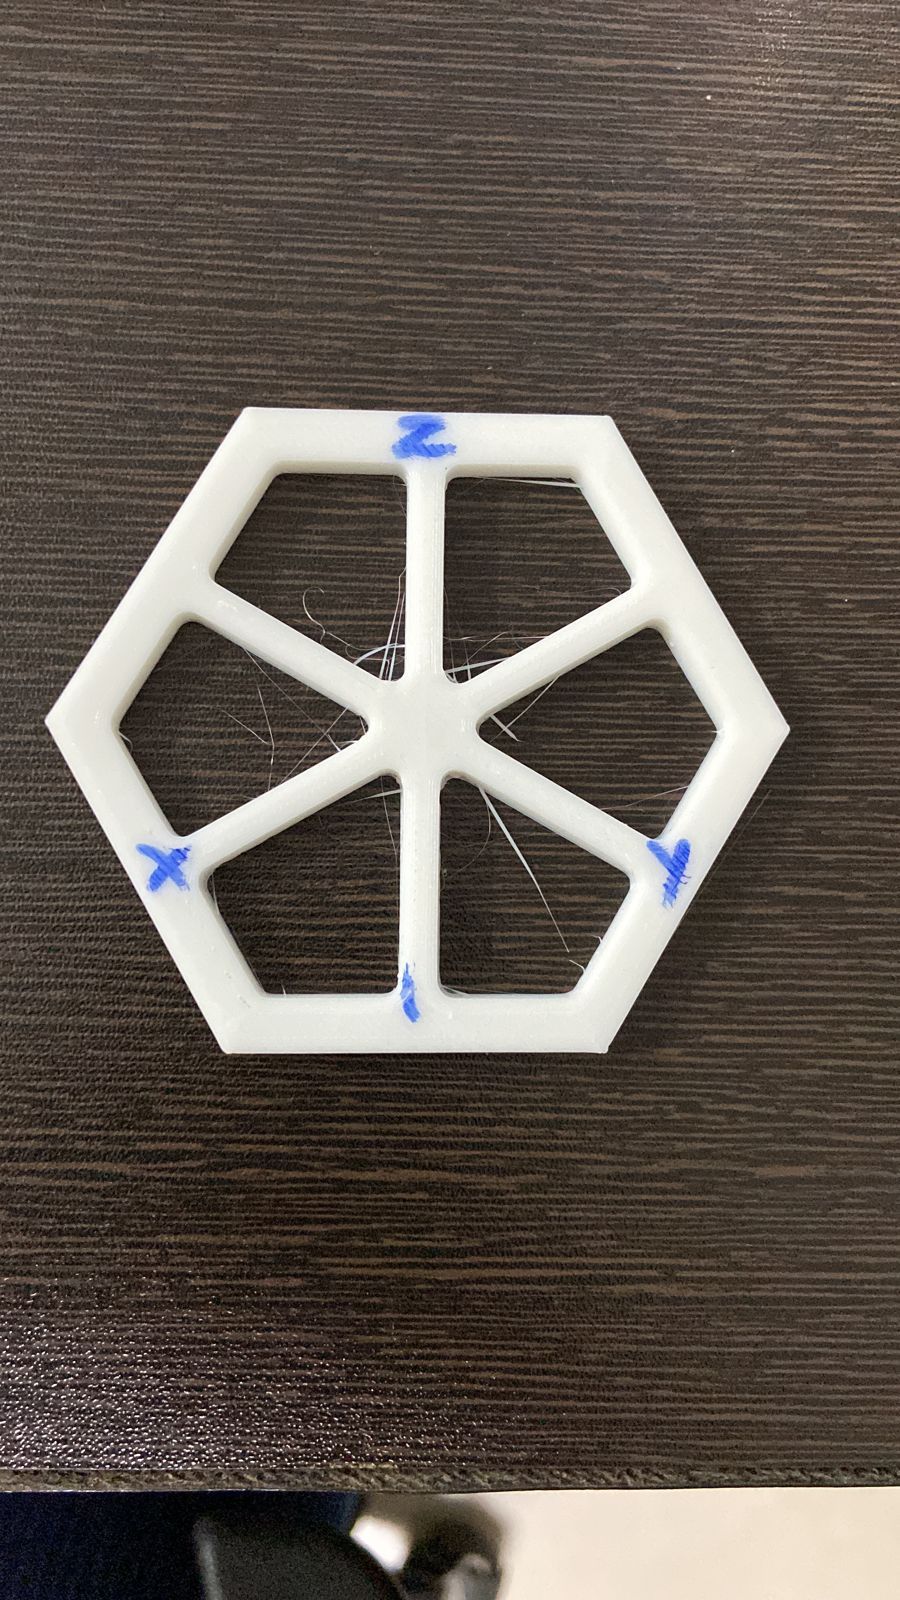
[link text](link url)
-
Likely a mechanical issue, though I'm no delta expert. For good measure can you share your config.g, homedelta.g, bed.g files as well as the results of M122 and M98 P"config.g" so we can look over your configuration in case there is something simple.
-
Bed - bed.g
Configuration - config.g
Config override - config-override.g
Homing - homedelta.gM98 P"config.g"
Turn off the current WiFi mode before selecting a new one
HTTP is enabled on port 80
FTP is disabled
TELNET is disabled
Warning: Heater 1 predicted maximum temperature at full power is 500°CM122
=== Diagnostics ===
RepRapFirmware for Duet 2 WiFi/Ethernet version 3.4.0 (2022-03-15 18:58:31) running on Duet WiFi 1.02 or later
Board ID: 0JD0M-9X6JA-JUNSN-6JKFJ-3SD6K-T9R3U
Used output buffers: 3 of 24 (13 max)
=== RTOS ===
Static ram: 23868
Dynamic ram: 73872 of which 36 recycled
Never used RAM 14304, free system stack 184 words
Tasks: NETWORK(ready,13.0%,243) HEAT(notifyWait,0.0%,316) Move(notifyWait,0.0%,364) MAIN(running,86.2%,448) IDLE(ready,0.8%,30), total 100.0%
Owned mutexes: WiFi(NETWORK)
=== Platform ===
Last reset 00:02:12 ago, cause: power up
Last software reset time unknown, reason: User, GCodes spinning, available RAM 14184, slot 2
Software reset code 0x0003 HFSR 0x00000000 CFSR 0x00000000 ICSR 0x0041f000 BFAR 0xe000ed38 SP 0x00000000 Task MAIN Freestk 0 n/a
Error status: 0x00
Aux0 errors 0,0,0
Step timer max interval 0
MCU temperature: min 25.0, current 30.6, max 31.1
Supply voltage: min 23.8, current 24.1, max 24.4, under voltage events: 0, over voltage events: 0, power good: yes
Heap OK, handles allocated/used 0/0, heap memory allocated/used/recyclable 0/0/0, gc cycles 0
Events: 0 queued, 0 completed
Driver 0: standstill, SG min n/a
Driver 1: standstill, SG min n/a
Driver 2: standstill, SG min n/a
Driver 3: standstill, SG min n/a
Driver 4: standstill, SG min n/a
Driver 5:
Driver 6:
Driver 7:
Driver 8:
Driver 9:
Driver 10:
Driver 11:
Date/time: 2022-10-08 10:42:57
Cache data hit count 4294967295
Slowest loop: 6.34ms; fastest: 0.18ms
I2C nak errors 0, send timeouts 0, receive timeouts 0, finishTimeouts 0, resets 0
=== Storage ===
Free file entries: 10
SD card 0 detected, interface speed: 20.0MBytes/sec
SD card longest read time 3.7ms, write time 0.0ms, max retries 0
=== Move ===
DMs created 83, segments created 0, maxWait 0ms, bed compensation in use: none, comp offset 0.000
=== MainDDARing ===
Scheduled moves 0, completed 0, hiccups 0, stepErrors 0, LaErrors 0, Underruns [0, 0, 0], CDDA state -1
=== AuxDDARing ===
Scheduled moves 0, completed 0, hiccups 0, stepErrors 0, LaErrors 0, Underruns [0, 0, 0], CDDA state -1
=== Heat ===
Bed heaters 0 -1 -1 -1, chamber heaters -1 -1 -1 -1, ordering errs 0
=== GCodes ===
Segments left: 0
Movement lock held by null
HTTP is idle in state(s) 0
Telnet is idle in state(s) 0
File is idle in state(s) 0
USB is idle in state(s) 0
Aux is idle in state(s) 0
Trigger is idle in state(s) 0
Queue is idle in state(s) 0
LCD is idle in state(s) 0
Daemon is idle in state(s) 0
Autopause is idle in state(s) 0
Code queue is empty
=== Network ===
Slowest loop: 15.93ms; fastest: 0.00ms
Responder states: HTTP(0) HTTP(0) HTTP(0) HTTP(0) FTP(0) Telnet(0), 0 sessions
HTTP sessions: 1 of 8- WiFi -
Network state is active
WiFi module is providing access point
Failed messages: pending 0, notready 0, noresp 0
WiFi firmware version 1.26
WiFi MAC address 4a:3f:da:a6:f0:2c
WiFi Vcc 3.36, reset reason Power up
WiFi flash size 2097152, free heap 25896
WiFi IP address 11.11.11.11
Connected clients 1
Clock register 00002002
Socket states: 0 0 0 0 0 0 0 0
- WiFi -
-
@vaibhav-jain
First of all... I'm not an expert on delta printers either.
The print itself looks great.
From my understanding the problem should be with the Z-axis.
Since the dimension of 75mm is correct for Z and Z probably moves the least or not at all with this pressure direction.Google Translate
-- Original Text --Vorweg... ich bin auch kein Experte für Delta-Drucker.
Der Druck ansich sieht super aus.
Nach meinem Verständnis müsste das Problem bei der Z-Achse liegen.
Da bei Z das Maß von 75mm stimmt und Z bei dieser Druckrichtung sich wohl am wenigsten bis gar nicht bewegt. -
I would say delete your config-override.g and redo your delta calibration and save afterwards with M500 to re-create it.
-
I did as per the instruction. I did the S6 calibration.
The new dimensions of the hexagon are:
Against tower Z: 74.52 mm
Against tower X: 74.62 mm
Against tower Y: 74.90 mmSurprisingly, the max deviation has come down to 0.38 mm from 1 mm, which is still a huge deviation.
Shall I try a S7 calibration ?
-
I'd say it's best to go through this guide closely and see if any improvements can be made.
https://docs.duet3d.com/en/User_manual/Tuning/Delta_calibration
-
@vaibhav-jain
Were the measurements taken from the printed hexagon?
If yes, then you have to consider the shrinkage factor of the plastic.
For each plastic I print, I measured the exact shrinkage factor, which I calculate from the slicer for printed parts that have to be dimensionally accurate by printing a certain oversize.More precise measured values of the printer can be obtained by measuring the travel of the three axes on the print head.
Either with a caliper gauge that you somehow fix on the print bed, or you attach a sharp pencil that draws a line on the print bed, or you attach a nail to the print head and run over an exact ruler.
There will definitely be more options.Of course, the main concern here is the evenness of the three axes, but for the later determination of the steps, the measuring method using calipers or similar is more accurate.
Google Translate
-- Original Text --Wurden die Maße vom gedruckten Sechseck genommen ?
Wenn Ja, dann muss man den Schrumpffaktor des Kunststoffes beachten.
Ich habe zu jedem Kunststoff den ich drucke den exakten Schrumpffaktor ausgemessen, den ich bei Druckteilen die maßhaltig sein müssen, vom Slicer mit einrechnen indem ich eine gewisse Übergröße drucke.Genauere Messwerte des Druckers erhält man in dem man den Verfahrweg der drei Achsen am Druckkopf misst.
Entweder mit einer Schieblehre die man irgendwie auf dem Druckbett fixiert oder man befestigt einen spitzen Bleistift der eine Linie auf das Druckbett zieht oder man befestigt eine Nagel am Druckkopf und fährt über ein genaues Lineal.
Es wird da bestimmt noch mehr Möglichkeiten geben.Klar geht es hier in erster Linie um die Gleichmäßigkeit der drei Achsen, aber für die spätere Ermittlung der Steps ist die Messmethode mittels Schieblehre o.ä. genauer.
DDA5X... 0.9° Stepper... Linearrails... Duet 2 Wifi... PT100 Board... Duet IR-Probe... Dyze Pro Kit up to 500°C.. etc
Thingiverse -
@phaedrux
Okay.If I change the calibration routine from S6 to S7 or S8 or if there is a hardware change, do I need to delete the config-override.g before calibration ?
-
@norder
Yes the measurements were taken from the printed hexagon (side to side length of 75 mm as per design).Is the shrinkage uniform on all 3 sides ?
I am trying to reduce the length-difference amongst all sides. Once the dimensions are precise (equal on all sides), I can play with diagonal rod length or M579 to get the dimension accurate if required.
-
@vaibhav-jain said in Dimensional Issue - (Hexagon side-to-side length):
Is the shrinkage uniform on all 3 sides ?
I don't think anyone can say for sure.
You know the warping where parts bend because they have different temperatures or areas have already shrunk more than others.
Then there is the pressure direction of the nozzle, which looks different with each layer and leaves a pattern, so to speak, on the inside of the printed part.For a cast part that cools evenly... I would say yes.
For a part that's being printed that cools differently and has an internal pattern... I would say maybe.
But I have to assume that because otherwise I wouldn't have a shrink factor to work with.I have to set TitanX (ABS) from FormFutura to 100.7% size in the slicer in order to print true to size.
Minadax ABS+ needs 100.5%.
COPA Nylon from Polymaker needs 100.2%
TPU from Eryone even needs 100.9% size when slicing to get 100% out of it.Normally you can do without this knowledge, but if you print a component that consists of different plastics and should be dimensionally accurate so that everything fits together or you want to minimize the reworking, then you should know the plastics you print with.
Therefore, the geometry of the printer is not set based on the dimensions of the printed parts, but I measure it or on the device itself.
And I think that with a Delta printer, because of its more complicated geometry compared to a cascading printer, it is even more important to measure and adjust as precisely as possible.Google Translate
-- Original Text --Is the shrinkage uniform on all 3 sides ?
Ich glaube das vermag niemand genau zu sagen.
Du kennst ja das Warping wo sich Teile biegen weil sie unterschiedliche Temperaturen haben bzw Bereiche bereits mehr geschrumpft sind als andere.
Dann kommt noch die Druckrichtung der Düse hinzu die mit jeder Schicht anders aussieht und sozusagen ein Muster im inneren des Druckteils hinterlässt.Bei einem gegossenen Teil welches gleichmäßig abkühlt... würde ich sagen Ja.
Bei einem Teil was gedruckt wird, unterschiedlich abkühlt und eine innerliches Muster hat ... würde ich sagen vielleicht.
Aber ich muss davon ausgehen weil ich es sonst garkeinen Schrumpffaktor hätte mit dem ich arbeiten kann.TitanX (ABS) von FormFutura muss ich im Slicer auf 100,7% Größe einstellen um maßhaltig zu drucken.
ABS+ von Minadax braucht 100,5%.
COPA Nylon von Polymaker braucht 100,2%
TPU von Eryone braucht sogar 100,9% Größe beim slicen damit 100% dabei heraus kommen.Im Normalfall wird man auf dieses Wissen verzichten können, aber wenn man zB ein Bauteil druckt was aus verschiedenen Kunststoffen besteht und maßhaltig sein soll damit alles zusammen passt bzw man die Nacharbeiten minimieren möchte, dann sollte man die Kunststoffe kennen mit denen man druckt.
Daher wird bei mir die Geometrie des Druckers auch nicht anhand von den Maßen gedruckten Teilen eingestellt sondern ich vermesse das bzw am Gerät selber.
Und ich finde dass das bei einem Delta Drucker wegen seiner komplizierteren Geometrie gegenüber einem kaskadischen Drucker, noch wichtiger ist so genau wie nur möglich zu vermessen und einzustellen.DDA5X... 0.9° Stepper... Linearrails... Duet 2 Wifi... PT100 Board... Duet IR-Probe... Dyze Pro Kit up to 500°C.. etc
Thingiverse -
P.S.:
Unfortunately, I don't have a Delta printer, but I think we're all different here...everyone would like one.I think if I had one I would take a needle... pinch off the head of the needle... heat up the nozzle and put the needle in the nozzle and then let the nozzle cool down. The remaining filament in the nozzle should now have the needle firmly stuck.
Then I would fix 2-3 sheets of paper on the print bed and approach the corners of the hexagon and let the needle pierce the paper.
I would get the exact coordinates of an exact hexagon from a CAD drawing or from any website where I can get the info.Now I would measure the distances with the tips of a caliper.
I would also measure and adjust the whole geometry... length of the rods etc. pp. as precisely as possible.I would be so crazy

Google Translate
-- Original Text --P.S.:
Leider habe ich keinen Delta Drucker, aber ich glaube wir hier sind uns alle einige... jeder hätte gerne einen.Ich glaube wenn ich einen hätte dann würde ich mir eine Nadel nehmen... den Kopf der Nadel abkneifen... die Düse kurz erhitzen und die Nadel in die Düse reinstecken und die Düse dann abkühlen lassen. Das restliche Filament in der Düse sollte die Nadel jetzt fest verklebt haben.
Dann würde ich mir 2-3 Blatt Papier auf dem Druckbett fixieren und die Eckpunkte des Sechseckes anfahren und die Nadel in das Papier stechen lassen.
Die genauen Koordinaten eines exakten Sechseckes würde ich mir aus einer CAD Zeichnung holen oder von irgend einer Internetseite wo ich mir die Info holen kann.Jetzt würde ich mit den Spitzen einer Schieblehre die Abstände vermessen.
Auch die ganze Geometrie... Länge der Rods etc. pp. würde ich so genau wie mir nur möglich vermessen und einstellen.Ich wäre so verrückt.
-
@vaibhav-jain said in Dimensional Issue - (Hexagon side-to-side length):
do I need to delete the config-override.g before calibration ?
No, as long as you send M500 after the calibration the config-override.g file is re-created with the current values.