Independent dual z axis with endstops - z homing not working
-
Hi guys, I was trying to follow the documentation on the dual independent z-axis for my printer.
My problem is, that it is not mentioned how the homez.g should look like:
this is where you can find the documentationI am using RRF3.x Firmware and I cannot home my z-axis at the moment.
This is what I am currently using in my config.g:M569 P5 R1 T2.5:2.5:5:5 S1 ; BreakoutBoard_Driver5 - new Z Axis Left M569 P7 R1 T2.5:2.5:5:5 S1 ; BreakoutBoard_Driver7 - new Z Axis Right M584 X0 Y1 Z5:7 P3 ; set drive mapping Driver 0 For X, 1 for Y, Z 5:7 M671 X-20:820 Y400:400 S2.5 ; leadscrews at left (connected to Z) and right (connected to E1) of X axis M574 Z1 S1 P"e1stop+e0stop" ; configure active-low endstops for low end on Z via pins e1stop and e0stopI am using the Duet Breakout Board and have my 2 external stepper drivers connected to the pins 5 and 7 - the corresponding endstops are wired to "e1stop&e0stop". The wiring is correct, the motors are moving and the LED is flashing, when the endstops are pressed.
This is the bed.g:
G28 ; home
M401 								; deploy Z probe (omit if using bltouch)
G30 P0 X20 Y400 Z-99999 			; probe near a leadscrew, half way along Y axis || P = Probe Number
G30 P1 X780 Y400 Z-99999 S2 		; probe near a leadscrew and calibrate 2 motors
M402 								; retract probe (omit if using bltouch)
I have no clue what my homez.g should look like rn. I have had several errors and completely leaving it out won´t work either ^^ .
homeall.g:
G91                     		; relative positioning

G1 H1 X-805 Y-805 F3000  		; move quickly to X or Y endstop and stop there (first pass) coarse home X or Y
G1 H1 X-805             		; home X axis coarse
G1 H1 Y-805             		; home Y axis coarse
G1 X5 Y5 F500          			; go back a few mm
G1 H1 X-10         				; move slowly to X axis endstop once more (second pass)
G1 H1 Y.10              		; then move slowly to Y axis endstop
G90                     		; absolute positioning X/Y
homez.g: [probably the main issue, also the fact, that there are like 300 different possibilities for z probing is super confusing - at least for me]
;G91 ; relative positioning
;G1 H2 Z5 F6000 ; lift Z relative to current position
;G90 ; absolute positioning
;G1 X5 Y85 F6000 ; go to first probe point
;G30 ; home Z by probing the bed
Thanks a lot in advance. I wouln´t write this if I hadn´t tried fixing it by myself for the last 5 hours...
I might be using a BL Touch in the future but this is a different story. -
@Steppenleguan said in Independent dual z axis with endstops - z homing not working:
G1 X5 Y5 F500 ; go back a few mmG1
H1 X-10 ; move slowly to X axis endstop once more (second pass)
G1 H1 Y.10I am not an endstop specialist, so I will not start analyzing your configuration in detail. But one detail came to my attention: the Y.10 means only 0.10 movement and should be Y-10. Moving 5 and another 0.10 will probably fail homings.
And for G1 H1 commands, the M208 limits in config.g are also important, please post and check them. Best would be, you post the complete config.g and home files. (removing sensible information like passwords and names)
-
@Steppenleguan there are some points which may be valuable for you for testing:
- most G-Code commands can be put into the console line directly and they are executed. So you can test the single homeall.g lines e.g.
- for testing you can set a homing value directly with G92 Z0 to set Z to 0 and the axis is marked as homed (I don't know however how your split Z axis behaves). This will allow proceeding without solving problems you may have currently
- you can check for syntax errors of a file, eg. config.g by executing:
M98 P"config.g" - when you want to know in detail what's happening, you can see the internal position by calling M114. The Count numbers are the motor positions, which are the 200-steps multiplied with the microsteps. If you know where your endstops are, you can check whether the homeall.g commands move far enough to trigger them and whether the movements are into the correct direction (higher Z should result in a higher distance hotend-bed, e.g.)
-
@Steppenleguan as long as the config.g and wiring are correct, it should treat the dual z as a single axis when sending gcode commands and stop each motor when the corresponding switch is triggered.
Out of curiosity, what does the axis do when you send a standard z home command to it? Is there movement, and do the correct motors stop when the endstop switch is triggered.
-
Please post your full config.g
Homing Z should be as simple as a G1 H1 Z move to move the z axis such that the endstops are hit.
-
Here is the full config.g:
; Configuration file for Duet WiFi (firmware version 3) ; executed by the firmware on start-up ; ; generated by RepRapFirmware Configuration Tool v3.2.3 on Sun Apr 04 2021 15:17:44 GMT+0200 (Mitteleuropäische Sommerzeit) ;References ; -------------> https://docs.duet3d.com/en/User_manual/Reference/Gcodes <------------- M911 S21.0 R23.0 P"M913 X0 Y0 G91 M83 G1 Z5:6 E-3:4 F1000" ; Power Loss || Drives noch Anpassen ; sys/ressurect-prologue.g noch anlegen ; General preferences G90 ; send absolute coordinates... M83 ; ...but relative extruder moves M550 P"Print Eastwood" ; set printer name M669 K1 ; select CoreXY mode ; Network M552 S1 ; enable network M586 P0 S1 ; enable HTTP M586 P1 S0 ; disable FTP M586 P2 S0 ; disable Telnet M564 H0 ;move without homing ; Define Drives M569 P0 S1 ; Drive 0 X M569 P1 S1 ; Drive 1 Y ;M569 P2 S0 ; Left z-motor (original Z) ; NOT USED M569 P3 S1 ; Drive3 [Extruder 0] - new Extruder 0 [ENABLED] M569 P4 S1 ; Drive4 [Extruder 1] - new Extruder 1 [ENABLED] M569 P5 R1 T2.5:2.5:5:5 S1 ; BreakoutBoard_Driver5 - new Z Axis Left M569 P7 R1 T2.5:2.5:5:5 S1 ; BreakoutBoard_Driver7 - new Z Axis Right M584 E3 E4 ; set drive mapping Driver Extruder 3, Extruder 4 M584 X0 Y1 Z5:7 P3 ; set drive mapping Driver 0 For X, 1 for Y, Z 5:7, with 4 Axis (exkl. Extruders) visible in UI M671 X-20:820 Y400:400 S2.5 ; leadscrews at left (connected to Z) and right (connected to E1) of X axis M350 X16 Y16 Z16:16 E16:16 I1 ; configure microstepping with interpolation - enable microstepping ich weiß gar nicht ob mehr als 16 überhaupt geht.... M92 X640 Y640 Z3200:3200 E3360:3440 ; set steps per mm M566 X500 Y500 Z20:20 E1500:1500 ; set maximum instantaneous speed changes (mm/min) [Jerk] M203 X30000 Y30000 Z420:420 E12000:12000 ; Set maximum speeds (mm/min) M201 X2500 Y2500 Z300:300 E2000:2000 ; Set accelerations (mm/s^2) M906 X2000 Y2000 E500:500 I30 ; set motor currents (mA) and motor idle factor in per cent M84 S60 ; Set idle timeout ; Axis Limits M208 X0 Y0 Z0 S1 ; set axis minima M208 X780 Y780 Z650 S0 ; set axis maxima ; Endstops M574 X1 S1 P"xstop" ; configure active-high endstop for low end on X via pin xstop M574 Y1 S1 P"ystop" ; configure active-high endstop for low end on Y via pin ystop M574 Z1 S1 P"e1stop+e0stop" ; configure active-low endstops for low end on Z via pins e1stop and e0stop ;M574 Z1 U1 S0 ; Set active low endstops DUAL Z ;M558 P0 X0 Y0 Z0 H2 F60 T6000 ; Set Z probe type to switch, the axes for which it is used and the dive height + speeds || P0 = keine Z-Probe verbaut ;G31 P600 X0 Y0 Z0 ; Set Z probe trigger value, offset and trigger height ;M557 X15:195 Y15:195 S20 ; Define mesh grid ; Temp Sensors M308 S0 P"spi.cs1" Y"rtd-max31865" ; create sensor number 0 as a PT100 sensor in the first position on the Duet 2 daughter board connector // BLAU GRAU // sets extruder 1 sensor type M308 S1 P"spi.cs2" Y"rtd-max31865" ; create sensor number 1 as a PT100 sensor in the second position on the Duet 2 daughter board connector // SCHWARZ ROSA // sets extruder 2 sensor type M308 S2 P"bed_temp" Y"thermistor" T100000 B4349 ;sets bed sensor type // UNUSED ; Heaters ; Main Nozzle M950 H0 T0 C"e0heat" ; make extruder #0 heater M950 H0 C"e0heat" T0 ; create nozzle heater output on e0heat and map it to sensor 0 M307 H0 B0 S1.00 ; disable bang-bang mode for heater and set PWM limit M143 H0 S350 ; set temperature limit for heater 0 to 350C ; Secondary Nozzle M950 H1 T1 C"e1heat" ;make extruder #1 heater M950 H1 C"e1heat" T1 ; create nozzle heater output on e1heat and map it to sensor 1 M307 H1 B0 S1.00 ; disable bang-bang mode for heater and set PWM limit M143 H1 S350 ; set temperature limit for heater 1 to 350C ; M950 H2 T2 C"bedheat" ;make bed heater ; M307 H2 B2 S1.00 ;enable bang-bang mode for the bed heater and set PWM limit ; M143 H2 S100 ;set temperature limit for heater 0 to 120C ; M140 H2 ; AirPump M950 F0 C"bedheat" Q500 ; create fan 5 on pin bedheat and set its frequency (500Hz) M106 P0 S0 H-1 ; set fan 0 value. Thermostatic control is turned off // BerdAir Q PWM 500Hz // Fan for Printing ; Hotend Fans M950 F1 C"fan0" Q500 ; create fan 1 on pin fan0 and set its frequency M106 P1 S255 H0 T45 ; set fan 1 value. Thermostatic control is turned on // Fan for Hotend 0 M950 F2 C"fan1" Q500 ; create fan 2 on pin fan1 and set its frequency M106 P2 S255 H1 T45 ; set fan 2 value. Thermostatic control is turned on // Fan for Hotend 1 ; Fans M950 F3 C"fan3" Q500 ; create fan 3 on pin fan3 and set its frequency M106 P3 S0 H-1 ; set fan 3 value. Thermostatic control is turned off M950 F4 C"fan4" Q500 ; create fan 4 on pin fan4 and set its frequency M106 P4 S0 H-1 ; set fan 4 value. Thermostatic control is turned on ;M950 F0 C"fan0" Q500 ; create fan 0 on pin fan0 and set its frequency ;M106 P0 S0 H-1 ; set fan 0 value. Thermostatic control is turned off ; Tools M563 P0 D0 H0 S"Main" F1 ; define tool 0 // Hotend 0 // Fan1 G10 P0 X0 Y0 Z0 ; set tool 0 axis offsets G10 P0 R0 S0 ; set initial tool 0 active and standby temperatures to 0C M563 P1 D1 H1 S"Secondary" F2 ; define tool 1 // Hotend 1 // p toolnr // d drivenr // h heaternr // f fannr // Fan2 G10 P1 X0 Y0 Z0 ; set tool 1 axis offsets , noch setzen G10 P1 R0 S0 ; set initial tool 1 active and standby temperatures to 0C ; Custom settings are not defined ; Miscellaneous M575 P1 S1 B57600 ; enable support for PanelDue ; MCU Anpassung M912 P0 S82,5 -
@knuxvomica no they don´t.
Current state: G28 homing failed , and nothing happens
Before with a homez.g: The axis lifts 5mm, moves down then passes! the endstops and hits my frame when I don´t emergency stop...As you can see I am using the M564 command to test the axis movements in advance (which works fine) but obviously I don´t have any homing , i.e. no printing possible
M564 H0 ;move without homing -
@Steppenleguan if it passes the endstop without triggering the endstop, the configuration of the endstop seems to be wrong. Please trigger the endstop manually*) and make sure it triggers. Endstops can be NO (normally open) and NC normally closed, so you may need to switch the type, according to https://docs.duet3d.com/en/User_manual/Connecting_hardware/Sensors_endstops or in this case https://docs.duet3d.com/User_manual/Reference/Gcodes about M574 to set ! (to invert), ^ (pullup) or a combination of it inside the P parameter.
*) I use a pencil to touch the endstop or pass the endstop if it's an optical one. I never use my fingers because the printer might move unintentionally.
I would also double check that Z5 triggers e1stop and Z7 triggers e0stop.
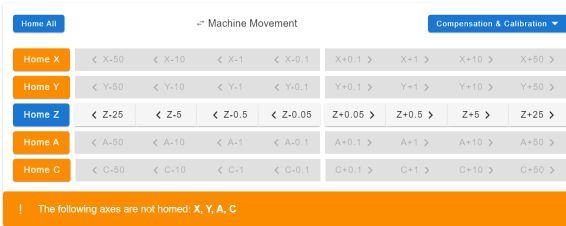
When triggering, I would check the DWC instead of the LEDs. In DWC, in menu Dashboard, when triggering, the "Home Z" button should turn it's color (my colors change from orange to blue). The line "The following axes are not homed: X, Y, Z" should change to excluding Z.
like this: (wihtout the A,C)
In case the Z is blue from the beginning, the NC/NO is wrong from the beginning, then you need to invert the endstop with the ! sign in the P parameter.
-
@Steppenleguan said in Independent dual z axis with endstops - z homing not working:
@knuxvomica no they don´t.
Current state: G28 homing failed , and nothing happens
Before with a homez.g: The axis lifts 5mm, moves down then passes! the endstops and hits my frame when I don´t emergency stop...As you can see I am using the M564 command to test the axis movements in advance (which works fine) but obviously I don´t have any homing , i.e. no printing possible
M564 H0 ;move without homing@Phaedrux said in Independent dual z axis with endstops - z homing not working:
Please post your full config.g
Homing Z should be as simple as a G1 H1 Z move to move the z axis such that the endstops are hit.You need
G1 H1 Z-700at the end of your homeall.g to home the Z axis. The same would be needed in homez.g -
 undefined droftarts moved this topic from Documentation