Cant calibrate good first layer.
-
ok so i been putting this off as i like to think im smart enough to figure it out i have no problem sorting out issues with Marlin on my first Anycubic predator or tevo Tarantula), but im not! reprap is kicking my arse everything i think should be the right way to work is not!
I purchased a 2nd, secondhand Anycubic predator that has the following up grades:-- a duet mini 5+ (wifi)
- smart effector
- orbiter extruder.
- Linear rails
- magball arms.
Now i can get it to move like its supposed to. it probes (i follow this instruction HERE
These are my specs for Printer, running 3.4.5
m665
Diagonals 445.219:445.219:445.219, delta radius 225.788, homed height 407.780, bed radius 223.8, X 0.337°, Y 0.148°, Z 0.000°

m666
Endstop adjustments X0.57 Y-0.71 Z0.15, tilt X-0.32% Y-0.02%

m558
Z Probe 0: type 8, input pin io3.in, output pin io3.out, dive height 5.0mm, probe speeds 1200,1200mm/min, travel speed 6000mm/min, recovery time 0.40 sec, heaters normal, max taps 1, max diff 0.03
My config after i do a Z-trigger calibration is this:-
; Configuration file for Duet 3 Mini 5+ (firmware version 3.3)
; executed by the firmware on start-up
;
; generated by RepRapFirmware Configuration Tool v3.3.15 on Sat Mar 04 2023 15:57:36 GMT+0800 (Australian Western Standard Time)

; General preferences
G90                                           ; send absolute coordinates...
M83                                           ; ...but relative extruder moves
M550 P"PREDDI-DUET"                           ; set printer name
M665 R223.75 L440.45 B223.75 H407.78          ; Set delta radius, diagonal rod length, printable radius and homed height
M666 X0 Y0 Z0                                 ; put your endstop adjustments here, or let auto calibration find them

; Network
M552 S1                                       ; enable network
M586 P0 S1                                    ; enable HTTP
M586 P1 S0                                    ; disable FTP
M586 P2 S0                                    ; disable Telnet

; Drives
M569 P0.0 S0                                  ; physical drive 0.0 goes backwards
M569 P0.1 S0                                  ; physical drive 0.1 goes backwards
M569 P0.2 S0                                  ; physical drive 0.2 goes backwards
M569 P0.3 S0                                  ; physical drive 0.3 goes backwards
M584 X0.0 Y0.1 Z0.2 E0.3                      ; set drive mapping
M350 X16 Y16 Z16 E16 I1                       ; configure microstepping with interpolation
M92 X200.00 Y200.00 Z200.00 E684.00              ; set steps per mm
M566 X1200.00 Y1200.00 Z1200.00 E90000.00      ; set maximum instantaneous speed changes (mm/min)
M203 X18000.00 Y18000.00 Z18000.00 E216000.00   ; set maximum speeds (mm/min)
M201 X4000.00 Y4000.00 Z1000.00 E1000.00      ; set accelerations (mm/s^2)
M906 X1700 Y1700 Z1700 E500 I30               ; set motor currents (mA) and motor idle factor in per cent
M84 S30                                       ; Set idle timeout

; Axis Limits
M208 Z0 S1                                    ; set minimum Z

; Endstops
M574 X2 S1 P"io0.in"                          ; configure switch-type (e.g. microswitch) endstop for high end on X via pin io0.in
M574 Y2 S1 P"io1.in"                          ; configure switch-type (e.g. microswitch) endstop for high end on Y via pin io1.in
M574 Z2 S1 P"io2.in"                          ; configure switch-type (e.g. microswitch) endstop for high end on Z via pin io2.in

; Z-Probe
M558 P8 R0.4 C"io3.in+io3.out" H5 F1200 T6000 ; set Z probe type to effector and the dive height + speeds
G31 P500 X0 Y0 Z-0.268                           ; set Z probe trigger value, offset and trigger height
M557 R200 S20                                 ; define mesh grid

; Heaters
M308 S0 P"temp0" Y"thermistor" T100000 B4138  ; configure sensor 0 as thermistor on pin temp0
M950 H0 C"out0" T0                            ; create bed heater output on out0 and map it to sensor 0
M307 H0 B1 S1.00                              ; enable bang-bang mode for the bed heater and set PWM limit
M140 H0                                       ; map heated bed to heater 0
M143 H0 S110                                  ; set temperature limit for heater 0 to 110C
M308 S1 P"temp1" Y"thermistor" T100000 B4138  ; configure sensor 1 as thermistor on pin temp1
M950 H1 C"out1" T1                            ; create nozzle heater output on out1 and map it to sensor 1
M307 H1 B0 S1.00                              ; disable bang-bang mode for heater  and set PWM limit
M143 H1 S280                                  ; set temperature limit for heater 1 to 280C

; Fans
M950 F0 C"out4" Q500                          ; create fan 0 on pin out4 and set its frequency
M106 P0 S0 H-1                                ; set fan 0 value. Thermostatic control is turned off
M950 F1 C"out3" Q500                          ; create fan 1 on pin out3 and set its frequency
M106 P1 S1 H1 T45                             ; set fan 1 value. Thermostatic control is turned on
M950 F2 C"out6" Q500                          ; create fan 2 on pin out6 and set its frequency
M106 P2 S1 H-1                                ; set fan 2 value. Thermostatic control is turned off

; Tools
M563 P0 D0 H1 F0                              ; define tool 0
G10 P0 X0 Y0 Z0                               ; set tool 0 axis offsets
G10 P0 R0 S0                                  ; set initial tool 0 active and standby temperatures to 0C

; Custom settings
M501                                          ; Load auto-generated calibration file
yet i still cant get a good first layer even when using baby stepping when print starts.
I am so ready to throw this printer in the bin. my firsat preddi with a upgraded SKR 1.4 t that i installed prints great on marlin, but for the life of me i can not get this to give be a good first layer it either to close(which i then adjust the offset to the z trigger hight) then its to fare away.
I am so lost.
-
@Uzi3L said in Cant calibrate good first layer.:
G31 P500 X0 Y0 Z-0.268
Also if i change the
G31 P500 X0 Y0 Z-0.268to
G31 P100 X0 Y0 Z-0.268I get very consistant z-trigger reading with P100 but it always to hight when doing a first layer.
but if i set it back to the P500 the consistancy of trigger offset is a larger range. but it seems to be alot closer to the bed but still first layer is bad. -
Please post your homedelta.g and bed.g files as well as your slicer start gcode.
Are you creating a heightmap as well with G29?
-
@Phaedrux
First thanks for reply.
Cura start codeG21 ;metric values G90 ;absolute positioning M107 ;start with the fan off G28 ;Home T0; tool zero G1 Z15.0 F1000;short move G92 E0 ;zero the extruded length G1 F200 E3 ;extrude 3mm of feed stock adjust so I don't have to remove any filament G92 E0 ;zero the extruded length again G1 F4000 ;move to bed ;Put printing message on LCD screen ;M117 Printing... ;G5; this is in order to resume on Power failure (only works on SD prints)Homedelta
; homedelta.g
; called to home all towers on a delta printer
;
; generated by RepRapFirmware Configuration Tool v3.3.15 on Sat Mar 04 2023 15:57:36 GMT+0800 (Australian Western Standard Time)
G91                        ; relative positioning
G1 H1 X430 Y430 Z430 F1800 ; move all towers to the high end stopping at the endstops (first pass)
G1 H2 X-5 Y-5 Z-5 F1800    ; go down a few mm
G1 H1 X10 Y10 Z10 F360     ; move all towers up once more (second pass)
G1 Z-5 F6000               ; move down a few mm so that the nozzle can be centred
G90                        ; absolute positioning
G1 X0 Y0 F6000             ; move X+Y to the centre
As per the instructions in first post i comment out the G1 Z-5 F6000 & G1 X0 Y0 F6000 then after i get the Z trigger, i then uncomment them.
Bed
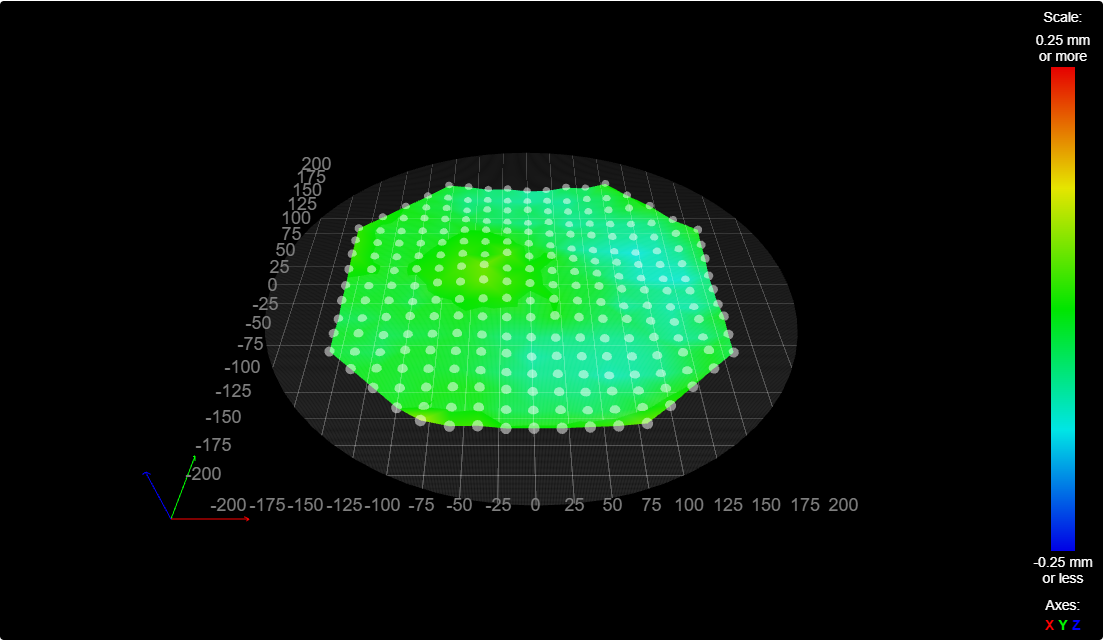
; bed.g
; called to perform automatic delta calibration via G32
;
; generated by RepRapFirmware Configuration Tool v3.3.15 on Tue Jan 17 2023 20:58:40 GMT+0800 (Australian Western Standard Time)
M561 ; clear any bed transform
G28  ; home all towers
; Probe the bed at 12 peripheral and 3 halfway points, and perform 9-factor auto compensation
; Before running this, you should have set up your Z-probe trigger height to suit your build, in the G31 command in config.g.
G30 P0 X0 Y159.9 H0 Z-99999
G30 P1 X79.95 Y138.48 H0 Z-99999
G30 P2 X138.48 Y79.95 H0 Z-99999
G30 P3 X159.9 Y0 H0 Z-99999
G30 P4 X138.48 Y-79.95 H0 Z-99999
G30 P5 X79.95 Y-138.48 H0 Z-99999
G30 P6 X0 Y-159.9 H0 Z-99999
G30 P7 X-79.95 Y-138.48 H0 Z-99999
G30 P8 X-138.48 Y-79.95 H0 Z-99999
G30 P9 X-159.9 Y0 H0 Z-99999
G30 P10 X-138.48 Y79.95 H0 Z-99999
G30 P11 X-79.95 Y138.48 H0 Z-99999
G30 P12 X0 Y79.9 H0 Z-99999
G30 P13 X69.2 Y-39.95 H0 Z-99999
G30 P14 X-69.2 Y-39.95 H0 Z-99999
G30 P15 X0 Y0 H0 Z-99999 S9
; Use S-1 for measurements only, without calculations. Use S4 for endstop heights and Z-height only. Use S6 for full 6 factors
; If your Z probe has significantly different trigger heights depending on XY position, adjust the H parameters in the G30 commands accordingly. The value of each H parameter should be (trigger height at that XY position) - (trigger height at centre of bed)
Yes i am creating a hight map with G29 after i do the z trigger, then i do a G32, and i then do a G29, i was also doing a G29 before each print, but never do it in marlin so i stopped on my duet one. so now i only have done a G29 after i set the Z trigger and G32.
Here is a SC of my hightmap.
-
Your slicer start gcode shows you're only homing the towers before starting the print. I suggest you modify the slicer gcode to use G32 instead of just G28. That will call bed.g which will home the towers and do a delta calibration, then you can add G29 S1 after the G32 to load the heightmap. I think that should solve your problem. Right now you're not taking advantage of the calibration or heightmap.
-
@Phaedrux said in Cant calibrate good first layer.:
Your slicer start gcode shows you're only homing the towers before starting the print. I suggest you modify the slicer gcode to use G32 instead of just G28. That will call bed.g which will home the towers and do a delta calibration, then you can add G29 S1 after the G32 to load the heightmap. I think that should solve your problem. Right now you're not taking advantage of the calibration or heightmap.
Ok thanks i will try your suggestions, fingers crossed.
-
@Phaedrux said in Cant calibrate good first layer.:
Your slicer start gcode shows you're only homing the towers before starting the print. I suggest you modify the slicer gcode to use G32 instead of just G28. That will call bed.g which will home the towers and do a delta calibration, then you can add G29 S1 after the G32 to load the heightmap. I think that should solve your problem. Right now you're not taking advantage of the calibration or heightmap.
This is what changes i made, will report back.
G21 ;metric values G90 ;absolute positioning M107 ;start with the fan off G28 ;Home G32 ;auto calibraation G29 S1 : Load heightmap T0; tool zero G1 Z15.0 F1000;short move G92 E0 ;zero the extruded length G1 F200 E3 ;extrude 3mm of feed stock adjust so I don't have to remove any filament G92 E0 ;zero the extruded length again G1 F4000 ;move to bed ;Put printing message on LCD screen ;M117 Printing... ;G5; this is in order to resume on Power failure (only works on SD prints) -
@Uzi3L said in Cant calibrate good first layer.:
This is what changes i made, will report back.
G28 ;Home
G32 ;auto calibraation
G29 S1 : Load heightmap
Note this will just reload a previous heightmap, unless your bed.g includes a G29 at the end to do the mesh bed compensation probing.
If you make it
G29 S0(or justG29) the printer will home, then do the calibration probing, then do teh mesh bed compensation probing every time. I prefer to do that with a relatively coarse probing grid every time rather than re-use a previous bed mesh. Even if you redo a fine bed mesh probe every time it doesn't add much to the overall print time. -
@achrn said in Cant calibrate good first layer.:
@Uzi3L said in Cant calibrate good first layer.:
This is what changes i made, will report back.
G28 ;Home
G32 ;auto calibraation
G29 S1 : Load heightmap
Note this will just reload a previous heightmap, unless your bed.g includes a G29 at the end to do the mesh bed compensation probing.
If you make it
G29 S0(or justG29) the printer will home, then do the calibration probing, then do teh mesh bed compensation probing every time. I prefer to do that with a relatively coarse probing grid every time rather than re-use a previous bed mesh. Even if you redo a fine bed mesh probe every time it doesn't add much to the overall print time.Ok ill give that a try as the cure start code i posted did not help.
i also did one just to update everything. and after thjis is what my console says. does it look ok?
3/6/2023, 10:12:32 PM m500 3/6/2023, 10:12:29 PM G29 249 points probed, min error -0.147, max error 0.095, mean -0.037, deviation 0.044 Height map saved to file 0:/sys/heightmap.csv 3/6/2023, 10:06:56 PM G32 Calibrated 9 factors using 16 points, (mean, deviation) before (0.015, 0.044) after (0.000, 0.023) -
Have you measured your probe XYZ offsets recently?
https://docs.duet3d.com/en/User_manual/Connecting_hardware/Z_probe_testing
-
@Uzi3L said in Cant calibrate good first layer.:
i also did one just to update everything. and after thjis is what my console says. does it look ok?
Looks OK, but I have some comments. My delta is not wildly different (mine is MB6HC, but otherwise smart effector, linear rails, magball arms). I have a Bondtech BMG and quite a long bowden.
I use 19 points in the calibration (12 outer, 6 inner, one central). I note you're using a few fewer. Also, I only do 6-factor calibration. https://docs.duet3d.com/en/User_manual/Tuning/Delta_calibration says "For typical delta printer builds, 6-factor is best. You should be able to measure the diagonal rod length accurately enough, and for auto calibration to be able to determine it accurately, you need probe points that are well outside the triangle formed by the towers. Likewise, without points well outside that triangle, auto calibration cannot accurately distinguish the effect of bed tilt from misplaced towers."
12 outer points means the calibration points are arranged equally around each of the three towers, which seems like it would be a good thing.
I get:
Calibrated 6 factors using 19 points, (mean, deviation) before (-0.017, 0.072) after (-0.000, 0.071)from calibration, which suggests more variation that you are getting.For bed levelling, your mesh plots up thread look more than flat enough to me, and they are not dramatically worse than mine:
21 points probed, min error -0.092, max error 0.068, mean -0.017, deviation 0.045
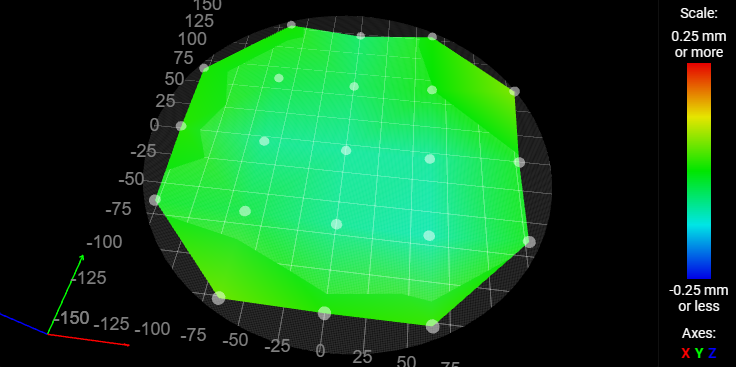
So your figures don't look to me to be cause of bad first layer, so I think I'd be looking elsewhere.
Is your trigger height consistent?
Is your extrusion calibrated (most of the times I've had problems with assorted bad behaviour it has been the extruder, not the print-head positional mechanics - and that has been first layer, bad infill and poorly performing support material).
-
So far not been able to test the last suggested change, found that the black 6 wire connector on the smart effector has a lose connection and it broke off, so i have ordered replacment ones and have to wait to put new one on as it seems like one or two others are just holding on. hope that maybe (dont know how) is part of the problem.