CoreXY to IDEX conversion update
-
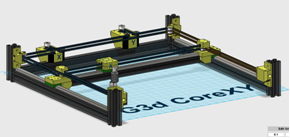
It has been over a year since I posted my IDEX project and decided I needed to provide some updates. (https://forum.duet3d.com/topic/27864/coreidx-conversion-of-a-corexy-printer-into-an-idex/7?_=1685127576825) . The machine has gone through multiple minor modifications but the CoreIDX design has remained the same. Here are several additional drawings to aid in explaining the differences between CoreXY, CoreIDX and HaqXY or Dual Markforge belt arrangements. Thank you to Haggan90 and dc42 as referenced by sonderzug, for setting up the kinematics for this back in 2019.
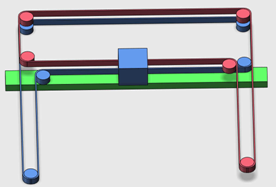 CoreXY
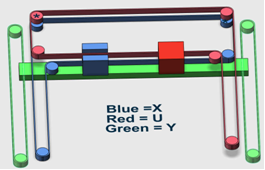 CoreIDX
First I wanted to show how close the physical layout is between a CoreXY and a CoreIDX. Basically just splitting the X carriage into X and U carriages and adding a Y drive. Of course one must add an additional endstop for U and modify the system software files for the kinematic changes plus it must be setup as an IDEX system.
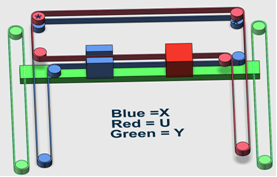 CoreIDX belt system
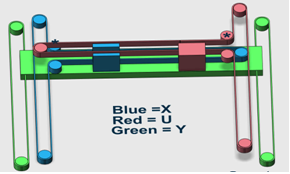
Dual Markforge belt systemNext is a quick discussion about the differences between "Dual Markforge" (which is HaqXY) and CoreIDX. They both use the same or very similar kinematics formulas as far as Duet RepRap firmware is concerned but the belt configuration is different and significant. The CoreXY belt pattern is superior to the Markforge configuration because the CoreXY belt tensions hold the gantry alignment. Note the only changes between these two belt systems are the routing of the belts and the placements of two pulleys (shown with "*"s) . The CoreIDX moves the pulleys off of the gantry and onto the opposite corner of the back frame (diagrams above) positioning pulleys like a CoreXY. That alteration makes all the difference in whether or not the gantry holds its proper right angle alignment to the frame. CoreXY theory states the gantry is held perpendicular to the Y axis, reference Ilan E. Moyer 2012 http://corexy.com/theory.html because of the pulleys and belt routing. This is true whether a single carriage (CoreXY), double carriage (CoreIDX), or no carriage (straight edge as is the case with a drafting table). The tension on the gantry presented by one CoreXY belt is countered by the tension of the other belt and gantry alignment is established by their tensions, as explained by Mark Rehorst in his “Core Belt Tensioning myths” https://drmrehorst.blogspot.com/2022/07/the-corexy-belt-tuning-myth.html If the belts are tightened to the point where the gantry is square to the printer frame and tight enough for precision movement, the gantry will be constrained by the CoreXY belts and remain perfectly aligned through all movements. That is true if the CoreXY system was designed properly in the first place. The CoreIDX belts do the same, with the new Y belts providing additional constraint.
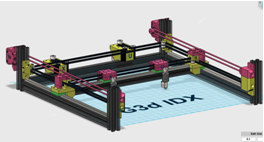 All HW changes shown in red
Here is CoreIDX with its latest updates that include moving from one to two Y motors for the Y drive, new carriage designs with Sailfin extruders and print cooling fans, and a new triple Z drive.
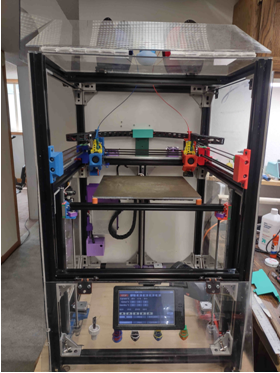 G3d CoreIDX
Soon to be released on a Thingiverse near you,
-
@Strider007 This project started life as a Hypercube HEVO kit with linear rails for X & Y, and was considered large format for 2019 when purchased. I used 3-mgn12 rails with H blocks to make a good CoreXY system. Multiple CoreXY designs of the time were studied and concepts were taken from many of the most popular ones; then I designed my own. The gantry XY joiners and rear pulleys are loosely based on SSchuelller’s HEVO Fusion design (thing:2839395, Mar’2018). He used a mgn15H rail for the gantry and a different carriage design while I used a mgn12 rail that I had. I also inverted his design to use single side rails on each side to mount both the Y rails and the top attachment for the Z drive linear rods. At the time Z was a double stepper drive with 12mm rods. This performed well as a CoreXY but I had already planned the CoreIDX. By fall 2020 I had found the thread which helped me define the proper kinematics to drive this system and I purchased a Duet 2 wifi.
The CoreXY motor mounts on the back of the printer came directly from Kuhnikuehnast (thing: 2975496, June 2018) but they are installed upside down. Other design influences included BLV (open front and top frame with belt adjustments in front) and HevORT, among others. PanDue 7i design is a slightly modified from Lumberjack Engineering (thing:2799628 Feb 2018).
The G3d CoreIDX printer as it is setup now uses 7- mgn12H blocks with 6 - 500mm linear rails. The frames interior dimensions are 520mm wide by 510mm deep and the height is 900mm tall. Just recently I decided to go with a triple Z drive and after multiple tries I adapted the SolidCore style design concept though I modeled it from scratch. I use 3-500mm T8-2 threaded rods and 3-500mm mgn12H rails and blocks for Z drive yielding a build height of just over 400mm. The Z drive steppers were also changed so that pillow blocks hold the weight of the build plate rather than motor couplings and motors.
This printer was designed for 2 color ABS work so a good enclosure was mandatory. I used standard cabinet hinges (HD) and Lexan to allow access to the upper sides (from belts up), the front and half of the top. There are some minor air gaps but I print ABS without layer separation using a small 350 watt heater in the bottom.
I wanted brushes for the extruders to minimize drips and eliminate the need for prime towers or ooze shields when printing dual colors. Those wipers are between the print bed and the endstop positions of the X and U carriages on the gantry so that they wipe each time a tool is called or retired. This limited my print bed to about 350mm. I settled on a 330x330x6 mm Mic6 plate with a 650 watt heater powered off the mains with a 125deg C thermal fuse in circuit to prevent thermal runaway.
The motherboard is a Duet 2 wifi with 3 separate stepper drivers circuits added individually. I drive 9 steppers but get away with 8 drivers by using the Duet’s Drive 2 dual motor connectors, (the original Z drive) to drive both Y steppers. There is 1 stepper motor each for X and U, 2 for Y, 3 for Z plus 2 extruders. The 3 external drivers are TMC2209s for the new Z drive. The Sailfin extruder design came from Threewheels design (thing: 5118899.Nov 8 2021) but was highly modified for my needs. The E3d V6 volcano extruders are driven by NEMA 14 steppers. The U carriage contains an E3d V6 heatsink that has a threaded rather than the standard mount so that shims can be used to allow precision vertical alignment with the X carriage. -
@Strider007 Here is a short U-Tube video of an ABS benchy
-
FYI, this printer was just posted on Thingiverse as "Core IDX" or as thing:6224372.